概要
この記事は モバイルファクトリー Advent Calendar 2017 21日目の記事です。
20日目の記事は@lycoris102さんの[Unity] 今年個人的に買ったアセット紹介2017でした。
本記事ではGoogle Cloud Platformで提供されているAPIライブラリであるNatural Language APIの紹介と、PythonによるSlackbotへの導入方法を紹介します。
※本記事は会社で開発しているアプリ/プロジェクトとは関係がありません。
Natural Language APIとは
Googleが提供している強力な機械学習モデルにより、テキストの構造と意味の解析が行えるAPIです。
サンプル実装が公式に用意されており、Try the APIに好きな文章を入れることでどのようなAPIなのか、誰でも試してみることができます。
提供されている分析手法は、「感情分析」、「エンティティ分析」、「エンティティ感情分析」、「構文解析」の4つがあります。
今回は感情分析とエンティティ分析を取り上げて紹介と導入を行います。
実行環境
Python 3.6.1
クイックスタート
Natural Language APIを利用できる言語はいくつかありますが、今回はPythonを使って実装します。
基本的にはクイックスタートの手順で利用できるようになります。
ただ一つハマったポイントなのですが、Python 用 Google Cloud クライアント ライブラリのインストールで
pip install --upgrade google-cloud-language
をするようにと書かれていますが、
pip install --upgrade google-cloud-natural-language
でないと実行できませんでした。
もしクイックスタートの手順で詰まるようでしたら、お試しください。
感情分析とは?
感情分析は、指定されたテキストを調べて、そのテキストの背景にある感情的な考え方を分析します。具体的には、執筆者の考え方がポジティブか、ネガティブか、ニュートラルかを判断します。
とのことです。
早速試してみましょう。
# 必要なライブラリのインポート
from google.cloud import language

# クライアントのインスタンス化
language_client = language.Client()

# 分析したいテキスト
text = """
頑張れ頑張れできるできる絶対できる頑張れもっとやれるって.
やれる気持ちの問題だ頑張れ頑張れそこだ!
そこで諦めるな絶対に頑張れ積極的にポジティブに頑張る頑張る.
"""

# リクエストのデータを格納
document = language_client.document_from_text(text)
# 感情分析のレスポンスを格納
response = document.analyze_sentiment()
# ドキュメント全体の感情が含まれたオブジェクト
sentiment = response.sentiment
# 各段落の感情が含まれたオブジェクトのリスト
sentences = response.sentences

# 全体の感情スコアを出力
print('Text全体')
print('Text: {}'.format(text))
print('Sentiment: {}, {}'.format(sentiment.score, sentiment.magnitude))

# 各段落の感情スコアを出力
for sentence in sentences:
    print('=' * 20)
    print('Text: {}'.format(sentence.content))
    print('Sentiment: {}, {}'.format(sentence.sentiment.score, sentence.sentiment.magnitude))
試しにまさにポジティブというテキストを感情分析してみましょう。
$ python analyze_sentiment.py
Text:
頑張れ頑張れできるできる絶対できる頑張れもっとやれるって.
やれる気持ちの問題だ頑張れ頑張れそこだ!
そこで諦めるな絶対に頑張れ積極的にポジティブに頑張る頑張る.

Text全体
Sentiment: 0.9, 2.7
====================
Text: 頑張れ頑張れできるできる絶対できる頑張れもっとやれるって.
Sentiment: 0.9, 0.9
====================
Text: やれる気持ちの問題だ頑張れ頑張れそこだ!
Sentiment: 0.8, 0.8
====================
Text: そこで諦めるな絶対に頑張れ積極的にポジティブに頑張る頑張る.
Sentiment: 0.9, 0.9
このような結果になったでしょうか?
Sentimentのすぐ右の数値はscoreと呼ばれる数値で-1.0(ネガティブ)~1.0(ポジティブ)の値を取ります。
scoreの右にある数値はmagnitudeというテキストの感情の強度(ポジティブとネガティブの両方)を表す数値で、0.0~+inf の値を取ります。
それを踏まえた上で結果を改めてみると、非常にポジティブなテキストであると分析されたことがわかると思います。
このように感情分析は入力されたテキストの感情がポジティブかネガティブかの判定と、どのくらい強い感情なのかを判定してくれます。
エンティティ分析とは?
エンティティ分析は、指定されたテキストに既知のエンティティ(著名人、ランドマークなどの固有名詞)が含まれていないかどうかを調べて、それらのエンティティに関する情報を返します。
とのことです。
こちらも早速試してみましょう。
# 必要なライブラリのインポート
from google.cloud import language
import six

language_client = language.Client()

# 分析したいテキスト
text = "リンカーンはパパの年の頃には、アメリカの大統領だったよ"
if isinstance(text, six.binary_type):
    text = text.decode('utf-8')

# リクエストのデータを格納
document = language_client.document_from_text(text)
# エンティティ分析のレスポンスを格納
response = document.analyze_entities()

# 検出されたエンティティのリスト
entities = response.entities

# 検出された言語を出力
print('language: {}'.format(response.language))

# エンティティの情報を出力
for entity in entities:
    print('=' * 20)
    print(u'{:<16}: {}'.format('name', entity.name))
    print(u'{:<16}: {}'.format('type', entity.entity_type))
    print(u'{:<16}: {}'.format('metadata', entity.metadata))
    print(u'{:<16}: {}'.format('salience', entity.salience))
    print(u'{:<16}: {}'.format('wikipedia_url',
          entity.metadata.get('wikipedia_url', '-')))
やり方は感情分析とほぼ同じです。
それでは実行結果を見てみましょう。
$ python analyze_entities.py
language: ja
====================
name            : リンカーン
type            : PERSON
metadata        : {}
salience        : 0.3658255
wikipedia_url   : -
====================
name            : パパ
type            : OTHER
metadata        : {}
salience        : 0.25270882
wikipedia_url   : -
====================
name            : 年
type            : OTHER
metadata        : {}
salience        : 0.22230811
wikipedia_url   : -
====================
name            : アメリカ
type            : LOCATION
metadata        : {'mid': '/m/09c7w0', 'wikipedia_url': 'https://en.wikipedia.org/wiki/United_States'}
salience        : 0.15915756
wikipedia_url   : https://en.wikipedia.org/wiki/United_States
このようにテキストに含まれる名詞が検出され、リンカーンは人物、アメリカは場所であることも分析されました。
検出できるエンティティのtypeはこちらで知ることができます。
ちなみにlanguage_client.document_from_text()の引数にテキストだけを渡した場合、言語(日本語や英語など)は自動で判別されます。
漢字だけの文章だと中国語と判定されてしまうこともあるのでその場合は、language_client.document_from_tex(content='', language='ja')のように指定してあげるといいでしょう。
Slackbotへの導入
いろいろ遊んでみて、これはSlackbotに入れたら面白そうだ!と思ったので早速試しに導入してみました。
(PythonによるSlackbotの実装方法はここでは割愛します)
from slackbot.bot import respond_to
from google.cloud import language
import six

type2text = {'UNKNOWN': '未確認', 'PERSON': '人物', 'LOCATION': '場所', 'ORGANIZATION': '組織', 'EVENT': 'イベント', 'WORK_OF_ART': '芸術品', 'CONSUMER_GOOD': '商品', 'OTHER': 'その他のもの'}

# 末尾に?か?がつくbot宛てのメッセージに反応
@respond_to('^(.+)[\?|?]$')
def respond_func(message, text):
    language_client = language.Client()

    if isinstance(text, six.binary_type):
        text = text.decode('utf-8')

    document = language_client.document_from_text(content=text)
    entities = document.analyze_entities().entities

    for entity in entities:
        message.send('{}は「{}」です'.format(entity.name, type2text[entity.entity_type]))

    if len(entities) == 0:
        message.send('エンティティは検出されませんでした')

# 末尾に?か?がつかないbot宛てのメッセージに反応
@respond_to('^(.+)(?!.*[\?|?]$).+$')
def respond_func(message, text):
    language_client = language.Client()
    document = language_client.document_from_text(text)
    response = document.analyze_sentiment()
    sentiment = response.sentiment
    sentences = response.sentences

    # 全体スコアに応じて返すメッセージを変更
    if sentiment.score < -0.25 :
        message.send('ネガティブな発言ですよ (average_score: {})'.format(sentiment.score))
        message.send(get_sentence_text(sentences))
        message.react('innocent')
    elif sentiment.score > 0.25 :
        message.send('ポジティブな発言です! (average_score: {})'.format(sentiment.score))
        message.send(get_sentence_text(sentences))
        message.react('+1')
    else:
        message.send('ニュートラルな発言です (average_score: {})'.format(sentiment.score))
        message.send(get_sentence_text(sentences))

def get_sentence_text(sentences):
    text = []
    for sentence in sentences:
        text.append('{} ({})'.format(sentence.content, sentence.sentiment.score))
    return "\n".join(text)
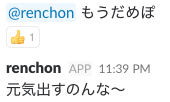
このbot氏にメンション付きでメッセージを飛ばすと、末尾に?/?がある場合はそのテキストをエンティティ分析し、それ以外の場合は感情分析してその結果を返してくれます。
やってることは上で紹介したものとほぼ同じですが、テキストを変えて各自楽しんでいただければと思います!
まとめ
Natural Language APIをSlackbotに導入して、入力したテキストの分析結果をbotで返せることがわかりました。
あしたは @Toriyabot さんの「App::Ikarosで分散CIの話」です。
先週に引き続きJenkinsの記事ですね!楽しみです。