AWSではCloud Watchのメトリックから利用料金を取得することができます。
Azureでも同じように利用料金を取得してSlackに毎日通知したかったんですが、だいぶ苦労しました。
前提
課金プラン
従量課金プランを対象としています。
利用料金を取得する流れ
まずAzure課金APIの種別を以下の記事にまとめました。
Azureの課金系REST APIをcurlで実行する方法
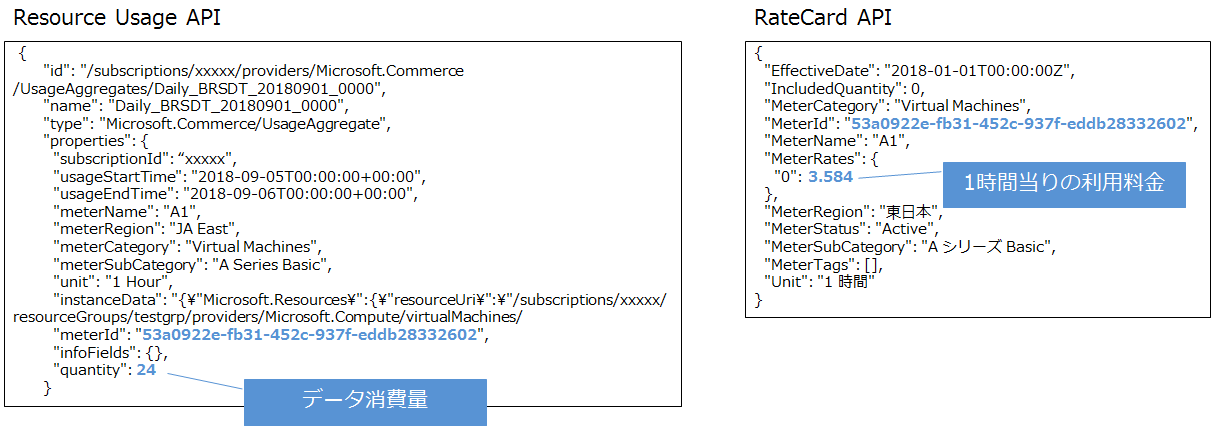
Azure Resource Usage APIで取得したJSONと、Azure Resource RateCard APIで取得したJSONの、meterIdを突合して利用料金を算出します。
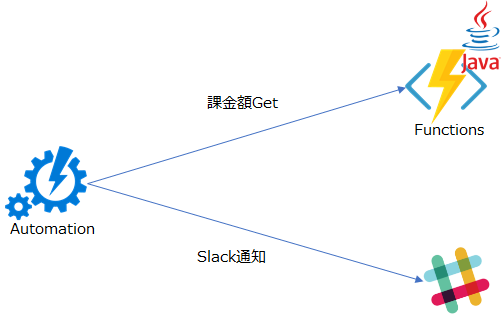
構成イメージ図
FunctionsをWeb APIとして利用します。
RESTでGETする契機はAzure Automationを使っています。
ローカルPC上でFunctionsの実行環境が整っていること
まとめた記事を書いたので参考にしてください。事前インストールの章ですね。
Azure FunctionsをJava + VS Codeで試してみた(Maven for Java編)
課金確認専用ユーザ作成
以下記事を参考に課金用サービスプリンシパルを作成します。
Azureの課金系REST APIをcurlで実行する方法
Azure Functions実装
それでは早速Functionsから実装していきます。
コードは以下に配置しています。
git clone
- git cloneでリポジトリを持ってくる。
git clone https://github.com/shingo-kawahara/Azure-Billing-Api-Sample.git
pom.xml修正
- pom.xmlを開いて、2箇所修正します。
- functionAppName: これはFunction Appの名前になります。
- functionResourceGroup: これはFunction Appが配置されるリソースグループ名です。
    <properties>
        <project.build.sourceEncoding>UTF-8</project.build.sourceEncoding>
        <maven.compiler.source>1.8</maven.compiler.source>
        <maven.compiler.target>1.8</maven.compiler.target>
        <azure.functions.maven.plugin.version>1.0.0-beta-7</azure.functions.maven.plugin.version>
        <azure.functions.java.library.version>1.0.0-beta-5</azure.functions.java.library.version>
        <functionAppName>azure-billing-api-sample</functionAppName>
        <functionAppRegion>japaneast</functionAppRegion>
        <stagingDirectory>${project.build.directory}/azure-functions/${functionAppName}</stagingDirectory>
        <functionResourceGroup>azure-billing-api-sample-grp</functionResourceGroup>
    </properties>
local.settings.json配置
- 新規ファイル作成する。
- ローカルPCでテストするとき、もしネットワーク上にProxyサーバがいる場合は、このファイルにIDとパスワードを設定します。
{
  "IsEncrypted": false,
  "Values": {
    "AzureWebJobsStorage": "",
    "AzureWebJobsDashboard": "",
    "FUNCTIONS_WORKER_RUNTIME": "java",
    "proxyHost": "Your Proxy HostName",
    "proxyPort": "Your Proxy Port",
    "proxyUser": "Your Proxy UserName",
    "ProxyPass": "Your Proxy Password"
  }
}
ローカルテスト
- 以下コマンドを実行して、ビルドとローカル実行をします。
mvn clean package
mvn azure-functions:run
- Webブラウザを開いて、以下のURLを入力します。
http://localhost:7071/api/billing?subscriptionId=[Azure Subscription ID]&clientId=[Clinet ID(Application ID)]&clientSecret=[Client Secret ID(token)]&tenantId=[AAD Tenant ID(Directory ID)]
- 利用料金が表示されたらOKです。
デプロイ
- 以下コマンドを実行して、Azure上にデプロイします。
mvn azure-functions:deploy
Functions Key取得
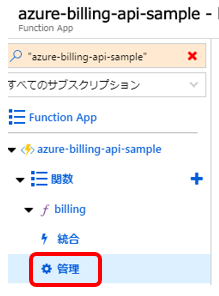
デプロイしたFunctionsを選択し、[管理]を選択します。
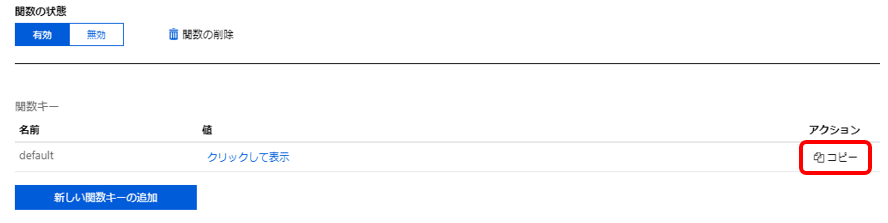
[関数キー]をコピーしておきます。
テスト
- Webブラウザを開いて、以下のURLを入力します。ローカル実行と比べて、Functions Keyを追加で付与しています。
http://azure-billing-api-sample.azurewebsites.net/api/billing?subscriptionId=[Azure Subscription ID]&clientId=[Clinet ID(Application ID)]&clientSecret=[Client Secret ID(token)]&tenantId=[AAD Tenant ID(Directory ID)]&code=[Functions Key]
- 利用料金が表示されたらOKです。
Azure Automation実装
Functions APIの実行は、Automationにさせることにします。
ここはなんでもよくて、オンプレからcronとかで定期実行してもよいです。
Automationアカウントの作成手順は割愛します。
- Runbookの種類は「PowerShell」で、以下のように作成します。
Param(
    [parameter(Mandatory=$True)]
    [string]$functionsKey,

    [parameter(Mandatory=$True)]
    [string]$subscriptionId,

    [parameter(Mandatory=$True)]
    [string]$clientId,

    [parameter(Mandatory=$True)]
    [String] $clientSecret,

    [parameter(Mandatory=$True)]
    [string] $tenantId
)

[Net.ServicePointManager]::SecurityProtocol = [Net.SecurityProtocolType]::Tls12
$msg = Invoke-RestMethod -Uri "https://azure-billing-api-sample.azurewebsites.net/api/billing" -Method GET -Body @{code="$functionsKey";subscriptionId="$subscriptionId";clientId="$clientId";clientSecret="$clientSecret";tenantId="$tenantId"}

$enc = [System.Text.Encoding]::GetEncoding('ISO-8859-1')
$utf8Bytes = [System.Text.Encoding]::UTF8.GetBytes($msg)
$payload = @{
        text = $enc.GetString($utf8Bytes);
        username = "Azure Automation";
        icon_emoji = ":azure:"
        channel = "#channel"
}

Invoke-RestMethod -Uri "https://hooks.slack.com/services/[Slack Incoming Webhook ID]" -Method Post -Body (ConvertTo-Json $payload)
スケジュール設定をして、定期的にSlack通知されればOKです。
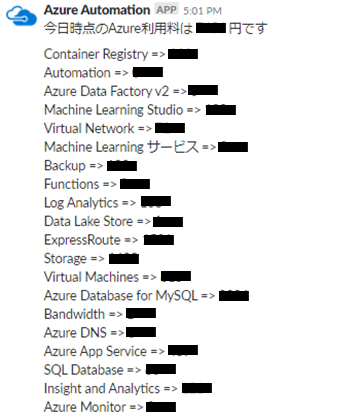
Slackじゃなくてメール通知させたい場合は、Automation側で制御すればOKです。
未対応というか注意点というか
- 請求書とピッタリは合わないので、ざっくりの目安としてもらえればと思います。
- 以下のような使用量に応じてレートが変わる系のサービスは対応するのがつらすぎたので、一番高いレートで計算してます。
{
  "EffectiveDate": "2018-01-01T00:00:00Z",
  "IncludedQuantity": 0,
  "MeterCategory": "Data Lake Store",
  "MeterId": "c7929966-0a48-4f73-a86b-30f4e39d1995",
  "MeterName": "従量課金制保存データ",
  "MeterRates": {
    "0": 4.368,
    "102400": 4.256,
    "1024000": 4.144,
    "5120000": 4.032
  },
 }