※ネタ注意
お子さんの夏休みの宿題がてら、かつPythonとAnsibleモジュールのお勉強も兼ねて
Ansibleで扇風機を操作してみましょう。
必要なもの
・ラズパイ
http://akizukidenshi.com/catalog/g/gM-10414/
・赤外線LED
http://akizukidenshi.com/catalog/g/gI-11845/
・赤外線受光モジュール
http://akizukidenshi.com/catalog/g/gI-04659/
・ジャンパ線、抵抗
・ブレッドボード接続キット(あると回路組みやすい)
http://akizukidenshi.com/catalog/g/gK-08892/
これらを用意します。
現在、秋月電子はお盆休みですのでご注意ください。
Ansibleインストール
SDカードにraspibianを焼いて起動させます。
固定IPを設定したら、以下のPlaybookでラズパイにAnsibleをインストールします。
---
- hosts: raspi
  connection: ssh
  become: true
  gather_facts: False

  tasks:
    - name: replace repo
      replace:
        path: /etc/apt/sources.list
        regexp: 'http://raspbian.raspberrypi.org/raspbian/'
        replace: 'http://ftp.jaist.ac.jp/raspbian/'

    - name: install need pack
      apt:
        name: "{{ packages }}"
        state: present
        update_cache: yes
      vars:
        packages:
          - python3-dev
          - python3-crypto
          - libffi-dev
          - libssl-dev

    - name: get-pip.py
      command: wget https://bootstrap.pypa.io/get-pip.py

    - name: pip install
      command: python3 get-pip.py

    - name: pip install ansible
      command: python3 -m pip install ansible
Ansibleを入れるとこでちょっと時間がかかりましたが入りました。
root:~/ans # ansible-playbook -i hosts install_ansible_raspi.yml

PLAY [raspi] ***************************************************************************

TASK [replace repo] ********************************************************************
changed: [192.168.0.21]

TASK [install need pack] ***************************************************************
changed: [192.168.0.21]

TASK [get-pip.py] **********************************************************************
 [WARNING]: Consider using the get_url or uri module rather than running wget.  If you
need to use command because get_url or uri is insufficient you can add warn=False to
this command task or set command_warnings=False in ansible.cfg to get rid of this
message.

changed: [192.168.0.21]

TASK [pip install] *********************************************************************
changed: [192.168.0.21]

TASK [pip install ansible] *************************************************************
changed: [192.168.0.21]

PLAY RECAP *****************************************************************************
192.168.0.21               : ok=5    changed=5    unreachable=0    failed=0

root:~/ans #
2.6.2 が入りました。
pi@raspberrypi:~ $ ansible --version
ansible 2.6.2
  config file = None
  configured module search path = ['/home/pi/.ansible/plugins/modules', '/usr/share/ansible/plugins/modules']
  ansible python module location = /usr/local/lib/python3.5/dist-packages/ansible
  executable location = /usr/local/bin/ansible
  python version = 3.5.3 (default, Jan 19 2017, 14:11:04) [GCC 6.3.0 20170124]
pi@raspberrypi:~ $
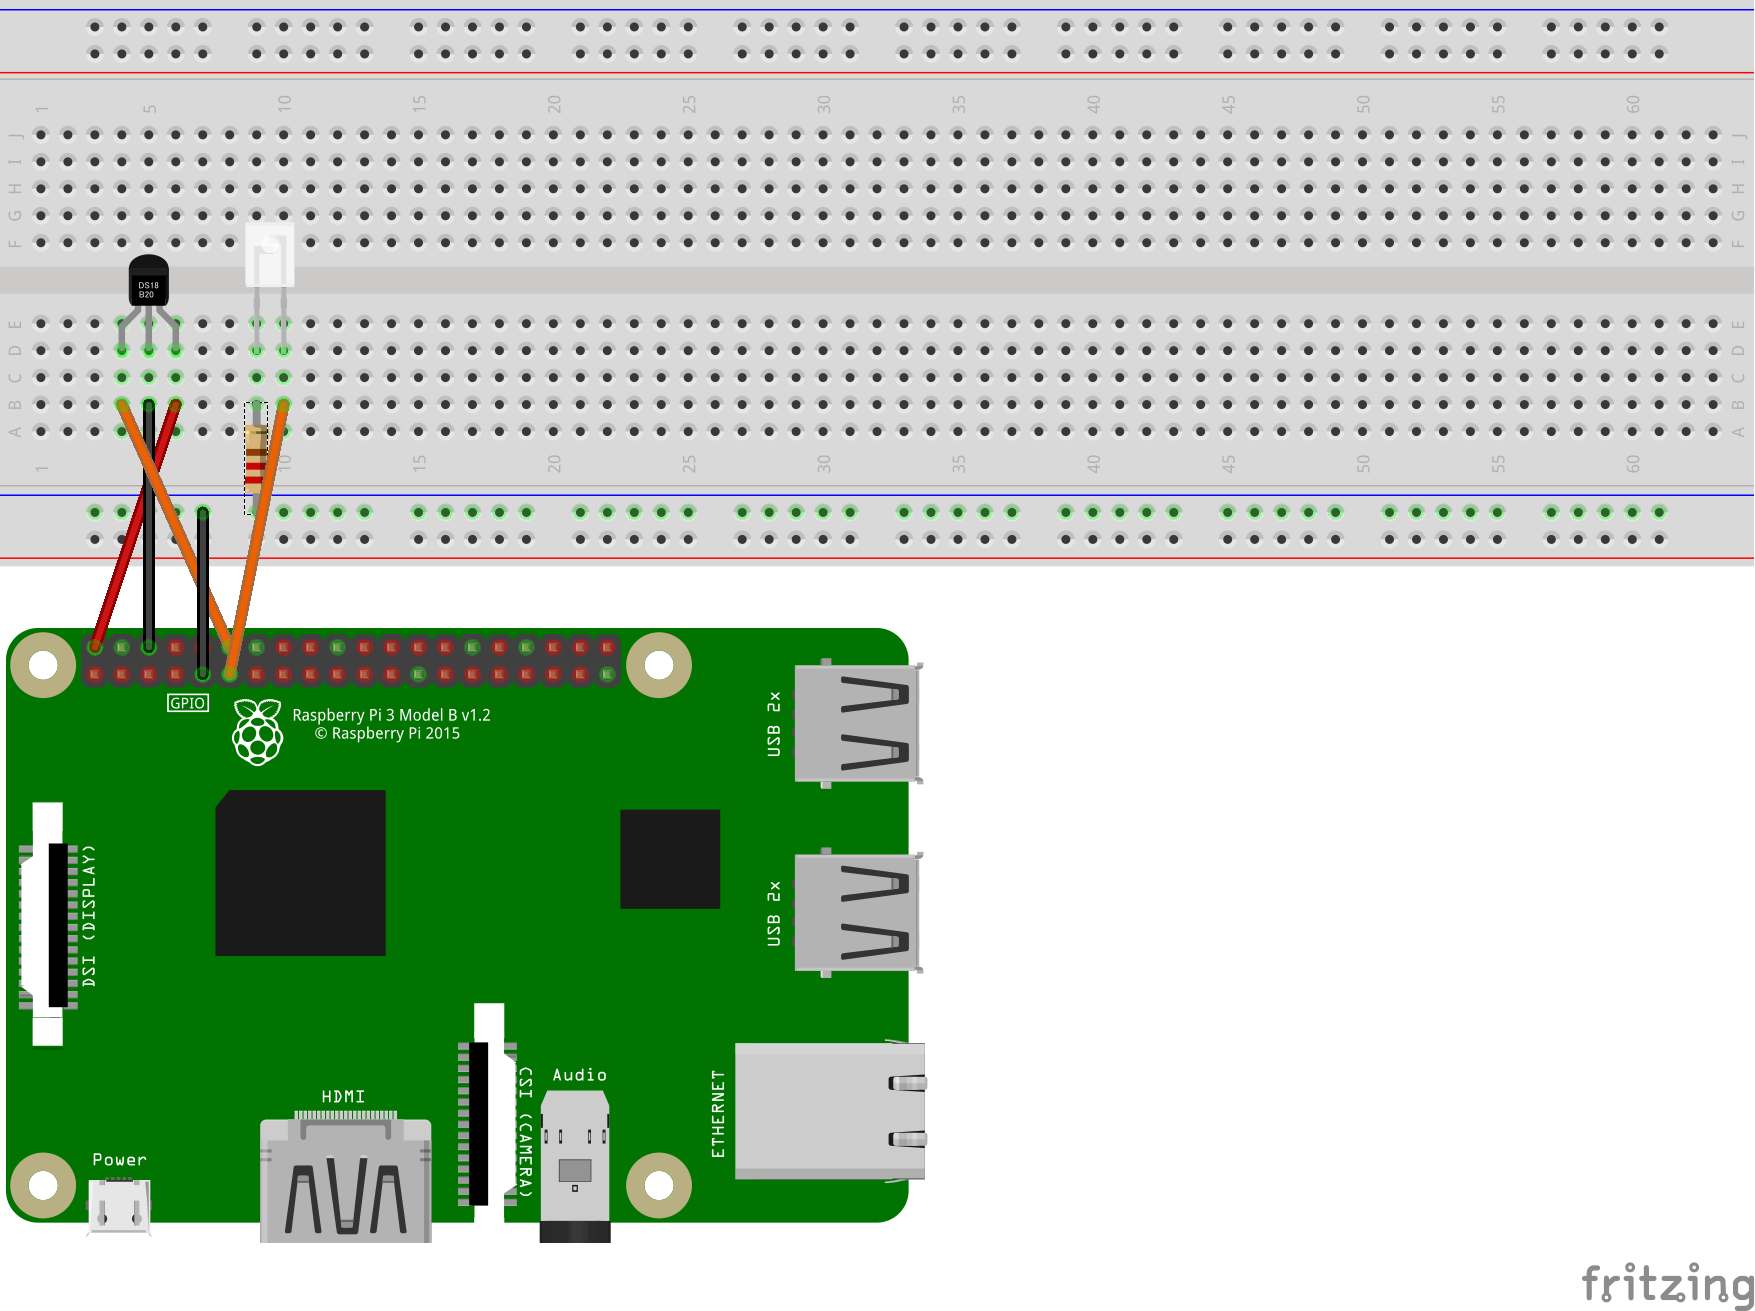
回路
受光モジュールと赤外線LEDをこんな感じで配線します。
赤外線リモコンの設定
こちらのページを参考に扇風機のリモコンの信号を受光器で読み取って、コマンドの設定をします。
以下のPlaybookでlircのインストールと/boot/config.txtを設定します。
---
- hosts: raspi
  connection: ssh
  become: true
  gather_facts: False

  tasks:
    - name: install lirc
      apt:
        name: lirc
        state: present
        update_cache: yes

    - name: add line config.txt
      lineinfile:
        path: /boot/config.txt
        line: "dtoverlay=lirc-rpi:gpio_out_pin=17,gpio_in_pin=18,gpio_in_pull=up"
設定できました。
root:~/ans # ansible-playbook -i hosts install_lirc.yml

PLAY [raspi] ***************************************************************************

TASK [install lirc] ********************************************************************
changed: [192.168.0.21]

TASK [add line config.txt] *************************************************************
changed: [192.168.0.21]

PLAY RECAP *****************************************************************************
192.168.0.21               : ok=2    changed=2    unreachable=0    failed=0

root:~/ans #
いったん再起動します。
pi@raspberrypi:~ $ sudo reboot
再起動後、/dev/lirc0の存在とlsmodでlircがロードされてることを確認します。
pi@raspberrypi:~ $ ls -l /dev/lirc*
crw-rw---- 1 root video 243, 0 Aug 12 14:45 /dev/lirc0
pi@raspberrypi:~ $ lsmod | grep lirc
lirc_rpi               16384  0
lirc_dev               16384  1 lirc_rpi
pi@raspberrypi:~ $
受光モジュールに向けてリモコンを押して読み取らせます。
pi@raspberrypi:~ $ irrecord -n -d /dev/lirc0 rimokon.conf
作成したファイルをフォルダにコピーします。
pi@raspberrypi:~ $ sudo cp senpuuki.lircd.conf /etc/lirc/lircd.conf.d/
設定ファイルを編集します。
pi@raspberrypi:~ $ sudo vi /etc/lirc/lirc_options.conf
11 driver          = default
12 device          = /dev/lirc0
サービスを起動して確認します。
pi@raspberrypi:~ $ sudo systemctl restart lircd
pi@raspberrypi:~ $ irsend LIST "" ""

devinput
devinput
senpuuki
pi@raspberrypi:~ $ irsend LIST "senpuuki" ""

0000000000000001 off
0000000000000002 on
0000000000000003 up
pi@raspberrypi:~ $
コマンドで動くか確認します。
pi@raspberrypi:~ $ irsend SEND_ONCE senpuuki on
pi@raspberrypi:~ $ irsend SEND_ONCE senpuuki up
pi@raspberrypi:~ $ irsend SEND_ONCE senpuuki off
senpuukiモジュールの作成
コマンドで動くことを確認したらモジュールにしてみます。
各モジュールのソースを見る限り、以下のお作法が守れてればよさげな気がします。
・最初にfutureを呼ぶ
・何かわからんがANSIBLE_METADATAっていうのを書いておく
・Playbookからパラメータを受け取る
・成功したらexit_json、失敗したらfail_jsonを呼ぶ
※公式doc読んでません...さーせんww
でこんな感じになりました。
#!/usr/bin/python3
# -*- coding: utf-8 -*-

from __future__ import absolute_import, division, print_function
__metaclass__ = type

from ansible.module_utils.basic import AnsibleModule

ANSIBLE_METADATA = {'metadata_version': '1.1',
                    'status': ['stableinterface'],
                    'supported_by': 'community'}

def main():

    module = AnsibleModule(
        argument_spec=dict(
            power_state=dict(type='str', required=True)
        )
    )

    power = module.params['power_state']

    if power == "on":
        cmd = "irsend SEND_ONCE senpuuki on"
    elif power == "up":
        cmd = "irsend SEND_ONCE senpuuki up"
    elif power == "on-up":
        cmd = "irsend SEND_ONCE senpuuki on && irsend SEND_ONCE senpuuki up"
    else:
        cmd = "irsend SEND_ONCE senpuuki off"

    (rc, out, err) = module.run_command(cmd)
    if rc == 0:
        module.exit_json(msg="OK", changed=True)

if __name__ == '__main__':
    main()
run_commandでコマンドを実行するだけです。
Oh...ってエラー処理してないですね...31日までに書いておきます。
扇風機の状態を変えるので、changed=Trueを返しています。
作ったファイルは/usr/local/lib/python3.5/dist-packages/ansible/modulesに配置します。
Playbookはこんな感じで
---
- hosts: localhost
  connection: local
  gather_facts: False

  tasks:
  - name: 扇風機つけるお
    raspberrypi_senpuuki:
      power_state: on
    register: result

  - debug:
      var: result
実行してみます。
pi@raspberrypi:~/an $ ansible-playbook -i hosts senpuuki.yml

PLAY [localhost] ***********************************************************************

TASK [扇風機つけるお] *************************************************************************
changed: [localhost]

TASK [debug] ***************************************************************************
ok: [localhost] => {
    "result": {
        "changed": true,
        "failed": false,
        "msg": "OK"
    }
}

PLAY RECAP *****************************************************************************
localhost                  : ok=2    changed=1    unreachable=0    failed=0

pi@raspberrypi:~/an $
僕の部屋の扇風機がONしました。(伝わらないけど伝われ)
ラズパイでAnsibleを動かすのは、まぁ本来の用途ではないのは十分承知しておりますが、
電子工作、Python、Ansibleもろもろで遊べるんで大人の自由研究として遊んでみます。
おわり。