はじめに
・ESXiを入れたNUCがある。
・VCenterがないのでVMをクローン出来ない
→いちいちOSを手で入れるのがめんどくさい。
・自動でインストールできへんもんか?
・PackerがESXiに対応してるようなのでこれを使う。
・PackerでCentOS7を自動インストール
・インストールしたCentOS7にWSLのansibleでdockerを入れる

1. PackerでCentOS7を自動インストール
Packerを使ってCentOS7を自動インストールしていきます。
Packerをダウンロードして解凍、PATHを通しました。
次にpacker buildで使うjsonファイルを作成します。
以下記事を参考しました。
{
    "variables": {
        "isoUrl": "./packer_cache/4271b0ddbfb74c84db443540d0e15947d4ab490b0eba7f5735901a0a6852c46d.iso",
        "isoChecksum": "4271b0ddbfb74c84db443540d0e15947d4ab490b0eba7f5735901a0a6852c46d",
        "isoChecksumType": "none",
        "remoteCacheDirectory":"packer_cache"
    },
    "builders": [
    {
        "name": "CentOS7",
        "type": "vmware-iso",

        "vm_name": "CentOS7_2",
        "guest_os_type": "CentOS7-64",
        "ssh_username": "xxxx",
        "ssh_password": "xxxx",
        "ssh_timeout": "15m",

        "iso_url": "{{user `isoUrl`}}",
        "iso_checksum":"{{user `isoChecksum`}}",
        "iso_checksum_type": "{{user `isoChecksumType`}}",

        "shutdown_command": "",
        "boot_command": [
            "<tab> text biosdevname=0 net.ifnames=0 ks=http://{{ .HTTPIP }}:{{ .HTTPPort }}/centos7.ks<enter><wait>"
        ],
        "http_directory": "./",
        "tools_upload_flavor": "linux",
        "headless": false,
        "keep_registered": true,

        "remote_type": "esx5",
        "remote_host": "x.x.x.x",
        "remote_datastore": "datastore1",
        "remote_username": "xxxx",
        "remote_password": "xxxx",
        "remote_cache_directory":"packer_cache",
        "disk_size": "20480",
        "disk_type_id": "thin",
        "vmx_data": {
            "memsize": "1024",
            "numvcpus": "2",
            "ethernet0.networkName": "VM Network",
            "ethernet0.present": "true",
            "ethernet0.startConnected": "true",
            "ethernet0.addressType": "generated",
            "ethernet0.virtualDev": "e1000"
        },

        "vnc_port_min": "5900",
        "vnc_port_max": "5911",
        "vnc_bind_address": "0.0.0.0",
        "vnc_disable_password": "true"
    }
    ]
}
既にESXiのdatastoreに格納済みのisoファイルを使うために変数でisoChecksumType
をnoneにしています。
kickstartインストール中に固定IPを設定したいので、起動パラメータでbiosdevname=0 net.ifnames=0を入れています。
こうするとNICのインターフェイス名が旧来のethxになるのでkickstartファイル内で
固定IPを設定できるようになりました。
次にjsonファイルと同じフォルダ内にkickstartのファイルを置きます。
既にインストールしていたCentOS7のanacond.kscfgを使い以下のようにしました。
#version=DEVEL
# System authorization information
auth --enableshadow --passalgo=sha512
# Use CDROM installation media
cdrom
# Use graphical install
text
# Run the Setup Agent on first boot
firstboot --enable
# Keyboard layouts
keyboard --vckeymap=jp --xlayouts='jp'
# System language
lang ja_JP.UTF-8

# Network information
network --bootproto=static --device=eth0 --gateway=x.x.x.x --ip=x.x.x.x --nameserver=x.x.x.x --netmask=255.255.255.0 --ipv6=auto --activate
network --hostname=localhost.localdomain

# Root password
rootpw --plaintext xxxxxxxx
# System services
services --enabled="chronyd"
# System timezone
timezone Asia/Tokyo --isUtc
# System bootloader configuration
bootloader --location=mbr --boot-drive=sda
autopart --type=lvm
# Partition clearing information
clearpart --none --initlabel

%packages
@^minimal
@core
chrony

%end

%addon com_redhat_kdump --disable --reserve-mb='auto'

%end

%anaconda
pwpolicy root --minlen=6 --minquality=50 --notstrict --nochanges --notempty
pwpolicy user --minlen=6 --minquality=50 --notstrict --nochanges --notempty
pwpolicy luks --minlen=6 --minquality=50 --notstrict --nochanges --notempty
%end
準備ができたら実行します。
C:\work\packer>packer build centos7.json
CentOS7 output will be in this color.

Warnings for build 'CentOS7':

* A checksum type of 'none' was specified. Since ISO files are so big,
a checksum is highly recommended.
* A shutdown_command was not specified. Without a shutdown command, Packer
will forcibly halt the virtual machine, which may result in data loss.

==> CentOS7: Downloading or copying ISO
    CentOS7: Downloading or copying: file://C:/work/packer/packer_cache/4271b0ddbfb74c84db443540d0e15947d4ab490b0eba7f5735901a0a6852c46d.iso
==> CentOS7: Uploading ISO to remote machine...
==> CentOS7: Creating virtual machine disk
==> CentOS7: Building and writing VMX file
==> CentOS7: Starting HTTP server on port 8096
==> CentOS7: Registering remote VM...
==> CentOS7: Starting virtual machine...
==> CentOS7: Waiting 10s for boot...
==> CentOS7: Connecting to VM via VNC
==> CentOS7: Typing the boot command over VNC...
==> CentOS7: Waiting for SSH to become available...
==> CentOS7: Connected to SSH!
==> CentOS7: Forcibly halting virtual machine...
    CentOS7: Waiting for VMware to clean up after itself...
==> CentOS7: Deleting unnecessary VMware files...
    CentOS7: Deleting: /vmfs/volumes/datastore1/output-CentOS7/vmware.log
==> CentOS7: Compacting the disk image
==> CentOS7: Cleaning VMX prior to finishing up...
    CentOS7: Unmounting floppy from VMX...
    CentOS7: Detaching ISO from CD-ROM device...
    CentOS7: Disabling VNC server...
==> CentOS7: Skipping export of virtual machine (export is allowed only for ESXi and the format needs to be specified)...
==> CentOS7: Keeping virtual machine registered with ESX host (keep_registered = true)
Build 'CentOS7' finished.

==> Builds finished. The artifacts of successful builds are:
--> CentOS7: VM files in directory: /vmfs/volumes/datastore1/output-CentOS7

C:\work\packer>
Starting virtual machine...が出てきたらESXiにアクセスし作成されたコンソールを
開くとインストールされていく様子がわかります。
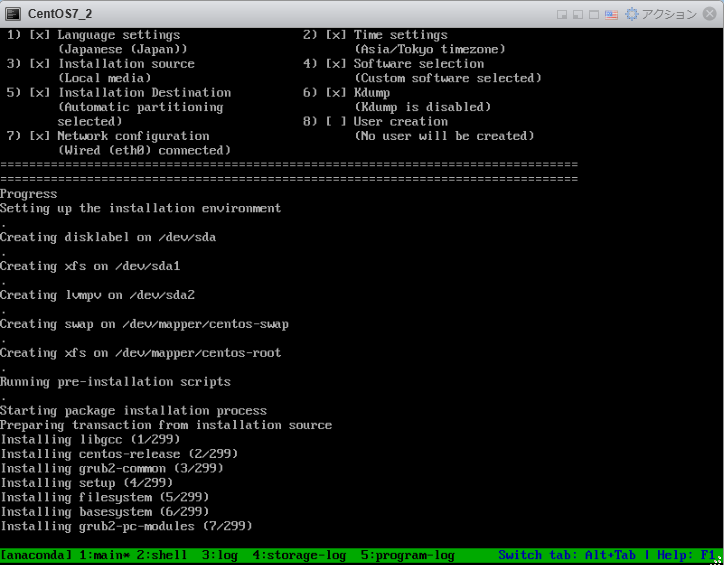
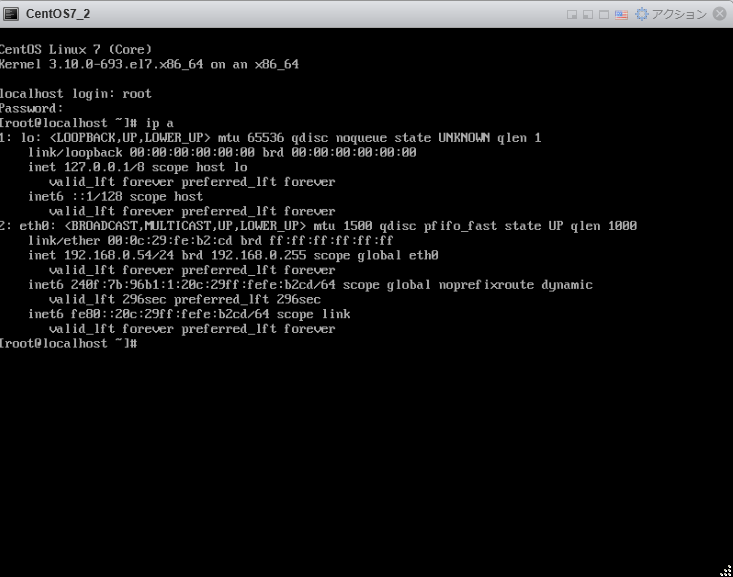
インストールできました。
2. WSLのansibleでdockerを入れる
WSLの有効化とansibleをインストールします。
コンパネ→プログラムと機能→Windowsの機能の有効化または無効化でWindows Subsysten for Linuxにチェックを入れて再起動します。
再起動したらWindowsストアからUbuntuをインストールして起動、ユーザ名とパスワードをセットします。
$ uname -a
Linux DESKTOP-JQLQS5F 4.4.0-43-Microsoft #1-Microsoft Wed Dec 31 14:42:53 PST 2014 x86_64 x86_64 x86_64 GNU/Linux
WSLのセットアップができたら公式手順に従いansibleをインストールします。
$ sudo apt-get update
$ sudo apt-get install software-properties-common
$ sudo apt-add-repository ppa:ansible/ansible
$ sudo apt-get update
$ sudo apt-get install ansible
$ ansible --version
ansible 2.4.2.0
ansibleの2.4が入りました。
playbook実行
playbookはこちらをそのまま使いました。
https://github.com/Vinelab/ansible-docker
---
- name: Install docker
  gather_facts: No
  hosts: CentOS7

  tasks:
    - name: Install yum utils
      yum:
        name: yum-utils
        state: latest

    - name: Install device-mapper-persistent-data
      yum:
        name: device-mapper-persistent-data
        state: latest

    - name: Install lvm2
      yum:
        name: lvm2
        state: latest

    - name: Add Docker repo
      get_url:
        url: https://download.docker.com/linux/centos/docker-ce.repo
        dest: /etc/yum.repos.d/docer-ce.repo
      become: yes

    - name: Enable Docker Edge repo
      ini_file:
        dest: /etc/yum.repos.d/docer-ce.repo
        section: 'docker-ce-edge'
        option: enabled
        value: 0
      become: yes

    - name: Enable Docker Test repo
      ini_file:
        dest: /etc/yum.repos.d/docer-ce.repo
        section: 'docker-ce-test'
        option: enabled
        value: 0
      become: yes

    - name: Install Docker
      package:
        name: docker-ce
        state: latest
      become: yes

    - name: Start Docker service
      service:
        name: docker
        state: started
        enabled: yes
      become: yes
上記のplaybookを実行します。
$ ansible-playbook -i hosts install_docker.yml

PLAY [Install docker] **************************************************************************************************

TASK [Install yum utils] ***********************************************************************************************
changed: [x.x.x.x]

TASK [Install device-mapper-persistent-data] ***************************************************************************
ok: [x.x.x.x]

TASK [Install lvm2] ****************************************************************************************************
ok: [x.x.x.x]

TASK [Add Docker repo] *************************************************************************************************
changed: [x.x.x.x]

TASK [Enable Docker Edge repo] *****************************************************************************************
changed: [x.x.x.x]

TASK [Enable Docker Test repo] *****************************************************************************************
changed: [x.x.x.x]

TASK [Install Docker] **************************************************************************************************
changed: [x.x.x.x]

TASK [Start Docker service] ********************************************************************************************
changed: [x.x.x.x]

PLAY RECAP *************************************************************************************************************
x.x.x.x               : ok=8    changed=6    unreachable=0    failed=0
完了しました。
ログインしてdockerがinstallされてるか確認します。
[root@localhost ~]# docker version
Client:
 Version:       17.12.0-ce
 API version:   1.35
 Go version:    go1.9.2
 Git commit:    c97c6d6
 Built: Wed Dec 27 20:10:14 2017
 OS/Arch:       linux/amd64

Server:
 Engine:
  Version:      17.12.0-ce
  API version:  1.35 (minimum version 1.12)
  Go version:   go1.9.2
  Git commit:   c97c6d6
  Built:        Wed Dec 27 20:12:46 2017
  OS/Arch:      linux/amd64
  Experimental: false
[root@localhost ~]#
ちゃんとインストールされています。
というわけでPackerとansibleを使ってESXiに自動で環境構築してみました。