はじめに
この記事では、API Connectに登録するAPI定義をAIを活用して作成する方法を紹介します。
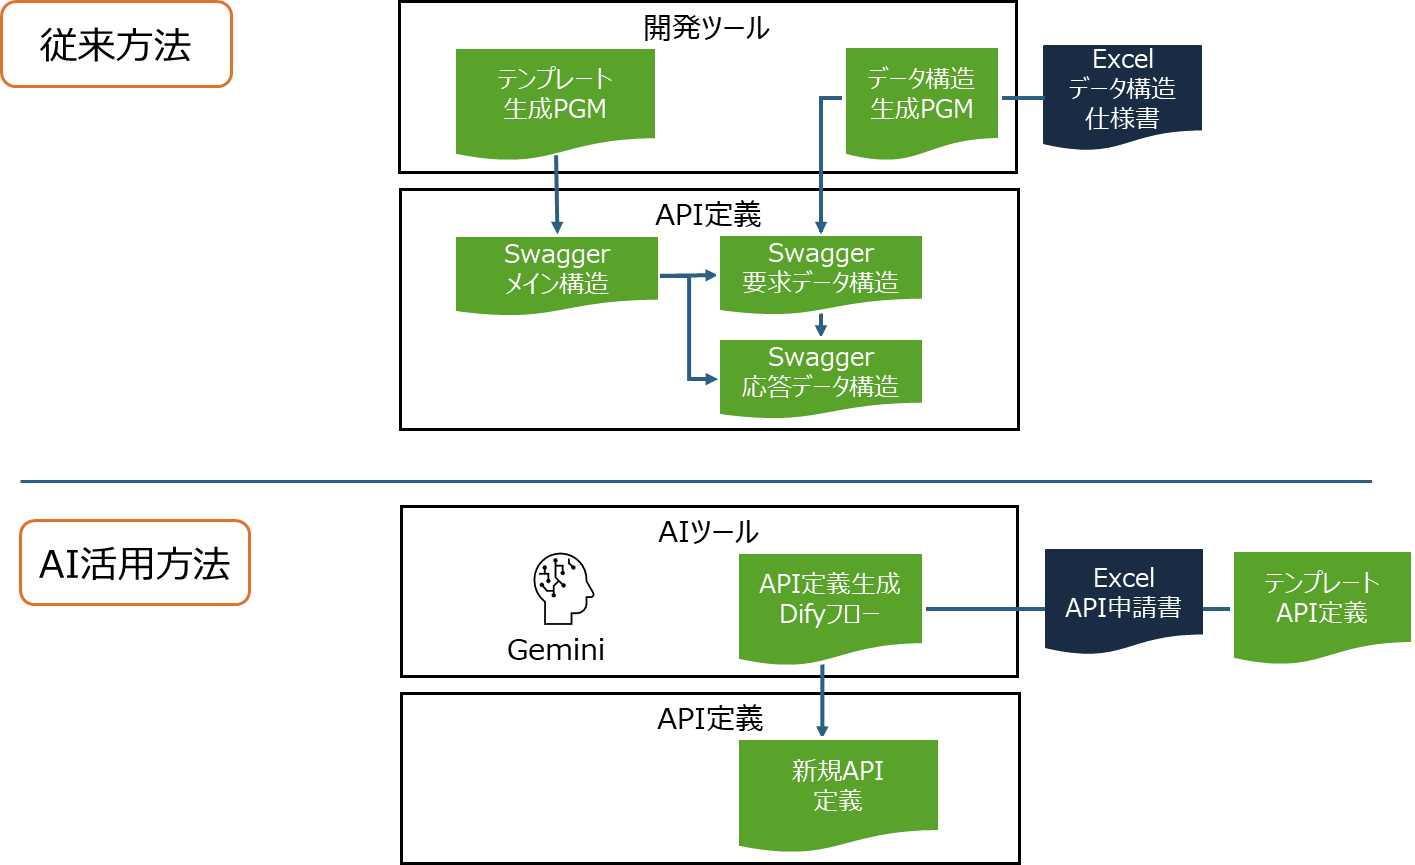
私が関わってきたAPI Connect案件では、呼び出し先となるバックエンドAPIの仕様書や申請書(Excel形式が多い)をベースとして、プログラミング言語を用いてAPI定義を作成していました。
また、API Connectでは、API定義のテンプレートを設定したり、メイン構造とデータ構造ファイルを分割したりする方法がとれますので、このような使い方をしている事例もありました。
このような従来型の方法は、Excel等の仕様書から必要な情報を抽出する、それをもとにAPI定義を生成するという処理を作りこむ必要があります。特に、API要求・応答のパラメーターについてはJSON Schemaを生成する必要がありますが、データ構造が複雑な場合は、この処理開発に苦労します。
今回は、Excel等の仕様書の読み込みや、API定義の生成に関して、AIを活用可能か検証してみました。
生成AIとしてGeminiと、API定義を生成するフローとしてDifyというツールを使っています。
事前準備
テンプレートAPI定義と申請書の準備
新規API定義を作成するためのテンプレートAPI定義と、申請書を作成しています。
今回は、シンプルな形で以下のような定義を作っています。
- テンプレートAPI定義
swagger: '2.0'
info:
  title: template-api
  x-ibm-name: template-api
  version: 1.0.0
  x-ibm-languages:
    description:
      ja: テスト
x-ibm-configuration:
  cors:
    enabled: true
  gateway: datapower-api-gateway
  type: rest
  phase: realized
  enforced: true
  testable: true
  assembly:
    execute:
      - switch:
          version: 2.1.0
          title: switch
          case:
            - condition: (($httpVerb() = 'get') and ($operationPath() = '/template'))
              execute:
                - invoke:
                    version: 2.3.0
                    title: invoke
                    timeout: 60
                    verb: keep
                    cache-response: protocol
                    cache-ttl: 900
                    target-url: https://target-url.com
    catch:
      - errors:
          - JavaScriptError
        execute:
          - set-variable:
              version: 2.0.0
              title: set-variable
              actions:
                - set: message.status.code
                  value: 500
                  type: any
          - set-variable:
              version: 2.0.0
              title: set-variable
              actions:
                - set: message.status.reason
                  value: apic error
                  type: any
  properties:
    target-url:
      value: http://example.com/operation-name
      description: The URL of the target service
      encoded: false
  activity-log:
    enabled: true
    success-content: activity
    error-content: payload
basePath: /v1
paths:
  /template:
    get:
      responses:
        '200':
          description: success
          schema:
            type: string
      consumes: []
      produces: []
securityDefinitions:
  clientID:
    type: apiKey
    in: header
    name: X-IBM-Client-Id
    x-key-type: client_id
  clientSecret:
    type: apiKey
    in: header
    name: X-IBM-Client-Secret
    x-key-type: client_secret
schemes:
  - https
- Excel申請書
以下のような形でシンプルなフォーマットを作成しました。
- API概要
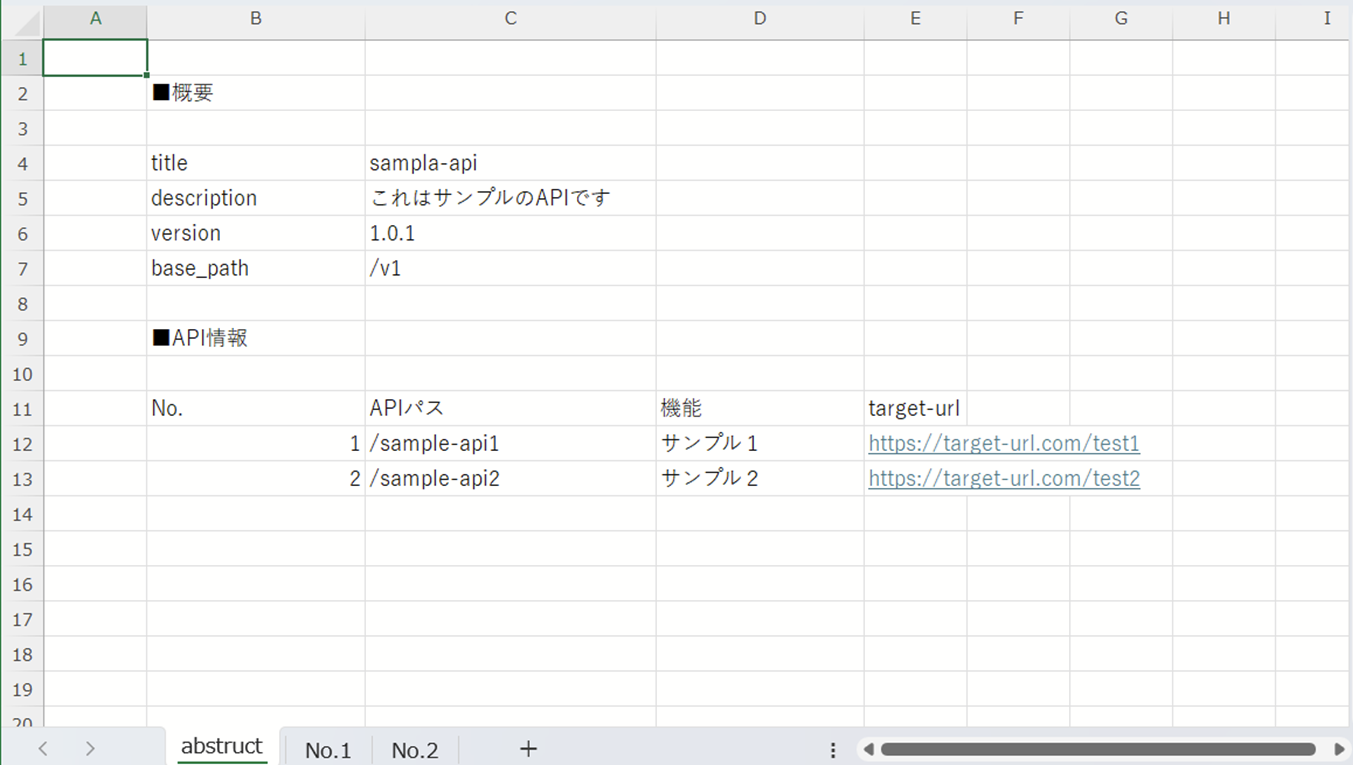
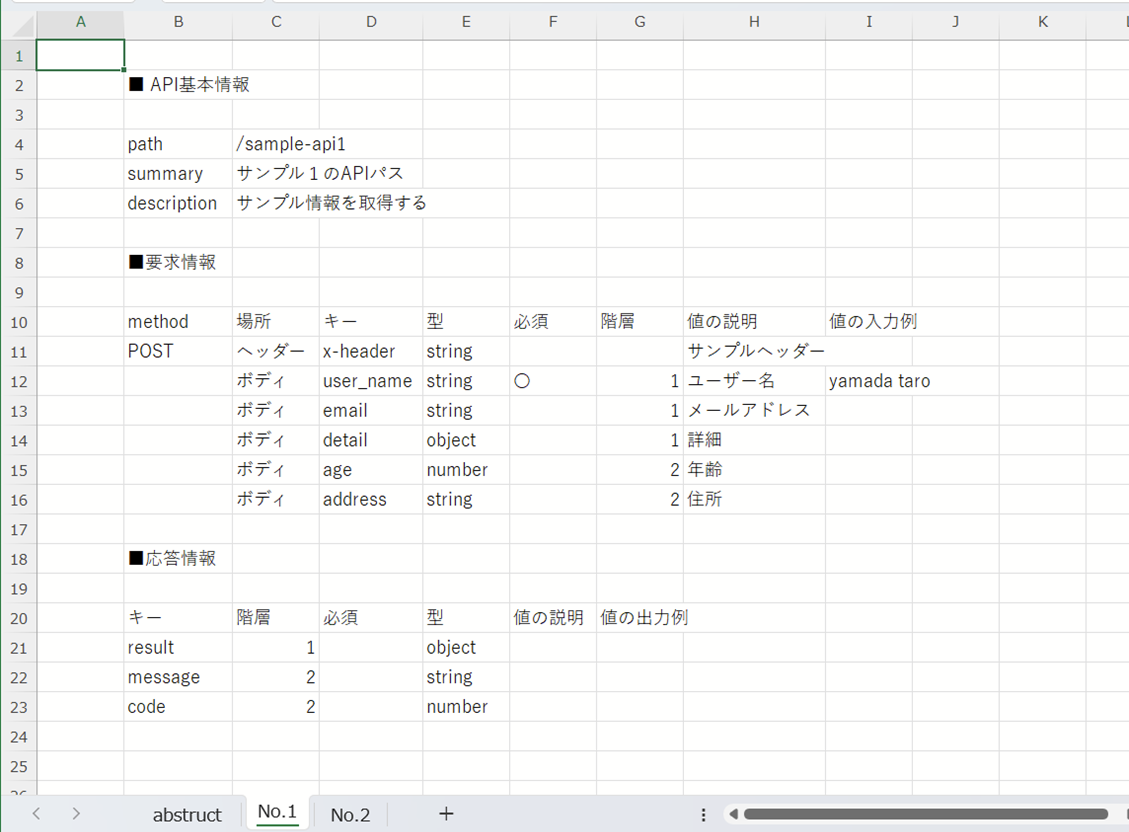
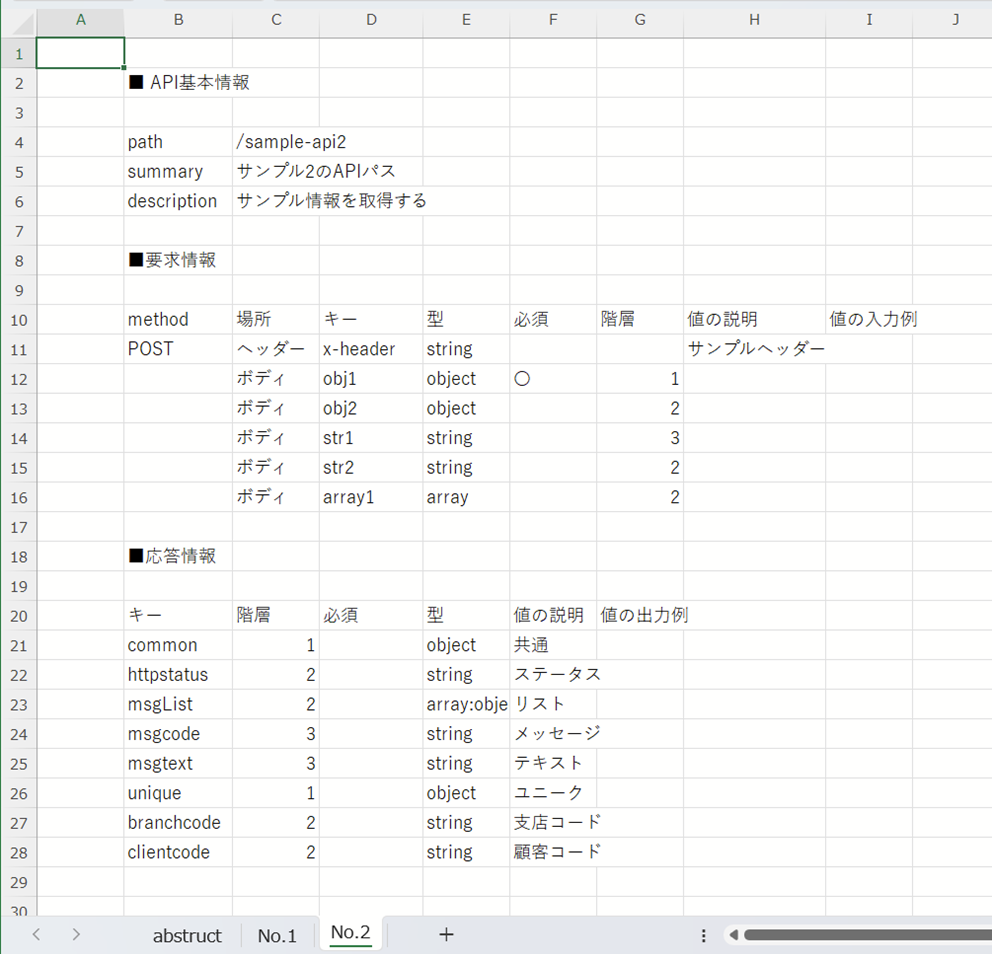
- 各APIパスの詳細
Difyワークフロー準備
Difyで以下のようなシンプルなワークフローを開発しています。
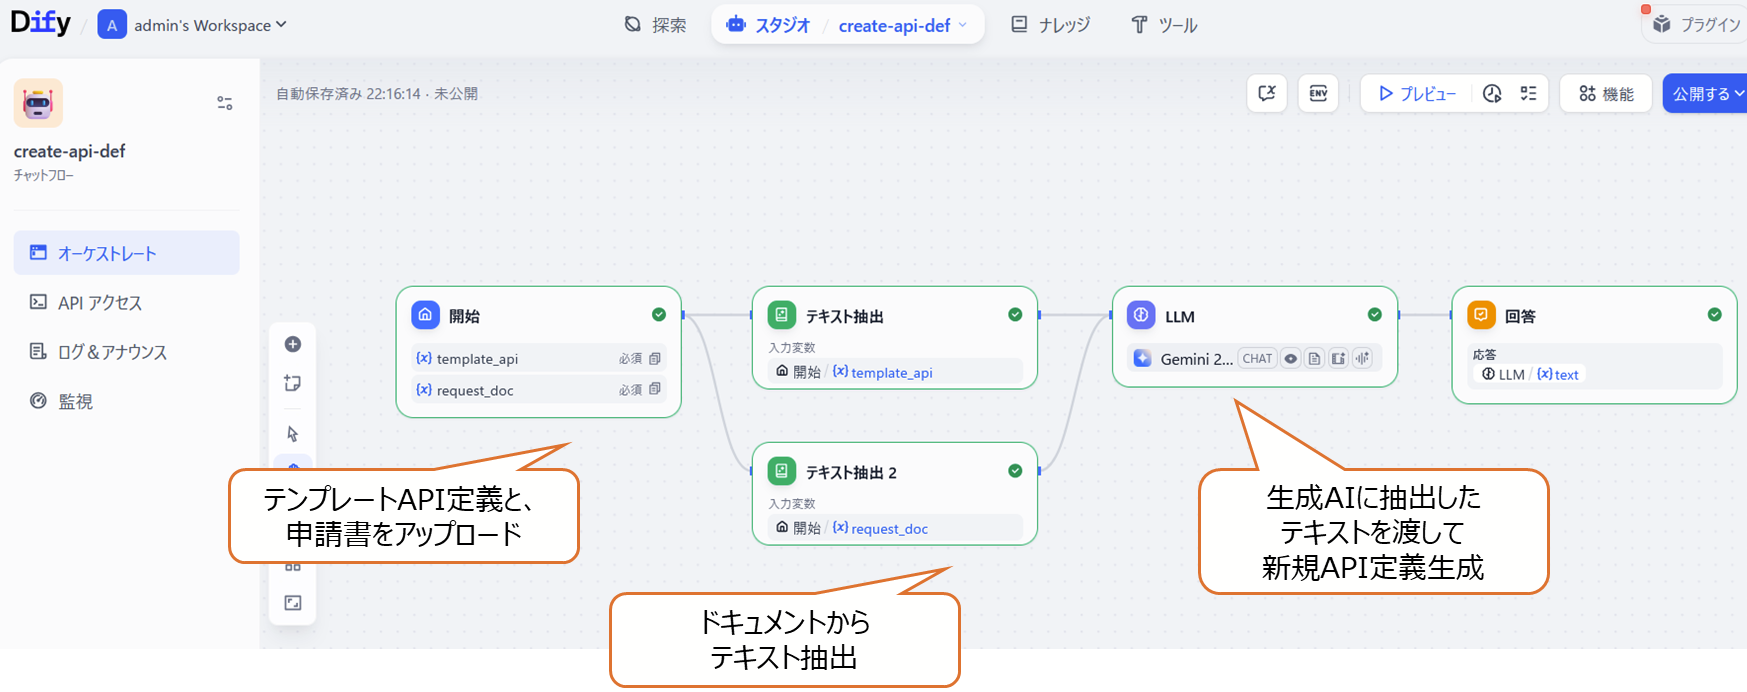
LLMブロックでは、以下のようなシステムプロンプトで処理を実施しています。
あなたはSwagger API定義の作成者です。
テンプレートのAPI定義と、申請書を参照してAPI定義を作成してください。
API定義を生成する際には、以下の作成ルールを適用してください。

# テンプレートAPI定義
{{#1759377512151.text#}}

# 申請書
{{#1759394817272.text#}}

申請書には以下のようなシートが含まれています。

- abstructにはAPI定義の共通設定とAPIパス情報
- No.1等のシートにはAPIパスの詳細情報


# 作成ルール

- 申請書のpaths、methodの値をもとにasembly以下のswitchのconditionを更新してください。
- 申請書のtarget-urlの値をもとに上記のcondition配下のinvokeのtarget-urlを更新してください。
- propertiesは更新しないでください。
- 申請書のAPIパスをもとにpathsを設定してください。
- このpathに関する要求・応答パラメーターを設定してください。内容はdefinitionsに記載し、pathからは参照する形にしてください。definition名は、<path>-<input>または、<path>-<output>としてください。
- API定義の中にコメントは入れないでください。
実行例
各種資料をアップロードしてワークフローを実行してみます。
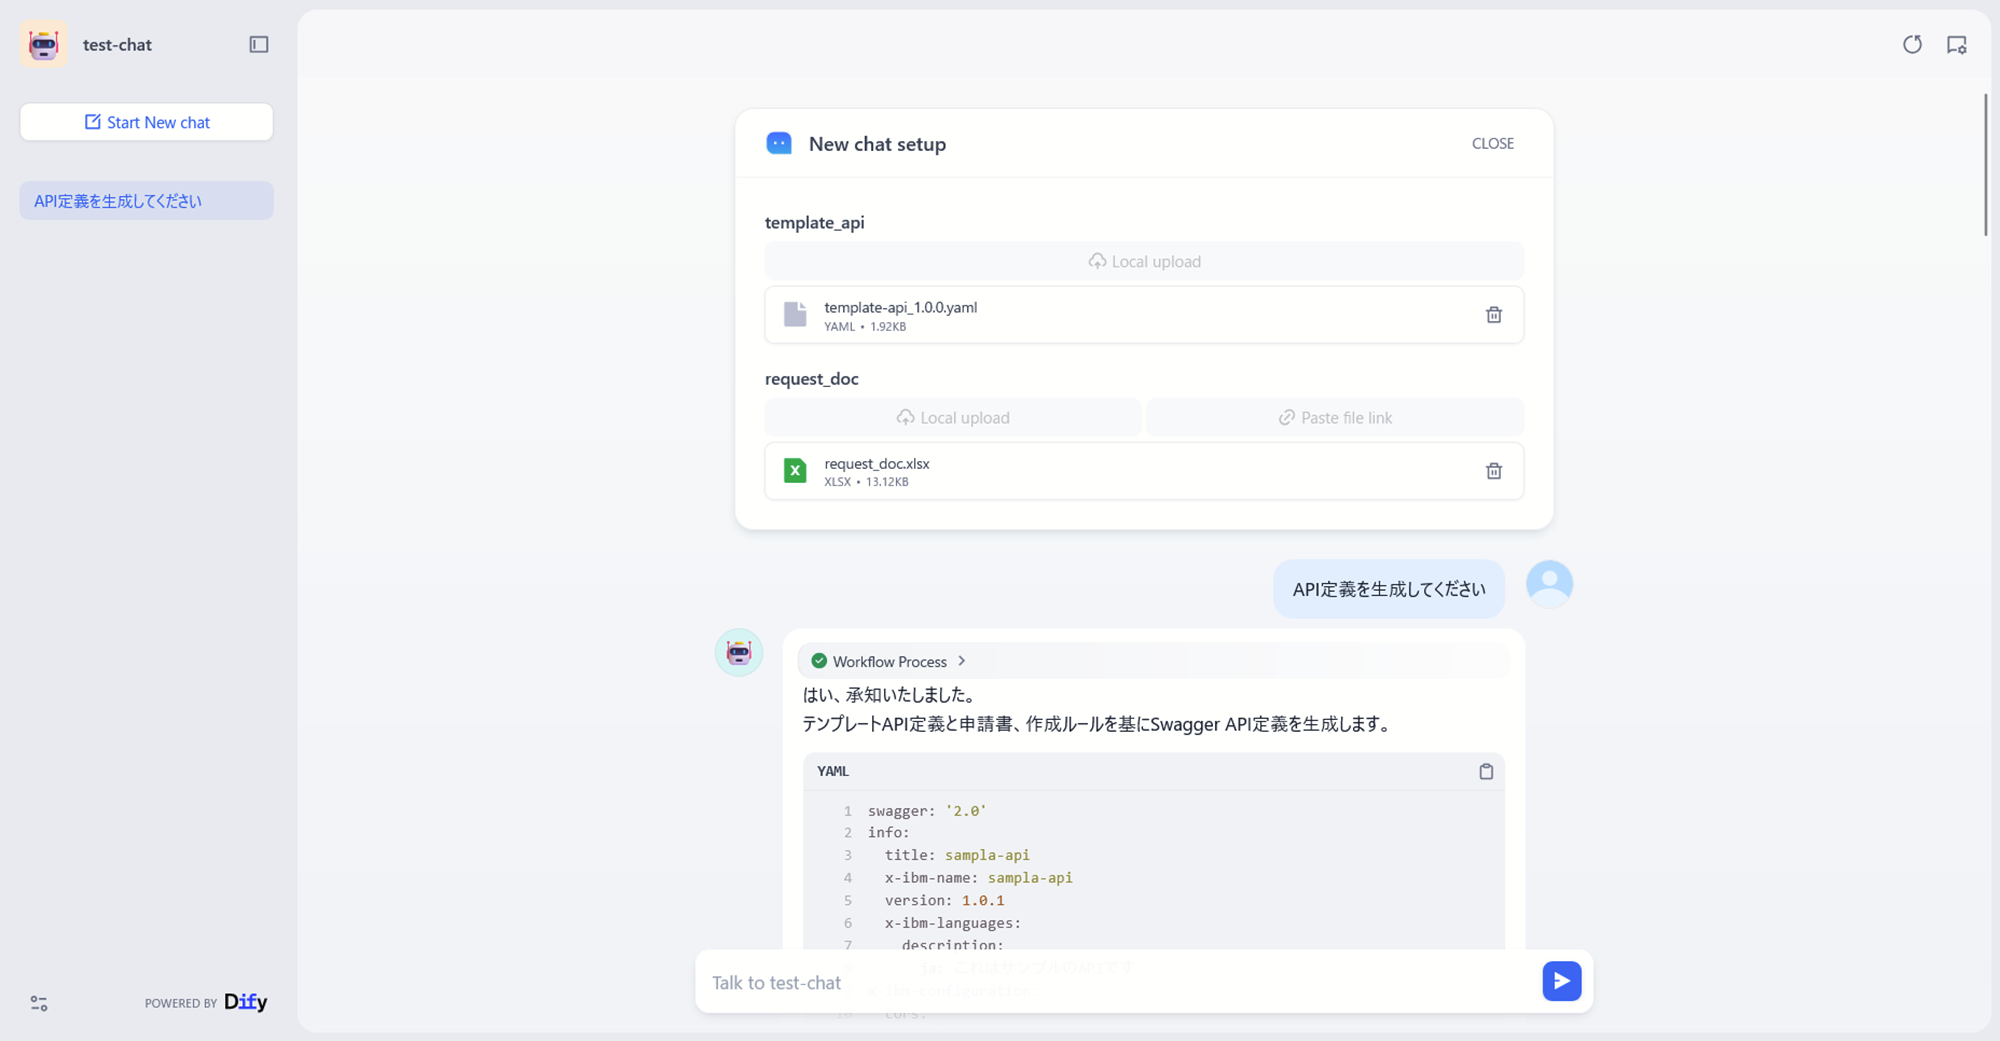
以下のような内容で、申請書に基づいたAPI定義が生成されました。
swagger: '2.0'
info:
  title: sampla-api
  x-ibm-name: sampla-api
  version: 1.0.1
  x-ibm-languages:
    description:
      ja: これはサンプルのAPIです
x-ibm-configuration:
  cors:
    enabled: true
  gateway: datapower-api-gateway
  type: rest
  phase: realized
  enforced: true
  testable: true
  assembly:
    execute:
    - switch:
        version: 2.1.0
        title: switch
        case:
        - condition: (($httpVerb() = 'post') and ($operationPath() = '/sample-api1'))
          execute:
          - invoke:
              version: 2.3.0
              title: invoke
              timeout: 60
              verb: keep
              cache-response: protocol
              cache-ttl: 900
              target-url: https://target-url.com/test1
        - condition: (($httpVerb() = 'post') and ($operationPath() = '/sample-api2'))
          execute:
          - invoke:
              version: 2.3.0
              title: invoke
              timeout: 60
              verb: keep
              cache-response: protocol
              cache-ttl: 900
              target-url: https://target-url.com/test2
    catch:
    - errors:
      - JavaScriptError
      execute:
      - set-variable:
          version: 2.0.0
          title: set-variable
          actions:
          - set: message.status.code
            value: 500
            type: any
      - set-variable:
          version: 2.0.0
          title: set-variable
          actions:
          - set: message.status.reason
            value: apic error
            type: any
  properties:
    target-url:
      value: http://example.com/operation-name
      description: The URL of the target service
      encoded: false
  activity-log:
    enabled: true
    success-content: activity
    error-content: payload
basePath: /v1
paths:
  /sample-api1:
    post:
      summary: サンプル1のAPIパス
      description: サンプル情報を取得する
      consumes:
      - application/json
      produces:
      - application/json
      parameters:
      - name: x-header
        in: header
        type: string
        required: false
        description: サンプルヘッダー
      - name: body
        in: body
        required: true
        schema:
          $ref: '#/definitions/sample-api1-input'
      responses:
        '200':
          description: success
          schema:
            $ref: '#/definitions/sample-api1-output'
  /sample-api2:
    post:
      summary: サンプル2のAPIパス
      description: サンプル情報を取得する
      consumes:
      - application/json
      produces:
      - application/json
      parameters:
      - name: x-header
        in: header
        type: string
        required: false
        description: サンプルヘッダー
      - name: body
        in: body
        required: true
        schema:
          $ref: '#/definitions/sample-api2-input'
      responses:
        '200':
          description: success
          schema:
            $ref: '#/definitions/sample-api2-output'
definitions:
  sample-api1-input:
    type: object
    properties:
      user_name:
        type: string
        description: ユーザー名
      email:
        type: string
        description: メールアドレス
      detail:
        type: object
        description: 詳細
        properties:
          age:
            type: number
            description: 年齢
          address:
            type: string
            description: 住所
    required:
    - user_name
  sample-api1-output:
    type: object
    properties:
      result:
        type: object
        properties:
          message:
            type: string
          code:
            type: number
  sample-api2-input:
    type: object
    properties:
      obj1:
        type: object
        properties:
          obj2:
            type: object
            properties:
              str1:
                type: string
          str2:
            type: string
          array1:
            type: array
            items:
              type: object
    required:
    - obj1
  sample-api2-output:
    type: object
    properties:
      common:
        type: object
        description: 共通
        properties:
          httpstatus:
            type: string
            description: ステータス
          msgList:
            type: array
            description: リスト
            items:
              type: object
              properties:
                msgcode:
                  type: string
                  description: メッセージ
                msgtext:
                  type: string
                  description: テキスト
      unique:
        type: object
        description: ユニーク
        properties:
          branchcode:
            type: string
            description: 支店コード
          clientcode:
            type: string
            description: 顧客コード
securityDefinitions:
  clientID:
    type: apiKey
    in: header
    name: X-IBM-Client-Id
    x-key-type: client_id
  clientSecret:
    type: apiKey
    in: header
    name: X-IBM-Client-Secret
    x-key-type: client_secret
schemes:
- https
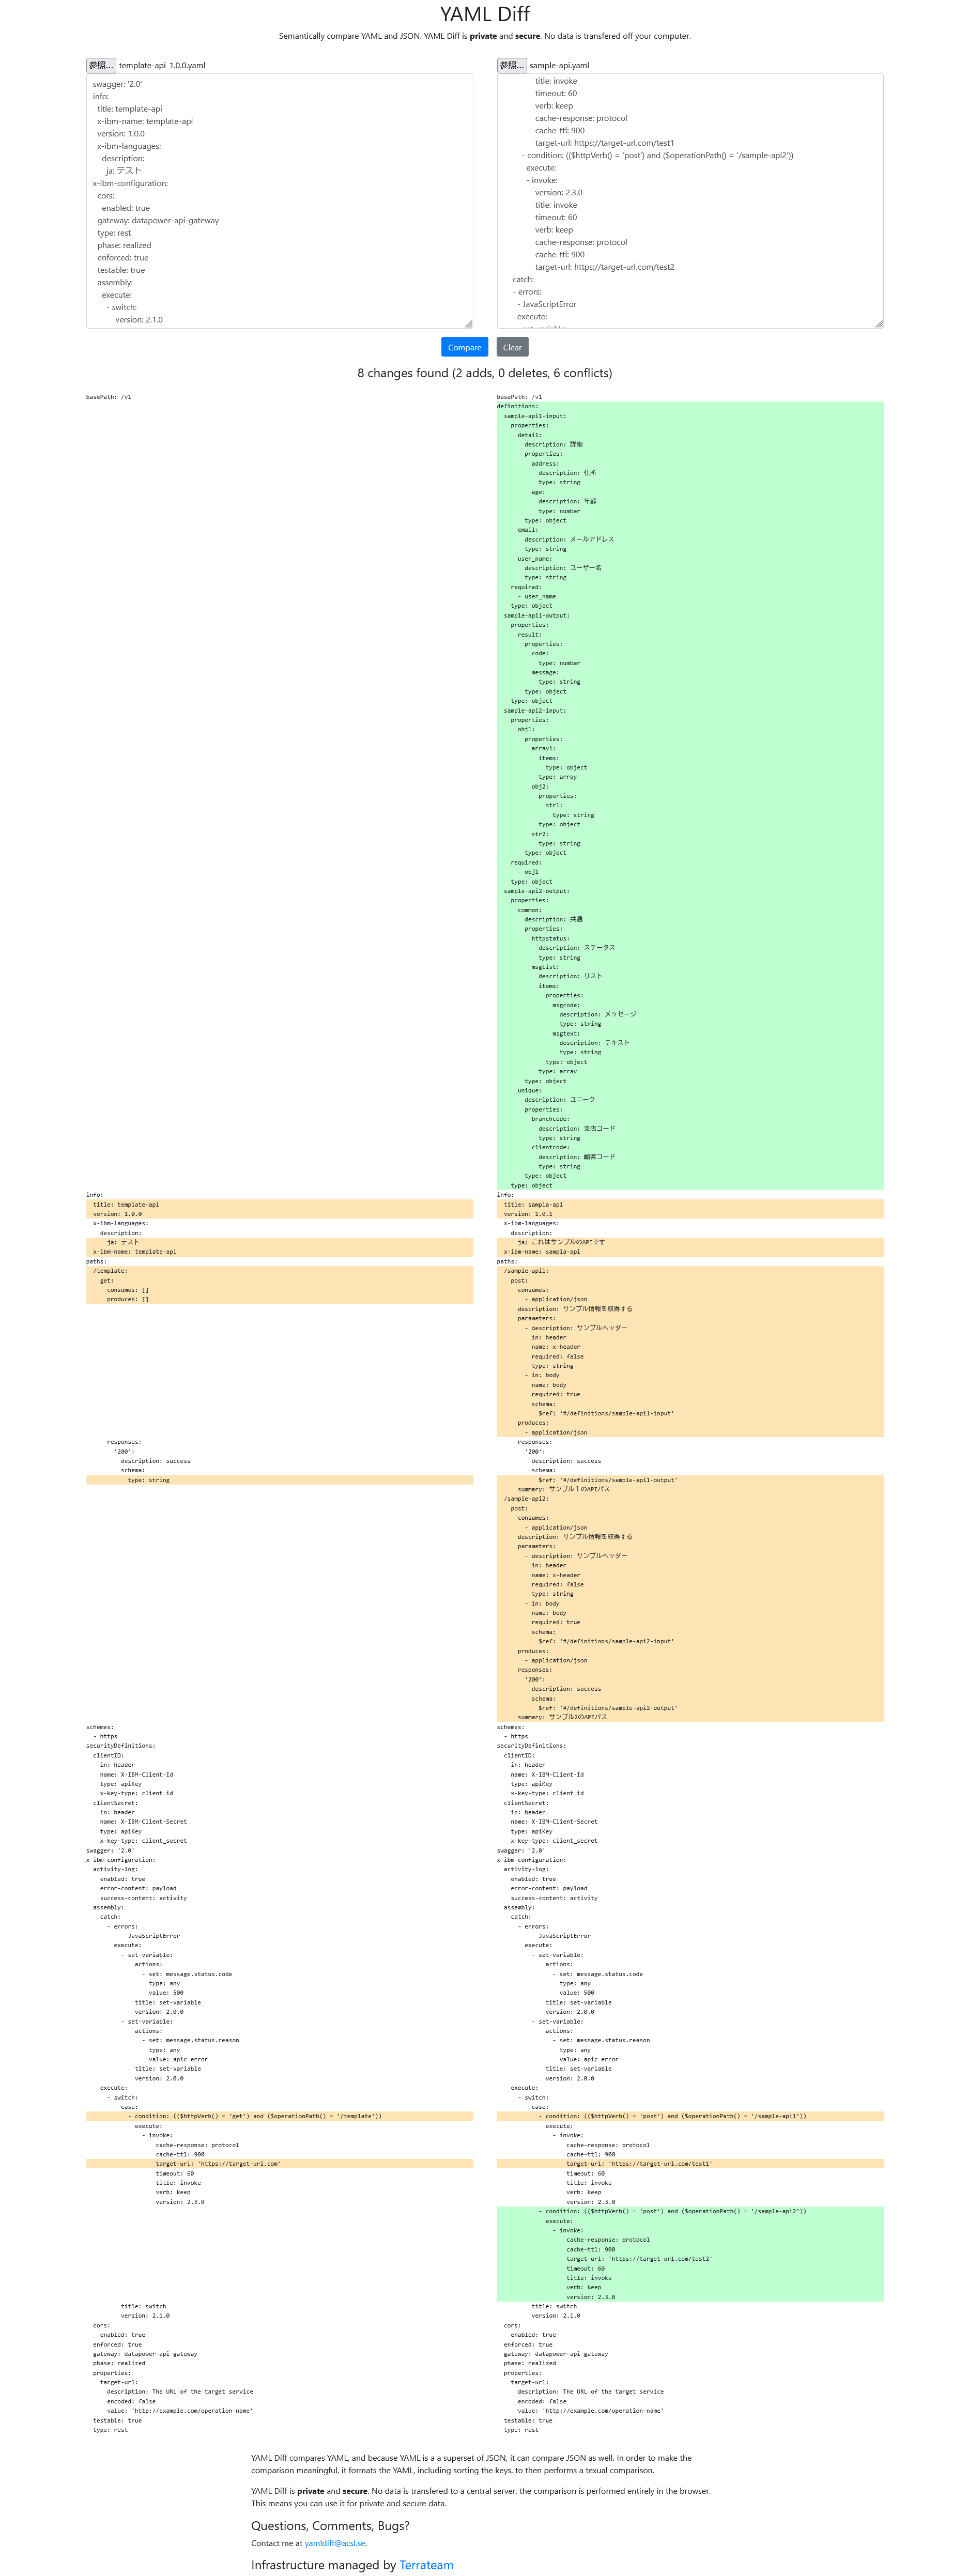
こちらのサイトで比較してみると、今回の該当箇所が適切に変換されていることがわかります。
最後に
今回は、簡易的な方法で生成AIを使用したAPI定義生成を実施してみました。特に試行錯誤は不要で、生成AIへ直感的なシステムプロンプトを設定するだけで、想定通りに動作することが確認できました。実際には、生成AIのモデルや、API定義の複雑さ、申請書のフォーマットによって考慮が必要になることもあるかと思いますので、要件に合わせて検証いただければと思います。
以上です。