事始め
既存のプロジェクトにGitを導入する
$ git init
監視対象を追加
$ git add -A
コミットする
$ git commit -m 'my first commit'
Gitのエディターの設定
コミットのメッセージを編集したり、設定configを編集する時のエディタを指定できる。
個人的な好みでAtomを選んでいる。好きなエディタを指定すれば良い。
$ git config --global core.editor atom
Gitのユーザ名、メアド設定
$ git config --global --editを実行すると、他の設定をまだしていなければ、エディタで次のように表示される。
# This is Git's per-user configuration file.
[user]
# Please adapt and uncomment the following lines:
#   name = Foo
#   email = foo@bar.local
これをあなたの設定したい名前・メールアドレスに直してコメントインすれば良い。
エディタから編集するのではなくコマンドで設定したい場合は、次の通り。
$ git config --global user.name "John Doe"
$ git config --global user.email johndoe@example.com
サーバ側の設定
サーバ用のGitを取得する。これには、既存のリポジトリをエクスポートして新たなリポジトリ(作業ディレクトリを持たないリポジトリ)を作る。
$ git clone --bare my_project my_project.git
理解のため言えば、これは次のこととほぼ同じ。
$ cp -Rf my_project/.git my_project.git
サーバから取得する
$ git clone user@domain_or_ip:/directly/in/your/server directly/local
これはおそらくSSHで接続して取ってきていると思われる。
普段の利用法
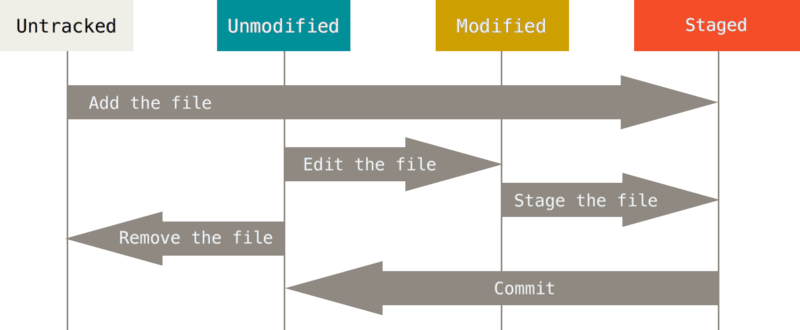
画像出典&参考:Git-の基本-変更内容のリポジトリへの記録
#ステージングする。新しいファイルはこれを行わないといけない
$ git add -A
#コミットする(コメントの指定は-m)
$ git commit -m 'comment'
#追跡している編集済みのファイルを自動でステージングしてコミットする。
#新しいファイルはこの前にステージングが必要。
$ git commit -a -m 'comment'
#状態の確認とその省略版
$ git status
$ git status -s
#詳細に違いを確認
$ git diff
#Gitにわかるようにrmやmvをする
$ git rm <filename>
$ git mv <filename> <newname>

#変更履歴を表示 (https://git-scm.com/book/ja/v2/Git-の基本-コミット履歴の閲覧)
$ git log
$ git log -p -2    #オプション:直近2エントリ(-2)の変更点を表示(-p)
$ git log --stat.  #オプション:変更されたファイル一覧を表示
監視するファイルを管理するためには.gitignoreファイルを編集する。
タグ
#タグを見る
$ git tag
$ git tag -l "v1.8.5*" #オプション:特定バージョンを見る
#タグを追加する
$ git tag -a v1.4 -m "my version 1.4"
#タグはデフォルトではpushされないので、オプション指定する必要がある
$ git push [remote-name] --tags
リモートでの作業
#設定したリモートサーバを確認する
$ git remote   #=> origin
$ git remote -v
#サーバから取ってくる?
#ただし、データをローカルリポジトリに引き出すだけ。
#ローカルの環境にマージされたり作業中の内容を書き換えたりすることはない。
$ git fetch
#
リモートブランチを追跡するためのブランチを作成すれば (次のセクションと Git のブランチ機能 で詳しく説明します)、git pull コマンドを使うことができます。 これは、自動的にフェッチを行い、リモートブランチの内容を現在のブランチにマージします。 おそらくこのほうが、よりお手軽で使いやすいことでしょう。 また、 git clone コマンドはローカルの master ブランチ(実際のところ、デフォルトブランチであれば名前はなんでもかまいません)がリモートの master ブランチを追跡するよう、デフォルトで自動設定します。 git pull を実行すると、通常は最初にクローンしたサーバーからデータを取得し、現在作業中のコードへのマージを試みます。
$ git pull
リモートへのプッシュ
#git push [remote-name] [branch-name] 省略しても大丈夫そう?
$ git push origin master
リモートの情報を知る
$ git show [remote-name]
リモートでフックを設定して、自動でベアリポジトリからプルする設定をする
* http://www.nekotricolor.com/entry/theory-of-bare-and-non-bare-repository-manage-wordpress-themes-with-git
http://qiita.com/tukiyo3/items/efd0132a5baec8326969
簡易参照:http://qiita.com/fnobi/items/98bd5d1c83c010842733
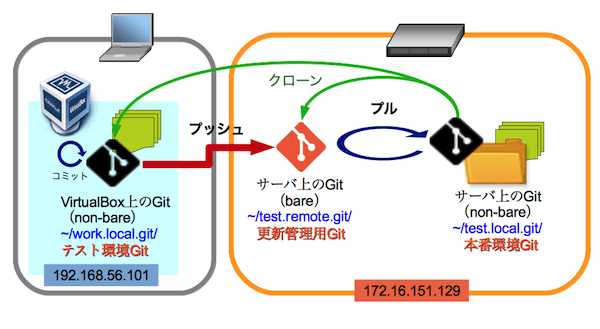
-画像出典
リモートサーバ上のノンベアリポジトリ、つまり本番環境のリポジトリは、「ベアリポジトリが更新されたらプルする」ということしかやりません。本番環境のテーマファイルを直接いじることはないという前提です。ですので自動化できます。
「○○されたら☓☓する」というのは、Gitでは「フック」という仕組みを使って実行できます。
サーバ側にあらかじめせちしておいたベアリポジトリのhooksフォルダにpost-receiveというファイルを作成して、次のように記述します。
#!/bin/sh

cd /home/fnobi/sites/my-website
git --git-dir=.git pull
--git-dir=.gitが無いとremote: fatal: Not a git repository: '.'と出ておこられます。
$ chmod +x post-receiveして実行権を付与するのを忘れずに!
これで次からローカルよりgit pushすればフックによってサーバ側で自動でpullしてくれる!
成功・失敗はgit pushするとremote:の行が出てくるからそこで確認できる。
エイリアス
$ git config --global alias.ci commit
#上のようにconfigでエイリアスを登録すれば、以下の二つが同じ効果を持つ
$ git ci
$ git commit
ただのメモ:ユーザー名とメールアドレスを指定しないと…
Alita:qiu.jp qiushi$ git commit -a -m 'successfully run rails on localhost'
[master 3fcbc24] successfully run rails on localhost
 Committer: Qiushi Pan <qiushi@Alita.local>
Your name and email address were configured automatically based
on your username and hostname. Please check that they are accurate.
You can suppress this message by setting them explicitly. Run the
following command and follow the instructions in your editor to edit
your configuration file:

    git config --global --edit

After doing this, you may fix the identity used for this commit with:

    git commit --amend --reset-author

 2 files changed, 2 insertions(+)
Alita:qiu.jp qiushi$
origin以外のリモートを追加する
git remote add {remote name. ex:origin} {address. ex:name@10.0.0.1:/Users/name/project_folder.git}
いろいろ設定し終えて見ると普段使いのコマンドがこんなにシンプルに!
$ git add -A
$ git commit -a -m 'leave comment here'
$ git push