もちろん、ライブラリを使った話です。
開発環境
| version | |
|---|---|
| Swift | 2.1.1 |
| OS | El Capitan 10.11.1 |
| pod | 1.0.1 |
使用ライブラリ
MDCSwipeToChooseを用います。
参考の実装
こちらを参考にさせていただきました。
手元で試そうと思ったところ、いろいろつっかえてしまったので、正常動作するまでに気をつけるポイントを述べます。
動くまでの手順(ざっくり)
- Xcodeでディレクトリ作成
- pod installでライブラリを取り入れる
- BridgeHeaderファイルを作成/Building Settings読み込み設定
- コードを記述
- 動作確認
Xcodeでディレクトリ作成
Xcodeでプロジェクトを作成します。
Single View Applicationでいいと思います
pod installでライブラリを取り入れる
Xcodeでプロジェクトを作成したら、ルートディレクトリへ移動し、
$ pod init
でPodfileを作成します。
これはライブラリの依存関係を記述するところで、
以下のコードを記述します
# Uncomment this line to define a global platform for your project
# platform :ios, '9.0'

target 'testProject' do
  pod "MDCSwipeToChoose"
end


target 'testProjectTests' do
inherit! :search_paths

  pod "MDCSwipeToChoose"
end

target 'testProjectUITests' do
inherit! :search_paths
# Pods for testing
end
記述したら、
$ pod install
でライブラリをインストールします。
...さてライブラリのインストールが終わりましたでしょうか?
BridgeHeaderファイルを作成/Building Settings読み込み設定
BridgeHeaderファイルを作成
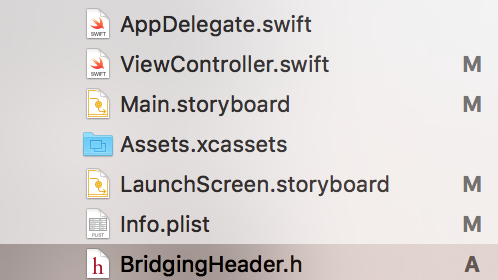
続いて、BridgeHeader.hファイルを追加します。
以下のように作成されることが目標です。
手順としては、
右クリックでファイル作成をする。このとき「Header File」を選択します。
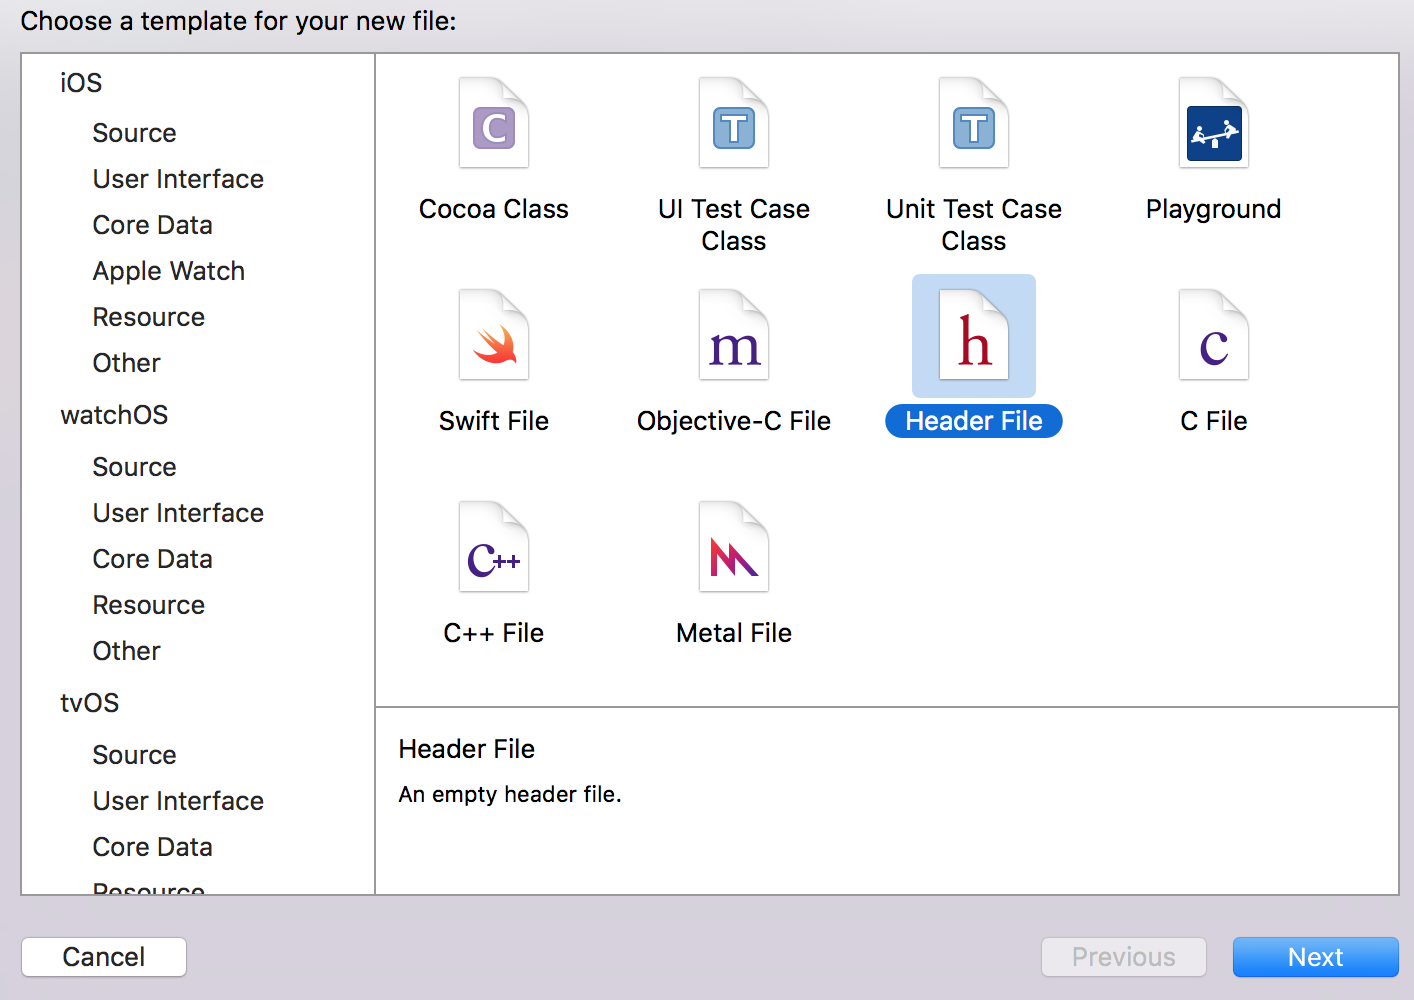
ファイル名は BridgeHeader.h にしましょう。
Building Settings読み込み設定
BridgeHeader.hを読み込むように設定しておく必要もあります。
これはXcodeの左サイドバーからプロジェクトファイルを選択し、「Build Settings」を開きます。
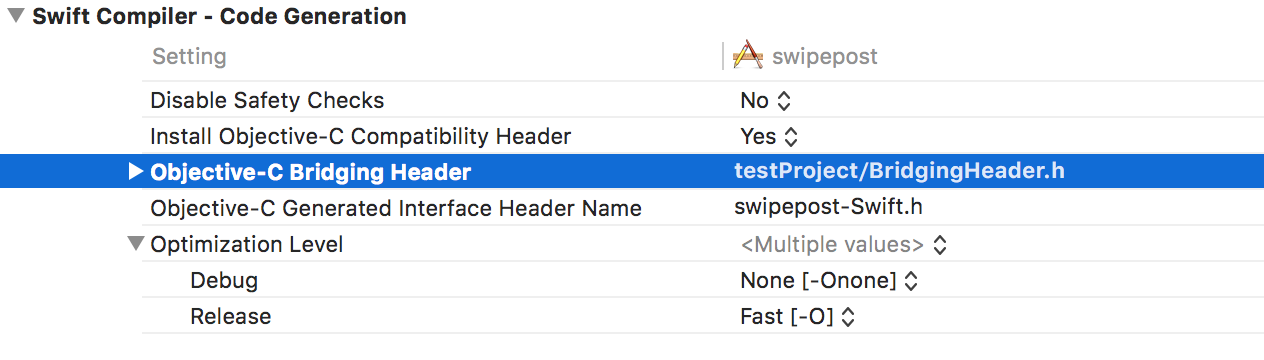
「Objective-c Bridging Header」で
<プロジェクト名>/BridgingHeader.h
と記述します。
コードを記述
最終手順です。
ViewController.swiftにこちらを貼ってください。
import UIKit

class ViewController: UIViewController, MDCSwipeToChooseDelegate {
    var swipeCount = 0
    var photoURL = [
        "http://up.gc-img.net/post_img_web/2013/03/a3a43755438b42d881929eefc7161191_0.jpeg",
        "http://pic.prepics-cdn.com/pib1298076039/5731792_218x291.gif",
        "http://omosoku.com/wp-content/uploads/misawa-225x300.gif"
    ]

    override func viewDidLoad() {
        super.viewDidLoad()

        let swipeView1 = createSwipeView(photoURL[0])
        self.view.addSubview(swipeView1)

        let swipeView2 = createSwipeView(photoURL[1])
        self.view.insertSubview(swipeView2, belowSubview: swipeView1)

        let swipeView3 = createSwipeView(photoURL[2])
        self.view.insertSubview(swipeView3, belowSubview: swipeView2)
    }

    func createSwipeView(url: String) -> UIView {
        let options = MDCSwipeToChooseViewOptions()
        options.delegate = self
        options.likedText = "Like"
        options.likedColor = UIColor.greenColor()
        options.nopeText = "Later"
        options.nopeColor = UIColor.lightGrayColor()

        let swipeView = MDCSwipeToChooseView(
            frame: CGRect(
                x: 0,
                y: 100,
                width: self.view.bounds.size.width,
                height: self.view.bounds.size.height - 300
            ),
            options: options
        )
        let imageURL = NSURL(string: url)
        swipeView.imageView.image = UIImage(data: NSData(contentsOfURL: imageURL!)!)

        return swipeView
    }

    func view(view: UIView!, wasChosenWithDirection direction: MDCSwipeDirection) {
        if (direction == MDCSwipeDirection.Left) {
        } else {
        }
        swipeCount++
    }
}
以上です!
動作確認
動作確認をする際は、 ルートディレクトリにある<プロジェクト名>.xcworkspace を起動してください。
動かない場合
実はHTTPリクエスト箇所でエラーが発生したりします。
そういう時は、以下のInfo.plistを変更すれば良いです。
App Transport Security Settingというkeyはそもそも最初は存在しないので追加することになります。

参考) http://qiita.com/akatsuki174/items/176886ac9f695e2f3d29
これで動くかと思います。