iOS ベータ機能(2019/7月現在)で利用可能な、ARKit3 の Motion Capture 機能を使った 2D Skeleton の可視化について、公式には載っていなくて少し手こずったので共有します。
はじめに
この記事では以下について紹介します。
- Motion Capture では何ができる?
- 2D Body Detection の有効化
- 2D Skeleton の取得
- 2D Skeleton の可視化
機材・環境
※絶対にバージョンを揃えてください。これ以外のバージョンでは動かない可能性大です。
- iPhone XR
- iOS13 Beta4
- MacBook Pro (15-inch, 2017)
- XCode 11 Beta4 版をインストール
Motion Capture では何ができる?
Motion Capture 機能はARKit3にて導入された 人体の各部位の動きを捉える 機能になります。Machine Learningを利用しているため、RGBカメラ1つで実現しています。これにより、体の動きに合わせてアバターを動かしたり、行動認識に応用したり、体を使ってバーチャルオブジェクトとインタラクションをしたりなどが可能になります。
より詳しく知りたい場合は、WWDC19でのこの動画の15:10~を確認すると良いと思います。動画内で紹介されていますが、奥行き情報も含めた3次元座標を返す3D Body Detectionと、カメラ画像上における2次元座標を返す2D Body Detectionがあり、今回は2Dに焦点を当てます。というのも3Dはすでにサンプルプロジェクトが提供されているからです。
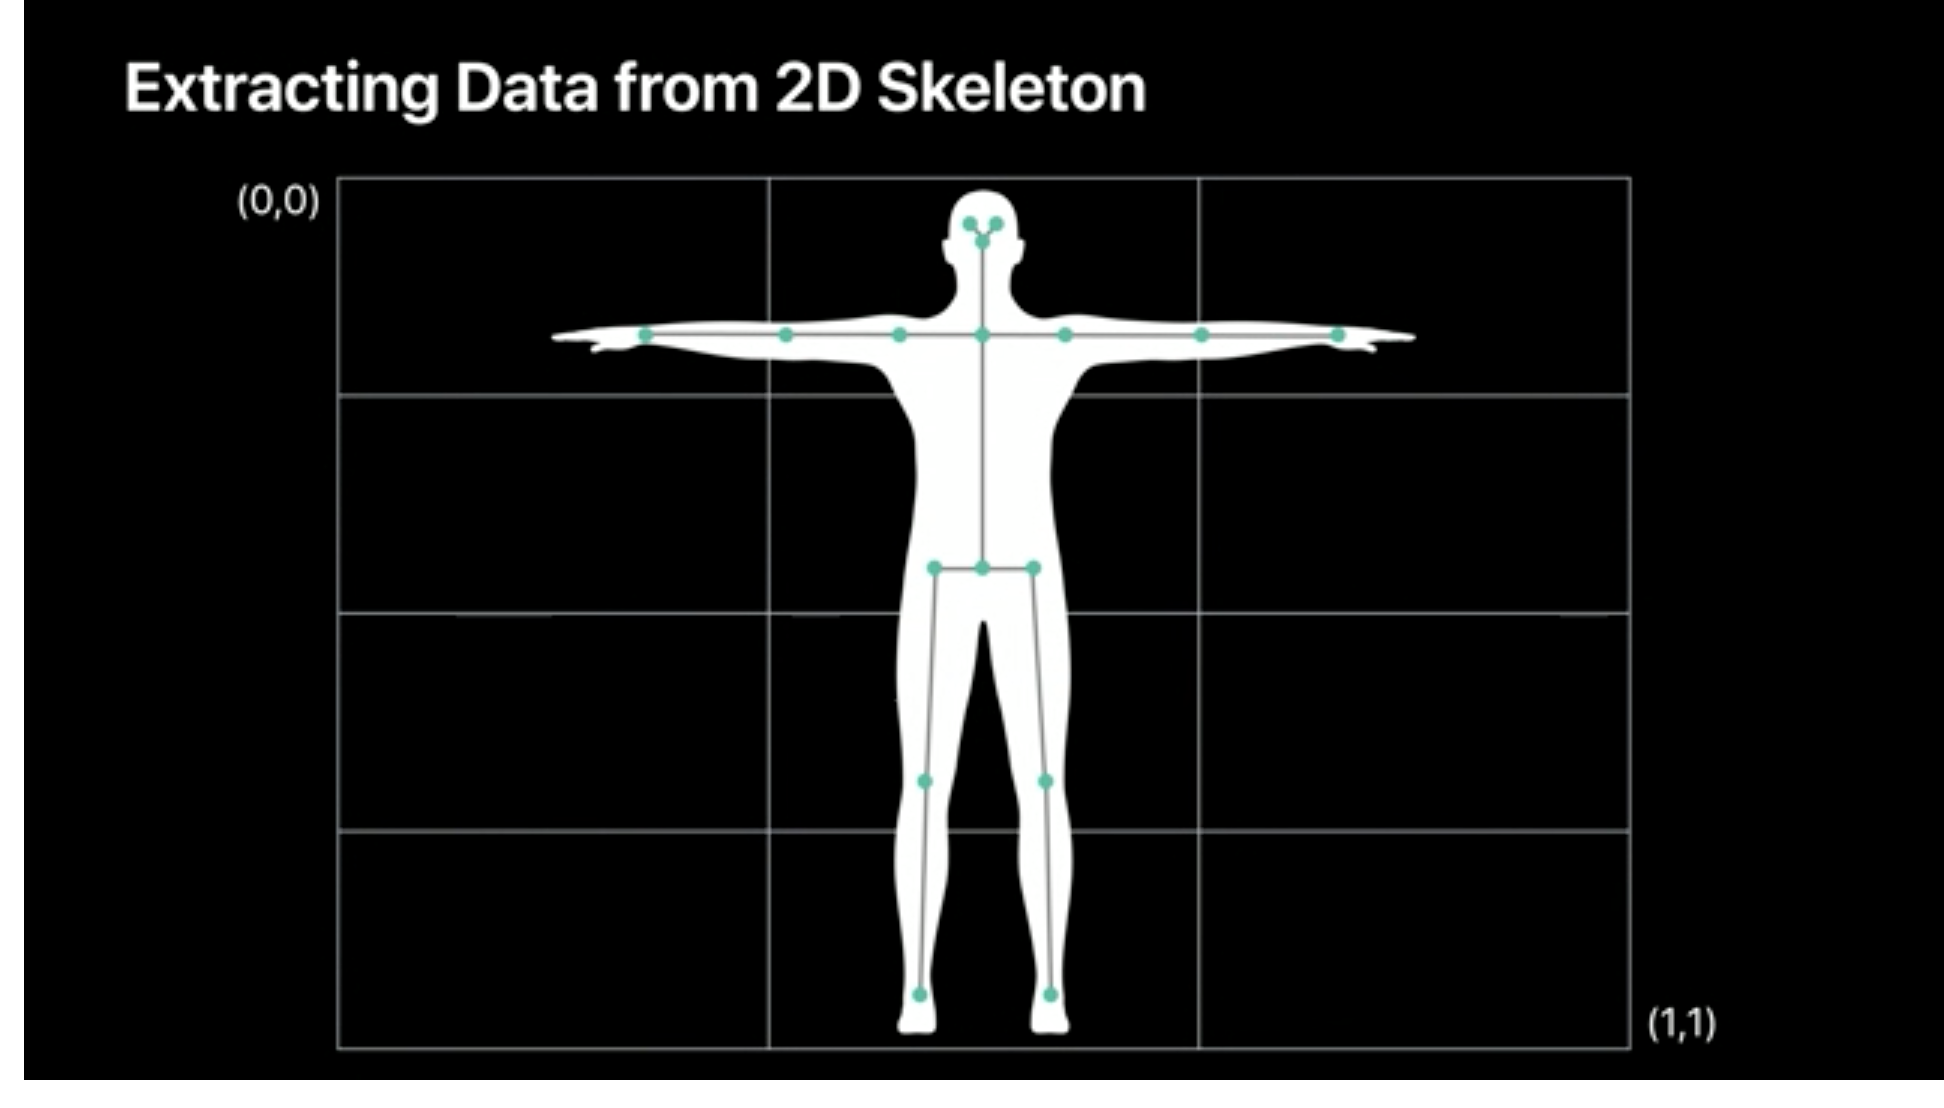
2D Skeletonのイメージ図(公式の動画 Bringing People into ARより引用)
2D Body Detection の有効化
Body Detectionは標準機能ではないため、有効にする必要があります。ARKitでは、ARViewのsessionに特定のコンフィグをセットすることで機能を有効化できます。
Body Detectionを有効化するには、以下のように ARBodyTrackingConfiguration を用います。ただそれだけでは3Dのみが有効化されるので、frameSemantics に .bodyDetection を加える必要があります。起動してすぐにこの機能を使いたい場合は、 ViewDidAppear や ViewDidLoad に記述すると良いでしょう。
// Body Detection 有効化
let configuration = ARBodyTrackingConfiguration()
// 2D 有効化
configuration.frameSemantics.insert(.bodyDetection)
arView.session.run(configuration)
2D Skeleton の取得
2D Skeleton のジョイント(連結部)のViewにおける座標を取得します。2D Body情報は ARFrame.detectedBody が持っているので、ARFrame が更新されるたびに新しい座標を得られるように、以下の delegate を利用しましょう。
func session(_ session: ARSession, didUpdate frame: ARFrame)
ジョイントの座標は detectedBody.skeleton.jointLandmarks に正規化された0 ~ 1の値で格納されています。公式のドキュメントには
The joint landmarks are normalized within the range [0..1] in the coordinate space of the current frame's camera image, where 0 is the upper left, and 1 is the bottom right.
と書いてありますが、簡単に言うと、左上を0,右下を1とした正規カメラ画像座標になっているということです。なのでこのままだとView上に描画できないので、座標変換する必要があります。ここで単純に「あ〜、正規画像座標ね。 View の width と height を掛ければいいじゃん。楽勝〜」という気持ちで復元してはいけません。私はこの間違いを犯しましたが...
なぜならこれは正規カメラ画像座標だからです。カメラの座標とViewの座標は異なるものなのです。なので、この2つの座標系間の変換をするための行列が必要になります。それが以下に書かれています。ここではさらにOrientationを取得することでアプリの回転にも対応しています。
// アプリのOrientationを取得
guard let interfaceOrientation = arView.window?.windowScene?.interfaceOrientation else { return }
// カメラ画像座標からView座標への変換行列を取得
let transform = frame.displayTransform(for: interfaceOrientation, viewportSize: arView.frame.size)
行列がわかれば、あとは正規カメラ画像座標に適用してあげればいいので、その座標を landmark とすると、
let normalizedCenter = CGPoint(x: CGFloat(landmark[0]), y: CGFloat(landmark[1])).applying(transform)
let center = normalizedCenter.applying(CGAffineTransform.identity.scaledBy(x: arView.frame.width, y: arView.frame.height))
このように対応するView上の座標 center を得ることができます。
2D Skeleton の可視化
先程得られた center を中心にした円を View 上に描画します。今回は UIBezierPath を View の Layer に追加することで実現しました。
let circleWidth: CGFloat = 10
let circleHeight: CGFloat = 10
// 円が描画される矩形領域を定義
let rect = CGRect(origin: CGPoint(x: center.x - circleWidth/2, y: center.y - circleHeight/2), size: CGSize(width: circleWidth, height: circleHeight))
// 円を定義
let circleLayer = CAShapeLayer()
circleLayer.path = UIBezierPath(ovalIn: rect).cgPath
// ViewのLayerに追加
arView.layer.addSublayer(circleLayer)
忘れてはいけないのが、この追加した Layer を Frame が更新されるたびにリセットする必要があるということです。そうしないと前の Frame で描かれた円がそのまま View に残ってしまうからです。 Layer を親から取り除くことで実現します。
private func ClearCircleLayers() {
    arView.layer.sublayers?.compactMap { $0 as? CAShapeLayer }.forEach { $0.removeFromSuperlayer() }
}
表示結果
写真に写っている人物にもちゃんと反応しますね。このように連結部に円が打たれているような表示になります。

おわりに
参考までにコードも載せておきます。改善方法やご意見などあれば、是非コメントください!
import UIKit
import RealityKit
import ARKit
import Combine

class ViewController: UIViewController, ARSessionDelegate {

    @IBOutlet var arView: ARView!

    override func viewDidAppear(_ animated: Bool) {
        super.viewDidAppear(animated)
        arView.session.delegate = self

        // If the iOS device doesn't support body tracking, raise a developer error for
        // this unhandled case.
        guard ARBodyTrackingConfiguration.isSupported else {
            fatalError("This feature is only supported on devices with an A12 chip")
        }

        let configuration = ARBodyTrackingConfiguration()
        configuration.frameSemantics.insert(.bodyDetection)
        arView.session.run(configuration)
    }

    func session(_ session: ARSession, didUpdate frame: ARFrame) {
        ClearCircleLayers()

        if let detectedBody = frame.detectedBody {
            guard let interfaceOrientation = arView.window?.windowScene?.interfaceOrientation else { return }
            let transform = frame.displayTransform(for: interfaceOrientation, viewportSize: arView.frame.size)

            detectedBody.skeleton.jointLandmarks.forEach { landmark in
                let normalizedCenter = CGPoint(x: CGFloat(landmark[0]), y: CGFloat(landmark[1])).applying(transform)
                let center = normalizedCenter.applying(CGAffineTransform.identity.scaledBy(x: arView.frame.width, y: arView.frame.height))
                let circleWidth: CGFloat = 10
                let circleHeight: CGFloat = 10
                let rect = CGRect(origin: CGPoint(x: center.x - circleWidth/2, y: center.y - circleHeight/2), size: CGSize(width: circleWidth, height: circleHeight))
                let circleLayer = CAShapeLayer()
                circleLayer.path = UIBezierPath(ovalIn: rect).cgPath

                arView.layer.addSublayer(circleLayer)
            }
        }
    }

    private func ClearCircleLayers() {
        arView.layer.sublayers?.compactMap { $0 as? CAShapeLayer }.forEach { $0.removeFromSuperlayer() }
    }
}