Vagrantで作成したVirtualBoxで仮想ディスクサイズを変更する方法
0) 事前確認
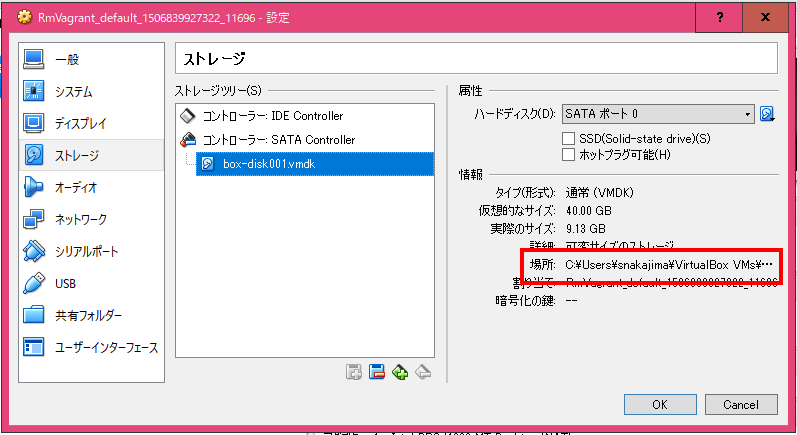
VirtualBoxでvmdkファイルの場所を確認しておく。(下図を参照)

今回は、「 C:\Users(user)\VirtualBox VMs\Vagrant_default_1506839927322_11696\box-disk001.vmdk 」とする。
1) vmdkファイルからvdiファイルにクローンする
"C:\Program Files\Oracle\VirtualBox\VBoxManage.exe" clonehd "C:\Users\(user)\VirtualBox VMs\Vagrant_default_1506839927322_11696\box-disk001.vmdk" "C:\Users\(user)\VirtualBox VMs\Vagrant_default_1506839927322_11696\clone.vdi" --format vdi
2) vdiファイルのサイズを圧縮する
"C:\Program Files\Oracle\VirtualBox\VBoxManage.exe" modifyhd "C:\Users\(user)\VirtualBox VMs\Vagrant_default_1506839927322_11696\clone.vdi" compact
3) サイズを変更する(150GBに変更)
"C:\Program Files\Oracle\VirtualBox\VBoxManage.exe" modifyhd "C:\Users\(user)\VirtualBox VMs\Vagrant_default_1506839927322_11696\clone.vdi" --resize 153600
4) vdiファイルからvmdkファイルにクローンし直す
※vmdkファイルは、box-disk001_clone.vmdkとする。
"C:\Program Files\Oracle\VirtualBox\VBoxManage.exe" clonehd "C:\Users\(user)\VirtualBox VMs\Vagrant_default_1506839927322_11696\clone.vdi" "C:\Users\(user)\VirtualBox VMs\Vagrant_default_1506839927322_11696\box-disk001_clone.vmdk" --format vmdk
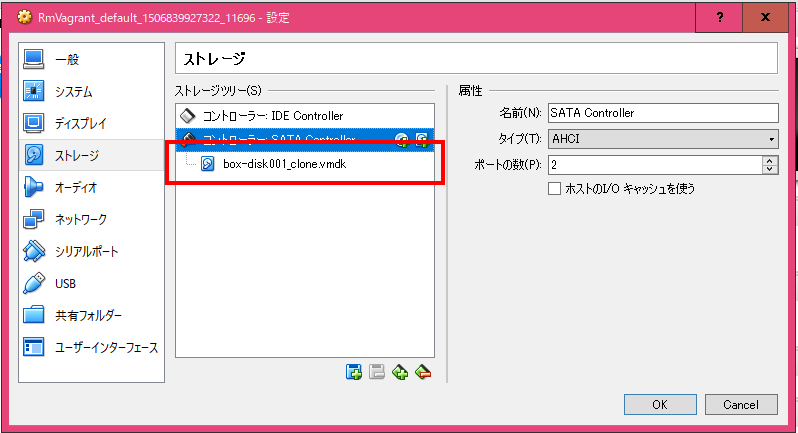
5) VirtualBoxでクローンしたディスクに付け替える
6) VM内でディスク設定
[vagrant@xxxx ~]$ sudo -s

[root@xxxx vagrant]# df -h
Filesystem               Size  Used Avail Use% Mounted on
/dev/mapper/centos-root   39G  9.0G   30G  24% /
devtmpfs                 1.9G     0  1.9G   0% /dev
tmpfs                    1.9G     0  1.9G   0% /dev/shm
tmpfs                    1.9G  8.4M  1.9G   1% /run
tmpfs                    1.9G     0  1.9G   0% /sys/fs/cgroup
/dev/sda1                497M  120M  378M  24% /boot
tmpfs                    380M     0  380M   0% /run/user/994
none                     232G  199G   34G  86% /vagrant
none                     232G  199G   34G  86% /var/www/vagrant
tmpfs                    380M     0  380M   0% /run/user/1000

[root@xxxx vagrant]# fdisk /dev/sda
Welcome to fdisk (util-linux 2.23.2).

Changes will remain in memory only, until you decide to write them.
Be careful before using the write command.


Command (m for help): n ←入力
Partition type:
   p   primary (2 primary, 0 extended, 2 free)
   e   extended
Select (default p): p ←入力
Partition number (3,4, default 3): 3 ←入力
First sector (83886080-314572799, default 83886080): (Enter) ←入力
Using default value 83886080
Last sector, +sectors or +size{K,M,G} (83886080-314572799, default 314572799): (Enter) ←入力
Using default value 314572799
Partition 3 of type Linux and of size 110 GiB is set


Command (m for help): t ←入力
Partition number (1-3, default 3): 3 ←入力
Hex code (type L to list all codes): 8e ←入力
Changed type of partition 'Linux' to 'Linux LVM'


Command (m for help): p ←入力

Disk /dev/sda: 161.1 GB, 161061273600 bytes, 314572800 sectors
Units = sectors of 1 * 512 = 512 bytes
Sector size (logical/physical): 512 bytes / 512 bytes
I/O size (minimum/optimal): 512 bytes / 512 bytes
Disk label type: dos
Disk identifier: 0x000982f5

   Device Boot      Start         End      Blocks   Id  System
/dev/sda1   *        2048     1026047      512000   83  Linux
/dev/sda2         1026048    83886079    41430016   8e  Linux LVM
/dev/sda3        83886080   314572799   115343360   8e  Linux LVM

Command (m for help): w ←入力
The partition table has been altered!

Calling ioctl() to re-read partition table.

WARNING: Re-reading the partition table failed with error 16: Device or resource busy.
The kernel still uses the old table. The new table will be used at
the next reboot or after you run partprobe(8) or kpartx(8)
Syncing disks.

[root@xxxx vagrant]#


(再起動: vagrant halt)


[vagrant@xxxx ~]$ sudo -s

[root@xxxx vagrant]# pvcreate /dev/sda3
  Physical volume "/dev/sda3" successfully created

[root@xxxx vagrant]# vgdisplay
  --- Volume group ---
  VG Name               centos
  System ID
  Format                lvm2
  Metadata Areas        1
  Metadata Sequence No  3
  VG Access             read/write
  VG Status             resizable
  MAX LV                0
  Cur LV                2
  Open LV               2
  Max PV                0
  Cur PV                1
  Act PV                1
  VG Size               39.51 GiB
  PE Size               4.00 MiB
  Total PE              10114
  Alloc PE / Size       10103 / 39.46 GiB
  Free  PE / Size       11 / 44.00 MiB
  VG UUID               X4tH7D-dQ99-gATd-QS3m-cYDm-sXGQ-XShDjH

[root@xxxx vagrant]# vgextend centos /dev/sda3
  Volume group "centos" successfully extended

[root@xxxx vagrant]# lvextend -l +100%FREE /dev/mapper/centos-root
  Size of logical volume centos/root changed from 38.46 GiB (9847 extents) to 148.50 GiB (38017 extents).
  Logical volume root successfully resized

[root@xxxx vagrant]# xfs_growfs /dev/mapper/centos-root
meta-data=/dev/mapper/centos-root isize=256    agcount=4, agsize=2520832 blks
         =                       sectsz=512   attr=2, projid32bit=1
         =                       crc=0        finobt=0
data     =                       bsize=4096   blocks=10083328, imaxpct=25
         =                       sunit=0      swidth=0 blks
naming   =version 2              bsize=4096   ascii-ci=0 ftype=0
log      =internal               bsize=4096   blocks=4923, version=2
         =                       sectsz=512   sunit=0 blks, lazy-count=1
realtime =none                   extsz=4096   blocks=0, rtextents=0
data blocks changed from 10083328 to 38929408

[root@xxxx vagrant]# df -h
Filesystem               Size  Used Avail Use% Mounted on
/dev/mapper/centos-root  149G  9.0G  140G   7% /
devtmpfs                 1.9G     0  1.9G   0% /dev
tmpfs                    1.9G     0  1.9G   0% /dev/shm
tmpfs                    1.9G  8.4M  1.9G   1% /run
tmpfs                    1.9G     0  1.9G   0% /sys/fs/cgroup
/dev/sda1                497M  120M  378M  24% /boot
tmpfs                    380M     0  380M   0% /run/user/994
none                     232G  199G   34G  86% /vagrant
none                     232G  199G   34G  86% /var/www/vagrant
tmpfs                    380M     0  380M   0% /run/user/1000

[root@xxxx vagrant]#

