経緯
なんか最近Twitterの規制が強くなったのか、やたらと色んな人のTwitterアカウントが凍結される事例が散見されます。
恐らくですが、何らかの禁止ワードが含まれていると、自動的にロックされるのではないかと予測されますが、何かしらユーザとして対処できるものはないかと考えておりましたが。
つい先日、くろば・U先生がTwitterで
ひらめき pic.twitter.com/W82JKu2rHo
— くろば・U@2日目東7あ14b (@cloba_____U) 2017年11月14日
と言うようなことを仰られ、以下のアイデアがピンと閃きました。
- 適当なCRUD機能を持つWebアプリをHerokuに作る
- ImageMagickでテキストを画像に変換する
- 変換された画像をCloudinaryにアップロードする
- アップロードされた画像のURLを取得してTwitterに投稿
思いつきのレベルだったんですが、ちょっと調べてみるとHerokuはImageMagickが使えるとのことなので、RMagick経由で画像生成してみたら行けるんじゃない? というノリで作ってみました。
作ったものは以下の通りです。
「Hagaki」
https://hagakipost.herokuapp.com/
Twitterアカウントでログインし、適当なテキストをツイート後、作成されたページからTweetボタンを押すとTwitterCard設定がされたURLがTwitterに投稿されます。
Webアプリの作成
ここらあたりは普通のRailsアプリとして作成します。
方法はググれば幾らも出てくるので省略しますが、Rails5.1で作ってみました。
ぶっちゃけBootstrap使いたいだけなのにWebpackerが矢鱈メンドかった。。
単純なCRUDなのでscaffoldで生成してもいいですが、今回は画像の生成とアップロードを間に挟むので少し手を加えています。
モデルはこんな感じにしてます。
  create_table "tweets", force: :cascade do |t|
    t.integer "user_id"
    t.text "content", null: false
    t.string "public_id", null: false
    t.datetime "created_at", null: false
    t.datetime "updated_at", null: false
    t.text "pic"
    t.index ["user_id"], name: "index_tweets_on_user_id"
  end
最初マルチテナントで考えていたので、ユーザ:Tweetが1:Nで考えていたのですが、結局無理そう(後述)なのでこの設定は削除する予定です。
public_idはCloudinaryにアップロードした画像のID指定に、picはアップロードした画像情報(これも後述)を格納します。
正直、picの中にpublic_idが含まれるので重複していると言えばそうですが、、(あんまりCloudinaryの仕様を調べずに設計してしまった)
画像生成の仕組みはこんな感じです。
  def create_image(content, public_id)
    content = content.scan(/.{1,#{20}}/).join('\n') # テキストを20文字で改行する
    image = Image.new(640, 480) # 画像サイズは640x480の決め打ち
    draw = Draw.new
    draw.font = Rails.root.join('.fonts/ipaexg.ttf').to_s # フォント指定(後述)
    draw.pointsize = 24
    draw.annotate(image, 640, 480, 50, 50, content)
    image.write("/tmp/#{public_id}.png") # 画像をtmpの下に書き出す
  end
Herokuのデフォルト状態だと日本語を表示するフォントがないので、別途用意する必要があります。
今回はIPAのフォントを使用しました。
Rails.rootの直下に.fonts/ディレクトリを作ってそこに入れています。
Cloudinaryへのアップロード、画像削除処理は以下の通り。
  def upload_image(public_id)
    Cloudinary::Uploader.upload("/tmp/#{public_id}.png", :public_id => public_id) if Rails.env.production?
  end

  def destroy_image(public_id)
    Cloudinary::Uploader.destroy(public_id) if Rails.env.production?
  end
Cloudinary::Uploader.uploadの成功時は以下のようなパラメータが返ってくるので、picカラムにjson形式で保存しておきます。
参考 : https://cloudinary.com/documentation/upload_images#data_upload_options
{
 public_id: 'sample',
 version: '1312461204',
 width: 864,
 height: 564,
 format: 'jpg',
 created_at: '2017-08-10T09:55:32Z',
 resource_type: 'image',
 tags: [],
 bytes: 9597,
 type: 'upload',
 etag: 'd1ac0ee70a9a36b14887aca7f7211737',
 url: 'https://res.cloudinary.com/demo/image/upload/v1312461204/sample.jpg',
 secure_url: 'https://res.cloudinary.com/demo/image/upload/v1312461204/sample.jpg',
 signature: 'abcdefgc024acceb1c1baa8dca46717137fa5ae0c3',
 original_filename: 'sample'
}
後は表示画面で、Tweetボタンを設置します。
<script>!function(d,s,id){var js,fjs=d.getElementsByTagName(s)[0],p=/^http:/.test(d.location)?'http':'https';if(!d.getElementById(id)){js=d.createElement(s);js.id=id;js.src=p+'://platform.twitter.com/widgets.js';fjs.parentNode.insertBefore(js,fjs);}}(document, 'script', 'twitter-wjs');</script>
(略)
<a href="https://twitter.com/share" class="twitter-share-button" data-text="<%= @image_url %>" data-size="large">Tweet</a>
後はボタンを押せば投稿される、、、のですが、
画像が展開されない!!!
という致命的な欠陥を抱えているので、画像を見える形で投稿する場合は、以下の修正が必要になります。
OGP TwitterCardの設定
上記で設定した画像をOGPを設定したページのURLに設定することで、表示が可能になります。
新規で追加するURLだと/tweets/:id/imageという具合に設定します。
内容は以下の通りです。
<!DOCTYPE html>
<head prefix="og: http://ogp.me/ns# fb: http://ogp.me/ns/fb# article: http://ogp.me/ns/article#">
  <head>
    <meta property="og:title" content="hagaki" />
    <meta property="og:type" content="" />
    <meta property="og:url" content="https://hagakipost.herokuapp.com/" />
    <meta property="og:image" content="<%=@image_url %>" />
    <meta property="og:site_name"  content="hagaki" />
    <meta property="og:description" content="hagaki" />

    <!-- Twitter -->
    <meta name="twitter:title" content="hagaki" />
    <meta name="twitter:description" content="hagaki" />
    <meta name="twitter:card" content="summary_large_image">
    <meta name="twitter:site" content="https://hagakipost.herokuapp.com/" />
    <meta name="twitter:creator" content="@<%=@user.nickname %>">
    <meta name="twitter:image" content="<%=@image_url %>" />

    <!-- facebook -->
    <meta property="fb:app_id" content="<%=ENV['FACEBOOK_APP_ID'] %>" />
  </head>
  <body>
    <%= image_tag(@image_url) %>
  </body>
</html>
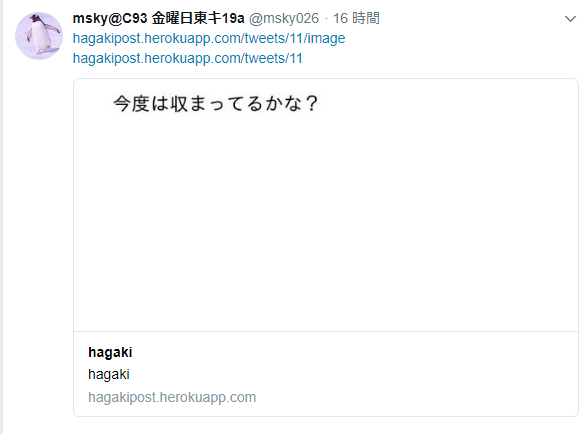
この設定後に投稿すると
という具合にTwitterCardで表示してくれます。
別案・TwitterAPIを使う
TwitterAPIのクレデンシャルを開発者サイトから取得し、RubyからTwitterの投稿が出来る準備をします。
ライブラリ
https://github.com/sferik/twitter
上記の画像生成までの手順は同じで、作成した画像を以下の手順でTwitterに投稿します。
t = TwitterAPI::Client.new({
  :consumer_key => 'YOUR_CONSUMER_KEY',
  :consumer_secret => 'YOUR_CONSUMER_SECRET',
  :token => 'YOUR_ACCESS_TOKEN',
  :token_secret => 'YOUR_ACCESS_SECRET'
}) # クライアント設定

image = File.open("/tmp/#{public_id}.png", 'rb').read
t.media_upload({'media' => image})
ただしこの方法だとTwitterのクレデンシャルを登録したアカウントに限られます。。
結論
もうMastodonでやればいいんじゃないのではないでしょうか。。。
まだまだ直すところは山積みですが、とりあえず当初の課題は何とかクリアできました。

