※ こちらの記事は古くなってきてしまっているのであれですが(近いうちに内容の更新をしたい…)、FirestoreはもちろんFirebaseにご興味ある方は、ConnpassのFirebase Japan User Groupに参加するといろいろと情報が得られると思いますのでぜひ。 (Slackのワークスペースもあるのでそちらもどうぞ)
運営でもなんでもないですが、宣伝でした。
はじめに
Firebaseを使用したアプリを作成しようと考えていたところ、Firestoreのベータ版がリリースされたとのことだったので、今後移行する可能性も考えて、使い勝手を試してみたいと思い使用してみました。
今回は、Swiftでのコーディングを試したいというところなので、GUIDESの内容で基本的なデータ操作まわりをざっと流したものをまとめた内容になります。
また、Realtime DatabaseとFirestoreの比較だとか、分析のような話はQittaの中で検索していただければ詳しい記事がご覧になれるかと思います。
事前準備
1.プロジェクトの追加
まず最初にFirebase を iOS プロジェクトに追加するの「アプリに Firebase を追加する」の内容を実行します。「SDKを追加する」以降は実行しないでください。
2.Firestoreの設定
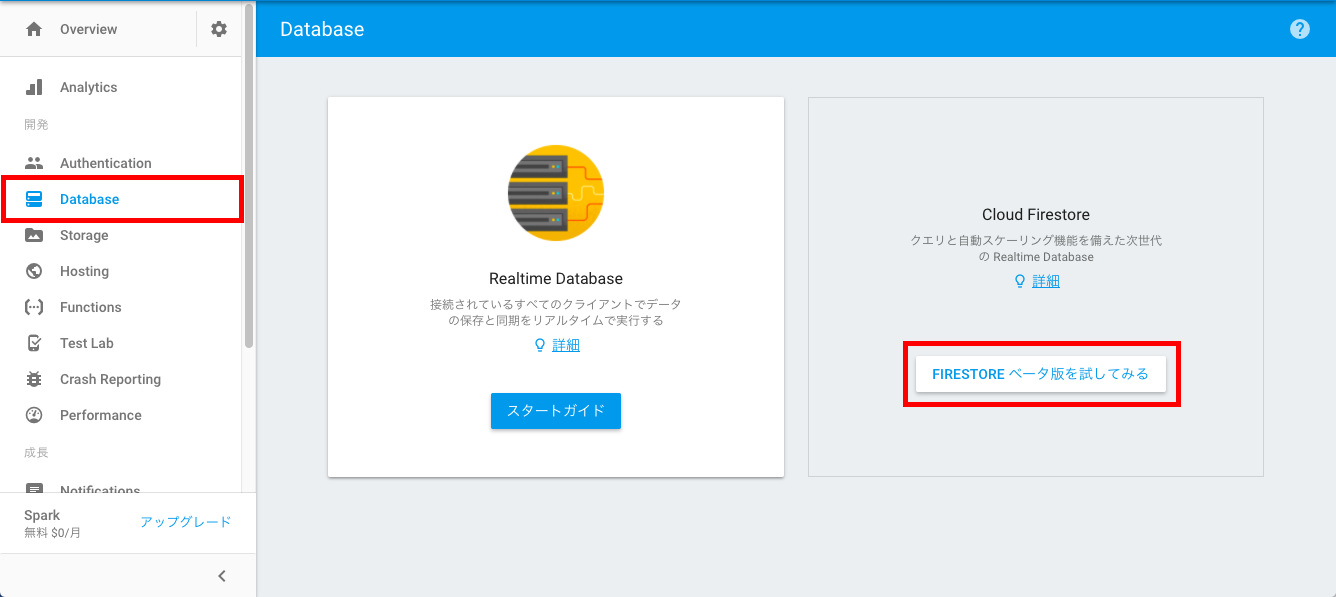
Firebaseコンソール画面で「Database」をを選択します。表示された「FIRESTOREベータ版を試してみる」をクリックしてください。
「Cloud Firestoreセキュリティ ルール」のプロンプトが表示されます。
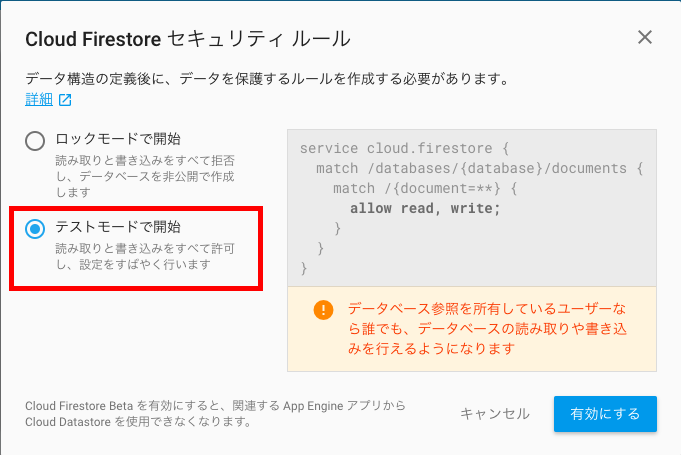
今回はテストなので「テストモードで開始」を選択しました。
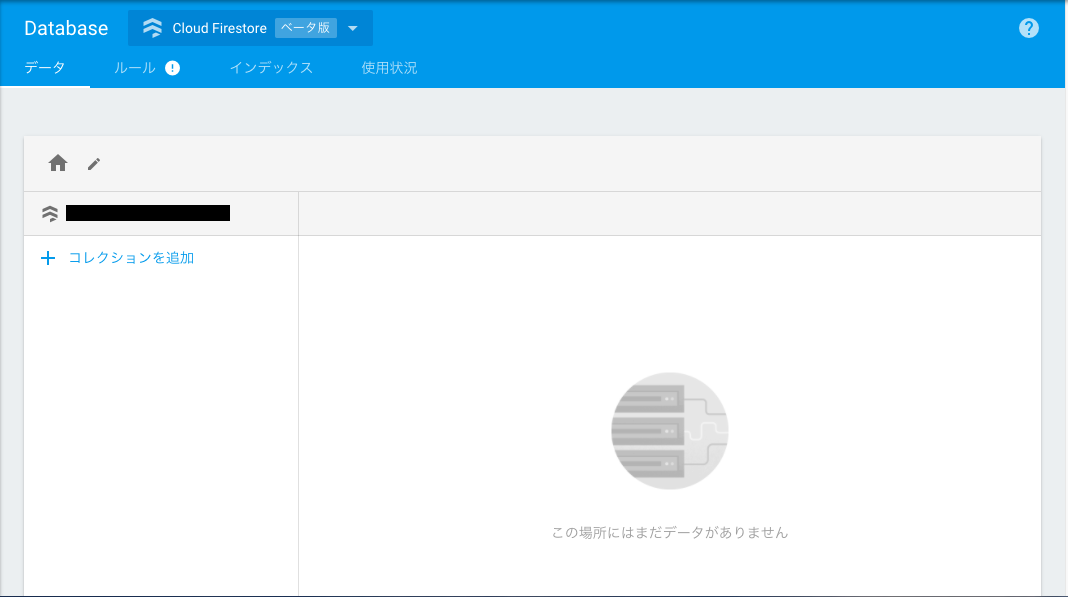
「有効にする」を選択して少し待つと、データベースの画面が表示されます。
ライブラリのインストール
CocoaPodsを使用してFirestoreをインストールします。リンク先にも記載がありますが、以下のようにPodfileへpod 'Firebase/Core'とpod 'Firebase/Firestore’を追加してpod installしてください。
# Uncomment the next line to define a global platform for your project
# platform :ios, '9.0'

target 'CloudFirestoreDemo' do
  # Comment the next line if you're not using Swift and don't want to use dynamic frameworks
  use_frameworks!

  # Pods for CloudFirestoreDemo

  pod 'Firebase/Core'
  pod 'Firebase/Firestore’

end
CocoaPodのインストール等についてわからない場合は、こちら【Swift】CocoaPods導入手順の記事等を参考にして導入してみてください。
Cloud Firestoreを設定する
Firestoreを使用するにあたって、Firebaseの初期化を行う必要があります。
1.Firebaseモジュールのインポート
import Firebase
2.FirebaseApp共有インスタンスの設定
FirebaseApp.configure()
上記の記述でFirebaseの初期化が行われるので、初期化後は適宜データベースの参照を定義して使用することが可能になります。
データの書き込み
Firestoreでは、Cloud Firestore Data Model(日本語ドキュメントは今のところ無いようです)に記載されている通りですが、collectionの中にdocumentが入っていて、documentに詳細なデータが書き込まれている状態で、JSONと同じような作りになります。
1.インスタンスの取得
データベースの読み書きを行うにはFirestoreのインスタンスが必要になります。
var defaultStore : Firestore!

defaultStore = Firestore.firestore()
2.データの書き込み
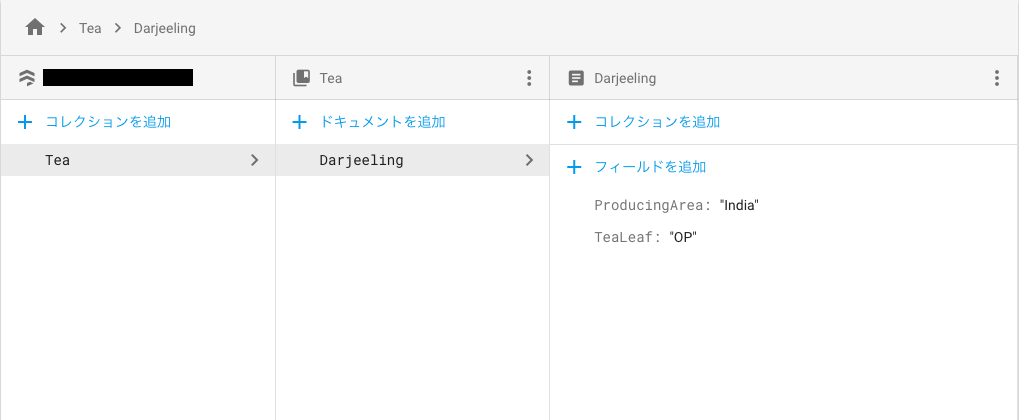
ドキュメントのIDを指定して単一のドキュメントを書き込むか上書きする場合は、setDataメソッドを使用することができます。
既に存在するドキュメントを指定して書き込んだ場合は、後から書き込んだ内容で上書きされます。
        defaultStore.collection("Tea").document("Darjeeling").setData([
            "ProducingArea": "India",
            "TeaLeaf": "OP"
        ]) { err in
            if let err = err {
                print("Error writing document: \(err)")
            } else {
                print("Document successfully written!")
            }
        }
書き込みに成功すると、データベースには以下のようにデータが追加されます。
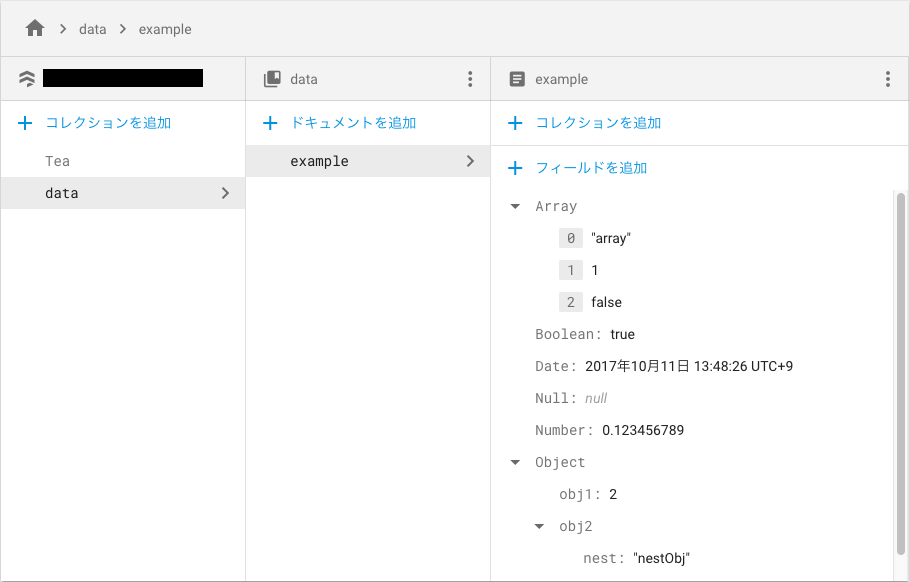
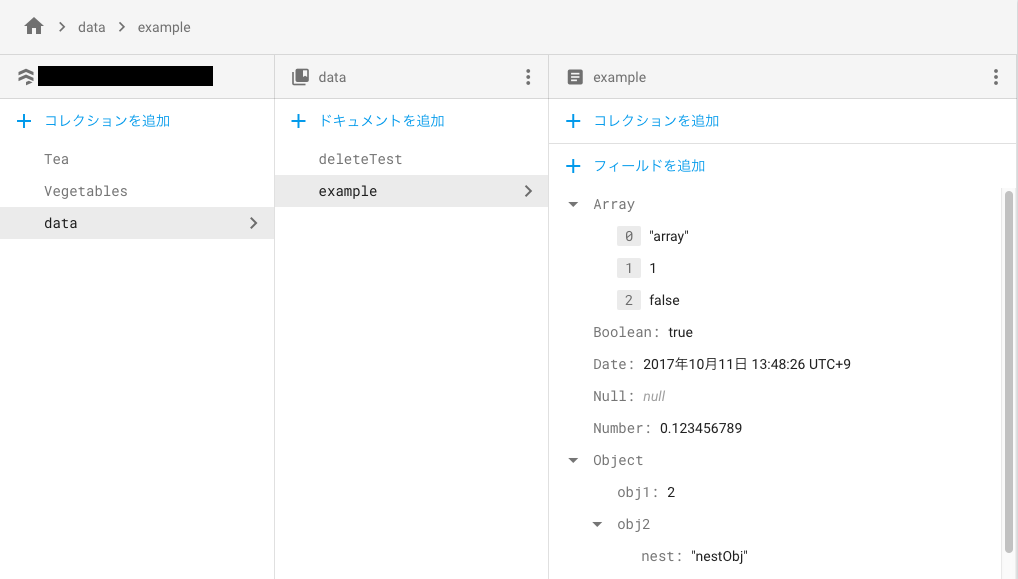
書き込みに使用できる型ですが、Supported Data Typesにある通りで、下記のようにドキュメントへはサポートされるデータ型を混在させて書き込むことが可能です。
        let data: [String: Any] = [
            "String": "string",
            "Boolean": true,
            "Number": 0.123456789,
            "Date": Date(),
            "Array": ["array", 1, false],
            "Null": NSNull(),
            "Object": [
                "obj1": 2,
                "obj2": ["nest": "nestObj"]
            ]
        ]

        defaultStore.collection("data").document("example").setData(data) { err in
            if let err = err {
                print("Error writing document: \(err)")
            } else {
                print("Document successfully written!")
            }
        }
上記を実行すると、以下のようにデータベースに追加されます。
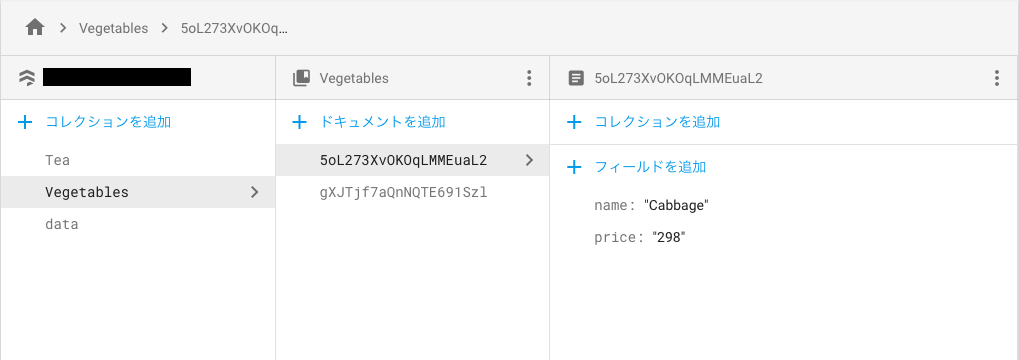
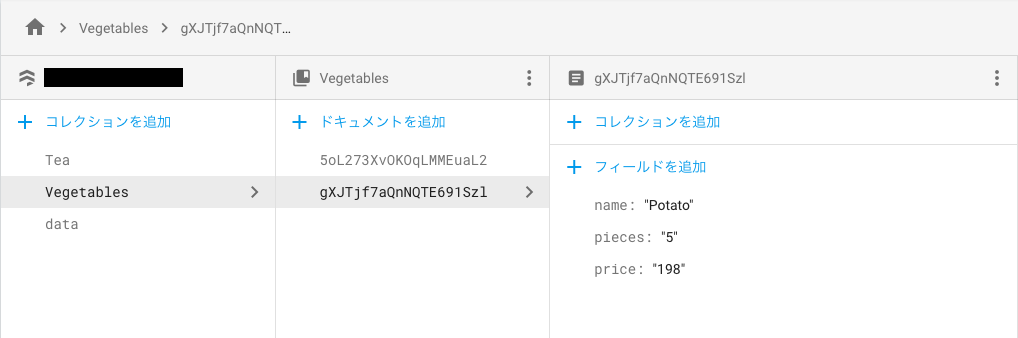
意味のあるドキュメントIDを指定する必要がない場合、addDocumentを使用しても、データの書き込みを行うことが可能です。addDocumentを使用した場合は、ドキュメントIDが自動で付番されます。
        var ref: DocumentReference?
        ref = defaultStore.collection("Vegetables").addDocument(data: [
            "name": "Cabbage",
            "price": "298"
        ]) { err in
            if let err = err {
                print("Error adding document: \(err)")
            } else {
                //ref(DocumentReference)に自動付番されたドキュメントIDが返ってくる
                print("Document added with ID: \(ref!.documentID)")
            }
        }
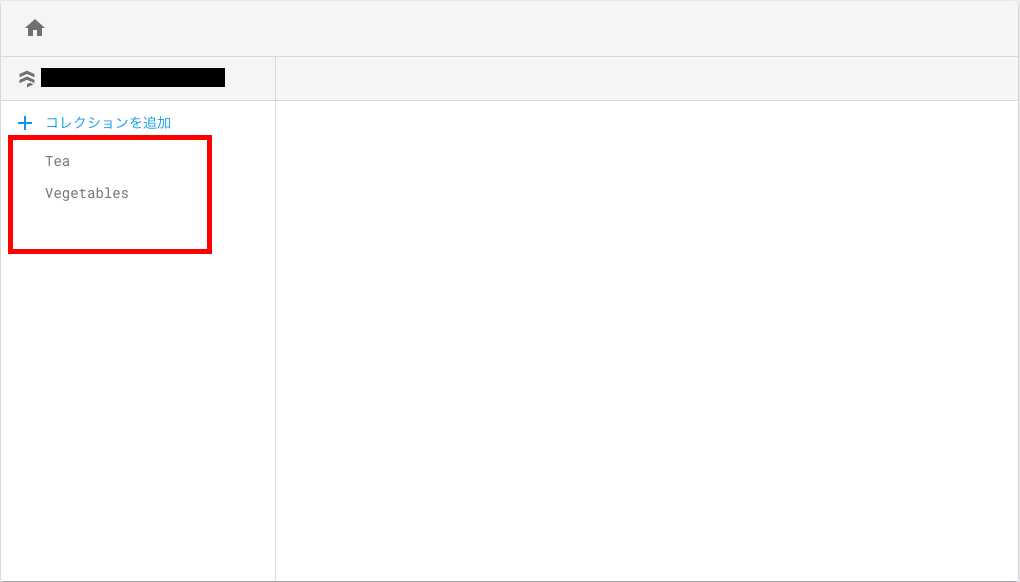
addDocumentでデータ追加を行うと、以下のようにデータベースに追加されていきます。
3.データの更新
ドキュメント全体を上書きせずに、一部のデータのみ追加・更新する場合はupdateDataを使用します。
        let ref = defaultStore.collection("Tea").document("Darjeeling")

        ref.updateData(["ProductionPhase" : "3〜11"]){ err in
            if let err  = err {
                print("Error update document: \(err)")
            }else{
                print("Document successfully update")
            }
        }
上記の更新を実行すると、データベースは以下のように変更されます。

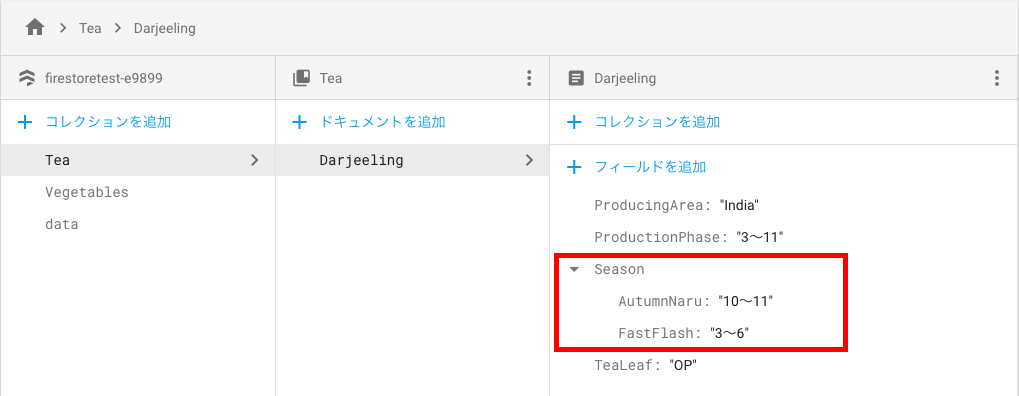
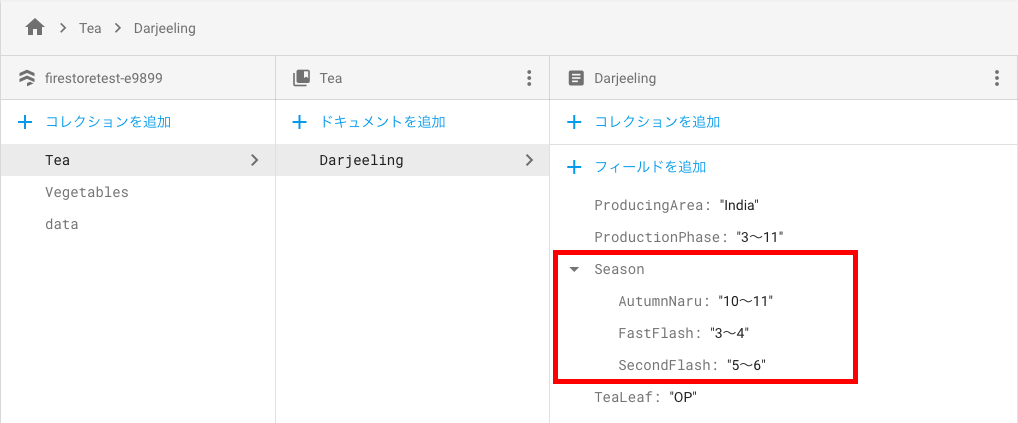
ネストしたデータの追加・更新は以下のように行うことができます。
       let ref = defaultStore.collection("Tea").document("Darjeeling")
       //①ネストデータの追加
       ref.updateData(["Season": ["FastFlash":"3〜6", "AutumnNaru":"10〜11"]]){err in
            if let err = err {
                print("Error update documet: \(err)")
            }else{
                print("Document successfully update")
            }
        }


       //②ネストデータの追加・更新
       ref.updateData(["Season.SecondFlash":"5〜6",
                         "Season.FastFlash":"3〜4"]){err in
                            if let err = err {
                                print("Error update documet: \(err)")
                            }else{
                                print("Document successfully update")
                            }
①実行時点ではデータベースは以下のようになります。
②実行時点ではデータベースは以下のようになります。
サーバタイムスタンプの保存、トランザクション処理、バッチ処理については、今回は記載しませんので、公式ドキュメントをご参照ください。(公式ドキュメントの内容で実行確認は行って正常に実行できました。)
4.データの削除
データの削除を行う場合、コレクション、ドキュメント、フィールドの各範囲で削除を行うことが可能です。
・削除実行前のデータベース
①ドキュメントの削除
以下の内容を実行して、dataコレクションのdeleteTestドキュメントを削除します。
        defaultStore.collection("data").document("deleteTest").delete(){ err in
            if let err = err{
                print("Error removing document: \(err)")
            }else{
                print("Document successfully removed!")
            }
        }
実行後、データベースは以下のように、deleteTestドキュメントが削除されます。
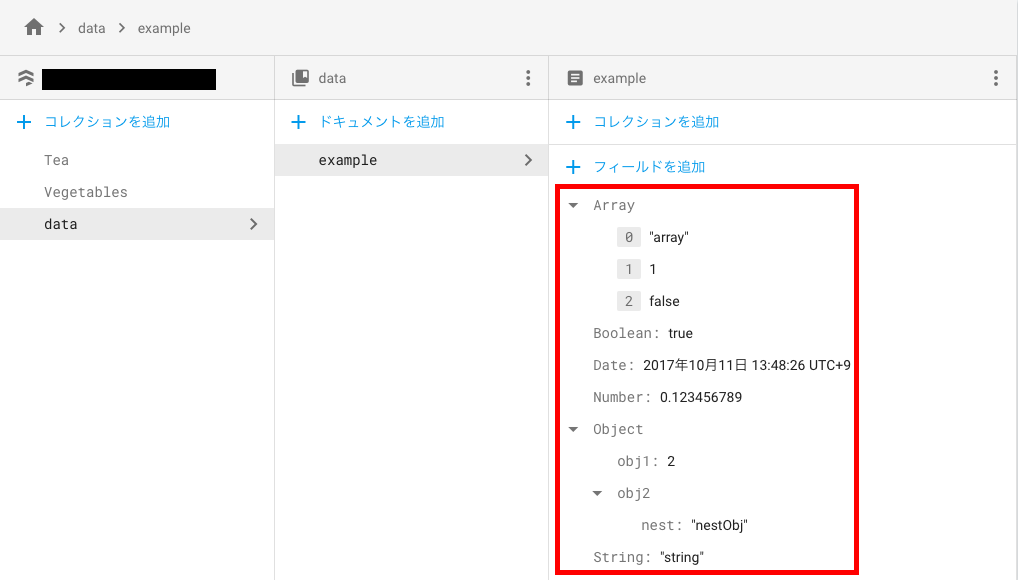
②データフィールドの削除
以下の内容を実行して、dataコレクションのexampleドキュメント内のNullデータフィールドを削除します。
        defaultStore.collection("data").document("example").updateData(["Null": FieldValue.delete(),]){ err in
            if let err = err{
                print("Error updating document: \(err)")
            }else{
                print("Document successfully updated")
            }
        }
実行後、データベースは以下のように、Nullデータフィールドが削除されます。
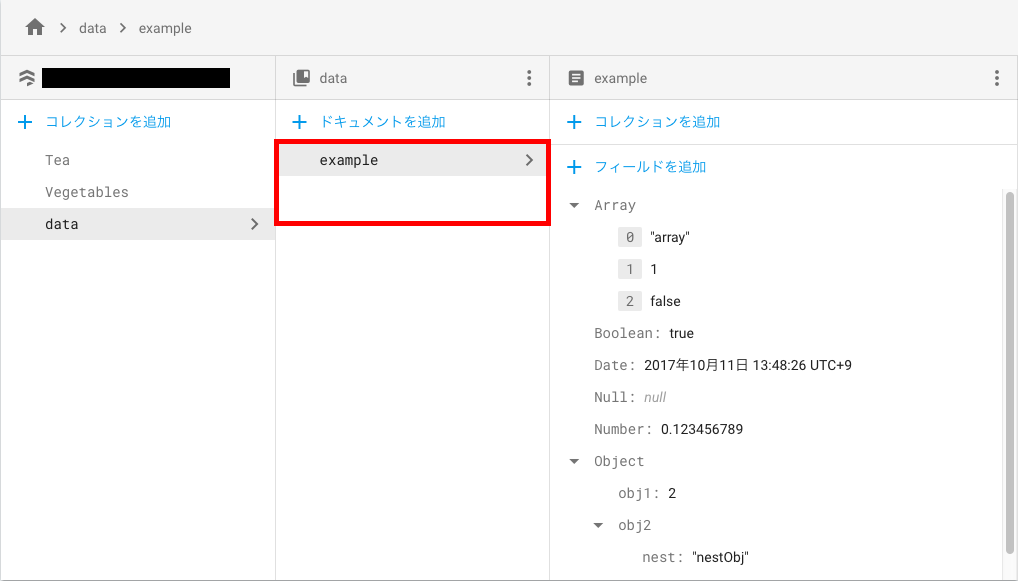
③コレクションの削除
以下の内容を実行して、dataコレクションを削除します。(コレクションの削除については公式ドキュメントにファンクションが記載されていたので、そのまま使用して「deleteの実行コード」のように実行しました。
        let ref = defaultStore.collection("data")
        delete.delete(collection: ref){ error in
            if let error = error {
                print("Error updating document: \(error)")
            }else{
                print("Document successfully updated")
            }
        }
    func delete(collection: CollectionReference, batchSize: Int = 100, completion: @escaping (Error?) -> ()){
        collection.limit(to: batchSize).getDocuments { (docset,error) in
            guard let docset = docset
                else{
                    completion(error)
                    return
            }
            guard docset.count > 0
                else{
                    completion(nil)
                    return
            }

            let batch = collection.firestore.batch()
            docset.documents.forEach {batch.deleteDocument($0.reference)}

            batch.commit { (batchError) in
                if let batchError = batchError {
                    completion(batchError)
                }else{
                    self.delete(collection: collection, batchSize: batchSize, completion: completion)
                }
            }
        }
    }
実行後、データベースは以下のように、dataコレクションが削除されます。
※ 実行時に、dataコレクションを選択していたせいか、ブラウザの更新をかけないとコレクションレベルの部分まで削除されているように見えませんでしたが、更新をかければ削除されていることが確認できました。
※ 補足
Firebase CLIを使用してデータの削除を行うことも可能です。公式ドキュメントを参照してください。
データの読み取り
Firestoreでのデータ読み取りは、以下の2つの方法が使用できます。
1.メソッドを使用してデータを取得する
2.リスナーを設定してイベントを取得する
以下のサンプルデータを使用して、データの読み取りを行います。
        let ref = defaultStore.collection("Tea")
        ref.document("Darjeeling").setData([
            "ProducingArea": "India",
            "TeaLeaf": "OP",
            "ProductionPhase" : "3〜11",
            "Season": ["FastFlash":"3〜4",
                       "SecondFlash":"5〜6",
                        "AutumnNaru":"10〜11"]
            ])
        ref.document("Uva").setData([
            "ProducingArea": "Sri Lanka",
            "TeaLeaf": "BOP",
            "Season": "7〜9"
            ])
        ref.document("NuwaraEliya").setData([
            "ProducingArea": "Sri Lanka",
            "Season": "1〜2"
            ])

        let vref = defaultStore.collection("Vegetables")
        //
        vref.addDocument(data: [
            "name": "Cabbage",
            "price": ["1/4": 98, "1/2": 128,  "1": 298]
            ])
        vref.addDocument(data: [
            "name": "Potato",
            "price": ["1" : 48, "5" : 198],
            "size": "M"
            ])
        vref.addDocument(data: [
            "name": "Potato",
            "price": ["1" : 68, "5" : 298],
            "size": "L"
            ])
        vref.addDocument(data: [
            "name": "Onion",
            "price": ["1": 48, "3": 198]
            ])
        vref.addDocument(data: [
            "name": "Tomato",
            "price": ["1" : 98, "3": 398]
            ])
1.メソッドを使用する
①単一ドキュメントの取得
単一のドキュメントを指定して出力する場合は、以下のようにドキュメントを指定して、getDocumentを使用します。
        let ref = defaultStore.collection("Tea").document("Darjeeling")

        ref.getDocument{ (document, error) in
            if let document = document {
                print("Tea=Darjeeling : Document data \(document.data())")
            }else{
                print("Document does not exist")
            }
        }
Tea=Darjeeling : Document data ["ProductionPhase": 3〜11, "Season": {
    AutumnNaru = "10\U301c11";
    FastFlash = "3\U301c4";
    SecondFlash = "5\U301c6";
}, "TeaLeaf": OP, "ProducingArea": India]
②複数ドキュメントの取得
抽出条件を指定して、複数のドキュメントを取得するには、以下のようにコレクションを指定してwhereFieldを使用して条件を設定します。以下の例はVegetablesでpriceの1が98より小さいものを抽出しています。(フィルターを使用しないでgetDocumentすると指定したドキュメントの全データを取得できます。)
※ whereFieldの詳細については、公式ドキュメントを参考にしてください。
        defaultStore.collection("Vegetables").whereField("price.1", isLessThan: 98).getDocuments(){(querySnapshot, err) in
            if let err = err {
                print("Error getting documents: \(err)")
            }else{
                for document in querySnapshot!.documents {
                    print("price(1)<98 : \(document.documentID) => \(document.data())")
                }
            }
        }
price(1)<98 : T2CnstM0uXlPhcIMsKxs => ["name": Onion, "price": {
    1 = 48;
    3 = 198;
}]
price(1)<98 : XugvULHiobn6lH8ulkg9 => ["name": Potato, "price": {
    1 = 48;
    5 = 198;
}, "size": M]
price(1)<98 : nAMyqXplJg9Cf32zhzEA => ["name": Potato, "price": {
    1 = 68;
    5 = 298;
}, "size": L]
③複合条件での抽出
抽出する条件を複数指定したい場合は、whereFieldを複数設定します。
ただし、複合条件を指定する際、以下のようにisEqualToのみを使用する場合は特に考慮の必要はありませんが、isLessThanやisGreaterThanOrEqualToなどを使用して範囲の比較を行う場合は、カスタムインデックスを作成する必要があります。
    let ref = defaultStore.collection("Vegetables")
    //複数条件にするときは、範囲を指定するのは1フィールドだけにしなければならない
    let query = ref.whereField("name", isEqualTo: "Potato")
                    .whereField("price.1", isEqualTo: 48)
name=Potato & price.1 = 48 : XugvULHiobn6lH8ulkg9 => ["name": Potato, "price": {
    1 = 48;
    5 = 198;
}, "size": M]
2.リスナーを設定する
①単一ドキュメントへ設定
単一のドキュメントにリスナーを設定してスナップショットを取得するためには、以下のようにドキュメントを指定してaddSnapshotListenerを使用します。
        defaultStore.collection("Tea").document("Darjeeling").addSnapshotListener{ (documentSnapshot, error) in
            guard let documentSnapshot = documentSnapshot
                else{
                    print("Error fetching document: \(error!)")
                    return
            }
            let source = documentSnapshot.metadata.hasPendingWrites ? "Local" : "Server"
            print("\(source) data : \(documentSnapshot.data())")
        }
Server data : ["ProductionPhase": 3〜11, "Season": {
    AutumnNaru = "10\U301c11";
    FastFlash = "3\U301c4";
    SecondFlash = "5\U301c6";
}, "TeaLeaf": OP, "ProducingArea": India]
②複数ドキュメントへ設定
複数ドキュメントへリスナーを設定してスナップショットを取得するためには、以下のようにwhereFieldでドキュメントを抽出してaddSnapshotListenerを使用します。
        defaultStore.collection("Vegetables").whereField("price.1", isLessThan: 98)
            .addSnapshotListener{ (querySnapshot, error) in
                guard let documents = querySnapshot?.documents
                    else{
                        print("Error fetching documents: \(error!)")
                        return
                }
                let name = documents.map {$0["name"]!}
                print("Current Vegetables price(1)<98 (\(name)")
        }
Current Vegetables price(1)<98 ([Onion, Potato, Potato]
③変更内容を参照
取得するスナップショットの中でも、変更を行った内容のみを取得したい場合は、スナップショットのdocumentChangesを取得して使用します。
    var snapshotListener:FIRListenerRegistration! = nil
    snapshotListener = defaultStore.collection("Vegetables").whereField("price.1", isLessThan: 98)
        .addSnapshotListener{ (querySnapshot, error) in
        guard let snapshot = querySnapshot
            else{
                print("Error fetching snapshots: \(error!)")
                return
        }
        snapshot.documentChanges.forEach{ diff in
            if (diff.type == .added){
                print("New Vegetables: \(diff.document.data())")
            }
            if (diff.type == .modified){
                print("Modified Vegetables: \(diff.document.data())")
            }
            if (diff.type == .removed){
                print("Removed Vegetables: \(diff.document.data())")
            }
        }
    }
New Vegetables: ["name": Onion, "price": {
    1 = 48;
    3 = 198;
}]
New Vegetables: ["name": Potato, "price": {
    1 = 48;
    5 = 198;
}, "size": M]
New Vegetables: ["name": Potato, "price": {
    1 = 68;
    5 = 298;
}, "size": L]
※ 最初に実行した時点では、実行したクエリに該当するデータの全てが取得されます。
④リスナーのデタッチ
データ監視をする必要がなくなった場合、以下のようにリスナーにremoveを使用して停止します。
        guard let listener = snapshotListener
            else{
                print("Error listener is nil")
                return
        }
        listener.remove()
⑤エラーの監視
以下のようにリスナーを設定すると、アクセス許可の影響や無効なクエリを使用した場合に発生するエラーを監視することが可能です。エラーが発生した際には、デタッチをしなくてもイベントの監視は停止します。
        defaultStore.collection("Vegetables").addSnapshotListener { (querySnapshot, error) in
            if let error = error{
                print("Error retreiving collection: \(error)")
                //エラーが発生した場合はlistenerのdetachはしなくてもイベント監視は停止される
            }
        }
データのオーダと制限
取得するデータの並び替えと、取得件数の制限を行います。order(by: フィールド[, descending: Bool])で並べ替えを行い、limit(to: Int)で取得データ数の制限を行います。
        var ref = defaultStore.collection("Vegetables")

        //nameの昇順にソートを行い、上から3つのデータを取得
        ref?.order(by: "name").limit(to: 3).getDocuments{ (snapshot, error) in
             guard let snapshot = snapshot
                else{
                    print("Error : \(error!)")
                    return
            }
            for doc in snapshot.documents {
                print("name(asc) : \(doc.data())")
            }
        }
name(asc) : ["name": Cabbage, "price": {
    1 = 298;
    "1/2" = 128;
    "1/4" = 98;
}]
name(asc) : ["name": Onion, "price": {
    1 = 48;
    3 = 198;
}]
name(asc) : ["name": Potato, "price": {
    1 = 48;
    5 = 198;
}, "size": M]
whereFieldと組み合わせても使用できます。
    ref?.whereField("price.1", isGreaterThanOrEqualTo: 98)
    .order(by: "price.1", descending: true)
    .limit(to: 2)
        .getDocuments{ (snapshot, error) in
            guard let snapshot = snapshot
                else{
                    print("\(error!)")
                    return
            }
            for doc in snapshot.documents{
                print("where+order+limit : \(doc.data())")
            }
    }
where+order+limit : ["name": Cabbage, "price": {
    1 = 298;
    "1/2" = 128;
    "1/4" = 98;
}]
where+order+limit : ["name": Tomato, "price": {
    1 = 98;
    3 = 398;
}]
※ 補足ですが、下記のように並び替えの条件を2つにした際に、「Error Domain=FIRFirestoreErrorDomain Code=9 "The query requires an index. You can create it here: https・・・"」と、言われてしまいました…ドキュメントに記載がなかったので気にしていませんでしたが、インデックスの追加が必要なようですね…
インデックスを追加したら、エラーなく処理されたので、あらかじめインデックスに追加していない組み合わせを使用する際はインデックスの追加を忘れないよう気をつけてください。
        ref?.order(by: "name").order(by: "price.1", descending: true).getDocuments{(snapshot, error) in
            guard let snapshot = snapshot
                else{
                    print("Error : \(error!)")
                    return
            }
            for doc in snapshot.documents{
                print("state,price.1 : \(doc.data())")
            }
        }
クエリカーソルによるページ制御
1.カーソルの追加
クエリカーソルを使用すると、設定したパラメータに従って、データ取得処理をバッチに分割できます。以下はgetDocumentの処理ですが、スナップショットにカーソルを設定することも可能です。
また、カーソルの指定は複数の条件を指定することも可能です。
    var ref = db.collection("Vegetables")
    //単価が50以上(50より大きい。の場合はatではなくafter)
    ref?.order(by: "price.1")
    .start(at: [50])
        .getDocuments{(snapshot,error) in
            guard let snapshot = snapshot
                else{
                    print("Error : \(error.debugDescription)")
                    return
            }
            for doc in snapshot.documents{
                print("start : \(doc.data())")
            }
    }
    //単価が50以内(未満はbefore)
    ref?.order(by: "price.1")
        .end(at: [50])
        .getDocuments{(snapshot,error) in
            guard let snapshot = snapshot
                else{
                    print("Error : \(error.debugDescription)")
                    return
            }
            for doc in snapshot.documents{
                print("end : \(doc.data())")
            }
    }
start : ["name": Potato, "price": {
    1 = 68;
    5 = 298;
}, "size": L]
start : ["name": Tomato, "price": {
    1 = 98;
    3 = 398;
}]
start : ["name": Cabbage, "price": {
    1 = 298;
    "1/2" = 128;
    "1/4" = 98;
}]
end : ["name": Onion, "price": {
    1 = 48;
    3 = 198;
}]
end : ["name": Potato, "price": {
    1 = 48;
    5 = 198;
}, "size": M]
2.ページ制御
limitと組み合わせてページングを行います。下記の例はバッチ内の最後のスナップショットを開始点として使用して、2ドキュメントずつページング処理を行います。
    let first = ref?.order(by: "price.1").limit(to: 2)
    first?.addSnapshotListener{(snapshot, error) in
        guard let snapshot = snapshot
            else{
                print("Error retreving price: \(error.debugDescription)")
                return
        }
        guard let lastSnapshot  = snapshot.documents.last
            else{return}    //The collection is empty
        let next = self.ref?.order(by: "price.1")
            .start(atDocument: lastSnapshot)
        next?.getDocuments{(nextSnapshot, error) in
            guard let nextSnapshot = nextSnapshot
                else{
                    print("Error : \(error.debugDescription)")
                    return
            }
            for doc in nextSnapshot.documents{
                print("price : \(doc.data())")
            }
        }
    }
price : ["name": Potato, "price": {
    1 = 48;
    5 = 198;
}, "size": M]
price : ["name": Potato, "price": {
    1 = 68;
    5 = 298;
}, "size": L]
price : ["name": Tomato, "price": {
    1 = 98;
    3 = 398;
}]
price : ["name": Cabbage, "price": {
    1 = 298;
    "1/2" = 128;
    "1/4" = 98;
}]
補足
CocoaPodsでFirestoreをインストールした時の話なのですが、Firebase/Coreをインストールした後に、PodfileにFirebase/Firestoreを追加してインストールをやり直したのですが、インストールに失敗するようになってしまいました。
(既にPod installしたことのあるプロジェクトに追加でインストールをしようとすると発生することがある?)
原因がわからず、検索をして同様の事例はないか調べていたら、以下の質問を見つけました。
https://stackoverflow.com/questions/46592883/cloud-firestore-minimum-deployment-target
その質問の回答にあるように、以下を順番に実行したところ、正常にインストールすることができました。
pod repo update
pod install
pod update
同様の現象が発生した場合は試してみてください。
おわりに
今回は、ざっとコーティングの仕方と動きを確認した感じなので、まだまだ確認しなければならない部分もありますし、まだベータ版ですし、実際のシステムに使用した場合にどうかなどは置いて置いておきますが…
今のところ、個人的にはコーディングする際はRealtime Databaseより使いやすいかなという印象です。
今後は試しに社内用に作成しているサンプルアプリでCloud Firestoreを使用できるようにしてみてどうかというのを確認してみようかなと思っています。(何かあればまた記事にします)
何かご指摘等ございましたら、コメントに書き込んでいただければ幸いです。