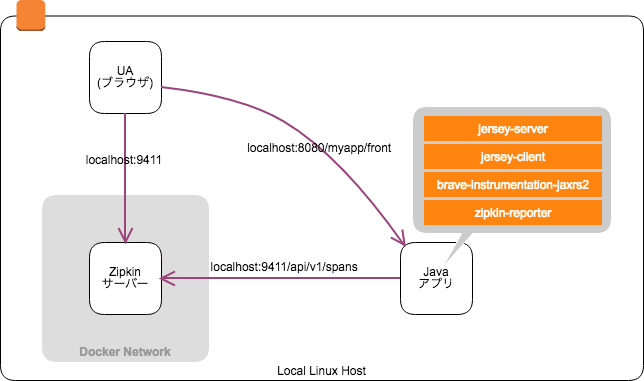
したいこと
Jersey で作った JAX-RS2 Java アプリケーションを Zipkin でトレーシングします。
- お試しなので、Javaアプリケーションも Zipkin サーバーも同じマシン上に立てます
- Zipkin サーバーは docker-zipkin で立てます
- JAX-RSサーバー実装 ==> jersey-server 2.x
- JAX-RSクライアント実装 ==> jersey-client 2.x
- Java HTTP サーバー実装に jersey-container-jdk-http を使います
- brave-instrumentation-jaxrs2 ライブラリがトレーシングデータを作ります
- zipkin-reporter ライブラリが Zipkin サーバーにトレーシングデータを送ります
Zipkin サーバーを立てる
docker をインストールします.
Linux は docker-compose を追加でインストールします. Mac, Windows は Docker installer に同梱されているので不要です
sudo curl -L https://github.com/docker/compose/releases/download/1.18.0/docker-compose-`uname -s`-`uname -m` -o /usr/local/bin/docker-compose
sudo chmod +x /usr/local/bin/docker-compose
github から docker-zipkin をクローンして docker で Zipkin サーバーを動かします
git clone https://github.com/openzipkin/docker-zipkin.git
cd docker-zipkin
docker-compose up -d
次のURLで Zipkin の Web UI にアクセスできます
アプリケーションを実装する
アプリケーションは表題の通り Jersey で作ります. 完成したものを github に上げました.
依存ライブラリ (pom.xml)
サーバーサイド JAX-RS2 参照実装である Jersey 2 を利用します.
Jerseyでググると良く出る、groupId=
com.sun.jerseyは Jersey 1系で互換性がないので注意.
<!-- https://mvnrepository.com/artifact/org.glassfish.jersey.core/jersey-server -->
<dependency>
  <groupId>org.glassfish.jersey.core</groupId>
  <artifactId>jersey-server</artifactId>
  <version>2.26</version>
</dependency>
<!-- https://mvnrepository.com/artifact/org.glassfish.jersey.inject/jersey-hk2 -->
<dependency>
  <groupId>org.glassfish.jersey.inject</groupId>
  <artifactId>jersey-hk2</artifactId>
  <version>2.26</version>
</dependency>
<!-- https://mvnrepository.com/artifact/org.glassfish.jersey.containers/jersey-container-servlet -->
<dependency>
  <groupId>org.glassfish.jersey.containers</groupId>
  <artifactId>jersey-container-servlet</artifactId>
  <version>2.26</version>
</dependency>
クライアントサイド JAX-RS2 も参照実装である Jersey 2 を利用します.
<!-- https://mvnrepository.com/artifact/org.glassfish.jersey.core/jersey-client -->
<dependency>
  <groupId>org.glassfish.jersey.core</groupId>
  <artifactId>jersey-client</artifactId>
  <version>2.26</version>
</dependency>
Javaで書いた Web Application は普段は Tomcat, Glassfish, Jetty 等で動かしますが、今回は簡単の為 jersey-container-jdk-http を利用してHttpサーバー実装をアプリケーションに直接埋め込みます.
<!-- https://mvnrepository.com/artifact/org.glassfish.jersey.containers/jersey-container-jdk-http -->
<dependency>
  <groupId>org.glassfish.jersey.containers</groupId>
  <artifactId>jersey-container-jdk-http</artifactId>
  <version>2.26</version>
</dependency>
JAX-RS2 Javaアプリケーション用の Zipkin Instrumentation ライブラリです. これを使って JAX-RSサーバー/クライアントでトレーシングが出来るようになります.
<!-- https://mvnrepository.com/artifact/io.zipkin.brave/brave-instrumentation-jaxrs2 -->
<dependency>
  <groupId>io.zipkin.brave</groupId>
  <artifactId>brave-instrumentation-jaxrs2</artifactId>
  <version>4.3.1</version>
</dependency>
収集したトレーシングデータは Zipkin サーバーに送信しなければなりません. このライブラリが任意の宛先に送信してくれます.
<!-- https://mvnrepository.com/artifact/io.zipkin.reporter/zipkin-sender-urlconnection -->
<dependency>
  <groupId>io.zipkin.reporter</groupId>
  <artifactId>zipkin-sender-urlconnection</artifactId>
  <version>1.1.2</version>
</dependency>
Java コード
JAX-RS2 では javax.ws.rs.core.Feature IFを実装した外部ライブラリをプラグインできます.
Javaアプリケーション向けの Zipkin ライブラリである Brave は様々なJavaフレームワークに対応しています. 今回は JAX-RS2 用の brave-instrumentation-jaxrs2 を使用します.
-
brave.jaxrs2.TracingFeatureは JAX-RS2 用のトレーシング実装 (Trace Instrumentation) で、トレーシングデータを作成 します -
zipkin.reporter.AsyncReporterはアプリケーション上に集めたトレーシングデータを Zipkin サーバーに送信します
package zipkin;

import brave.Tracing;
import brave.jaxrs2.TracingFeature;
import brave.sampler.Sampler;
import zipkin.reporter.AsyncReporter;
import zipkin.reporter.urlconnection.URLConnectionSender;
import javax.ws.rs.core.Feature;

public class ZipkinFeature {

    /**
     * @param localServiceName Zipkin Web UI に表示されるサービス名
     */
    public static Feature create(String localServiceName) {
        // create a zipkin reporter.
        AsyncReporter<Span> asyncReporter = AsyncReporter
                .builder(URLConnectionSender.create("http://localhost:9411/api/v1/spans"))
                .build();

        // create a zipkin tracing.
        Tracing tracing = Tracing.newBuilder()
                .reporter(asyncReporter)
                .localServiceName(localServiceName)
                .sampler(Sampler.ALWAYS_SAMPLE)
                .build();

        // create a JAX-RS feature.
        Feature tracingFeature = TracingFeature.create(tracing);

        return tracingFeature;
    }
}
サーバーサイド JAX-RS2 のエントリポイントである javax.ws.rs.core.Application IFを実装したクラスを作ります. ここで先程生成したトレーシング機能 brave.jaxrs2.TracingFeature をサーバーサイド JAX-RS2 に登録します.
package app;

import zipkin.ZipkinFeature;
import javax.ws.rs.ApplicationPath;
import javax.ws.rs.core.Application;
import javax.ws.rs.core.Feature;
import java.util.Arrays;
import java.util.LinkedHashSet;
import java.util.Set;

@ApplicationPath("")
public class MyApplication extends Application {

    @Override
    public Set<Object> getSingletons() {
        // create a JAX-RS feature.
        Feature tracingFeature = ZipkinFeature.create("server");

        return new LinkedHashSet<>(Arrays.asList(tracingFeature));
    }
}
サーバーサイド JAX-RS2 のリソースクラス (API定義) を作ります. 本来は複数のサービスをデプロイして Zipkin の動作を確認したいのですが、簡単化の為に 3 API を定義し、クライアント JAX-RS2 で順に呼んでいます.
ここでも先程生成したトレーシング機能 brave.jaxrs2.TracingFeature をクライアント JAX-RS2 に登録しています.
- /front --> /mid --> /back
package resource;

import zipkin.ZipkinFeature;
import javax.ws.rs.GET;
import javax.ws.rs.Path;
import javax.ws.rs.Produces;
import javax.ws.rs.client.ClientBuilder;
import javax.ws.rs.core.Feature;
import javax.ws.rs.core.MediaType;
import javax.ws.rs.core.Response;

@Path("")
public class MyResource {

    /**
     * /front --> /mid --> /back
     *
     * @return String that will be returned as a text/plain response.
     */
    @GET
    @Produces(MediaType.TEXT_PLAIN)
    @Path("front")
    public Response front() {
        // create a JAX-RS feature.
        Feature tracingFeature = ZipkinFeature.create("client");

        // http client: GET /mid
        Response r = ClientBuilder.newClient()
                .register(tracingFeature)
                .target("http://localhost:8080/myapp/mid")
                .request()
                .get();

        return Response.fromResponse(r).build();
    }

    /**
     * /mid --> /back
     *
     * @return String that will be returned as a text/plain response.
     */
    @GET
    @Produces(MediaType.TEXT_PLAIN)
    @Path("mid")
    public Response mid() {
        // create a JAX-RS feature.
        Feature tracingFeature = ZipkinFeature.create("client");

        // http client: GET /back
        Response r = ClientBuilder.newClient()
                .register(tracingFeature)
                .target("http://localhost:8080/myapp/back")
                .request()
                .get();

        return Response.fromResponse(r).build();
    }

    /**
     * /back
     *
     * @return String that will be returned as a text/plain response.
     */
    @GET
    @Produces(MediaType.TEXT_PLAIN)
    @Path("back")
    public String back() {
        return "hello";
    }
}
簡単に動かしたいので、Httpサーバー実装には jersey-container-jdk-http を使用します。
package main;

import app.MyApplication;
import com.sun.net.httpserver.HttpServer;
import org.glassfish.jersey.jdkhttp.JdkHttpServerFactory;
import org.glassfish.jersey.server.ResourceConfig;
import java.net.URI;

public class Main {

    public static void main(String[] args) {
        // register JAX-RS Application class.
        ResourceConfig rc = ResourceConfig.forApplicationClass(MyApplication.class);

        // register a path of REST resources.
        rc.packages(true, "resource");

        // run a jersey server.
        URI uri = URI.create("http://localhost:8080/myapp/");
        HttpServer httpServer = JdkHttpServerFactory.createHttpServer(uri, rc);
        Runtime.getRuntime().addShutdownHook(new Thread(() -> httpServer.stop(0)));
    }
}
アプリケーションを実行します. 以下のURLでアクセスできます.
Zipkin Web UI にアクセスしましょう. 先程アクセスした際のトレーシングデータが見れる筈です.

