この記事はCircleCI Advent Calendar 2018 3日目の記事です。
前回の記事は @yasuhiroki さんの「CircleCIのOnly build pull requestsをoffにしてもプルリクエストを作ったらJobを実行したい」でした
はじめに
この記事ではCircleCIの並列処理についてAnsibleを使って解説します。この記事での検証結果は  で確認できます。
この記事で解説する事
- CircleCIの並列処理の基本的なやり方
- CI/CDの処理時間を短縮する方法
この記事で解説しない事
- Ansibleの使い方
- CircleCIの使い方
- Dockerの使い方
- Orbsの解説、導入方法
この記事で言いたい事
- Orbsを利用してパイプラインの再利用性を高めましょう
- Orbsに定義出来ない処理、もしくはOrbsで定義すると再利用が難しくなる処理は「.circleci/config.yml」へ書きましょう
- CircleCIで処理する必要がないものはあらかじめDockerイメージ化しレジストリへ登録しておきましょう(スナップショットの作成)
- CircleCIで利用する独自のDockerイメージはcron等を用いて頻繁にアップデートしましょう(スナップショットのリフレッシュ)
Ansibleとは
Ansible(アンシブル)は、レッドハットが開発するオープンソースの構成管理ツールである。サーバを立ち上げる際、あらかじめ用意した設定ファイルに従って、ソフトウェアのインストールや設定を自動的に実行する事が出来る[1]。特に大規模なコンピュータ・クラスターを構築する時に、時間の短縮やミスの削減に有用である。構成管理に加え、オーケストレーションやソフトウェアデプロイメントの機能を持つ
Ansible (ソフトウェア) - Wikipedia より引用
Ansibleについての注意点
Ansibleは通常OSやネットワーク機器に対して利用されます。この記事みたいにDockerで利用する場合 Ansibleの性能を100%引き出す事はできません 。
この記事ではあくまでCircleCIで並列処理を説明するための事例として取り上げました。
実際にAnsibleを利用する際はDockerではなくOS環境下で実行してください。
シナリオ
目標
複数の異なるディストリビューション に 複数の異なるバージョンのAnsible を利用しプログラムをインストールする処理のCIを行う。
CI/CDの速度を速めるためにOSイメージの「 スナップショット 」を利用し「 並列で処理 」をする。
処理の流れ
- Playbook取得
- 静的解析(lintを実行する)
- Playbook実行
想定するディストリビューション
- CentOS7
- Ubuntu18
利用するAnsibleのバージョン
- 2.7系(aptもしくはyumコマンドでインストールされるAnsible)
- 2.7系(pipコマンドでインストールされるAnsible)
- 2.8系
全部で 「2系統のディストリビューション」 x 「3系統のAnsible」 の6系統の並列処理を行います。
インストールするプログラム

使用するAnsible Playbook
準備作業としてDockerイメージをレジストリサービスへ登録する
CI/CDの速度を上げるためOSイメージのスナップショットを作成しておきます。
1.Dockerfileを作成する
あらかじめ「CentOS7」と「Ubuntu18」に
- Ansible
- Ansible-lint
- Git
をインストールしたDockerイメージを作成しレジストリへ登録します。
CentOS7へAnsible、Ansible-lint、GitをインストールするDockerfileの例
FROM centos:latest

RUN set -x && \
    rm -f /etc/rpm/macros.image-language-conf && \
    sed -i '/^override_install_langs=/d' /etc/yum.conf && \
    yum -y reinstall glibc-common && \
    yum clean all && \
    yum update -y && \
    yum install -y epel-release git && \
    yum -y install ansible && \
    yum -y install expect python-devel python-pip && \
    pip install --upgrade pip && pip install --upgrade setuptools && \
    pip install ansible-lint

ENV LANG="ja_JP.UTF-8" \
    LANGUAGE="ja_JP:ja" \
    LC_ALL="ja_JP.UTF-8"
Ubuntu18へAnsible、Ansible-lint、GitをインストールするDockerfileの例
FROM ubuntu:latest

RUN apt update -y && \
    apt install -y language-pack-ja-base language-pack-ja && \
    apt install -y software-properties-common && \
    apt-add-repository -y ppa:ansible/ansible && \
    apt update -y && \
    apt install -y ansible && \
    apt install -y curl python-dev git && \
    curl "https://bootstrap.pypa.io/get-pip.py" -o "/tmp/get-pip.py" && \
    python /tmp/get-pip.py && \
    pip install --upgrade pip && pip install --upgrade setuptools && \
    pip install ansible-lint

ENV LANG="ja_JP.UTF-8" \
    LANGUAGE="ja_JP:ja" \
    LC_ALL="ja_JP.UTF-8"
2. Docker HubへDockerイメージを登録する
この記事ではレジストリに Docker Hub を利用します。
Docker Hub は GitHubへDockerfileをpushすると自動でDockerイメージをbuildするサービス を提供しています。
そのため
- 記事等で利用する
- OSSの活動で利用する
など「作成したDockerイメージの内容を開示したい」場合は有用なツールになります。
利用するDockerイメージ
Ansible Playbookを作成する
こちらのPlaybookを使用します。
Ansible Playbookでは以下の処理を定義しています。
- Playbookを実行するDockerコンテナのディストリビューション情報を取得する
- ディストリビューションによって処理を選択し実行する
- hosts: all
  tasks:
    - name: Install cowsay with yum
      include_role:
        name: centos7
      when: ansible_distribution == "CentOS"

    - name: Install cowsay with apt
      include_role:
        name: ubuntu18
      when: ansible_distribution == "Ubuntu"
- name: Install cowsay with yum
  become: yes
  yum:
    name: cowsay
    state: present
- name: Install cowsay with apt
  become: yes
  apt:
    name: cowsay
    state: present

- name: Copy cowsay execution file to '/usr/local/bin/'
  become: yes
  copy:
    src: /usr/games/cowsay
    dest: /usr/local/bin/cowsay
    owner: root
    group: root
    mode: 0755
orbを作成する
この記事ではCircleCI 2.1から本格的に利用できる Orbs を使います。
orbでの処理について
version: 2.1

commands:
  show-os-version:
    description: "Show OS version information"
    steps:
      - run:
          name: Show OS version
          command: |
            if [ -e /etc/os-release ]; then
              cat /etc/os-release
            elif [ -e /etc/redhat-release ]; then
              cat /etc/redhat-release
            else
              echo 'Invalid Image' 1>&2
              exit 1
            fi

  ansible-lint:
    description: "Execute ansible-lint command"
    steps:
      - run:
          name: Show ansible-lint version
          command: ansible-lint --version
      - run:
          name: Retrieve Ansible lint rules file
          command: |
            cd /tmp
            git clone https://github.com/TomonoriMatsumura/ansible_joke-programs_lint-rules
      - run:
          name: Execute ansible-lint
          command: |
            cd $CIRCLE_WORKING_DIRECTORY
            find . -type f -name '*.yml' | xargs ansible-lint -c /tmp/ansible_joke-programs_lint-rules/.ansible-lint-rules

  ansible-playbook:
    description: "Execute ansible-playbook command"
    steps:
      - run:
          name: Show Ansible version
          command: ansible --version
      - run:
          name: Execute Ansible Playbook
          command: |
            cd $CIRCLE_WORKING_DIRECTORY
            ansible-playbook -i localhost install.yml
      - run:
          name: Execute Ansible Playbook again, checking to make sure it's idempotent.
          command: |
            cd $CIRCLE_WORKING_DIRECTORY
            ansible-playbook -i localhost install.yml

executors:
  centos7-ansible-yum:
    docker:
      - image: tomonorimatsumura/centos7-ansible:yum
  centos7-ansible-stable:
    docker:
      - image: tomonorimatsumura/centos7-ansible:stable
  centos7-ansible-devel:
    docker:
      - image: tomonorimatsumura/centos7-ansible:devel
  ubuntu18-ansible-apt:
    docker:
      - image: tomonorimatsumura/ubuntu18-ansible:apt
  ubuntu18-ansible-stable:
    docker:
      - image: tomonorimatsumura/ubuntu18-ansible:stable
  ubuntu18-ansible-devel:
    docker:
      - image: tomonorimatsumura/ubuntu18-ansible:devel
orbにて以下の処理を定義します。
- 利用するDockerイメージのディストリビューション情報を表示する
- Ansible-lintを使いPlaybookのシンタックスをチェックする
- Playbookを実行する
これはcommandsセクションの
- show-os-version key
- ansible-lint key
- ansible-playbook key
がそれぞれ対応します。
またexecutorセクションでDockerイメージを定義しています。
.circleci/config.yml を作成する
show-os-version-steps: &show-os-version-steps
  steps:
    - ansible/show-os-version

lint-steps: &lint-steps
  steps:
    - checkout
    - ansible/ansible-lint

playbook-steps: &playbook-steps
  steps:
    - checkout
    - ansible/ansible-playbook
    - run:
        name: Execute cowsay
        command: |
          export TERM=xterm
          cowsay "hello world!"

version: 2.1

orbs:
  ansible: orbss/ansible@volatile

jobs:
  Ce7-yum_os-version:
    executor:
      name: ansible/centos7-ansible-yum
    <<: *show-os-version-steps
  Ce7-yum_lint:
    working_directory: /tmp/ansible
    executor:
      name: ansible/centos7-ansible-yum
    <<: *lint-steps
  Ce7-yum_playbook:
    working_directory: /tmp/ansible
    executor:
      name: ansible/centos7-ansible-yum
    <<: *playbook-steps

  Ce7-stable_os-version:
    executor:
      name: ansible/centos7-ansible-stable
    <<: *show-os-version-steps
  Ce7-stable_lint:
    working_directory: /tmp/ansible
    executor:
      name: ansible/centos7-ansible-stable
    <<: *lint-steps
  Ce7-stable_playbook:
    working_directory: /tmp/ansible
    executor:
      name: ansible/centos7-ansible-stable
    <<: *playbook-steps

  Ce7-devel_os-version:
    executor:
      name: ansible/centos7-ansible-devel
    <<: *show-os-version-steps
  Ce7-devel_lint:
    working_directory: /tmp/ansible
    executor:
      name: ansible/centos7-ansible-devel
    <<: *lint-steps
  Ce7-devel_playbook:
    working_directory: /tmp/ansible
    executor:
      name: ansible/centos7-ansible-devel
    <<: *playbook-steps

  Ub18-apt_os-version:
    executor:
      name: ansible/ubuntu18-ansible-apt
    <<: *show-os-version-steps
  Ub18-apt_lint:
    working_directory: /tmp/ansible
    executor:
      name: ansible/ubuntu18-ansible-apt
    <<: *lint-steps
  Ub18-apt_playbook:
    working_directory: /tmp/ansible
    executor:
      name: ansible/ubuntu18-ansible-apt
    <<: *playbook-steps

  Ub18-stable_os-version:
    executor:
      name: ansible/ubuntu18-ansible-stable
    <<: *show-os-version-steps
  Ub18-stable_lint:
    working_directory: /tmp/ansible
    executor:
      name: ansible/ubuntu18-ansible-stable
    <<: *lint-steps
  Ub18-stable_playbook:
    working_directory: /tmp/ansible
    executor:
      name: ansible/ubuntu18-ansible-stable
    <<: *playbook-steps

  Ub18-devel_os-version:
    executor:
      name: ansible/ubuntu18-ansible-devel
    <<: *show-os-version-steps
  Ub18-devel_lint:
    working_directory: /tmp/ansible
    executor:
      name: ansible/ubuntu18-ansible-devel
    <<: *lint-steps
  Ub18-devel_playbook:
    working_directory: /tmp/ansible
    executor:
      name: ansible/ubuntu18-ansible-devel
    <<: *playbook-steps

workflows:
  version: 2
  ansible-playbook:
    jobs:
      - Ce7-yum_os-version
      - Ce7-yum_lint:
          requires:
            - Ce7-yum_os-version
      - Ce7-yum_playbook:
          requires:
            - Ce7-yum_lint


      - Ce7-stable_os-version
      - Ce7-stable_lint:
          requires:
            - Ce7-stable_os-version
      - Ce7-stable_playbook:
          requires:
            - Ce7-stable_lint


      - Ce7-devel_os-version
      - Ce7-devel_lint:
          requires:
            - Ce7-devel_os-version
      - Ce7-devel_playbook:
          requires:
            - Ce7-devel_lint


      - Ub18-apt_os-version
      - Ub18-apt_lint:
          requires:
            - Ub18-apt_os-version
      - Ub18-apt_playbook:
          requires:
            - Ub18-apt_lint


      - Ub18-stable_os-version
      - Ub18-stable_lint:
          requires:
            - Ub18-stable_os-version
      - Ub18-stable_playbook:
          requires:
            - Ub18-stable_lint


      - Ub18-devel_os-version
      - Ub18-devel_lint:
          requires:
            - Ub18-devel_os-version
      - Ub18-devel_playbook:
          requires:
            - Ub18-devel_lint
Anchors & Aliasesについて
| anchorの設定 | aliasの配置 |
|---|---|
| show-os-version-steps: &show-os-version-steps | <<: *show-os-version-steps |
| lint-steps: &lint-steps | <<: *lint-steps |
| playbook-steps: &playbook-steps | <<: *playbook-steps |
表にある記述がある箇所は 「.circleci/config.yml」 で利用できるAnchors & Aliasesの機能です。anchorを定義した後aliasを指定した箇所へ配置できます。
詳しくはこちらを参考にして下さい。
workflowsでJobを並列実行する
workflowsセクションではそれぞれのJobを並列実行するように処理を書いています。CircleCIでJobを実行する順序を定義する詳しい方法はこちらを参考にして下さい。
利用するorbのバージョンについて
Orbsでは「circleci/config.yml」で参照するorbのバージョンを指定できます。ですがこの記事に関しては常に最新版を取得する volatile を使用しています。
実際にOrbsを利用する際には最新バージョンではなく特定のバージョン番号を指定した方が良い場合もあります。バージョンの指定の記述は適宜使い分けると良いでしょう。
まとめ
CircleCIでCIを並列実行する方法を紹介しました。この方法を利用すれば、例えばバージョン違いの Ruby + Rails や PHP + Laravel を利用し並列処理で検証を行う、と言うような事も可能になります。
フレームワークや言語のバージョンの互換性を考慮した開発が可能になるかもしれません。
CircleCIの並列処理のポイント
- Orbsを利用してパイプラインの再利用性を高める
- Orbsに定義出来ない処理、もしくはOrbsで定義すると再利用が難しくなる処理は「.circleci/config.yml」へ書く
- CircleCIで処理する必要がないものはあらかじめDockerイメージ化しレジストリへ登録する(スナップショットの作成)
- CircleCIで利用する独自のDockerイメージはcron等を用いて頻繁にアップデートする(スナップショットのリフレッシュ)
この辺りを意識すると良いと思います。特にコンテナを含む OSイメージのスナップショット は並列処理に次いでCI/CDのスピードに大きな影響を与えます。スナップショットは意識的に採用すべきでしょう。
今後の課題
並列処理のレポートの問題
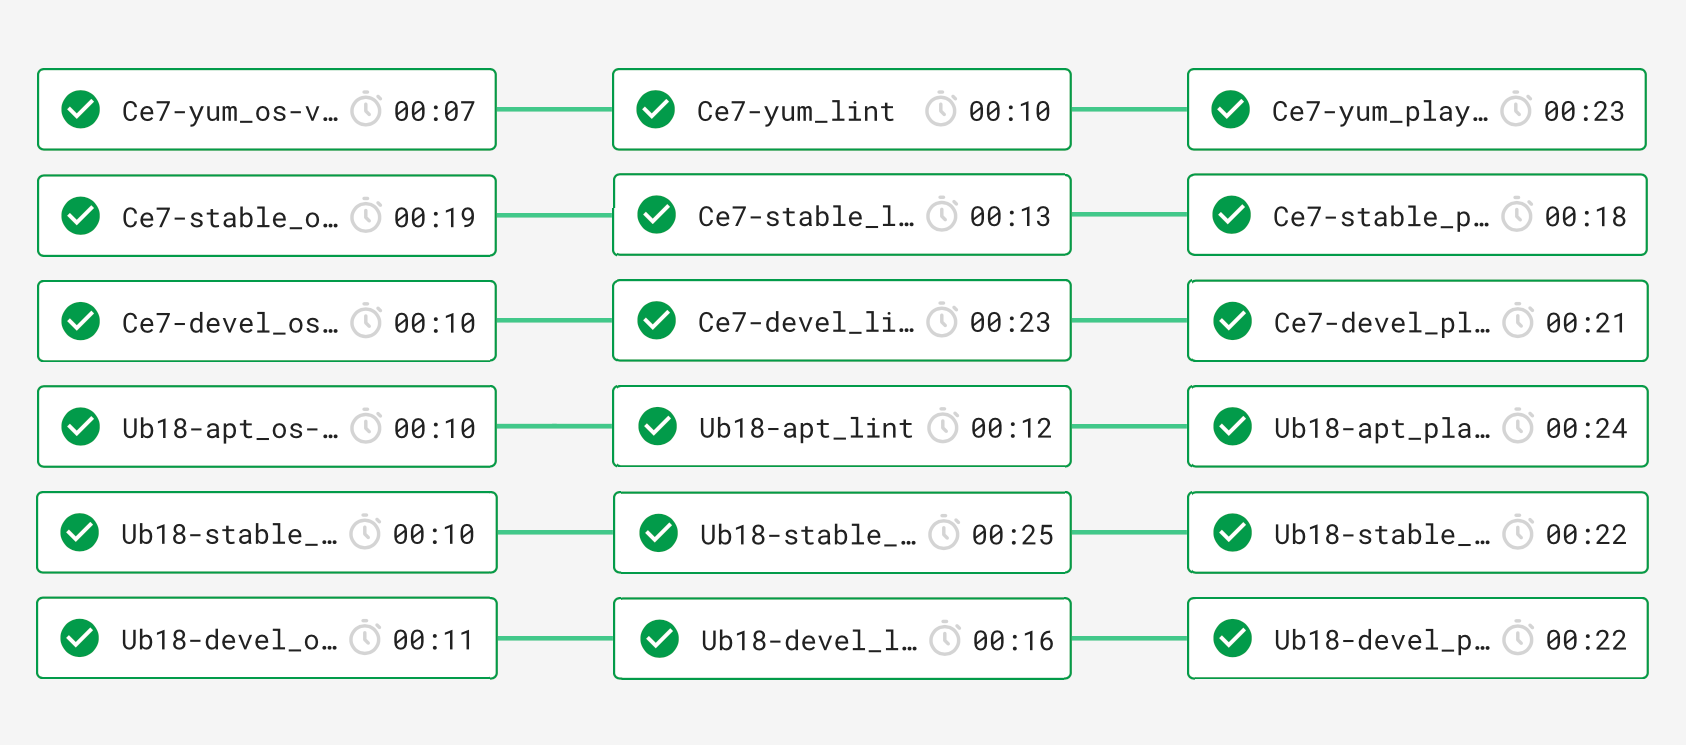
今回使用した 「.circleci/config.yml」 ですが問題がひとつあります。それは並列処理だと実行するJobの順番が指定できないと言うことです。
理想的なパイプライン
実際のパイプライン

パイプラインをリニアに表示したいのですがCircleCIは処理を実行した順にJobを表示するみたい?で意図したものと異なったものが出力されます。
この挙動を改善できると良いのですが今のところ方法が分かりません。
参考リンク
Ansible
- Ansible (ソフトウェア) - Wikipedia
- Ansible is Simple IT Automation
- TomonoriMatsumura/ansible_joke-programs_cowsay | GitHub
CircleCI
Orbsについて
Anchor & Aliasesについて
並列処理について
記事の検証
Cowsay
Docker Hub
- Docker Hub
- Docker HubでDockerfileを公開する AUTOMATED BUILD - Qiita
- tomonorimatsumura/centos7-ansible - Docker Hub
- tomonorimatsumura/ubuntu18-ansible - Docker Hub
最後に
CircleCI Advent Calendar 2018 の明日の記事は @ganta さんです