はじめに
こちらに pytestとdatabricksの連携するサンプルコードがあったので、実際に試しながら動きを確認してみました。
(追記)
GitHub Actionと連携させた記事はこちらです。
https://qiita.com/maroon-db/items/48668d5f4c4b65ab6c1d
実行内容
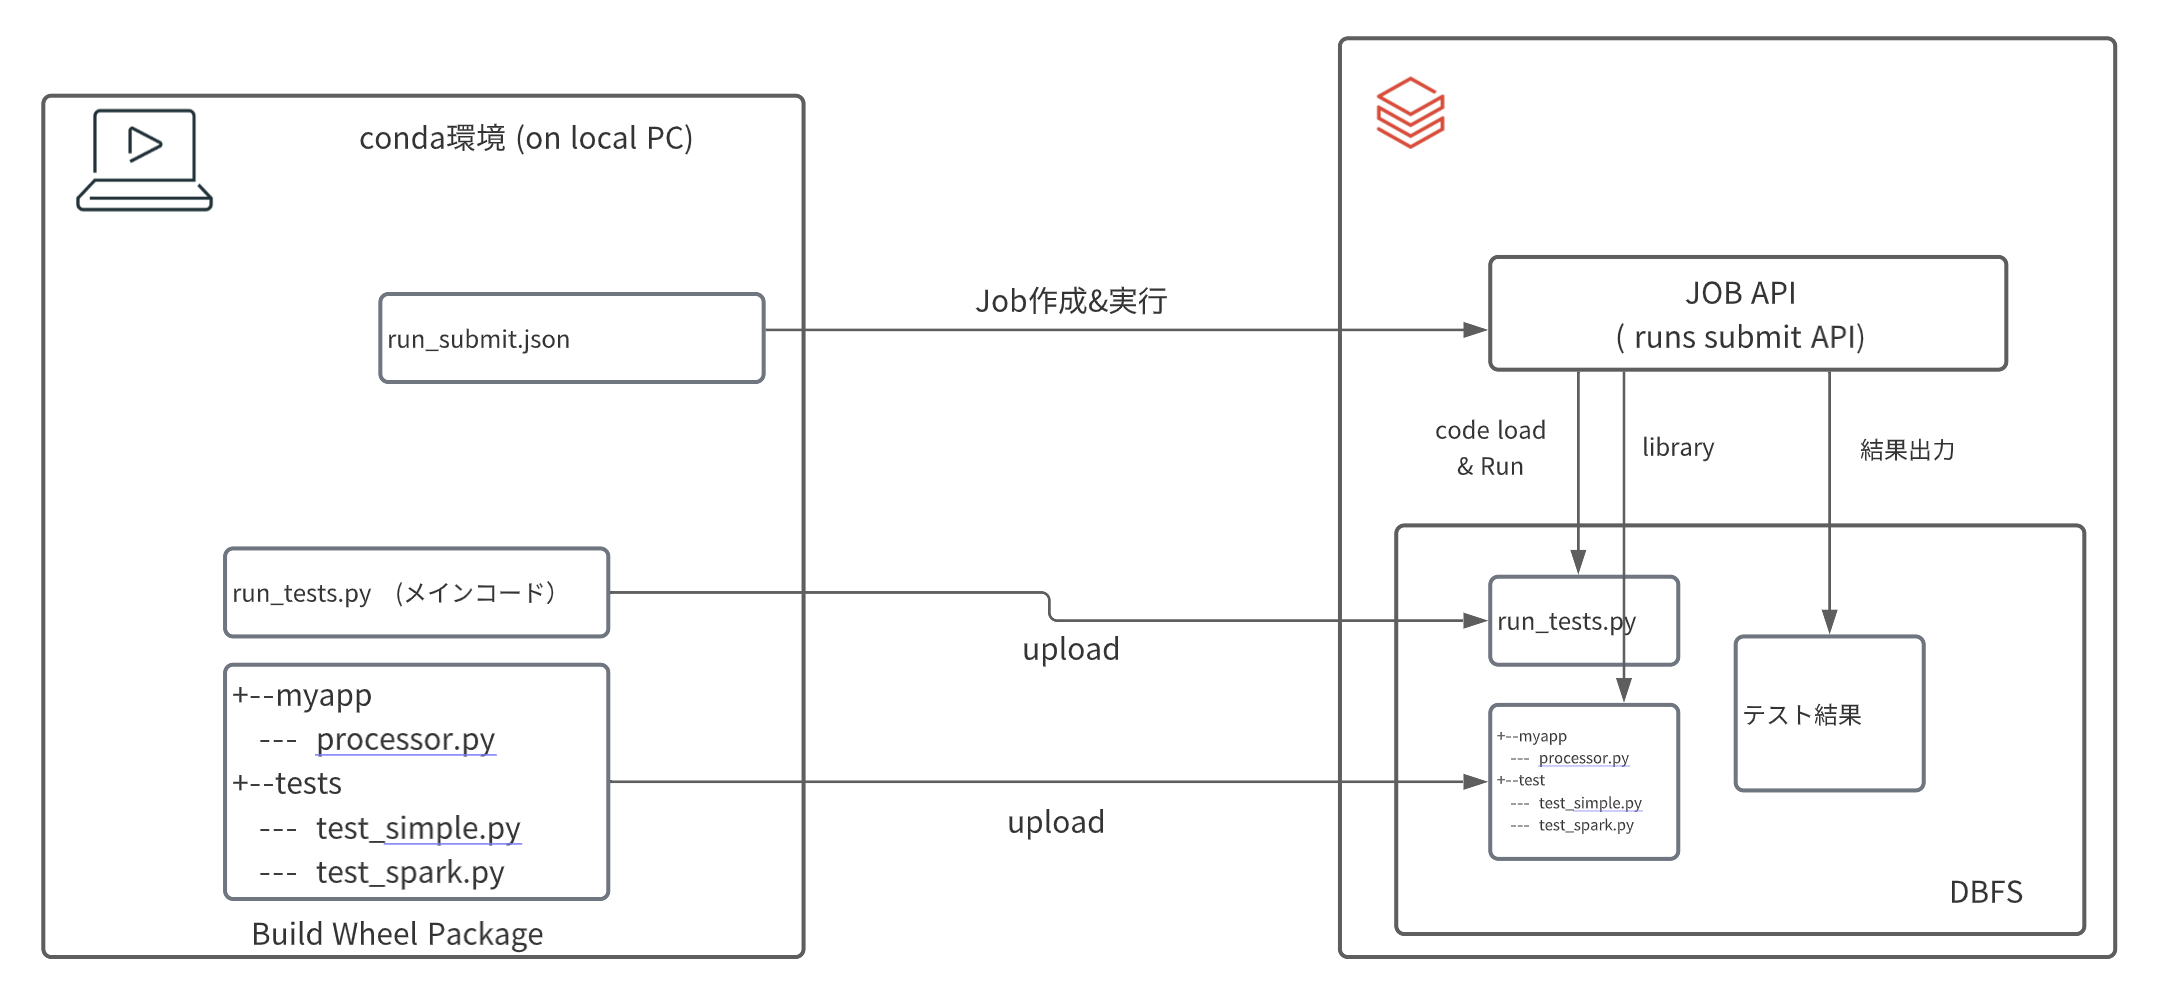
今回は上図のような動作環境で実行します。
- 予めメインコード(run_tests.py)とWheelライブラリをDBFS上にアップロード(コピー)しておきます。
- JOB APIを利用して、アップロードしたコードを実行します。
- 最後に結果を確認
環境準備
今回のサンプルコードをクローンしておきます。
git clone https://github.com/amesar/databricks-tests.git
Databricks Workspace and Authentication
DBFS上にファイルをアップロード(コピー)するため、databricks-cliをローカルPCにインストールし、対象ワークスペースの構成をセットアップします。databricks-cli のインストール&セットアップ詳細は@ktmrmshkさんの記事をご覧ください。
Conda環境の作成
wheelパッケージ作成のためconda環境を作成しdatabricks-testsをアクティベートします。(conda.yaml)
conda env create --file conda.yaml
conda activate databricks-tests.   ## conda.yaml ファイルに環境名(databricks-tests)が記載
以上でローカルPC側の環境準備は終了です。
それでは早速コードを実行していきましょう。
コード内容の確認
JOB実行内容 (run_submit)
まずは、JOB APIを利用して実行する内容を確認しておきます。 run_submit.json.templateをコピーして、{DBFS_DIR}の箇所を全て自分で指定するDirecotoryに書き換えます。(今回は、dbfs:/tmp/jmaru/jobs/myappに変更)
あと、クラスターの spark_versionも適宜最新版に変更しておきます。
以下を見てみると、libraryとしてdatabricks_tests_example-0.0.1-py3-none-any.whlというwheelファイルと、タスクとしてrun_tests.pyが必要であることがわかります。
これらを予めDBFSの指定したDirectory上にアップロードする必要がありそうです。
{
  "run_name": "jmaru_DatabricksTestsExample",
  "new_cluster": {
    "spark_version": "10.4.x-scala2.12",
    "node_type_id": "i3.xlarge",
    "num_workers": 1
  },
  "timeout_seconds": 3600,
  "libraries": [
    { "pypi": { "package": "pytest==5.3.5" } },
    { "whl": "dbfs:/tmp/jmaru/jobs/myapp/databricks_tests_example-0.0.1-py3-none-any.whl" }
  ],
  "spark_python_task": {
    "python_file": "dbfs:/tmp/jmaru/jobs/myapp/run_tests.py",
    "parameters": [ "--pyargs", "tests", "-s", "-v", "--junit-xml", "dbfs:/tmp/jmaru/jobs/myapp/junit.xml" ]
  }
}
Wheelライブラリ(databricks_tests_example-0.0.1-py3-none-any.whl)
pytestのテストコードや、チェック対象となるコードは予めWheelパッケージとしてまとめておきます。Wheelを作成するため、example Directoryを見ると以下のような構成で配置してあります。
example/
  +-- setup.py
  +-- myapp/
       |-- __init.py__
       |-- processor.py
  +-- tests/
       |-- __init.py__
       |-- test_simple.py
       |-- test_spark.py
それぞれのコードの内容はこちらです。
まずは、チェック対象となるコードはこちらです。今回はシンプルに'num'列の値をn倍する関数になります。
from pyspark.sql.functions import col

def multiply(df, n):
    return df.withColumn("num", col("num") * n)
pytestでテストするコードは2つあります。一つはそのままpassを返しますが、下のtest_spark.pyは計算して結果があっているかチェックしてくれます。
import pytest

class TestSimple():
    def test_simple(self):
        pass
from pyspark.sql import SparkSession
import pytest
from myapp import processor

spark = SparkSession.builder.getOrCreate()

class TestSpark():
    def test_multiply(self):
        df = spark.createDataFrame([[1], [2], [3]], [ "num" ] )
        df = processor.multiply(df, 2)
        df2 = spark.createDataFrame([[2], [4], [6]], [ "num" ] )
        assert df.collect() == df2.collect()
Wheelを作成するためのsetup.pyの中身はこちらです。
from setuptools import setup

setup(name='databricks_tests_example',
      version='0.0.1',
      description='databricks-tests-example',
      author='Andre',
      packages=[
        'myapp',
        'tests'
        ],
      zip_safe=False)
メインコード(run_tests.py)
メインコードである、run_tests.pyはこちらです。 単純に読み込んだpytestのwheelライブラリを実行して結果を表示します。run_submitの引数で結果の出力先のDBFSに結果(junit.xml)が出力されます。
import os
import sys

if __name__ == "__main__":
    import pytest
    args = [ arg.replace("dbfs:","/dbfs") for arg in sys.argv[1:] ]
    print("run_tests: args:",args)
    errcode = pytest.main(args)
    print("run_tests: errcode:",errcode)
    if errcode != 0:
        sys.exit(errcode)
    #sys.exit(0) # causes run failure!
セットアップ&実行
それでは、コードの概要がわかったので実際に試してみたいと思います。
1. Wheel作成
それでは example Directoryに移動して、Wheelを作成します。
python setup.py bdist_wheel
dist directoryにwheelファイルが作成されていれば成功です。
ls dist/
databricks_tests_example-0.0.1-py3-none-any.whl
2. DBFSへコードのアップロード
メインコードとWheelファイルをDBFS上にアップロードします。
databricks fs cp ../test-harness/databricks_test_harness/run_tests.py dbfs:/tmp/jmaru/jobs/myapp/run_tests.py --overwrite
databricks fs cp dist/databricks_tests_example-0.0.1-py3-none-any.whl dbfs:/tmp/jmaru/jobs/myapp/databricks_tests_example-0.0.1-py3-none-any.whl
3. JOB(run submit)実行
こちらを実行すると、JOB用のクラスターが作成され、コードが実行されます。
databricks runs submit --json-file run_submit.json
実行すると、run_idが返ってきます。
{
  "run_id": 2404336
}
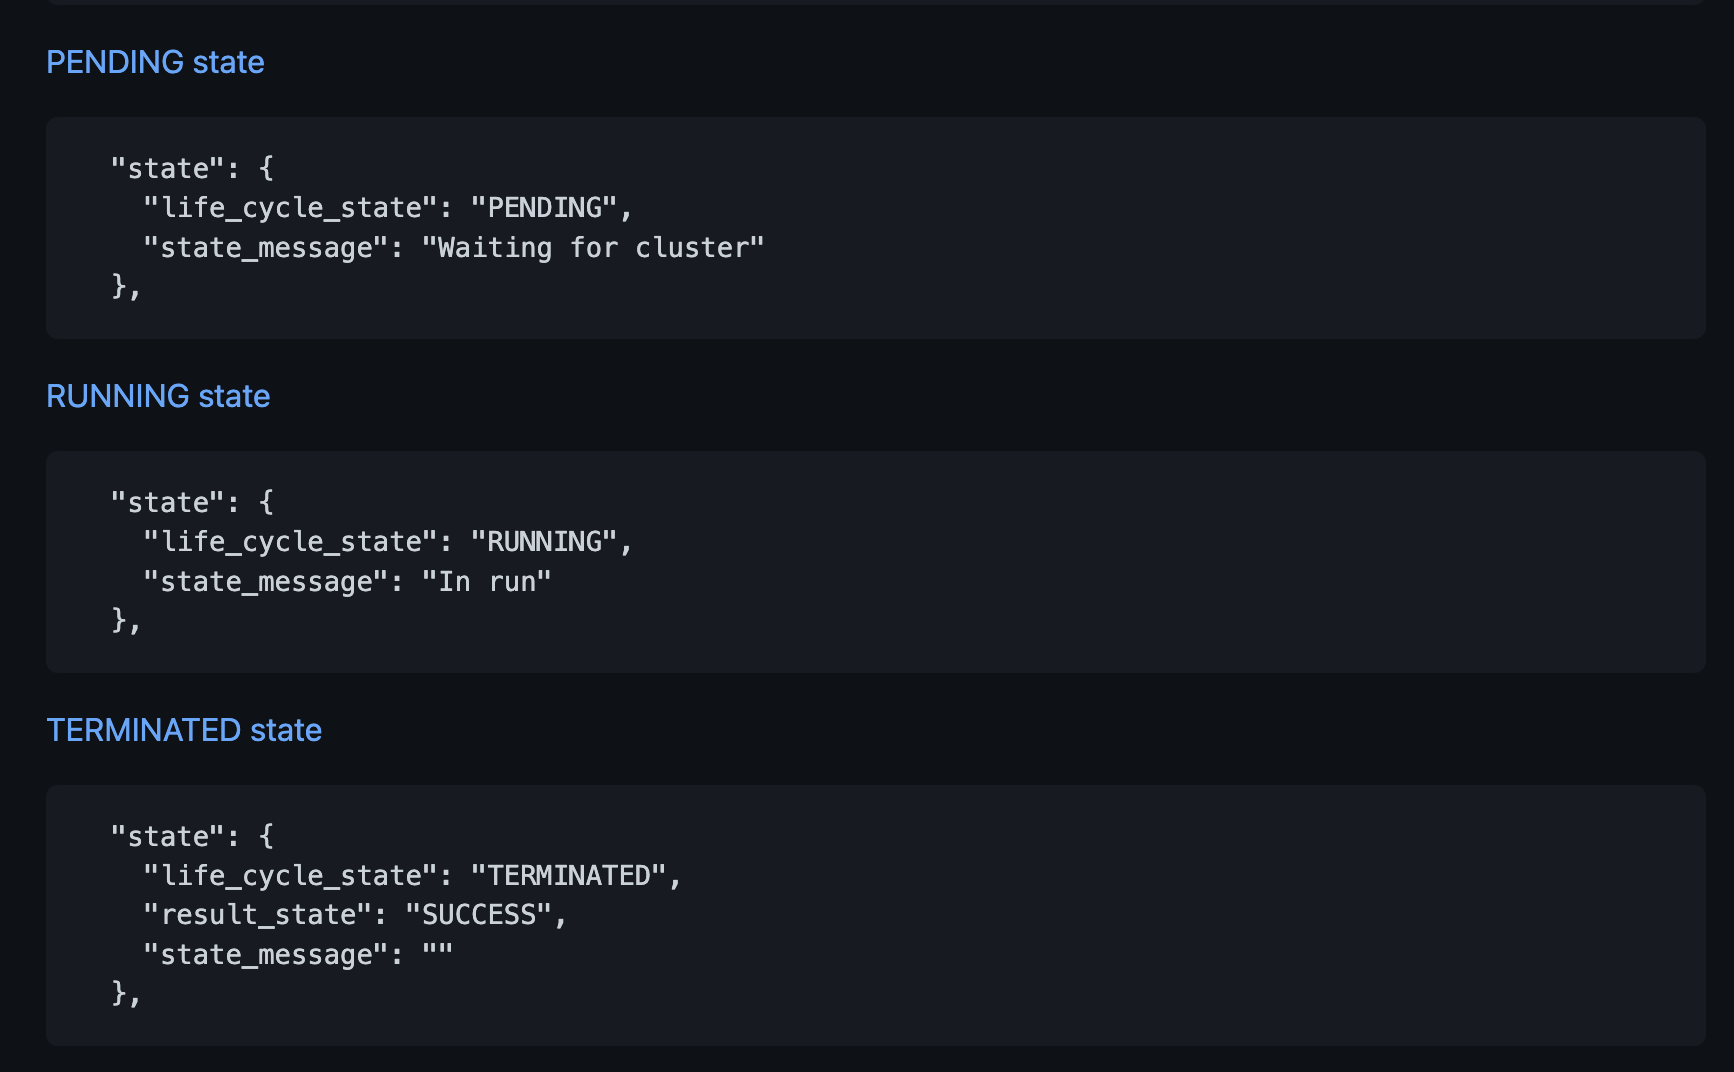
Jobのステータスはコマンドで確認します。
databricks runs get --run-id 2404336
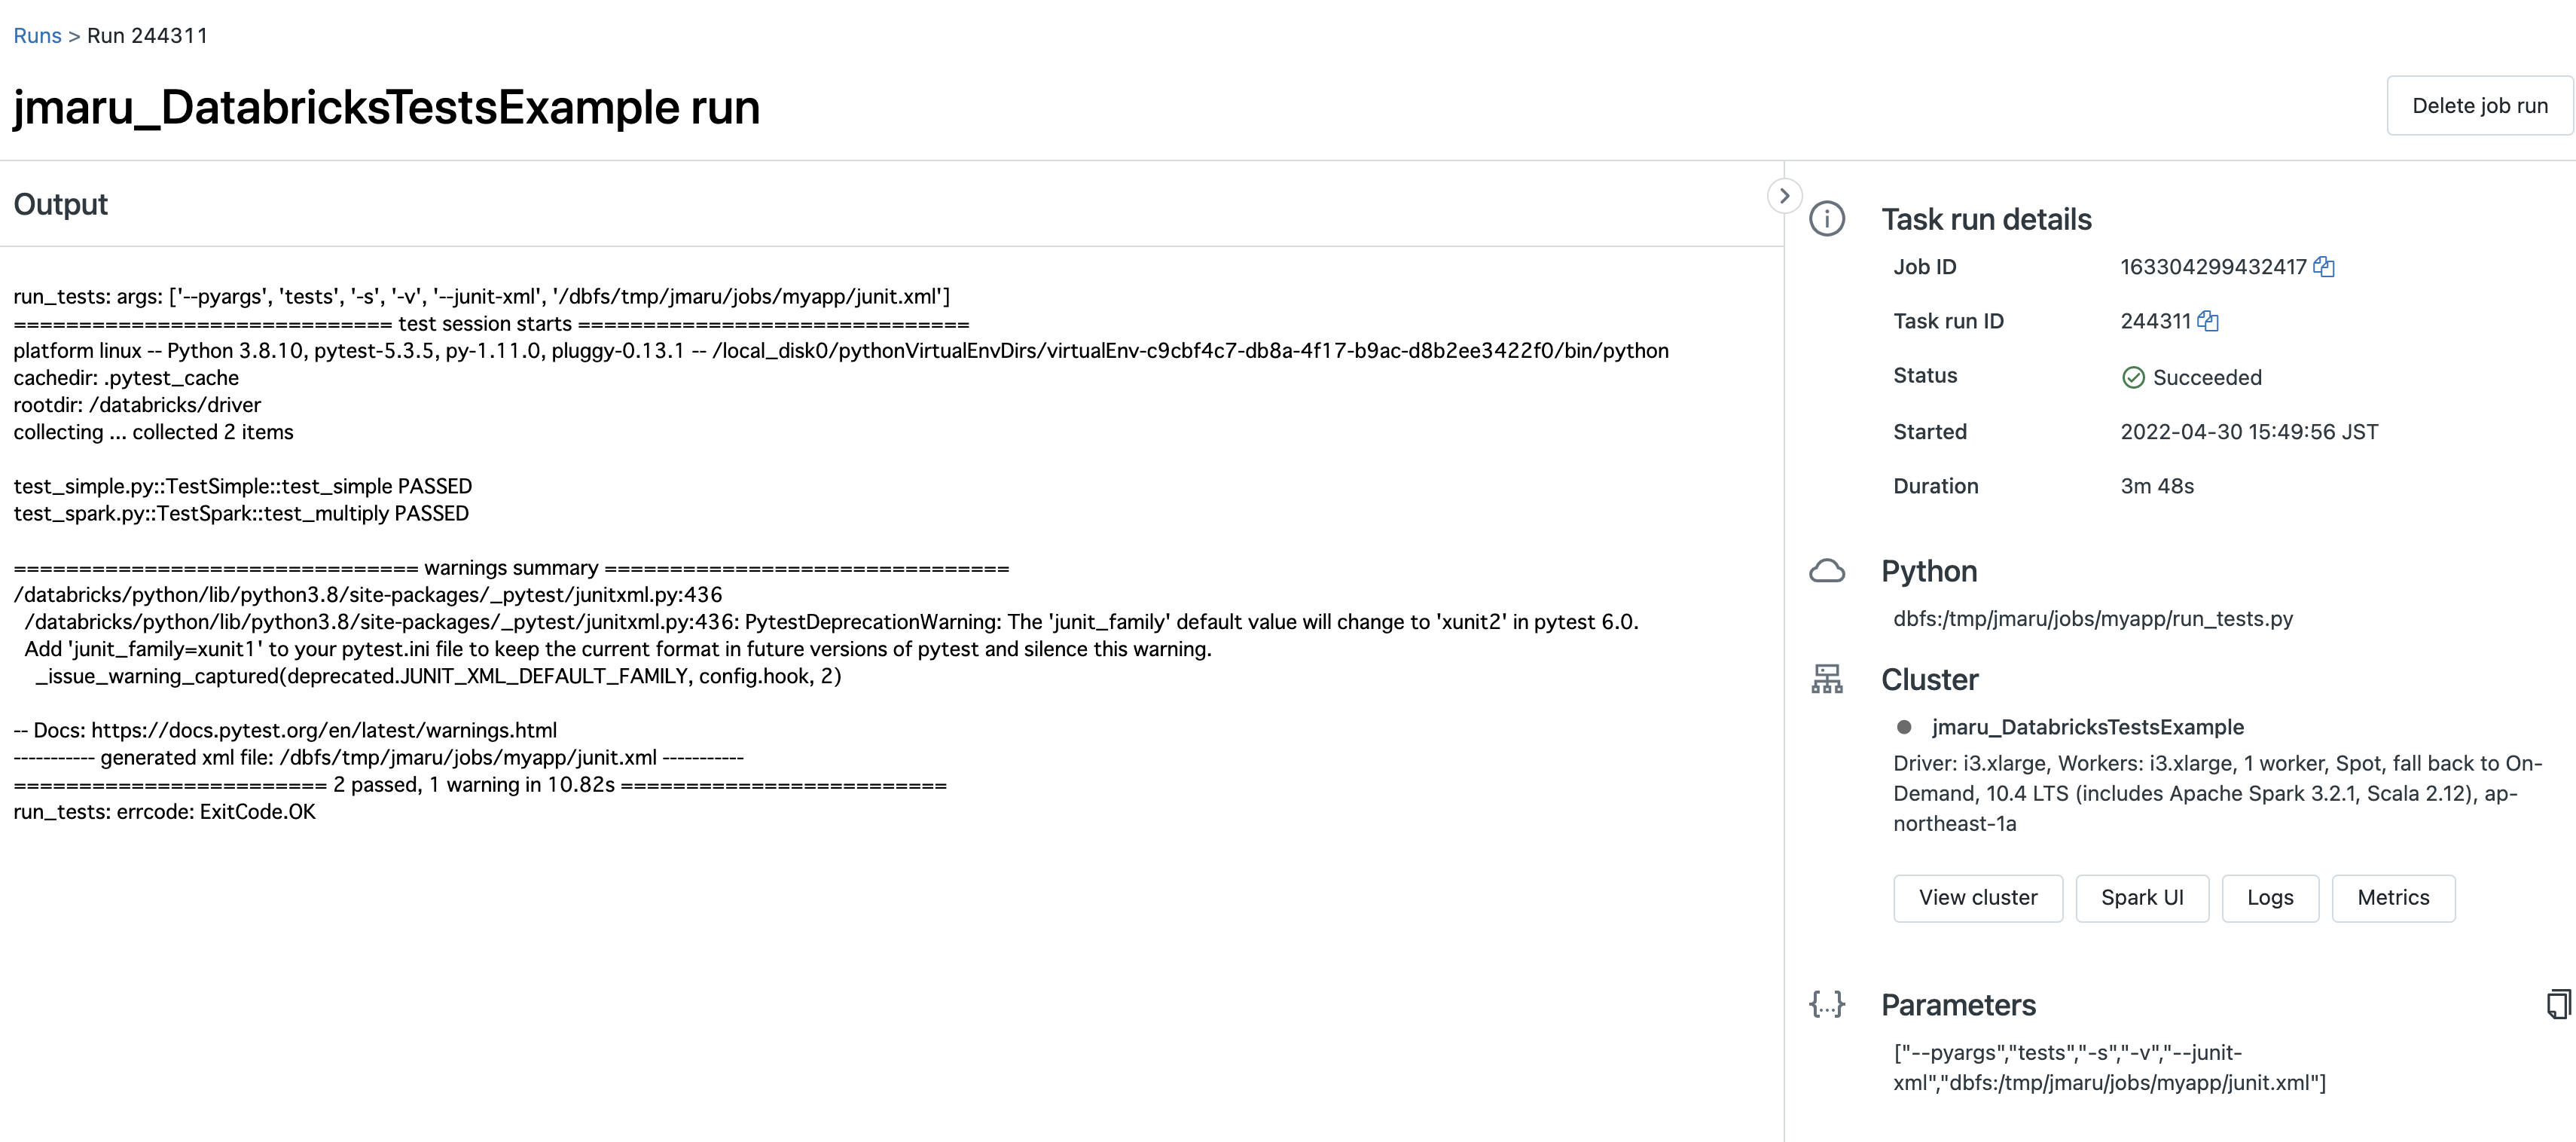
Databricks workspace側でも実行結果が確認できます。(Jobs --> Job runs)
出力された結果(junit.xml)をダウンロードして確認します。
databricks fs cp dbfs:/tmp/jmaru/jobs/myapp/junit.xml .
<?xml version="1.0" ?>
<testsuites>
  <testsuite
     errors="0"
     failures="0"
     hostname="0716-190309-boll22-10-0-249-156"
     name="pytest"
     skipped="0"
     tests="2"
     time="8.975"
     timestamp="2020-07-16T19:06:17.155587">
     <testcase classname="test_simple.TestSimple"
       file="../python3/lib/python3.7/site-packages/tests/test_simple.py"
       line="3"
       name="test_simple"
       time="0.001"/>
     <testcase classname="test_spark.TestSpark"
       file="../python3/lib/python3.7/site-packages/tests/test_spark.py"
       line="6"
       name="test_multiply"
       time="8.829"/>
  </testsuite>
</testsuites>
最後に
上記は確認のためマニュアルでセットアップしていきましたが、これらを自動化するworkflowスクリプトも用意されております。
github actionsなどと組み合わせれば、CI/CDも実現可能です。
(追記)
GitHub Actionsと連携させた記事はこちらです。
https://qiita.com/maroon-db/items/48668d5f4c4b65ab6c1d