.NET nanoFrameworkのサンプルプログラム5つ目です。
Azure IoT Centralに接続してみましょう。
M5ATOM Matrixに ENVIII UNITを接続して、IoT Centralアプリケーションに温度、湿度のデータを送信してみます。
IoT Centralアプリケーションはあらかじめ作成しておいてください。(まだの方はこちらの記事前半を参照して作成しておいてください。)
ハードウェア
・M5 ATOM Matrix
・ENVIII UNIT(SHT30温湿度センサー)
ソフトウェア
・VisualStudio2019
・ファームウェア ESP32_PICO 1.7.4-preview.54
・Azure IoT Central
追加するNuGetパッケージ
・nanoFramework.System.Device.WiFi 1.4.0-preview.36
・nanoFramework.Azure.Devices.Client 1.0.0-preview.222
・nanoFramework.Hardware.Esp32 1.3.5-preview.7
・nanoFramework.Iot.Device.Sht3x 1.0.288-preview.77
・nanoFramework.ResourceManager 1.1.4-preview.8
プログラム
using System;
using System.Diagnostics;
using System.Threading;

//追加
using System.Device.WiFi;
using nanoFramework.Networking;
using System.Security.Cryptography.X509Certificates;
using nanoFramework.Azure.Devices.Client;
using nanoFramework.Azure.Devices.Provisioning.Client;
using nanoFramework.M2Mqtt.Messages;
using System.Device.I2c;
using Iot.Device.Sht3x;
using nanoFramework.Hardware.Esp32;

namespace NF_ATOM_IoTCentral
{
    public class Program
    {
        const string ssid = "YOUR SSID";
        const string password = "PASSWORD";

        const string dspaddress = "global.azure-devices-provisioning.net";
        const string idscope = "IDSCOPE";
        const string registrationid = "DEVICEID";
        const string saskey = "SASKEY";

        public static void Main()
        {
            //Wifi接続
            if (!ConnectWifi())
            {
                Debug.WriteLine("Wifi Connection failed...");
                return;
            }
            else
            {
                Debug.WriteLine("Wifi Connected...");
            }

            //ROOT CA 証明書
            X509Certificate certificate = new (Resource.GetBytes(Resource.BinaryResources.BaltimoreCyberTrustRoot));

            //DPS設定
            var provisioning = ProvisioningDeviceClient.Create(dspaddress, idscope, registrationid, saskey, certificate);

            //DPSから情報取得
            var myDevice = provisioning.Register(null, new CancellationTokenSource(30000).Token);

            if (myDevice.Status != ProvisioningRegistrationStatusType.Assigned)
            {
                Debug.WriteLine($"Registration is not assigned: {myDevice.Status}, error message: {myDevice.ErrorMessage}");
                return;
            }

            Debug.WriteLine($"Device successfully assigned:");

            //IoTCentoralに接続
            var device = new DeviceClient(myDevice.AssignedHub, registrationid, saskey,MqttQoSLevel.AtMostOnce,certificate);
            var res = device.Open();

            if (!res)
            {
                Debug.WriteLine("can't open the device");
                return;
            }

            //I2C Setting
            Configuration.SetPinFunction(26, DeviceFunction.I2C1_DATA);
            Configuration.SetPinFunction(32, DeviceFunction.I2C1_CLOCK);

            //Sensor Address
            I2cConnectionSettings settings = new I2cConnectionSettings(1, 0x44);

            //センサー
            using I2cDevice i2cdevice = I2cDevice.Create(settings);
            using Sht3x sensor = new(i2cdevice);

            while (true)
            {
                //データ送信
                device.SendMessage($"{{\"temperature\":{sensor.Temperature.DegreesCelsius.ToString("F2")},\"humidity\":{sensor.Humidity.Percent.ToString("F2")}}}",new CancellationTokenSource(2000).Token);

                Debug.WriteLine($"{{\"temperature\":{sensor.Temperature.DegreesCelsius.ToString("F2")},\"humidity\":{sensor.Humidity.Percent.ToString("F2")}}}");

                Thread.Sleep(60000);
            }
        }

        private static bool ConnectWifi()
        {
            Debug.WriteLine("Connecting WiFi");

            var success = WiFiNetworkHelper.ConnectDhcp(ssid, password, reconnectionKind: WiFiReconnectionKind.Automatic, requiresDateTime: true, token: new CancellationTokenSource(60000).Token);

            if (!success)
            {
                Debug.WriteLine($"Can't connect to the network, error: {WiFiNetworkHelper.Status}");
                if (WiFiNetworkHelper.HelperException != null)
                {
                    Debug.WriteLine($"ex: {WiFiNetworkHelper.HelperException}");
                }
            }

            Debug.WriteLine($"Date and time is now {DateTime.UtcNow}");

            return success;
        }
    }
}
・IoT Centralに接続するにはDPSサーバから接続情報を取得する必要があります。nanoFramework.Azure.Devices.ClientパッケージにDPSクライアントが含まれているのでそれを使って簡単に接続することができます。
・接続に必要なRootCA証明書はIoT Hubの時とは違いプロジェクトにリソースとして追加しそれを読み込むようにします。
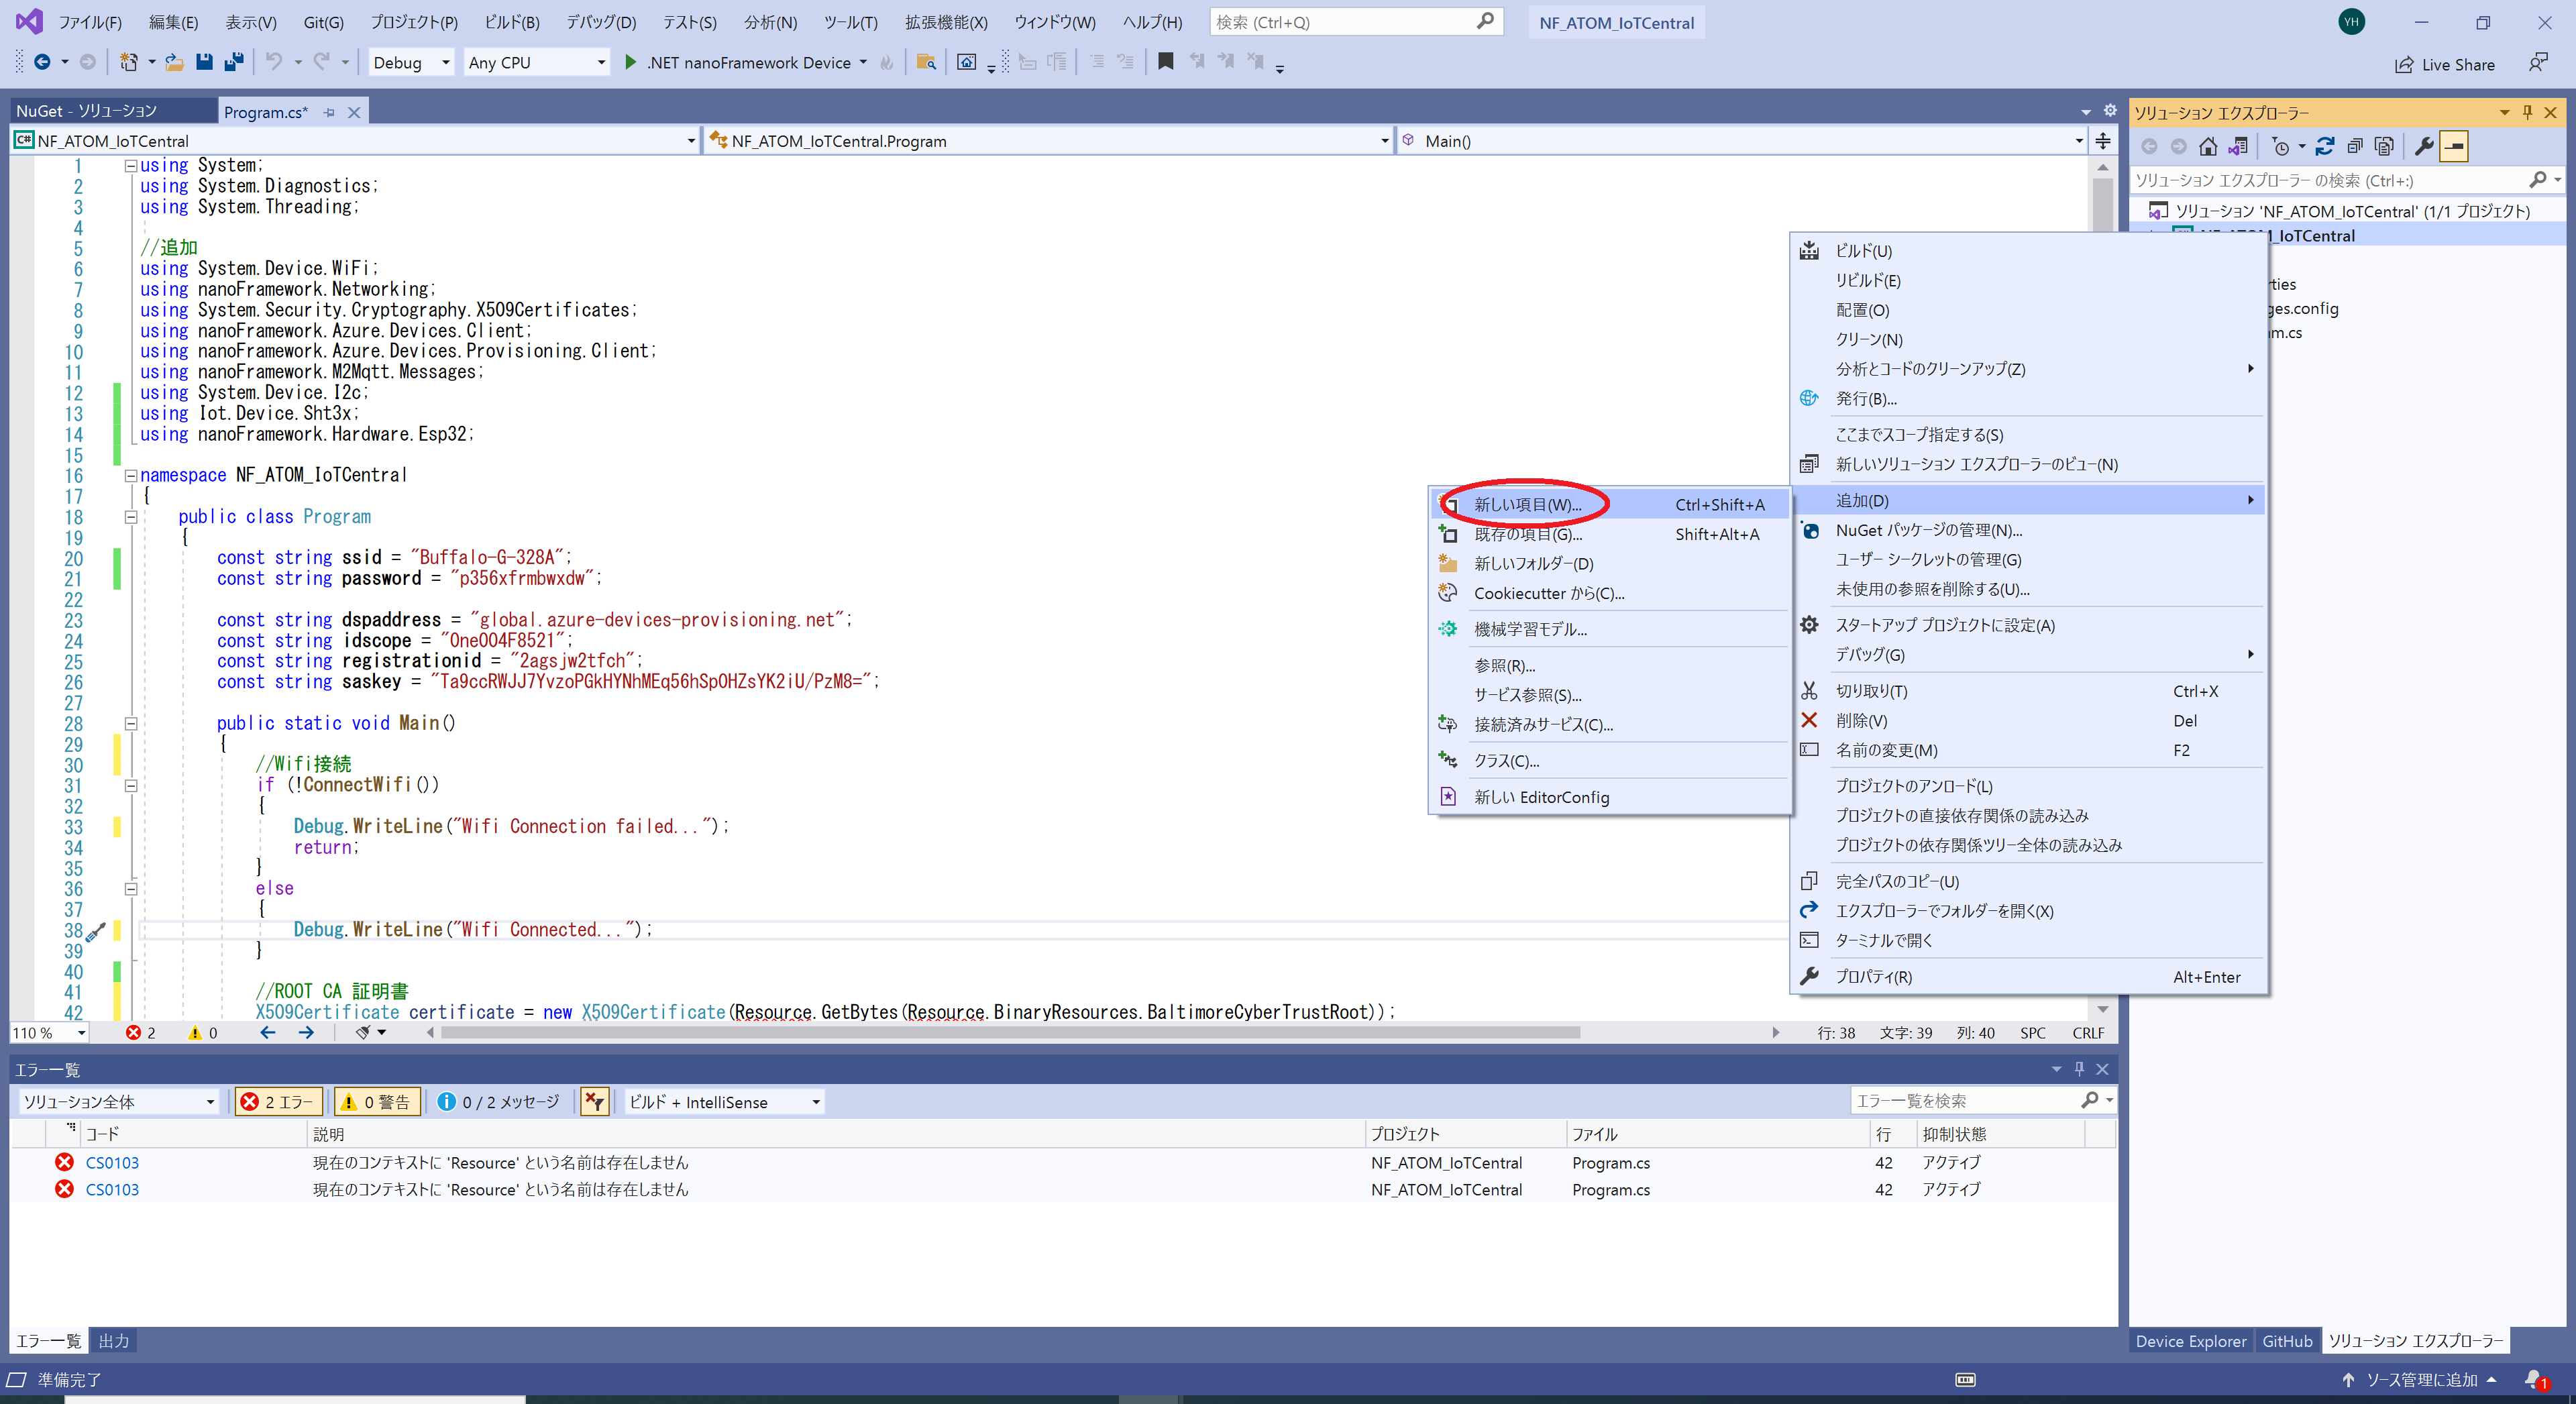
・ソリューションエクスプローラーのプロジェクト名を右クリックして追加>新しい項目をクリックします。
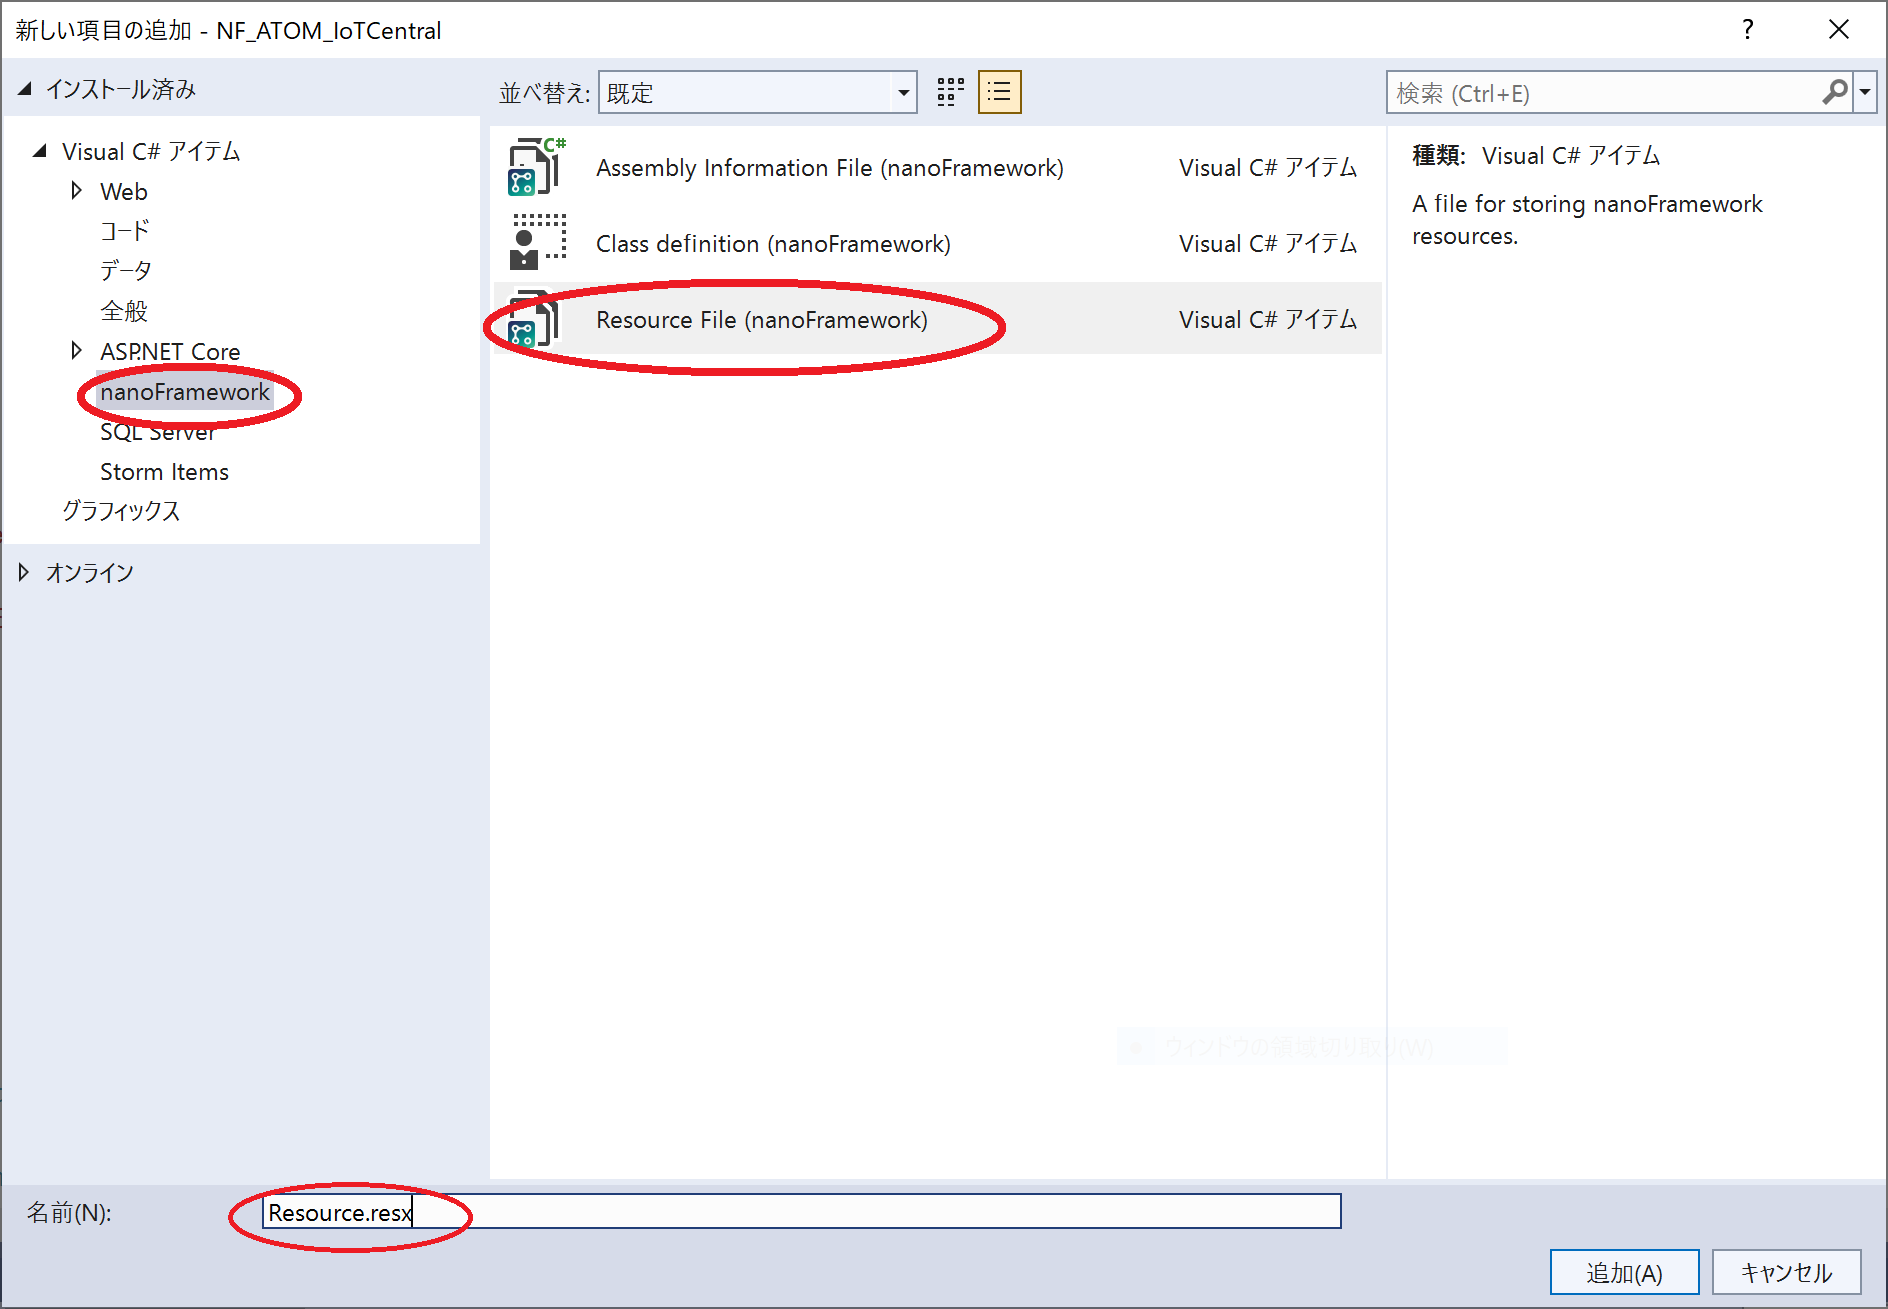
・nanoFramework用のResource Fileを選択して、ファイル名をResource.resxとして追加します。
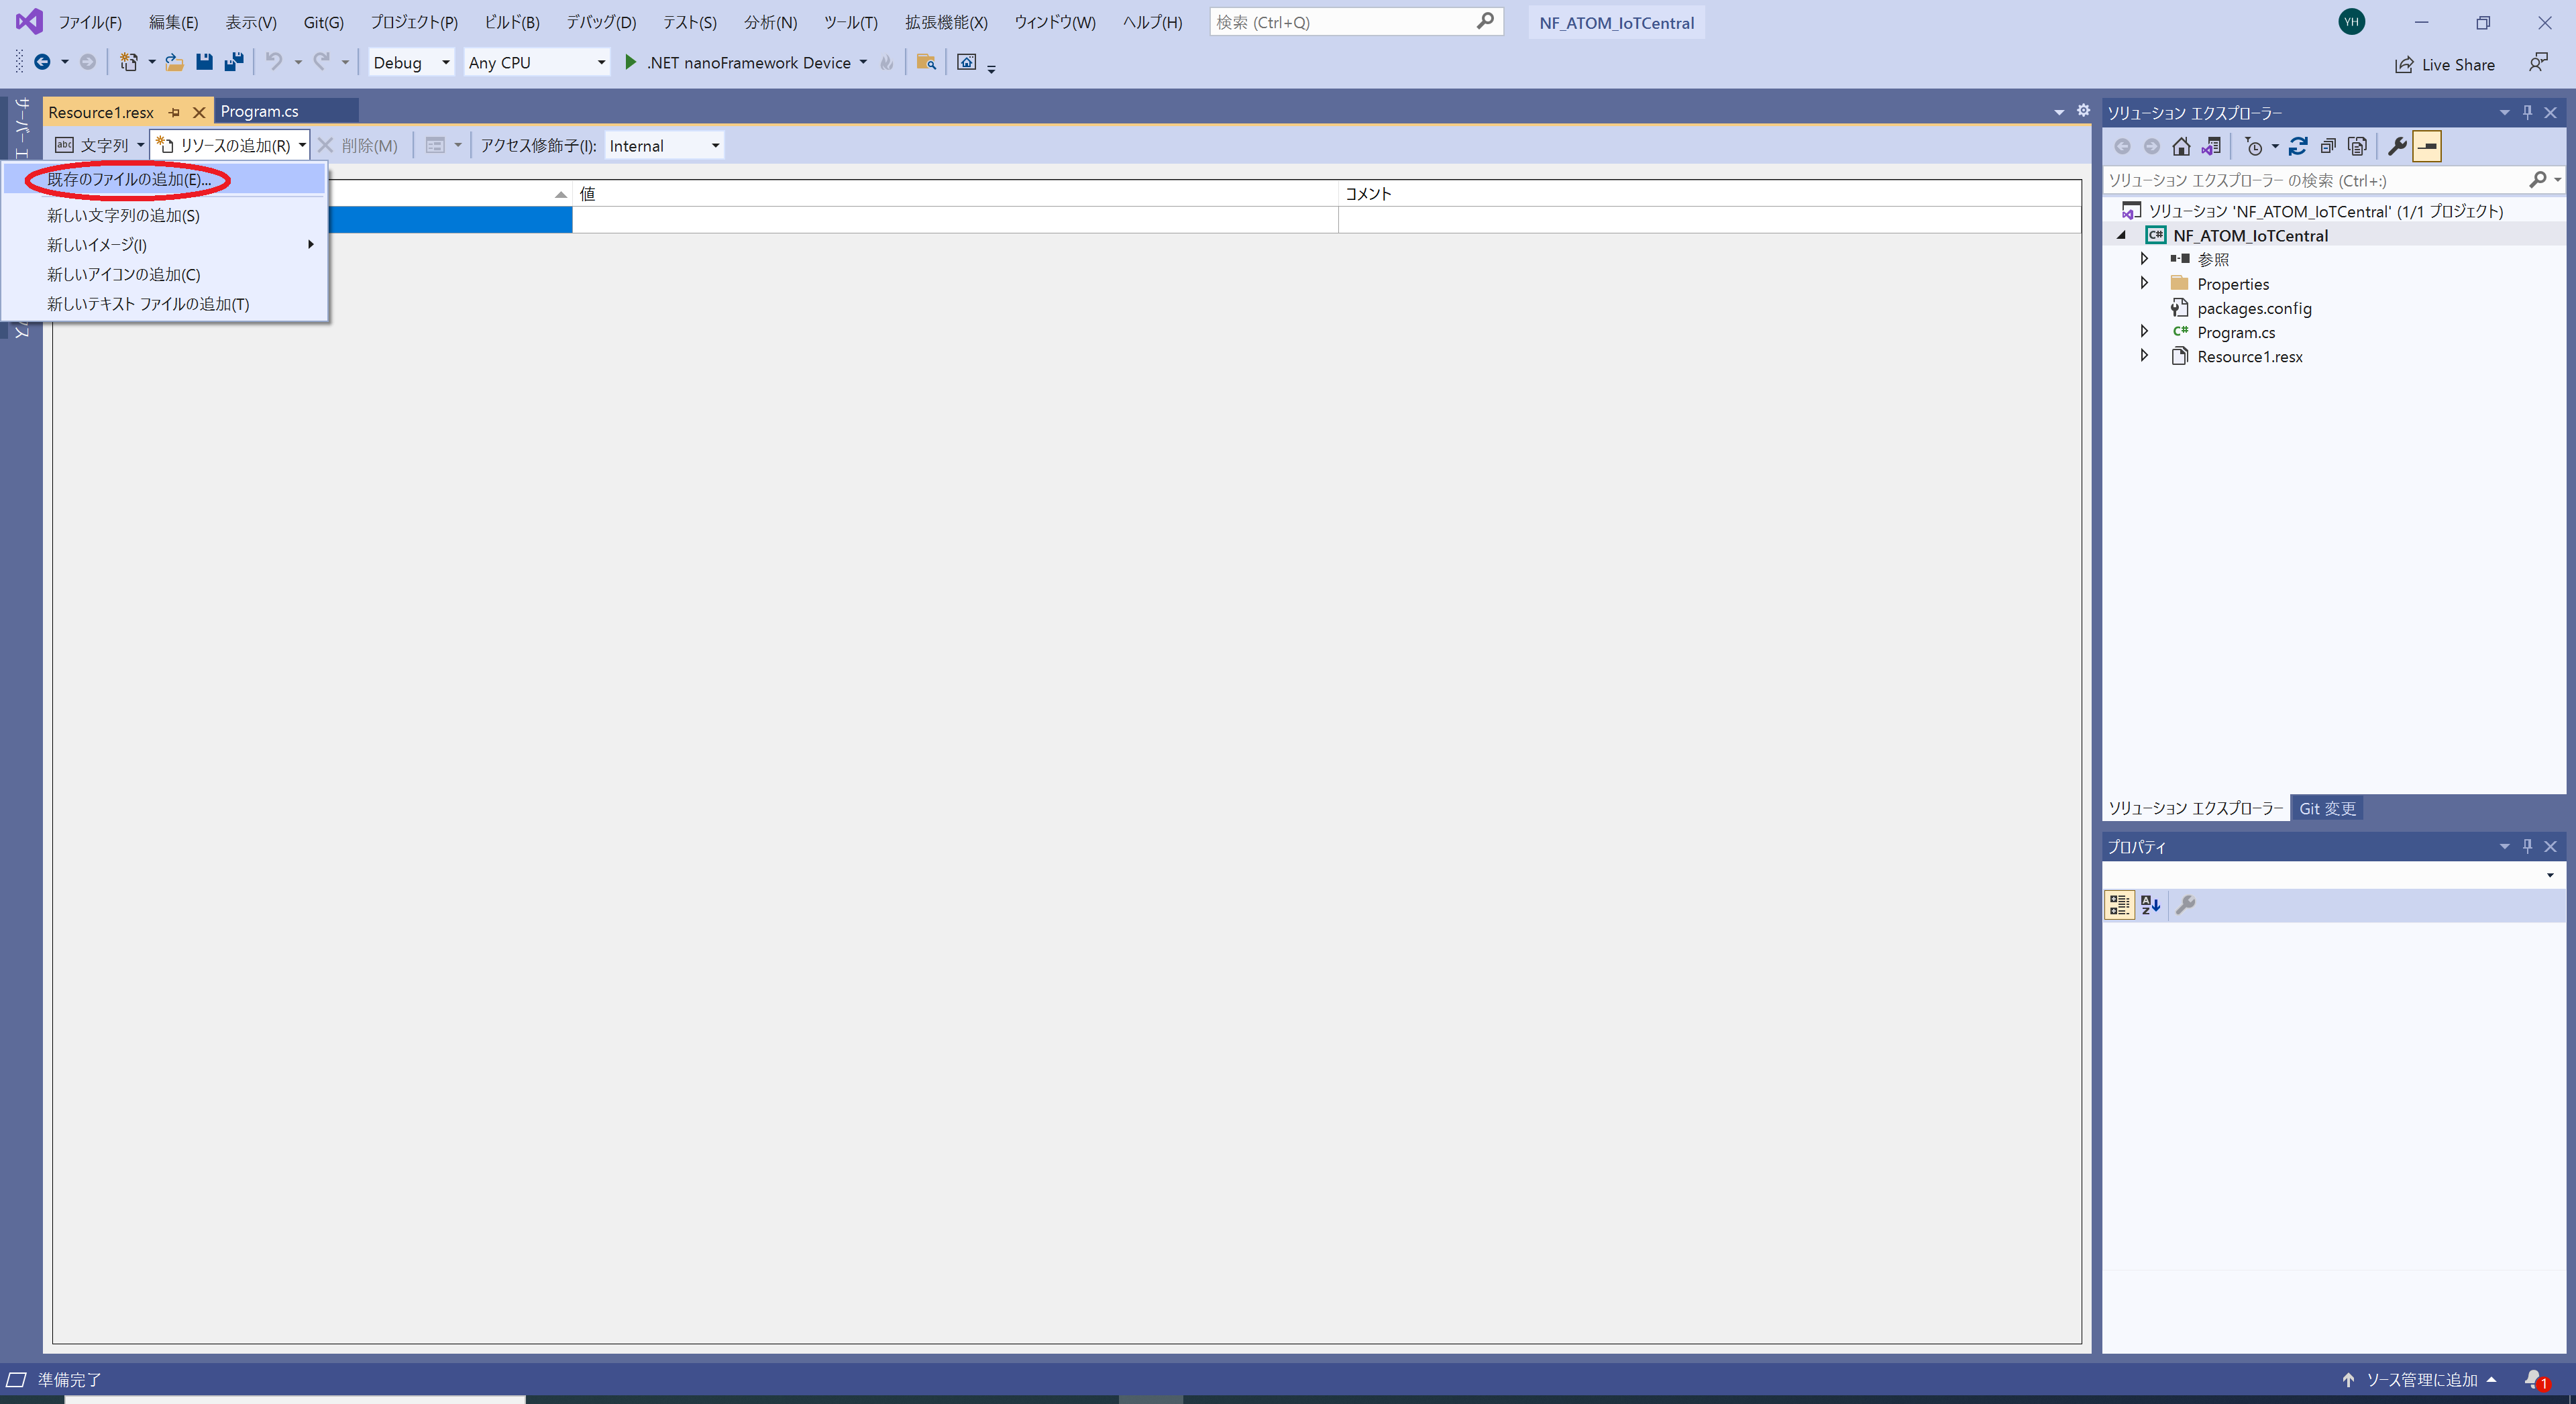
・リソースの追加>既存のファイルの追加を選択します。
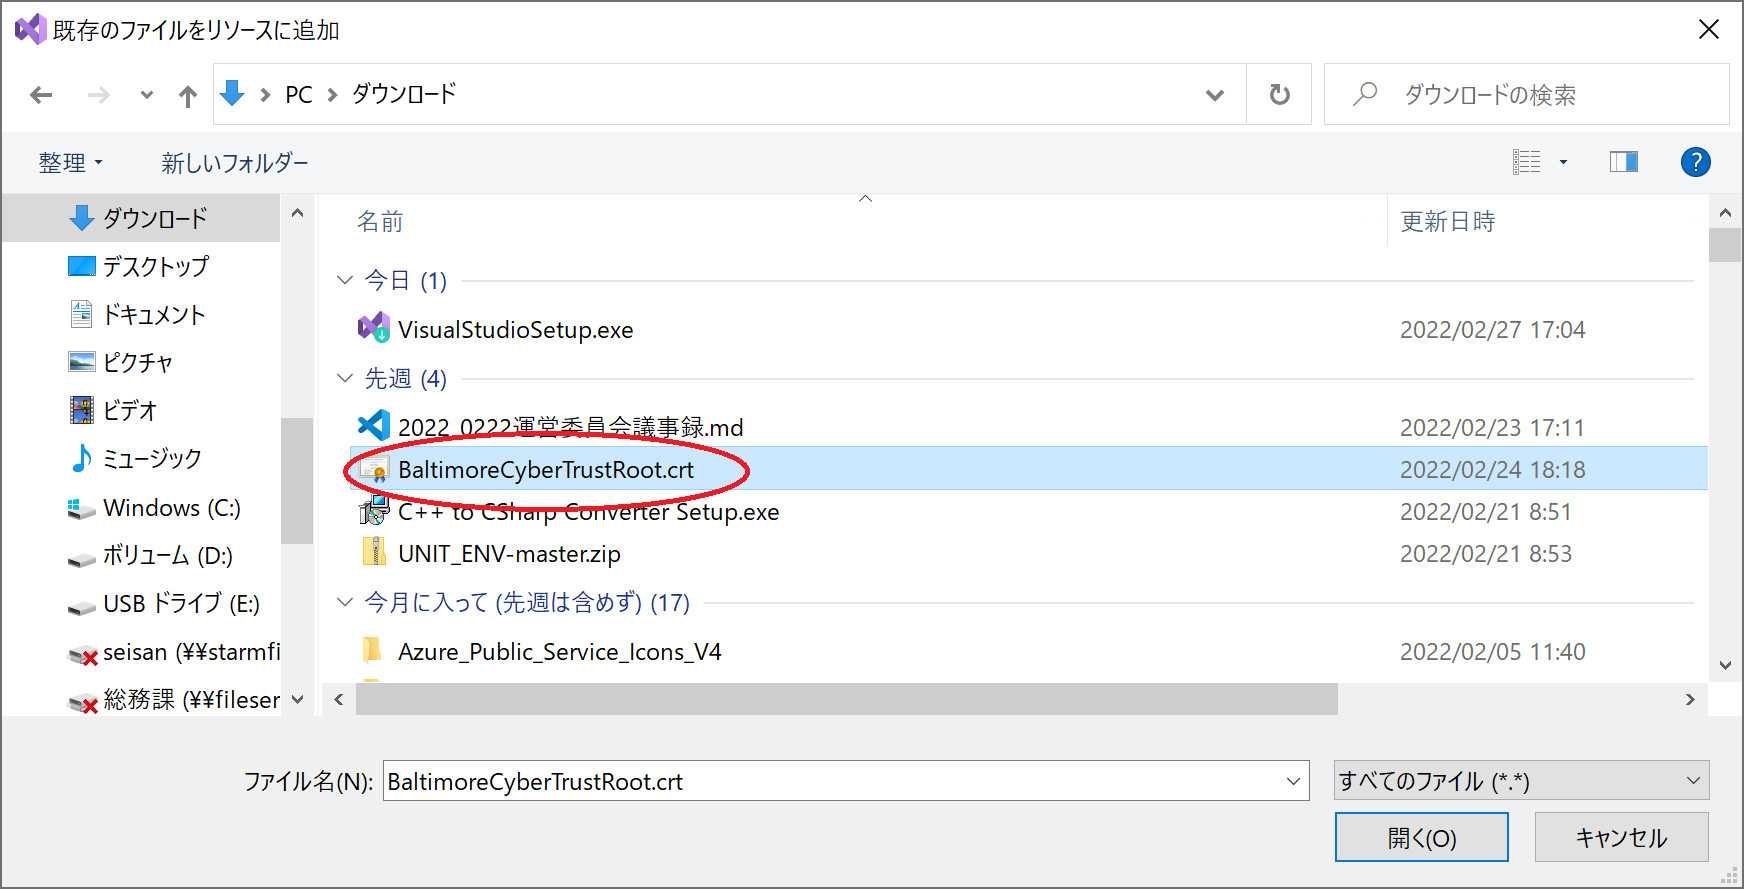
・IoT Hubの時と同じRootCA証明書を選択して、リソースに追加します。
以上で Azure IoT Central用のデバイスが完成となります。
ソースコード一式はこちらからダウンロードできます。