先日AngularDartが0.14.0にアップデートしたので、新機能であるPolymerサポートのサンプルを触ってみました。公式のリポジトリはこちらです。
今回のサンプルはこちらにリポジトリを公開しているので、以下読み飛ばしてサンプルいじっていただいて結構です。
準備
まずDartのWebアプリケーションなので、ルートにpubspec.yamlとwebフォルダを作ります。
必要なpubspecはこんな感じです。AngularDartは破壊的変更激しいのでバージョンちゃんと指定しましょう。
name: angular-paper
dependencies:
  browser: any
  angular: ">=0.14.0 <0.15.0"

transformers:
- angular
まだpubのpolymer.dart、paper-elementsとは依存関係がマッチしないらしく、公式のサンプルでもbowerとの併用をしているので、bower.jsonも書きます。
{
  "name": "paper-example",
  "version": "0.0.1",
  "homepage": "",
  "authors": [],
  "description": "Paper with AngularDart",
  "main": "web/paper.html",
  "license": "MIT",
  "private": true,
  "ignore": [
    "**/.*",
    "node_modules",
    "bower_components",
    "test",
    "tests"
  ],
  "dependencies": {
    "polymer": "Polymer/polymer#~0.3.4",
    "paper-elements": "Polymer/paper-elements#~0.3.4",
    "core-elements": "Polymer/core-elements#~0.3.4"
  }
}
このままだとルートディレクトリにbower_componentsできちゃうので、webディレクトリの下にできるように.bowerrcも書きます。
{
  "directory": "web/bower_components",
  "json": "bower.json"
}
ここまでできたら$ bower install && pub installして依存関係解決しましょう。
HTML側
paper-elementsを使うHTMLを書きます。公式のサンプルとはちょっと変えてあります。
<!DOCTYPE html>
<html>
<head>
    <meta name="viewport" content="width=device-width, minimum-scale=1.0, initial-scale=1.0, user-scalable=yes">

    <!-- 1. Load platform.js for polyfill support. -->
    <script src="bower_components/platform/platform.js"></script>

    <!-- 2. Use an HTML Import to bring in the element. -->
    <link rel="import" href="bower_components/paper-progress/paper-progress.html">
    <link rel="import" href="bower_components/paper-checkbox/paper-checkbox.html">
    <link rel="import" href="bower_components/paper-slider/paper-slider.html">
    <script type="application/dart" src="paper.dart"></script>
    <script src="packages/browser/dart.js"></script>
    <style>
        div {
            padding: 0.25em;
        }

        paper-slider {
            width: 40em;
        }
    </style>
</head>
<body>
<h1>Polymer components inside a AngularDart app</h1>

<h2>Property binding: paper-progress</h2>

<p>Text from Angular: <b>{{text}}</b></p>

<div>
    <paper-progress bind-max=max bind-value=curValue></paper-progress>
</div>

<p>
    <label>
        <input type="text" ng-model="curValue">
    </label>
</p>

<h2>Events: paper-checkbox</h2>

<div>
    <paper-checkbox on-change="onCheck(curValue)"></paper-checkbox>
</div>

<h2>Two-way binding: paper-slider</h2>

<div>
    <paper-slider min="0" bind-max="max" bind-value="curValue" pin="true"></paper-slider>
</div>
</body>
</html>
長々と書いていますが、headではbower_componentsからpolyfillや使うpaper-elementsのコンポーネント、自作のpaper.dartを読み込んでいます。注目するポイントは各paper-elementsの属性にあるbind-*とon-*です。
bind-*はAngularDartがpolymer-elementsのフィールドとバインドするための属性です。
<paper-progress bind-max=max bind-value=curValue></paper-progress>
によって、paper-progressのmax属性がAngular側のフィールドmaxに、value属性がAngular側のフィールドcurValueに双方向バインドされます。
on-*はpolymer-elementsのイベントを受け取るための属性です。
<paper-checkbox on-change="onCheck(curValue)"></paper-checkbox>
によって、paper-checkboxのchangeイベントをAngular側の関数onCheckで受け取ることができます。
また、従来のngModelとの両立も可能です。
<input type="text" ng-model="curValue">
で、curValueの値がinput要素とバインディングされます。
Dart側
Angularの処理を書いたpaper.dartはこのようになっています。
import 'package:angular/angular.dart';
import 'package:angular/application_factory.dart';


main() {
  var app = applicationFactory().run();
  Scope scope = app.get(Scope);
  scope.context['text'] = "Hello future";
  scope.context['max'] = 20;
  scope.context['curValue'] = 12;
  scope.context['onCheck'] = (curValue) {
    scope.context['curValue'] = curValue == 5 ? 2 : curValue == 2 ? 10 : 5;
  };
  scope.apply();
}
まずAngularのアプリケーションを作成します。
var injector = applicationFactory().run();
次にデフォルトのスコープを取得します。
Scope scope = app.get(Scope);
Scope#contextはdynamic型で、HTMLとのバインドに使われています。バインドの初期値をセットします。
  scope.context['text'] = "Hello future";
  scope.context['max'] = 20;
  scope.context['curValue'] = 12;
関数を渡すこともできます。onCheckで渡された値をもとにスコープの値を適用しなおしています。
  scope.context['onCheck'] = (curValue) {
    scope.context['curValue'] = curValue == 5 ? 2 : curValue == 2 ? 10 : 5;
  };
最後にスコープを反映します。
scope.apply();
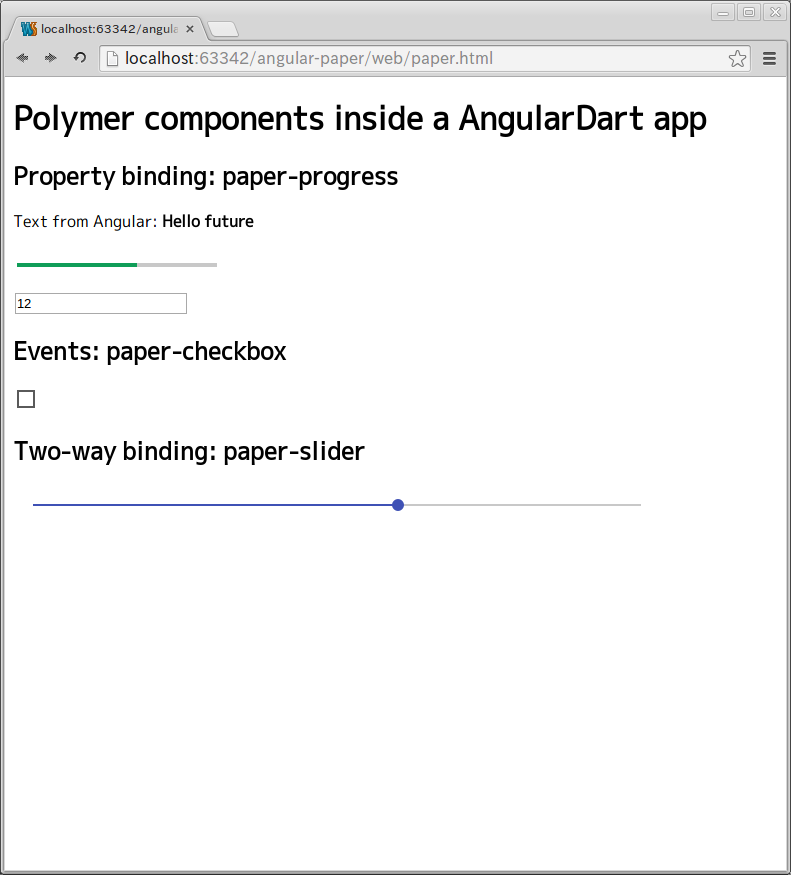
完成
こんな感じです
よかったところ
- このレベルのバインディングならコントロール作らずにdart少し書くだけで良くて楽だった
難しいところ
- AngularJS+TypeScriptのようにスコープをインタフェースとして定義して扱うのがAngularDartだとControllerを使ってScopeAware継承して〜〜という結構な段階が必要そうで、今のところ触る気がしない。
まだ0.14.0なので今後も破壊的変更が続くだろうからあんまり意味のある情報ではないですがAngularDartがPolymerと共存の道を選んだというのが重要だと思いました。