前回まででPUSHしてくれるところまでできた。
追記
この記事は、LINE Messaging APIになる前のbot trialの内容である。
内容
あまり長くなるのもあれなのでこれで一応最後まで書きたいと思う。
昨日として詰めようと思うのは
- 友達追加時のメッセージ
- 本命のチラシ
- データベース接続
かな??
順番に説明していく。
1. 友達追加時
そもそも友達追加した時とかブロックした時とかブロック解除した時ってサーバー側でなんか起こってるの?と疑問に思った。
結果は。。。。。
できる!!だ。
実際にやり方を説明する。
まずはLINE BOT APIから
| eventType | mean |
|---|---|
| 138311608800106203 | 普通のメッセージ(画像とかも含む)を送る |
| 140177271400161403 | 複数のメッセージをまとめて送る |
| 138311609000106303 | メッセージがきた時 |
| 138311609100106403 | ブロック or ブロック解除 or 友達追加 |
そしてさらにブロック周辺の情報のなかには
| opType | mean |
|---|---|
| 4 | ブロック解除と友達追加時 |
| 8 | ブロック時 |
が大事なパラメーターとしてある。
eventTypeを目的に応じたものにする事がわかるとグッとできることが増える。
毎回恒例 実際にきたやつ
{
"result"=>[{"content"=>{"params"=>["自分のID", nil, nil],
                        "message"=>nil,
                        "reqSeq"=>0,
                        "revision"=>306,
                        "opType"=>8 #大事
                        },
        "createdTime"=>1464423223957,
        "eventType"=>"138311609100106403", #大事
        "from"=>"なんか",
        "fromChannel"=>1341301815,
        "id"=>"WB1519-3472446263",
        "to"=>["mid"],
        "toChannel"=>ChannelID
        }]
}
{
"result"=>[{"content"=>{"params"=>["自分のID", nil, nil],
                        "message"=>nil,
                        "reqSeq"=>0,
                        "revision"=>311,
                        "opType"=>4 #大事
                        },
        "createdTime"=>1464424015102,
        "eventType"=>"138311609100106403", #大事
        "from"=>"なんか",
        "fromChannel"=>1341301815,
        "id"=>"WB1519-3472463731",
        "to"=>["mid"],
        "toChannel"=>ChannelID
        }]
}
となる。
だから、eventType,opType がきた時の処理をすれば簡単に友達追加の時にメッセージ送信ができる。
def add_friend_event(toId)
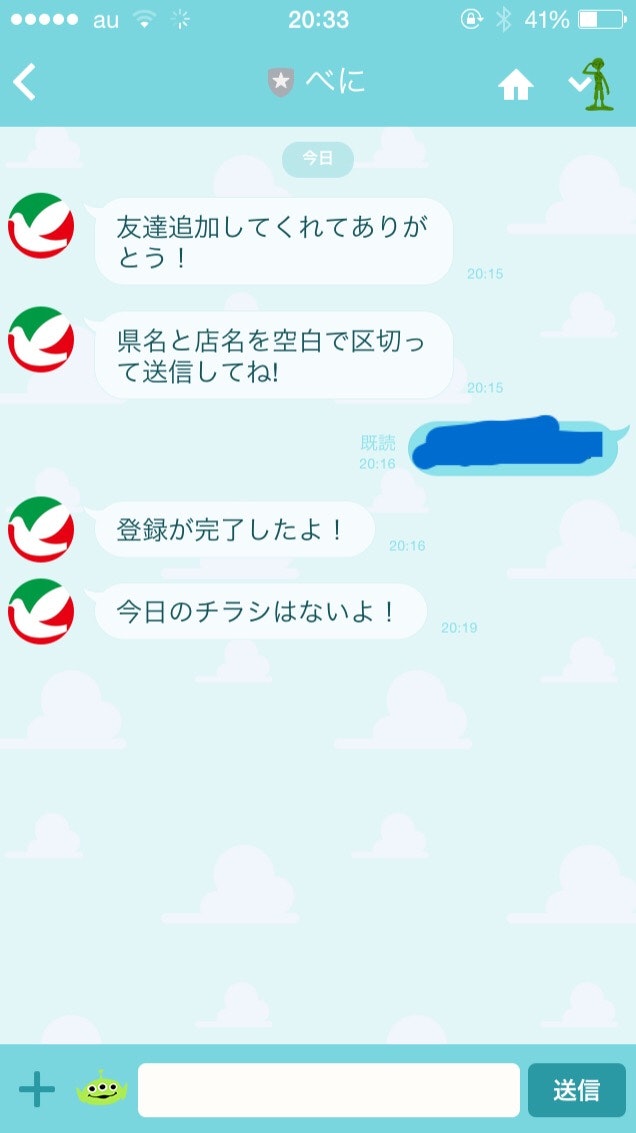
text1 = "友達追加してくれてありがとう!"
add_friend_send = {
to: [toId],
toChannel: 1383378250, # Fixed value
eventType: "138311608800106203", # Fixed value
content: {
contentType: 1,
text: text1
}
}
send_information = add_friend_send.to_json
RestClient.proxy = ENV["FIXIE_URL"]
RestClient.post(@endpoint_uri,send_information,@request_header)
end
こんな感じにして
callbackの方で
add_friend_eventType = "138311609100106403"

if (params['result'][0]['eventType'] == add_friend_eventType && params['result'][0]['content']['opType'] == 4)
      p "add_friend_event or cancel_block"
      add_friend_event(params['result'][0]['content']['params'][0])

    elsif(params['result'][0]['eventType'] == add_friend_eventType && params['result'][0]['content']['opType'] == 4)
      p "block"

    else
#普通のメッセージがきた時の処理
end
みたいな感じのコードを前回までのコードに追加するといい感じになる。
2.複数メッセージ送信
複数メッセージ送信は楽だ。
multi_send = {
  to: [送り先],
  toChannel: 1383378250, # Fixed  value
  eventType: "140177271400161403", # Fixed value
  content: {
    messageNotified: 0,
    messages: [
      {
        contentType: 1,
        text: "おは"
      },
      {
        contentType: 1,
        text: "ヨウ"
      }
    ]
  }
}
こんな感じにeventTypeを変えて messageNotified を追加。これは0でいいはず。
3.チラシ
チラシの部分は最後に汚いコードを載せるので見てください!
なにも難しい事はしてません、某スーパーのサイトをスクレイピングしただけですので。。。
4.データベースにつなぐ
まずはなんとなくMongoDBがいいかなぁと思いながら、なにも知らないので調べまくった。
その時の参考記事
ruby には Mongoid というパッケージ時が用意されている。そして、今回はHerokuでの開発なので MongoLabという無料アドオンを使った。
Herokuのアドオンを追加したところから書いていく。
まずはアプリを作ってるディレクトリに
development:
  clients:
    default:
      database: mongoid_dev
      hosts:
        - localhost:27017

production:
  clients:
    default:
      uri: <%= ENV['MONGODB_URI'] %>
と記述 MONGODB_URL はアドオンを入れた時点で Heroku の環境変数に入ってる。
参考記事とちょっと違うのはymlの書き方が変わったため。
次にModelを作成。
class User
  include Mongoid::Document
  field :toId, type: String
  field :pref, type: String
  field :shopName, type: String
end
今回チラシを取ってくる関係で必要な県名と店名とLINEのUIDをフィールドに入れた。後は
require './users.rb'
Mongoid.load!("./mongoid.yml")
をコードに追加すれば使えるようになる。
def create_user(pref,shop,toId)
  user = User.create(
    toId: toId,
    pref: pref,
    shopName: shop
  )

  requestContent = {
    to: [toId],
    toChannel: 1383378250, # Fixed  value
    eventType: "138311608800106203", # Fixed value
    content: {contentType: 1,
              toType: 1,
              text: "登録が完了したよ!",
             }
  }
  request_content_json = requestContent.to_json
  RestClient.proxy = ENV["FIXIE_URL"]
  RestClient.post(@endpoint_uri,request_content_json,@request_header)
end
こんな感じのを追加してcallbackから呼んであげればOKかな?
機能としてはここら辺で一応全部だと思う。
5.コードとスクショ
最後に実際のコードと画像を載せる
コードは自分でもかなり汚いと思うので優しい目で見てください〜

最後に
今回はHerokuで最後までやりましたがやっぱりHerokuは開発&検証にはいいけどちゃんと運用しようと思ったらだめかな〜って思う。
ぼちぼち他のサーバーとは借りたりしてやってみようかなその時にはまた書く。