14章
この章では
1、他のユーザーをフォロー (およびフォロー解除) できるソーシャルな仕組みの追加
2、フォローしているユーザーの投稿をステータスフィードに表示する機能を追加
を目指してチュートリアルの完了を目指す(長かった~~~。。。)
14.1 Relationshipモデル
ユーザーをフォローする機能とは何かを考えると
「1人のユーザーが複数のユーザーをhas_manyとしてフォローし、1人のユーザーに複数のフォロワーがいることをhas_manyで表す」といった関連付けを行っていきたいが問題があるらしい
現時点ではなんのことかさっぱりだ。
$ git checkout -b following-users
14.1.1 データモデルの問題 (および解決策)
問題1・・・英語で表現できない
フォローしてくれている人==follower 〇 → その人達の集合==followers 〇
フォローしてる人(自分がフォローした人(過去形))==followed 〇 → その人達の集合==followeds・・・??????
followeds??????過去形に複数形???
そんな言葉(複数形)英語にありません
解決策・・・followeds じゃなくてfollowingにしちゃおう(ただし個人はのことはfollowed_idでidもたせるよ)
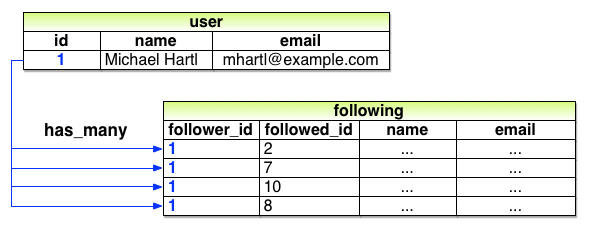
ってことでfollowing(自分がフォローした人)をhas_manyで関連付ければよくない?
自分のidが、相手にとってのfollower_idになればヨシ
followingテーブルはユーザーの集合なんだからUserテーブルと同じカラムを持つべき(名前メアドパスワード等を持つ)
問題2・・・このまま進めて行くと仮定しよう。followersテーブル(表)をつくるまでは簡単としても、Userと同じカラムがそのまま入れなければならない訳で、さらに仮定してUser.firstがユーザー名を変更したなら、↑の二つのテーブルのnameカラムも変更しなければならない
解決策・・・自分なりに考えてまとめると、一番大事な事はこのフォロー/フォロワー機能はユーザー1とユーザー2(UserモデルとUserモデル(self))をつなぎたいというシンプルなものであるということ。故に、それを行う為にRelationshipモデルというテーブルを挟み、道筋をつなぐものとして構成するのだ。ユーザー情報はUserテーブルにだけ持たせて(言い換えるとそれぞれの機能が無駄な情報をもつことのないようにする)RelationshipテーブルにはUserテーブル自身(id)と自身を繋ぐ為のカラム(=follower_idとfollowed_idの二つ)だけ持たせる。(自分用にまとめた言葉なので理解不能かもしれない)
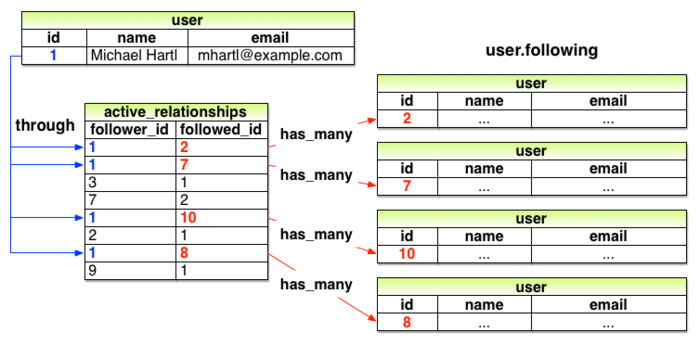
↑は解り易くしてある「仮定」の図で、フォロー/フォロワー機能は独立して動いているから(Facebookの様な友達関係(相互)ではないということ)”こうやって組めば能動的なやつ(フォローした人)と受動的なやつ(フォローしてきたやつ)判別できるだろ?”ってだけ。
仮ではないテーブルの名前はRelationships
$ rails generate model Relationship follower_id:integer followed_id:integer
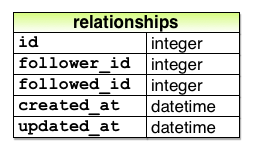
このリレーションシップは今後follower_idとfollowed_idで頻繁に検索することになるので、それぞれのカラムにインデックスを追加します。
 class CreateRelationships < ActiveRecord::Migration[5.0]
  def change
    create_table :relationships do |t|
      t.integer :follower_id
      t.integer :followed_id

      t.timestamps
    end
    add_index :relationships, :follower_id
    add_index :relationships, :followed_id
    add_index :relationships, [:follower_id, :followed_id], unique: true<--注目
  end
end
注目・・・複合キーインデックス。”この組合せ”がユニーク(一意)で2回以上フロー出来ないよってなことを保証
$ rails db:migrate
14.1.2 User/Relationshipの関連付け
早速フォローしているユーザー(能動的)とフォロワーを実装する前に、UserとRelationshipの関連付けを行います。
1人のユーザーにはhas_many (1対多) のリレーションシップがあり、このリレーションシップは2人のユーザーの間の関係なので、フォローしているユーザーとフォロワーの両方に属します (belongs_to)。
 class User < ApplicationRecord
  has_many :microposts, dependent: :destroy
  has_many :active_relationships, class_name:  "Relationship",<--注目1
                                  foreign_key: "follower_id",<--注目2
                                  dependent:   :destroy
  .
  .
  .
end
型としてRelationshipsモデルはありますが、上の方であらわした仮のテーブルを実用に回していきたいということで上のようなactive_relationshipsシンボルをつかったコードになる
注目1・・・
rb:class User < ApplicationRecord

  has_many :microposts

  .

  .

  .

end
13章の関連付けでは上の様に書いたがこれはrailsがMicropostモデルをシンボルから勝手に探してくれたからで今回の場合
has_many :active_relationships
だけでは仮のテーブルを探しにいってしまう(あるわけない)
のでRails に探して欲しいモデルのクラス名を明示している
注目2・・・データベースの2つのテーブルを繋ぐidは外部キー (foreign key)と呼びます
この外部キーの名前を使って、Railsは関連付けの推測をしています。今回はフォローしているユーザーをfollower_idという外部キーを使って特定しなくてはなりません。
しかし特徴として、Railsはデフォルトでは外部キーの名前を_idといったパターンとして理解し、 に当たる部分からクラス名 (正確には小文字に変換されたクラス名) を推測します
followerというクラス名は存在しないので、ここでもRailsに正しいクラス名を伝える必要が発生します。」
 class Relationship < ApplicationRecord
  belongs_to :follower, class_name: "User"
end
14.1.3 Relationshipのバリデーション
バリデーションを追加します
 require 'test_helper'

class RelationshipTest < ActiveSupport::TestCase

  def setup
    @relationship = Relationship.new(follower_id: users(:michael).id,
                                     followed_id: users(:archer).id)
  end

  test "should be valid" do
    assert @relationship.valid?
  end

  test "should require a follower_id" do
    @relationship.follower_id = nil
    assert_not @relationship.valid?
  end

  test "should require a followed_id" do
    @relationship.followed_id = nil
    assert_not @relationship.valid?
  end
end
 class Relationship < ApplicationRecord
  belongs_to :follower, class_name: "User"
  belongs_to :followed, class_name: "User"
  validates :follower_id, presence: true
  validates :followed_id, presence: true
end
モデル生成の際作られたtest/fixtures/relationships.yml内にある中身はたった今設けたバリデーションをパスできないので消しとく事
GREEN
14.1.4 フォローしているユーザー
1人のユーザーにはいくつもの「フォローする」「フォローされる」といった関係性があります (こういった関係性を「多対多」と呼びます)。
のでhas_manyではなくhas_many throughをつかいます。
デフォルトのhas_many throughという関連付けでは、Railsはモデル名 (単数形) に対応する外部キーを探します。つまり、次のコードでは、
has_many :followeds, through: :active_relationships
Railsは「followeds」というシンボル名を見て、これを「followed」という単数形に変え、 relationshipsテーブルのfollowed_idを使って対象のユーザーを取得してきます。
ただ英語が変だから:sourceパラメーターを使って、「following配列の元はfollowed idの集合である」(言い換えれば名前を置き換えておいて、しかし元はfolloweds)ということを明示的にRailsに伝えます。
 class User < ApplicationRecord
  has_many :microposts, dependent: :destroy
  has_many :active_relationships, class_name:  "Relationship",
                                  foreign_key: "follower_id",
                                  dependent:   :destroy
  has_many :following, through: :active_relationships, source: :followed
  .
  .
  .
end
上の定義した関連付けにより、フォローしているユーザーを配列の様に扱えるようになりました
例えば、include?メソッドを使ってフォローしているユーザーの集合を調べてみたり、findメソッドで関連付けを通してオブジェクトを探しだせるようになったり、followingで取得したオブジェクトは、配列のように要素を追加したり削除したりすることができます。
user.following.include?(other_user)
user.following.find(other_user)
user.following << other_user
user.following.delete(other_user)
賢いメソッドの使い方
話の途中だがこういった配列の中身を参照するメソッドの使い方について賢いつかいかたを一つ。
ユーザーが増える=配列の中身が増え、時には膨大になる事がある。
その時にデータベースから全てを取りだしてメソッドを行うのでは負担が掛かる為(length等)
following.include?(other_user)
user.microposts.count
といったメソッドはデータベース内で直接比較を行って結果をレスポンスしてくれてるので高速で処理を行える。
らしい。
テスト駆動開発でメソッドを作成していく(follow,unfollow,following?(boolean))
本筋にもどしてfollowingで取得した集合をより簡単に取り扱うために、followやunfollowといった便利メソッドを追加しましょう。これらのメソッドは、例えばuser.follow(other_user)といった具合に使います。さらに、これに関連するfollowing?論理値メソッドも追加し、あるユーザーが誰かをフォローしているかどうかを確認できるようにします
 require 'test_helper'

class UserTest < ActiveSupport::TestCase
  .
  .
  .
  test "should follow and unfollow a user" do
    michael = users(:michael)
    archer  = users(:archer)
    assert_not michael.following?(archer)
    michael.follow(archer)
    assert michael.following?(archer)
    michael.unfollow(archer)
    assert_not michael.following?(archer)
  end
end
もちろんRED
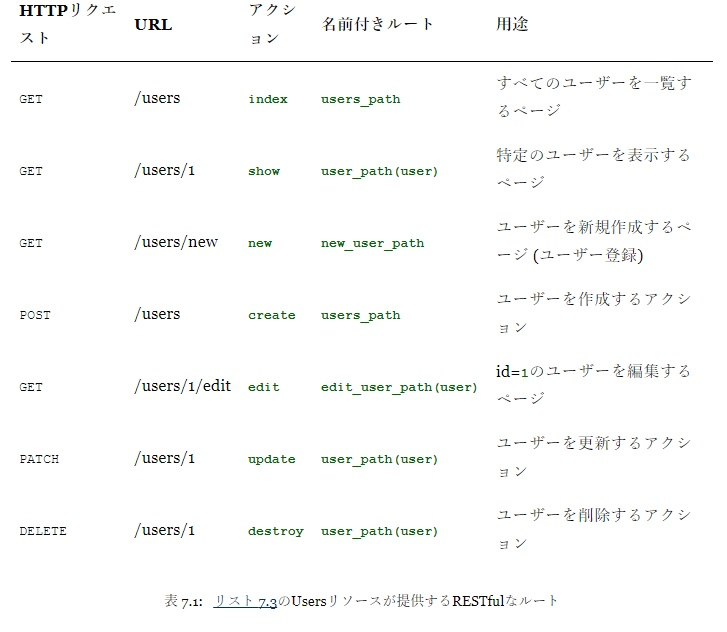
上に張った表を参考にメソッドを作っていく
 class User < ApplicationRecord
  .
  .
  .
  def feed
    .
    .
    .
  end

  # ユーザーをフォローする
  def follow(other_user)
    active_relationships.create(followed_id: other_user.id)
  end

  # ユーザーをフォロー解除する
  def unfollow(other_user)
    active_relationships.find_by(followed_id: other_user.id).destroy
  end

  # 現在のユーザーがフォローしてたらtrueを返す
  def following?(other_user)
    following.include?(other_user)
  end

  private
  .
  .
  .
end
GREEN
14.1.5 フォロワー
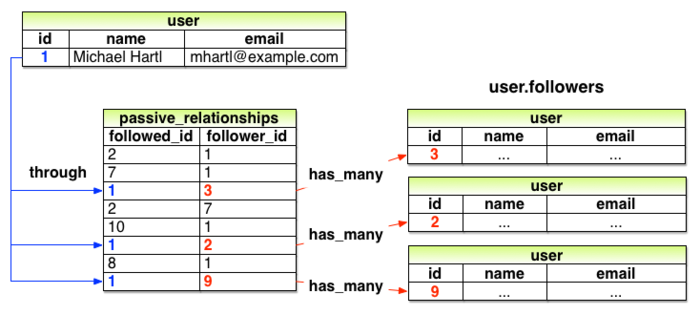
いままでフォローする側(能動的)を設けてきたのでされる側を扱って行く。
これは上のuser.followingメソッドと対になります。
実際、follower_idとfollowed_idを入れ替えるだけで、フォロワーについてもフォローする場合と全く同じ方法が活用できます
 class User < ApplicationRecord
  has_many :microposts, dependent: :destroy
  has_many :active_relationships,  class_name:  "Relationship",
                                   foreign_key: "follower_id",
                                   dependent:   :destroy
  has_many :passive_relationships, class_name:  "Relationship",
                                   foreign_key: "followed_id",
                                   dependent:   :destroy
  has_many :following, through: :active_relationships,  source: :followed
  has_many :followers, through: :passive_relationships, source: :follower※
  .
  .
  .
end```

※上に書いた説明から、オプションsourceは消しても問題なし。なぜか分からないなら見直すべし。
ここでは類似的な書き方をしてわかりやすくしている

次に、followers.include?メソッドを使って先ほどのデータモデルをテストしていきます。

```rb:test/models/user_test.rb
 require 'test_helper'

class UserTest < ActiveSupport::TestCase
  .
  .
  .
  test "should follow and unfollow a user" do
    michael  = users(:michael)
    archer   = users(:archer)
    assert_not michael.following?(archer)
    michael.follow(archer)
    assert michael.following?(archer)
    assert archer.followers.include?(michael)<--これ
    michael.unfollow(archer)
    assert_not michael.following?(archer)
  end
end
GREEN
14.2 [Follow] のWebインターフェイス
フォロー/フォロワー機能のデータモデリングが完了したので実際にWebインターフェイスで使ってみることでしょう。
14.2.1 フォローのサンプルデータ
1つ前の章のときと同じように、サンプルデータを自動作成するrails db:seedを使って、データベースにサンプルデータを登録できるとやはり便利です。先にサンプルデータを自動作成できるようにしておけば、Webページの見た目のデザインから先にとりかかることができ、バックエンド機能の実装を後に回すことができます。
リレーションシップのサンプルデータを生成するためのコードです。
 # ユーザー
User.create!(name:  "Example User",
             email: "example@railstutorial.org",
             password:              "foobar",
             password_confirmation: "foobar",
             admin:     true,
             activated: true,
             activated_at: Time.zone.now)

99.times do |n|
  name  = Faker::Name.name
  email = "example-#{n+1}@railstutorial.org"
  password = "password"
  User.create!(name:  name,
               email: email,
               password:              password,
               password_confirmation: password,
               activated: true,
               activated_at: Time.zone.now)
end

# マイクロポスト
users = User.order(:created_at).take(6)
50.times do
  content = Faker::Lorem.sentence(5)
  users.each { |user| user.microposts.create!(content: content) }
end

# リレーションシップ
users = User.all
user  = users.first
following = users[2..50]
followers = users[3..40]
following.each { |followed| user.follow(followed) }
followers.each { |follower| follower.follow(user) }
リレーションシップの部分。
ここでは、
1、最初のユーザーにユーザー3からユーザー51までをフォローさせ、
2、
それから逆にユーザー4からユーザー41に最初のユーザーをフォローさせます。
こういった短文で関係性まで生成出来るようによく参考に。
$ rails db:migrate:reset

$ rails db:seed
14.2.2 統計と [Follow] フォーム
サンプルが用意できたのでビューに反映させていきます
1、プロフィールページとHomeページに、フォローしているユーザーとフォロワーの統計情報を表示するためのパーシャルを作成します。
2、フォロー用とフォロー解除用のフォームを作成します。
3、それから、フォローしているユーザーの一覧 ("following") とフォロワーの一覧 ("followers") を表示する専用のページを作成します。
1の統計情報には、現在のユーザーがフォローしている人数と、現在のフォロワーの人数が表示されています。それぞれの表示はリンクになっており、3にあるような専用の表示ページに移動できます。
先に3のルーティングを設定します
 Rails.application.routes.draw do
  root   'static_pages#home'
  get    '/help',    to: 'static_pages#help'
  get    '/about',   to: 'static_pages#about'
  get    '/contact', to: 'static_pages#contact'
  get    '/signup',  to: 'users#new'
  get    '/login',   to: 'sessions#new'
  post   '/login',   to: 'sessions#create'
  delete '/logout',  to: 'sessions#destroy'
  resources :users do <--ここからね
    member do
      get :following, :followers
    end
  end
  resources :account_activations, only: [:edit]
  resources :password_resets,     only: [:new, :create, :edit, :update]
  resources :microposts,          only: [:create, :destroy]
end
流れがあべこべになりそうなので進めます。←ここで下記のルーティングのメソッドをよむとヨシ
ルーティングを定義したので、統計情報のパーシャルを実装する準備が整いました。このパーシャルでは、divタグの中に2つのリンクを含めるようにします
 <% @user ||= current_user %>
<div class="stats">
  <a href="<%= following_user_path(@user) %>">
    <strong id="following" class="stat">
      <%= @user.following.count %>
    </strong>
    following
  </a>
  <a href="<%= followers_user_path(@user) %>">
    <strong id="followers" class="stat">
      <%= @user.followers.count %>
    </strong>
    followers
  </a>
</div>
このパーシャルはプロフィールページとHomeページの両方に表示されるので最初の行で現在のユーザーを取得します。
また数の取得に関しては上記の賢いメソッドの使い方を使ってデータベースから引っ張っている
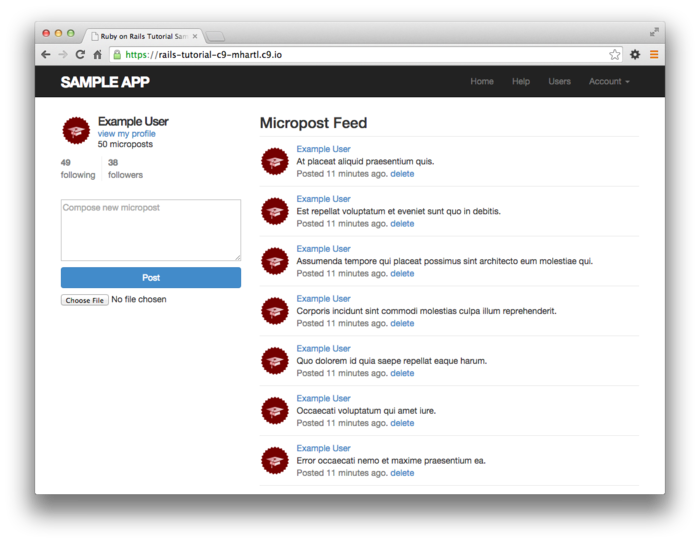
 <% if logged_in? %>
  <div class="row">
    <aside class="col-md-4">
      <section class="user_info">
        <%= render 'shared/user_info' %>
      </section>
      <section class="stats">
        <%= render 'shared/stats' %>
      </section>
      <section class="micropost_form">
        <%= render 'shared/micropost_form' %>
      </section>
    </aside>
    <div class="col-md-8">
      <h3>Micropost Feed</h3>
      <%= render 'shared/feed' %>
    </div>
  </div>
<% else %>
  .
  .
  .
<% end %>
 .
.
.
/* sidebar */
.
.
.
.gravatar {
  float: left;
  margin-right: 10px;
}

.gravatar_edit {
  margin-top: 15px;
}

.stats {
  overflow: auto;
  margin-top: 0;
  padding: 0;
  a {
    float: left;
    padding: 0 10px;
    border-left: 1px solid $gray-lighter;
    color: gray;
    &:first-child {
      padding-left: 0;
      border: 0;
    }
    &:hover {
      text-decoration: none;
      color: blue;
    }
  }
  strong {
    display: block;
  }
}

.user_avatars {
  overflow: auto;
  margin-top: 10px;
  .gravatar {
    margin: 1px 1px;
  }
  a {
    padding: 0;
  }
}

.users.follow {
  padding: 0;
}

/* forms */
.
.
.
↓ ↓ ↓
この後すぐ、プロフィールにも統計情報パーシャルを表示しますが、今のうちに2を達成する [Follow] / [Unfollow] ボタン用のパーシャルも作成してなんなら同時に行う。
 <% unless current_user?(@user) %>
  <div id="follow_form">
  <% if current_user.following?(@user) %>
    <%= render 'unfollow' %>
  <% else %>
    <%= render 'follow' %>
  <% end %>
  </div>
<% end %>
このコードは、if文にてfollowとunfollowのパーシャルに作業を振っているだけです。
パーシャルでは、Relationshipsリソース用の新しいルーティングが必要です。
 Rails.application.routes.draw do
  root                'static_pages#home'
  get    'help'    => 'static_pages#help'
  get    'about'   => 'static_pages#about'
  get    'contact' => 'static_pages#contact'
  get    'signup'  => 'users#new'
  get    'login'   => 'sessions#new'
  post   'login'   => 'sessions#create'
  delete 'logout'  => 'sessions#destroy'
  resources :users do
    member do
      get :following, :followers
    end
  end
  resources :account_activations, only: [:edit]
  resources :password_resets,     only: [:new, :create, :edit, :update]
  resources :microposts,          only: [:create, :destroy]
  resources :relationships,       only: [:create, :destroy]
end
フォロー/フォロー解除用のパーシャル自体を作って
 <%= form_for(current_user.active_relationships.build) do |f| %>
  <div><%= hidden_field_tag :followed_id, @user.id %></div>
  <%= f.submit "Follow", class: "btn btn-primary" %>
<% end %>
 <%= form_for(current_user.active_relationships.find_by(followed_id: @user.id),
             html: { method: :delete }) do |f| %>
  <%= f.submit "Unfollow", class: "btn" %>
<% end %>
これらの2つのフォームでは、いずれもform_forを使ってRelationshipモデルオブジェクトを操作しています。これらの2つのフォームの主な違いは、新しいリレーションシップを作成(create)するのに対し、既存のリレーションシップを見つけ出して、そのあと削除する(destroy)という点です。
これらのふたつはボタンのみを設けたということです
しかし、それでもこのフォームはfollowed_idをコントローラに送信する必要があります。これを行うために、hidden_field_tagメソッドを使います。このメソッドは、次のフォーム用HTMLを生成します。
<input id="followed_id" name="followed_id" type="hidden" value="3" />
隠しフィールドのinputタグを使うことで、ブラウザ上に表示させずに適切な情報を含めることができます。
これでプロフィールページにも表示させることができます
 <% provide(:title, @user.name) %>
<div class="row">
  <aside class="col-md-4">
    <section>
      <h1>
        <%= gravatar_for @user %>
        <%= @user.name %>
      </h1>
    </section>
    <section class="stats">
      <%= render 'shared/stats' %>
    </section>
  </aside>
  <div class="col-md-8">
    <%= render 'follow_form' if logged_in? %>
    <% if @user.microposts.any? %>
      <h3>Microposts (<%= @user.microposts.count %>)</h3>
      <ol class="microposts">
        <%= render @microposts %>
      </ol>
      <%= will_paginate @microposts %>
    <% end %>
  </div>
</div>
このあとアクションを編集してこのボタンが効くように設定していきます
ルーティングのメソッド
↓参考
https://qiita.com/hiyoko/items/f1491e53450cb347606b
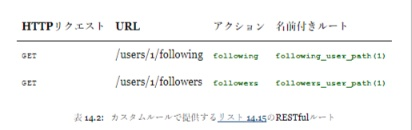
memberメソッドを使うとユーザーidが含まれているURLを扱うようになります
この場合のURLは /users/1/following や /users/1/followers のようになります
どちらもデータを表示するページなので、適切なHTTPメソッドはGETリクエストでそれぞれシンボルでメソッドに渡されている
tutorialでは idを指定せずにすべてのメンバーを表示する、collectionメソッドも紹介されている
resources :users do
  collection do
    get :tigers
  end
end
このコードは /users/tigers というURLに応答します (アプリケーションにあるすべてのtigerのリストを表示します)
14.2.3 [Following] と [Followers] ページ
前節の続きになりますが、3を達成していきたい。
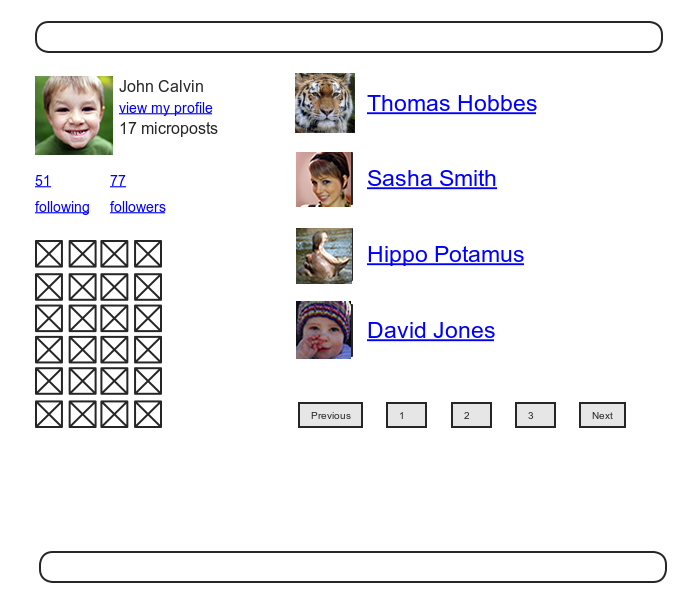
フォローしてるひと一覧モックアップ
まずはテストから
 require 'test_helper'

class UsersControllerTest < ActionDispatch::IntegrationTest

  def setup
    @user = users(:michael)
    @other_user = users(:archer)
  end
  .
  .
  .
  test "should redirect following when not logged in" do
    get following_user_path(@user)
    assert_redirected_to login_url
  end

  test "should redirect followers when not logged in" do
    get followers_user_path(@user)
    assert_redirected_to login_url
  end
end
ログインが必要なページとするテスト
この実装には1つだけトリッキーな部分があります。
それはUsersコントローラに2つの新しいアクションを追加する必要があるということです。memberメソッド内で定義した2つのルーティングにもとづいており、これらはそれぞれfollowingおよびfollowersと呼ぶ必要があります。
それぞれのアクションでは、タイトルを設定し、ユーザーを検索し、@user.followingまたは@user.followersからデータを取り出し、ページネーションを行なって、ページを出力する必要があります。
 class UsersController < ApplicationController
  before_action :logged_in_user, only: [:index, :edit, :update, :destroy,
                                        :following, :followers]
  .
  .
  .
  def following
    @title = "Following"
    @user  = User.find(params[:id])
    @users = @user.following.paginate(page: params[:page])
    render 'show_follow'
  end

  def followers
    @title = "Followers"
    @user  = User.find(params[:id])
    @users = @user.followers.paginate(page: params[:page])
    render 'show_follow'
  end

  private
  .
  .
  .
end
Railsは慣習に従って、アクションに対応するビューを暗黙的に呼び出します。例えば、showアクションの最後でshow.html.erbを呼び出す、といった具合です。
一方で上のいずれのアクションも、renderを明示的に呼び出し、show_followという同じビューを出力しています(構造が同じの為)。したがって、作成が必要なビューはこれ1つです。
 <% provide(:title, @title) %>
<div class="row">
  <aside class="col-md-4">
    <section class="user_info">
      <%= gravatar_for @user %>
      <h1><%= @user.name %></h1>
      <span><%= link_to "view my profile", @user %></span>
      <span><b>Microposts:</b> <%= @user.microposts.count %></span>
    </section>
    <section class="stats">
      <%= render 'shared/stats' %>
      <% if @users.any? %>
        <div class="user_avatars">
          <% @users.each do |user| %>
            <%= link_to gravatar_for(user, size: 30), user %>
          <% end %>
        </div>
      <% end %>
    </section>
  </aside>
  <div class="col-md-8">
    <h3><%= @title %></h3>
    <% if @users.any? %>
      <ul class="users follow">
        <%= render @users %>
      </ul>
      <%= will_paginate %>
    <% end %>
  </div>
</div>
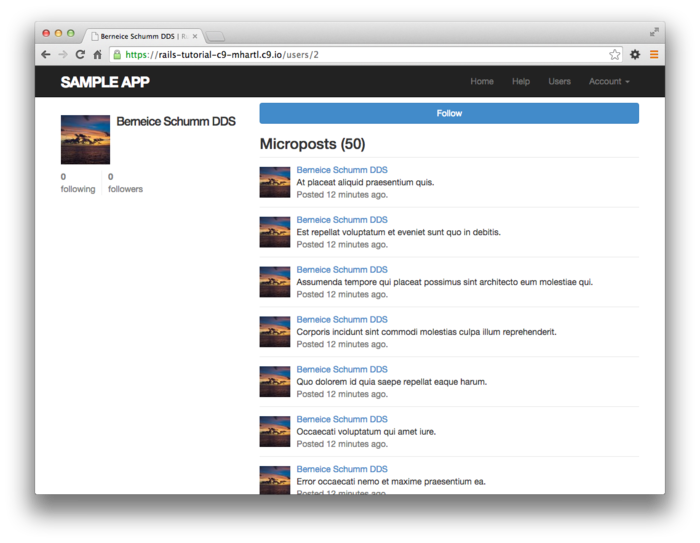
このとき、上のコードでは現在のユーザーを一切使っていない点に注目してください。
したがって、他のユーザーのフォロワー一覧ページもうまく動きます
コントローラ内のアクションでインスタンス変数@userに何を代入したのか、確認しとくといいかも
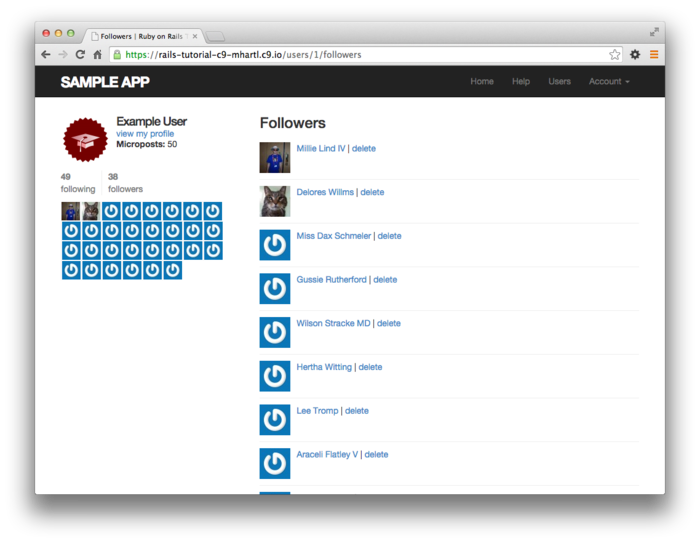
↓ユーザーのフォロワー
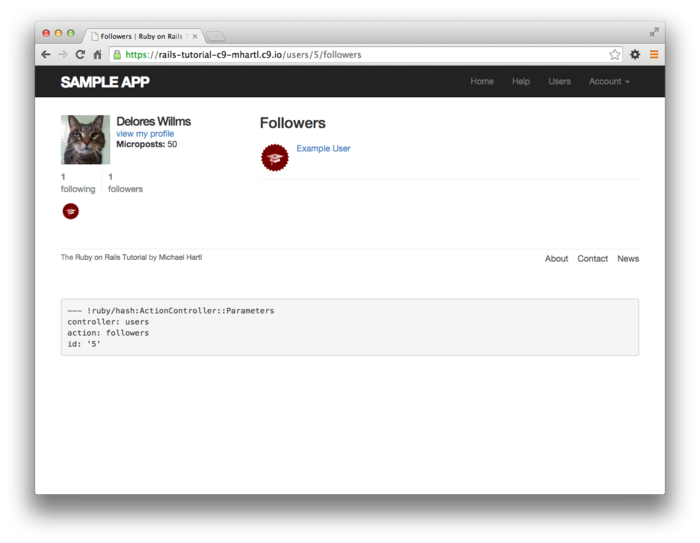
↓他のユーザーのフォロワー
beforeフィルターを既に実装しているため、この時点でテストは green
show_followの描画結果を確認するための統合テスト
$ rails generate integration_test following

      invoke  test_unit

      create    test/integration/following_test.rb
Relationshipsのfixtureにいくつかサンプルを。
 one:
  follower: michael
  followed: lana

two:
  follower: michael
  followed: malory

three:
  follower: lana
  followed: michael

four:
  follower: archer
  followed: michael
前半の2つでMichaelがLanaとMaloryをフォローし、後半の2つでLanaとArcherがMichaelをフォローしています
 require 'test_helper'

class FollowingTest < ActionDispatch::IntegrationTest

  def setup
    @user = users(:michael)
    log_in_as(@user)
  end

  test "following page" do
    get following_user_path(@user)
    assert_not @user.following.empty?
    assert_match @user.following.count.to_s, response.body
    @user.following.each do |user|
      assert_select "a[href=?]", user_path(user)
    end
  end

  test "followers page" do
    get followers_user_path(@user)
    assert_not @user.followers.empty?
    assert_match @user.followers.count.to_s, response.body
    @user.followers.each do |user|
      assert_select "a[href=?]", user_path(user)
    end
  end
end
正しい数が表示されているかどうかと、正しいURLが表示されているかどうか。
もし@user.following.empty?の結果がtrueであれば、assert_select内のブロックが実行されなくなるため、その場合においてテストが適切なセキュリティモデルを確認できなくなることを防いでいます。(?)
GREEN
14.2.4 [Follow] ボタン (基本編)
いよいよ [Follow] / [Unfollow] ボタンを動作させましょう。フォローとフォロー解除はそれぞれリレーションシップの作成と削除に対応しているため、まずはRelationshipsコントローラが必要
$ rails generate controller Relationships
セキュリティモデルを確立させていきましょう。(アクセス制限のテスト)
 require 'test_helper'

class RelationshipsControllerTest < ActionDispatch::IntegrationTest

  test "create should require logged-in user" do
    assert_no_difference 'Relationship.count' do
      post relationships_path
    end
    assert_redirected_to login_url
  end

  test "destroy should require logged-in user" do
    assert_no_difference 'Relationship.count' do
      delete relationship_path(relationships(:one))
    end
    assert_redirected_to login_url
  end
end
RED
 class RelationshipsController < ApplicationController
  before_action :logged_in_user

  def create
  end

  def destroy
  end
end
GREEN
[Follow] / [Unfollow] ボタンを動作させるためには、フォームから送信されたパラメータを使って、followed_idに対応するユーザーを見つけてくる必要があります。その後、見つけてきたユーザーに対して適切にfollow/unfollowメソッドを使います。(よく上の方のコードを見て理解を深めて置く事)
 class RelationshipsController < ApplicationController
  before_action :logged_in_user

  def create
    user = User.find(params[:followed_id])
    current_user.follow(user)
    redirect_to user
  end

  def destroy
    user = Relationship.find(params[:id]).followed
    current_user.unfollow(user)
    redirect_to user
  end
end
14.2.5 [Follow] ボタン (Ajax編)
上の機能で申し分ないところにtutorialは改善策を。
上の機能だとユーザーはプロフィールページを最初に表示し、それからユーザーをフォローし、その後すぐ元のページにリダイレクトされるという流れになります
Ajaxを使えば、Webページからサーバーに「非同期」で、ページを移動することなくリクエストを送信することができます。つまりリダレクトすることなくアクションを終了できる。
form_for
上のコードを次のように置き換えるだけです。
form_for ..., remote: true
 <%= form_for(current_user.active_relationships.build, remote: true) do |f| %>
  <div><%= hidden_field_tag :followed_id, @user.id %></div>
  <%= f.submit "Follow", class: "btn btn-primary" %>
<% end %>
 <%= form_for(current_user.active_relationships.find_by(followed_id: @user.id),
             html: { method: :delete },
             remote: true) do |f| %>
  <%= f.submit "Unfollow", class: "btn" %>
<% end %>
フォームの更新が終わったので、今度はこれに対応するRelationshipsコントローラを改造して、Ajaxリクエストに応答できるようにしましょう。こういったリクエストの種類によって応答を場合分けするときは、respond_toメソッドというメソッドを使います。
この文法は少々変わっていて混乱を招く可能性がありますが、上の (ブロック内の) コードのうち、いずれかの1行が実行されるという点が重要です(if文みたいな??)
RelationshipsコントローラでAjaxに対応させるために、respond_toメソッドをcreateアクションとdestroyアクションでそれぞれ追加します
 class RelationshipsController < ApplicationController
  before_action :logged_in_user

  def create
    @user = User.find(params[:followed_id])
    current_user.follow(@user)
    respond_to do |format|
      format.html { redirect_to @user }
      format.js
    end
  end

  def destroy
    @user = Relationship.find(params[:id]).followed
    current_user.unfollow(@user)
    respond_to do |format|
      format.html { redirect_to @user }
      format.js
    end
  end
end
※アクション内のuser変数をここでインスタンス変酢に変更しています(なぜなのかは理解に至らなかった)
頭がパンクしそうなので一旦suspend
https://railstutorial.jp/chapters/following_users?version=5.1#sec-a_working_follow_button_with_ajax
14.2.6 フォローをテストする
フォローボタンが動くようになったのでテストを。
ユーザーのフォローに対するテストでは、 /relationshipsに対してPOSTリクエストを送り、フォローされたユーザーが1人増えたことをチェックします。
フォロー解除の場合はDELETEリクエストで以下同文
 require 'test_helper'

class FollowingTest < ActionDispatch::IntegrationTest

  def setup
    @user  = users(:michael)
    @other = users(:archer)
    log_in_as(@user)
  end
  .
  .
  .
  test "should follow a user the standard way" do
    assert_difference '@user.following.count', 1 do
      post relationships_path, params: { followed_id: @other.id }
    end
  end

  test "should follow a user with Ajax" do
    assert_difference '@user.following.count', 1 do
      post relationships_path, xhr: true, params: { followed_id: @other.id }
    end
  end

  test "should unfollow a user the standard way" do
    @user.follow(@other)
    relationship = @user.active_relationships.find_by(followed_id: @other.id)
    assert_difference '@user.following.count', -1 do
      delete relationship_path(relationship)
    end
  end

  test "should unfollow a user with Ajax" do
    @user.follow(@other)
    relationship = @user.active_relationships.find_by(followed_id: @other.id)
    assert_difference '@user.following.count', -1 do
      delete relationship_path(relationship), xhr: true
    end
  end
end
ここではAjax版のテストものせてます。
xhr :trueオプションを使うようにするだけです。 xhr (XmlHttpRequest)
respond_toでは、JavaScriptに対応した行が実行されるようになります。
GREEN