MS Build 2021 で発表された Azure Arc の App Services の拡張機能ですが、なにやら便利そうなのでどれほど簡単に Kubernetes に Azure App Services を実装できるか試してみたいと思います。MS Learn が大変参考になりました。
環境設定
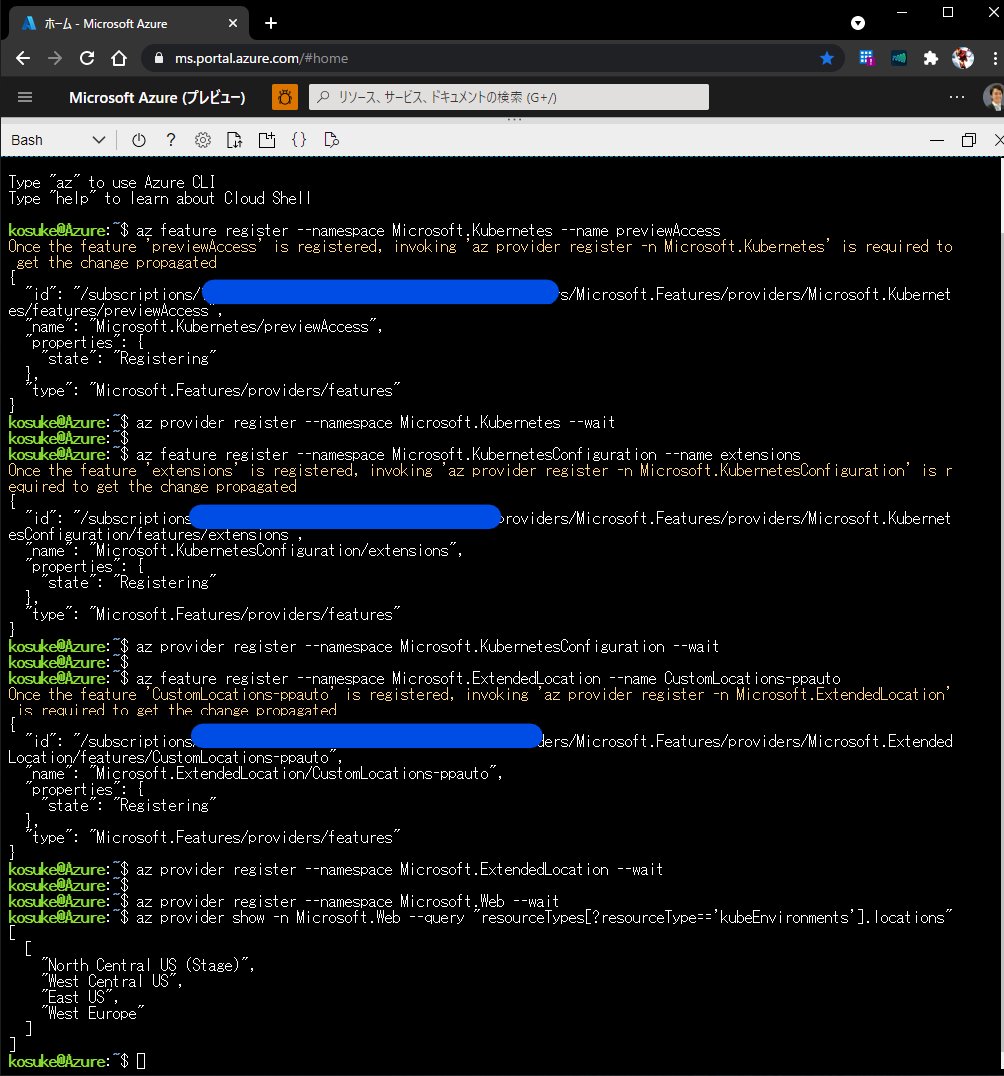
今回はすべて Azure Cloud Shell で実行しようと思います。まず Preview 版の機能を使用できるように以下コマンドを実行します。
az feature register --namespace Microsoft.Kubernetes --name previewAccess
az provider register --namespace Microsoft.Kubernetes --wait

az feature register --namespace Microsoft.KubernetesConfiguration --name extensions
az provider register --namespace Microsoft.KubernetesConfiguration --wait

az feature register --namespace Microsoft.ExtendedLocation --name CustomLocations-ppauto
az provider register --namespace Microsoft.ExtendedLocation --wait

az provider register --namespace Microsoft.Web --wait
MS Learn には2分くらいかかると書いてありますが、Preview 版を使用していない環境ではだいたい5分くらいかかります。完了したら以下コマンドで設定を確認します。
az provider show -n Microsoft.Web --query "resourceTypes[?resourceType=='kubeEnvironments'].locations"
次に必要な機能をインストールします。MS Learn には色々記載してありますが、以下コマンドを実施すれば必要なものがインストールされます。
az extension add --upgrade --yes -n connectedk8s
az extension add --upgrade --yes -n customlocation
az extension remove -n appservice-kube
az extension add --yes --source "https://aka.ms/appsvc/appservice_kube-latest-py2.py3-none-any.whl"
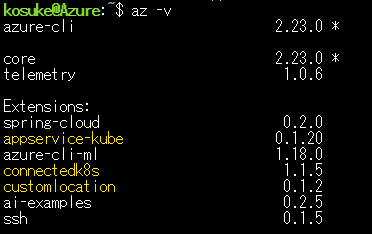
これで az -v を実行してみましょう。今回必要な拡張機能は三つで、customlocation connectedk8s appservice-kube の三つです。コマンドを実行して拡張機能が無事インストールされていることを確認できれば環境設定は完了です!
Kubernetes クラスターを設定する
環境設定ができたら Kubernetes クラスターを作成、設定してきます。まずは AKS クラスターをデプロイします。
AKS クラスターのデプロイ
AKS クラスターのデプロイは以下コマンドのコピペで実行できます!Kubernetes クラスターの名前も &RAMDOM で指定しているので名前がかぶるとうこともなく5分くらいでデプロイが完了します。
(補足)
MS Learn では Location を自分で指定することになっていましたがここでは eastus を指定しました。
K8S_CLUSTER_RG_NAME=k8sAKS-RG
K8S_CLUSTER_NAME=k8sAKS-c$RANDOM
LOCATION=eastus
az group create -l $LOCATION -n $K8S_CLUSTER_RG_NAME
az aks create -g $K8S_CLUSTER_RG_NAME -n $K8S_CLUSTER_NAME --enable-aad --generate-ssh-keys
AKS クラスターに接続する
今回は AKS クラスター管理者組み込みロールを使用してクラスター管理者資格情報を取得します。以下コマンドで、クラスターから管理者資格情報を取得して、ローカルの kubeconfig ファイルにマージし、kubectl get ns でクラスターに正常接続されたか確認します。
az aks get-credentials -g $K8S_CLUSTER_RG_NAME -n $K8S_CLUSTER_NAME --admin
kubectl get ns
出力結果は以下のようになります。クラスターがデプロイされ、それに接続できていることが分かります!
kosuke@Azure:~$ az aks get-credentials -g $K8S_CLUSTER_RG_NAME -n $K8S_CLUSTER_NAME --admin
Merged "k8sAKS-XXXXXX-admin" as current context in /home/kosuke/.kube/config
kosuke@Azure:~$ kubectl get ns
NAME              STATUS   AGE
default           Active   4m10s
kube-node-lease   Active   4m12s
kube-public       Active   4m12s
kube-system       Active   4m12s
Kubernetes クラスターを Arc にオンボードさせる
では AKS クラスターを Azure Arc にオンボードさせるための手順を確認していきたいと思います。
AKS クラスターを Azure Arc に接続するために準備する
準備として、以下コマンドで必要な値を設定していきます。
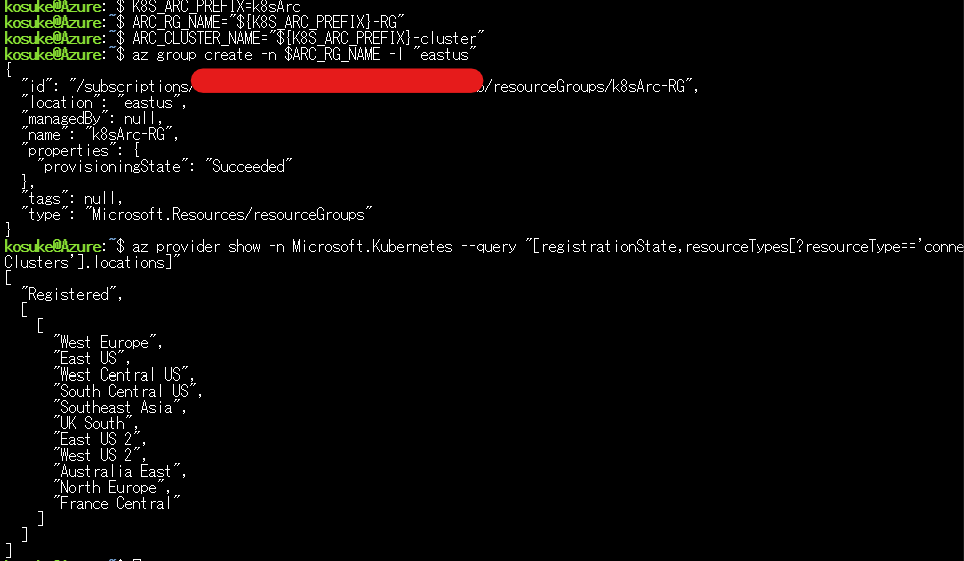
K8S_ARC_PREFIX=k8sArc
ARC_RG_NAME="${K8S_ARC_PREFIX}-RG"
ARC_CLUSTER_NAME="${K8S_ARC_PREFIX}-cluster"
az group create -n $ARC_RG_NAME -l "eastus"
リソースグループを作成する際の注意点ですが、プレビュー期間中に Arc がサポートされている場所は 米国東部 と 西ヨーロッパ のみになります。私は先ほど同様 eastus で設定しました。
次のコマンドを実行して、リソース グループをホストするリージョンに接続されたクラスター リソースを実装するために必要なリソース プロバイダーの登録を確認します。
az provider show -n Microsoft.Kubernetes --query "[registrationState,resourceTypes[?resourceType=='connectedClusters'].locations]"
AKS クラスターを Azure Arc に接続
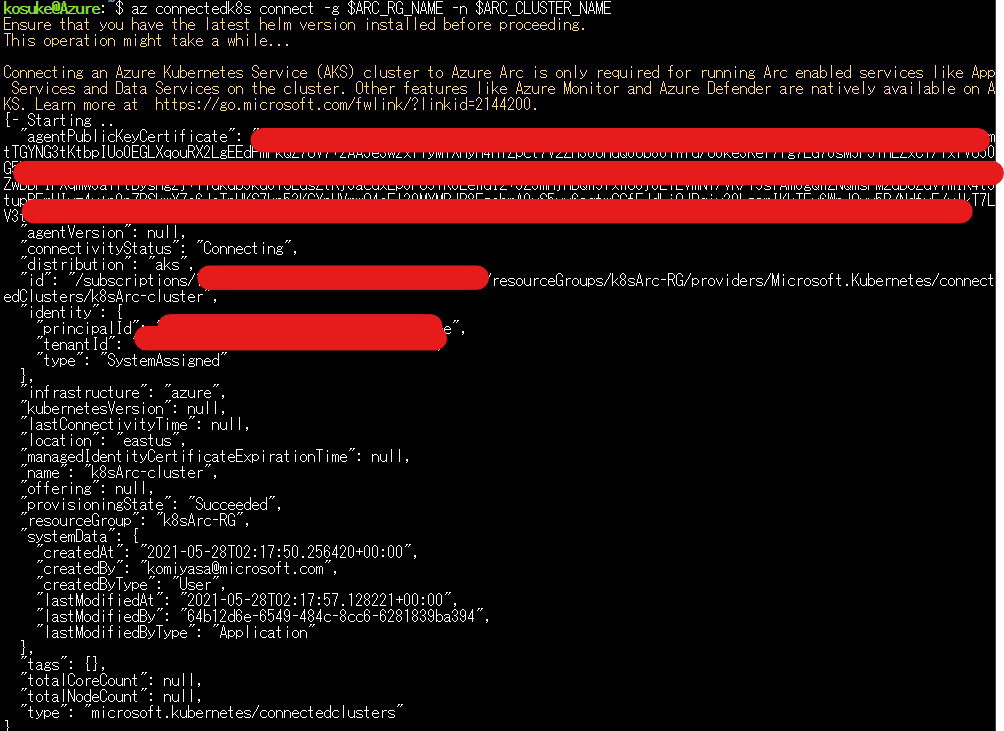
AKS クラスターを Azure Arc に接続する準備ができてので、実際に接続してみます。接続は以下のコマンド一発でできます!イカしてますね!
az connectedk8s connect -g $ARC_RG_NAME -n $ARC_CLUSTER_NAME
2分くらいで接続が完了します。出力結果の provisioningState が Success になっていると完了です!
kubectl get コマンドを使って pod 一覧を取得するとこんな感じになります。(pod はすでに削除したのでべた書きです笑)
kosuke@Azure:~$ kubectl get pods -n azure-arc
NAME                                         READY   STATUS    RESTARTS   AGE
cluster-metadata-operator-7cff574c4f-8mbqt   2/2     Running   0          11m
clusterconnect-agent-6dfd867c68-vpnxz        3/3     Running   0          11m
clusteridentityoperator-fd498bf96-xfjqs      2/2     Running   0          11m
config-agent-75f76dfc49-9vd5r                2/2     Running   0          11m
controller-manager-8676dcdc6-wbsvn           2/2     Running   0          11m
extension-manager-6955d7868f-std7r           2/2     Running   0          11m
flux-logs-agent-6596f58c56-w94kw             1/1     Running   0          11m
kube-aad-proxy-c9b84df8c-pvnkr               2/2     Running   0          11m
metrics-agent-5b9b94754f-khqlr               2/2     Running   0          11m
resource-sync-agent-f8c7c6b6b-b76r5          2/2     Running   0          11m
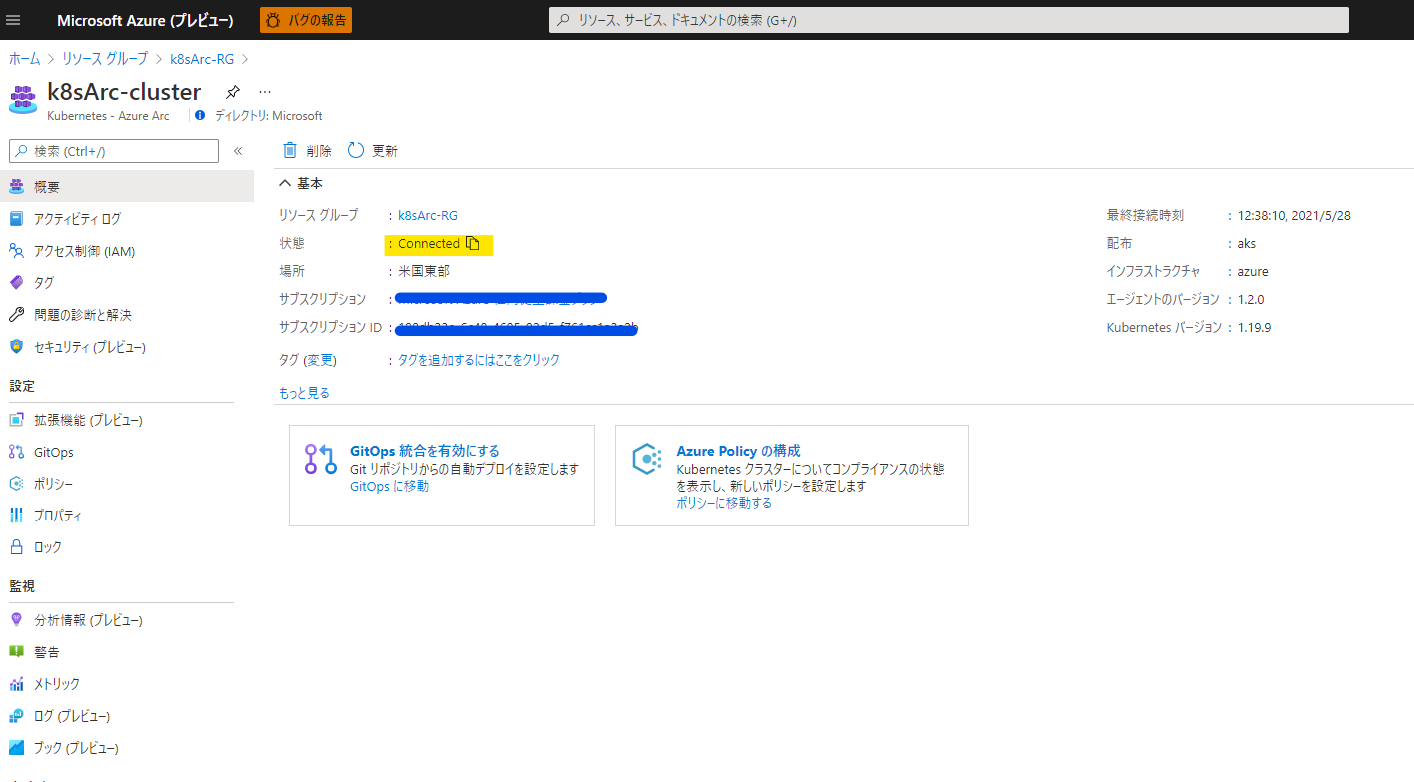
これで AKS クラスターを Azure Arc に接続できたことが確認できました。Azure Portal の Azure Arc をみると、Status が Connected になっていることが確認できます。
Azure Arc を使用して Kubernetes に Azure App Services を実装する
ではいよいよ、Azure Arc 対応 Kubernetes クラスターに App Services を実装していきます。
準備
まずは準備として、AKS クラスターをホストしているリソースグループの名前、AKS クラスター、Arc リソースを含むリソースグループ、Azure Arc に接続された変数値を設定します。
K8S_CLUSTER_RG_NAME=k8sAKS-RG
K8S_CLUSTER_NAME=$(az aks list -g $K8S_CLUSTER_RG_NAME --query "[0].name" -o tsv)
K8S_ARC_PREFIX=k8sArc
ARC_RG_NAME="${K8S_ARC_PREFIX}-RG"
ARC_CLUSTER_NAME="${K8S_ARC_PREFIX}-cluster"
次に、以下のコマンドを実行して、クラスターをホストするリソースグループを識別し、そのグループにパブリック IP アドレスリソースを作成し、その値を格納します。(PIP = パブリックIP)
K8S_PIP_NAME=k8sAKS-cluster-pip
K8S_INFRA_RG_NAME=$(az aks show -g $K8S_CLUSTER_RG_NAME -n $K8S_CLUSTER_NAME --query nodeResourceGroup -o tsv)
az network public-ip create -g $K8S_INFRA_RG_NAME -n $K8S_PIP_NAME --sku STANDARD
K8S_PIP=$(az network public-ip show -g $K8S_INFRA_RG_NAME -n $K8S_PIP_NAME --query ipAddress -o tsv)
続いて、Azure Arc に接続された Kubernetes クラスターにデプロイしたリソースをホストする場所、拡張機能の名前、環境、App Servies をホストする Azure Kubernetes の名前を指定する変数を設定します。
CUSTOM_LOCATION_NAME="${K8S_ARC_PREFIX}-location"
EXTENSION_NAME="${K8S_ARC_PREFIX}-kube"
KUBE_ENV_NAME="${K8S_ARC_PREFIX}-env-$RANDOM"
APP_SERVICE_NAMESPACE_NAME=appservice-ns
Log Analytics ワークスぺース作成
ログを分析するために Log Analytics を設定します。ここは単純に Log Analytics を Azure CLI で作成する方法と同じなので、いっきに以下コマンドを実行してしまいましょう。
K8S_INFRA_RG_NAME=$(az aks show -g $K8S_CLUSTER_RG_NAME -n $K8S_CLUSTER_NAME --query nodeResourceGroup -o tsv)
LA_WORKSPACE_NAME=k8sAKS-workspace
az monitor log-analytics workspace create -g $K8S_INFRA_RG_NAME -n $LA_WORKSPACE_NAME
LA_WORKSPACE_NAME=k8sAKS-workspace
LA_WORKSPACE_ID=$(az monitor log-analytics workspace show --resource-group $K8S_INFRA_RG_NAME --workspace-name $LA_WORKSPACE_NAME --query "customerId" -o tsv)
LA_WORKSPACE_ID_ENC=$(printf %s $LA_WORKSPACE_ID | base64)
LA_WORKSPACE_KEY=$(az monitor log-analytics workspace get-shared-keys --resource-group $K8S_INFRA_RG_NAME --workspace-name $LA_WORKSPACE_NAME --query "secondarySharedKey" -o tsv)
LA_WORKSPACE_KEY_ENC_WITH_SPACE=$(printf %s $LA_WORKSPACE_KEY | base64)
LA_WORKSPACE_KEY_ENC=$(echo -n "${LA_WORKSPACE_KEY_ENC_WITH_SPACE//[[:space:]]/}")
Kubernetes クラスターにアプリケーションサービス拡張機能をインストールする
まず、次のコマンドを実行して Microsoft.KubernetesConfiguration リソース プロバイダーの登録状態を確認します。
az provider show -n Microsoft.KubernetesConfiguration --query "[registrationState,resourceTypes[?resourceType=='extensions'].locations]"
次のコマンドを実行して、Log Analytics のサポートを含む拡張機能をインストールします。
az k8s-extension create -g $ARC_RG_NAME --name $EXTENSION_NAME --cluster-type connectedClusters -c $ARC_CLUSTER_NAME --extension-type 'Microsoft.Web.Appservice' --release-train stable --auto-upgrade-minor-version true --scope cluster --release-namespace $APP_SERVICE_NAMESPACE_NAME --configuration-settings "Microsoft.CustomLocation.ServiceAccount=default" --configuration-settings "appsNamespace=${APP_SERVICE_NAMESPACE_NAME}" --configuration-settings "clusterName=${KUBE_ENV_NAME}" --configuration-settings "loadBalancerIp=${K8S_PIP}" --configuration-settings "buildService.storageClassName=default" --configuration-settings "buildService.storageAccessMode=ReadWriteOnce" --configuration-settings "envoy.annotations.service.beta.kubernetes.io/azure-load-balancer-resource-group=${K8S_CLUSTER_RG_NAME}" --configuration-settings "customConfigMap=${APP_SERVICE_NAMESPACE_NAME}/kube-environment-config" --configuration-settings "logProcessor.appLogs.destination=log-analytics" --configuration-protected-settings "logProcessor.appLogs.logAnalyticsConfig.customerId=${LA_WORKSPACE_ID_ENC}" --configuration-protected-settings "logProcessor.appLogs.logAnalyticsConfig.sharedKey=${LA_WORKSPACE_KEY_ENC}"
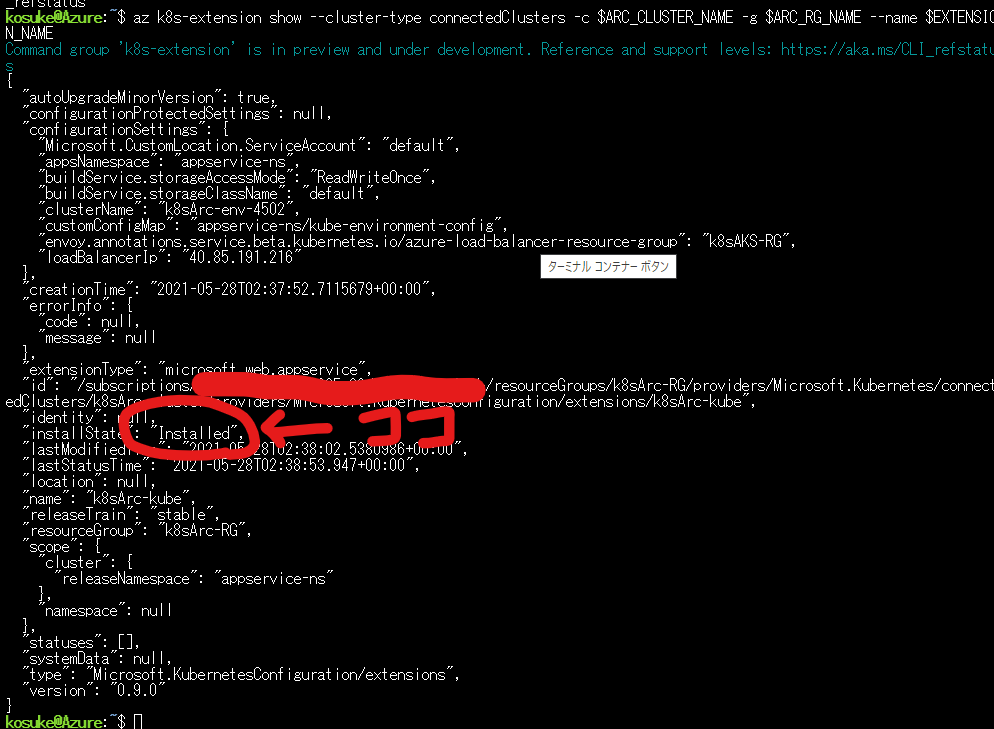
以下コマンドで、インストールされている拡張機能の状態を確認します。
az k8s-extension show --cluster-type connectedClusters -c $ARC_CLUSTER_NAME -g $ARC_RG_NAME --name $EXTENSION_NAME
install State が Installed になればインストールは完了です!
拡張機能の id プロパティ値を変数に格納します。
EXTENSION_ID=$(az k8s-extension show --cluster-type connectedClusters -c $ARC_CLUSTER_NAME -g $ARC_RG_NAME --name $EXTENSION_NAME --query id -o tsv)
Azure Arc 対応 Kubernetes クラスターにカスタムの場所を作成する
以下コマンドで Arc 対応クラスターに場所を作成します。
az provider show -n Microsoft.ExtendedLocation --query "[registrationState,resourceTypes[?resourceType=='customLocations'].locations]"
CONNECTED_CLUSTER_ID=$(az connectedk8s show -n $ARC_CLUSTER_NAME -g $ARC_RG_NAME --query id -o tsv)
az customlocation create -g $ARC_RG_NAME -n $CUSTOM_LOCATION_NAME --host-resource-id $CONNECTED_CLUSTER_ID --namespace $APP_SERVICE_NAMESPACE_NAME -c $EXTENSION_ID
出力結果の provisionigState が Succeeded になっていれば完了です!
id プロパティのカスタムの場所の値を変数に格納します。
CUSTOM_LOCATION_ID=$(az customlocation show -g $ARC_RG_NAME -n $CUSTOM_LOCATION_NAME --query id -o tsv)
AKS 環境をカスタムの場所に登録する
カスタムの場所を作成できたら、場所に App Services Kubernetes 環境を登録します。appservices kube が使用できるわけですね。ふむふむ。
az provider show -n Microsoft.Web --query "[registrationState,resourceTypes[?resourceType=='kubeEnvironments'].locations]"
az appservice kube create -g $ARC_RG_NAME -n $KUBE_ENV_NAME --custom-location $CUSTOM_LOCATION_ID --static-ip $K8S_PIP
az appservice kube show -g $ARC_RG_NAME -n $KUBE_ENV_NAME
ここまでで、 Azure Arc 対応 Kubernetes クラスターにアプリケーションサービス拡張機能が実装されました。ここまででが今回の肝ですが、最後に App Service が動くのかも確認してみましょう。
Kubernetes に Azure Arc を使用して App Service web app をデプロイする
以下のコマンドで App Services Kubernetes 環境に Web App を作成していきます。
K8S_ARC_PREFIX=k8sArc
ARC_RG_NAME="${K8S_ARC_PREFIX}-RG"
ARC_CLUSTER_NAME="${K8S_ARC_PREFIX}-cluster"
EXTENSION_NAME="${K8S_ARC_PREFIX}-kube"
KUBE_ENV_NAME=$(az appservice kube list -g $ARC_RG_NAME --query "[0].name" -o tsv)
CUSTOM_LOCATION_NAME="${K8S_ARC_PREFIX}-location"
CUSTOM_LOCATION_ID=$(az customlocation show -g $ARC_RG_NAME -n $CUSTOM_LOCATION_NAME --query id -o tsv)
WEBAPP_NAME=k8sarcwebapp$RANDOM$RANDOM
az webapp create -g $ARC_RG_NAME -n $WEBAPP_NAME --custom-location $CUSTOM_LOCATION_ID --runtime "NODE|12-lts"
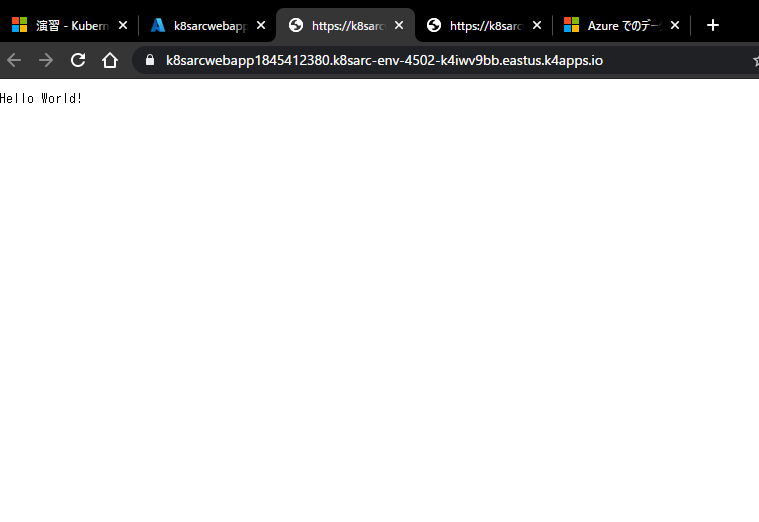
これで web app のリソースが作成されました。ここに github からソースをダウンロードした Node.js アプリ(単純な Hello World アプリ)をデプロイしていきます。Azure CLI で App Services にアプリをデプロイする方法と同じです。以下コマンドで実行します。
git clone https://github.com/Azure-Samples/nodejs-docs-hello-world.git
cd nodejs-docs-hello-world
zip -r nodejs-docs-hello-world.zip .
az webapp deployment source config-zip -g $ARC_RG_NAME -n $WEBAPP_NAME --src nodejs-docs-hello-world.zip
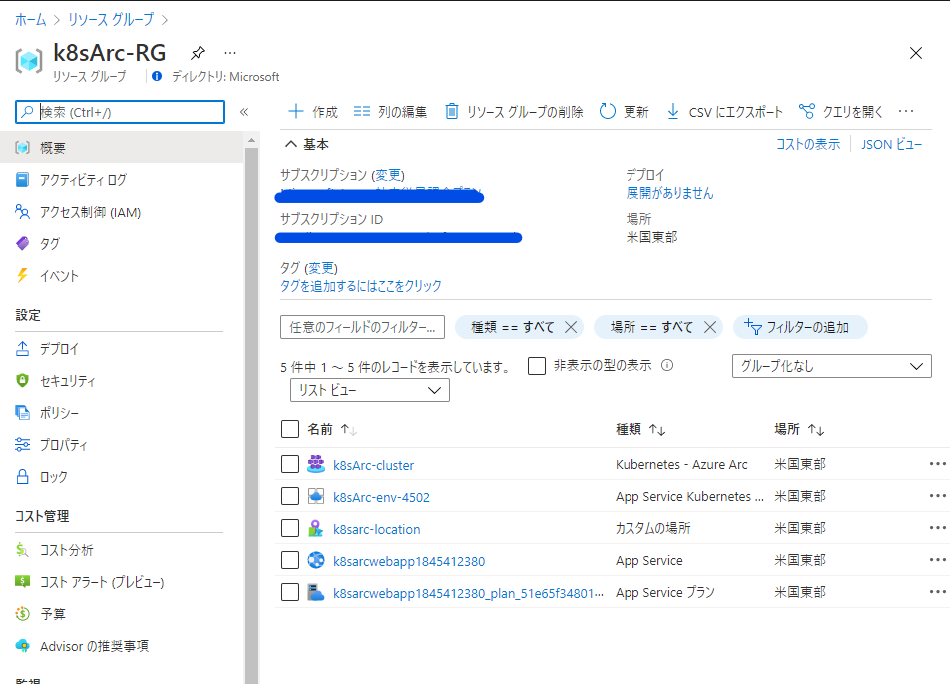
Azure Portal を見ると、web app が作成され、アクセスすると無事デプロイされていることが確認できました。
kubectl get pods -n appservice-ns
このコマンドで pods の状態を確認することができます。AKS に web app がオンボードされていることがわかると思います!いやーすごい便利な世の中!!
kosuke@Azure:~/azure-voting-app-redis$ kubectl get pods -n appservice-ns
NAME                                               READY   STATUS    RESTARTS   AGE
k8sarc-kube-k8se-activator-bc4499f7d-6cbf5         1/1     Running   0          41m
k8sarc-kube-k8se-app-controller-7869d7d6d6-w5r4h   1/1     Running   0          41m
k8sarc-kube-k8se-build-service-866454fd66-gb4ql    1/1     Running   0          51m
k8sarc-kube-k8se-envoy-8cc449cd9-254k6             1/1     Running   0          51m
k8sarc-kube-k8se-envoy-8cc449cd9-4kxf7             1/1     Running   0          51m
k8sarc-kube-k8se-envoy-8cc449cd9-nsw2g             1/1     Running   0          51m
k8sarc-kube-k8se-http-scaler-96f9bbfd7-ppmn4       1/1     Running   0          51m
k8sarc-kube-k8se-img-cacher-dn5vv                  1/1     Running   0          51m
k8sarc-kube-k8se-img-cacher-fdbs7                  1/1     Running   0          51m
k8sarc-kube-k8se-img-cacher-khzj9                  1/1     Running   0          51m
k8sarc-kube-k8se-log-processor-gv2tx               1/1     Running   2          51m
k8sarc-kube-k8se-log-processor-n6xsc               1/1     Running   2          51m
k8sarc-kube-k8se-log-processor-qbj5x               1/1     Running   1          51m
k8sarcwebapp768213518-6c684f778b-rrcpq             1/1     Running   0          19s
まとめ
さっそく試してみましたがこれは相当便利ですね。Web App は非常に気に入っていましたが、Arc で Kubernetes に App Services を実行できるようにすることで、開発者にとってさらに便利になることは間違いないかと思います。監視の観点では Monitor を連携しているので一元管理することができますし、様々な観点で非常に便利な機能かと思いました。
ちなみに、めんどくさがりな人のために、以下のコマンドを Azure Cloud Shell に打つだけで、今回試した見たことが一発でできます!笑 是非試してみてください。(デプロイの時間によってできないことがあるのでその際は再度試すなどしてください。)
az feature register --namespace Microsoft.Kubernetes --name previewAccess
az provider register --namespace Microsoft.Kubernetes --wait
az feature register --namespace Microsoft.KubernetesConfiguration --name extensions
az provider register --namespace Microsoft.KubernetesConfiguration --wait
az feature register --namespace Microsoft.ExtendedLocation --name CustomLocations-ppauto
az provider register --namespace Microsoft.ExtendedLocation --wait
az provider register --namespace Microsoft.Web --wait
az provider show -n Microsoft.Web --query "resourceTypes[?resourceType=='kubeEnvironments'].locations"
az extension add --upgrade --yes -n connectedk8s
az extension add --upgrade --yes -n customlocation
az extension remove -n appservice-kube
az extension add --yes --source "https://aka.ms/appsvc/appservice_kube-latest-py2.py3-none-any.whl"

K8S_CLUSTER_RG_NAME=k8sAKS-RG
K8S_CLUSTER_NAME=k8sAKS-c$RANDOM
LOCATION=eastus
az group create -l $LOCATION -n $K8S_CLUSTER_RG_NAME
az aks create -g $K8S_CLUSTER_RG_NAME -n $K8S_CLUSTER_NAME --enable-aad --generate-ssh-keys
az aks get-credentials -g $K8S_CLUSTER_RG_NAME -n $K8S_CLUSTER_NAME --admin
kubectl get ns

K8S_ARC_PREFIX=k8sArc
ARC_RG_NAME="${K8S_ARC_PREFIX}-RG"
ARC_CLUSTER_NAME="${K8S_ARC_PREFIX}-cluster"
az group create -n $ARC_RG_NAME -l "eastus"
az provider show -n Microsoft.Kubernetes --query "[registrationState,resourceTypes[?resourceType=='connectedClusters'].locations]"
az connectedk8s connect -g $ARC_RG_NAME -n $ARC_CLUSTER_NAME
kubectl get pods -n azure-arc

K8S_CLUSTER_RG_NAME=k8sAKS-RG
K8S_CLUSTER_NAME=$(az aks list -g $K8S_CLUSTER_RG_NAME --query "[0].name" -o tsv)
K8S_ARC_PREFIX=k8sArc
ARC_RG_NAME="${K8S_ARC_PREFIX}-RG"
ARC_CLUSTER_NAME="${K8S_ARC_PREFIX}-cluster"
K8S_PIP_NAME=k8sAKS-cluster-pip
K8S_INFRA_RG_NAME=$(az aks show -g $K8S_CLUSTER_RG_NAME -n $K8S_CLUSTER_NAME --query nodeResourceGroup -o tsv)
az network public-ip create -g $K8S_INFRA_RG_NAME -n $K8S_PIP_NAME --sku STANDARD
K8S_PIP=$(az network public-ip show -g $K8S_INFRA_RG_NAME -n $K8S_PIP_NAME --query ipAddress -o tsv)
CUSTOM_LOCATION_NAME="${K8S_ARC_PREFIX}-location"
EXTENSION_NAME="${K8S_ARC_PREFIX}-kube"
KUBE_ENV_NAME="${K8S_ARC_PREFIX}-env-$RANDOM"
APP_SERVICE_NAMESPACE_NAME=appservice-ns
K8S_INFRA_RG_NAME=$(az aks show -g $K8S_CLUSTER_RG_NAME -n $K8S_CLUSTER_NAME --query nodeResourceGroup -o tsv)
LA_WORKSPACE_NAME=k8sAKS-workspace
az monitor log-analytics workspace create -g $K8S_INFRA_RG_NAME -n $LA_WORKSPACE_NAME
LA_WORKSPACE_NAME=k8sAKS-workspace
LA_WORKSPACE_ID=$(az monitor log-analytics workspace show --resource-group $K8S_INFRA_RG_NAME --workspace-name $LA_WORKSPACE_NAME --query "customerId" -o tsv)
LA_WORKSPACE_ID_ENC=$(printf %s $LA_WORKSPACE_ID | base64)
LA_WORKSPACE_KEY=$(az monitor log-analytics workspace get-shared-keys --resource-group $K8S_INFRA_RG_NAME --workspace-name $LA_WORKSPACE_NAME --query "secondarySharedKey" -o tsv)
LA_WORKSPACE_KEY_ENC_WITH_SPACE=$(printf %s $LA_WORKSPACE_KEY | base64)
LA_WORKSPACE_KEY_ENC=$(echo -n "${LA_WORKSPACE_KEY_ENC_WITH_SPACE//[[:space:]]/}")
az provider show -n Microsoft.KubernetesConfiguration --query "[registrationState,resourceTypes[?resourceType=='extensions'].locations]"
az k8s-extension create -g $ARC_RG_NAME --name $EXTENSION_NAME --cluster-type connectedClusters -c $ARC_CLUSTER_NAME --extension-type 'Microsoft.Web.Appservice' --release-train stable --auto-upgrade-minor-version true --scope cluster --release-namespace $APP_SERVICE_NAMESPACE_NAME --configuration-settings "Microsoft.CustomLocation.ServiceAccount=default" --configuration-settings "appsNamespace=${APP_SERVICE_NAMESPACE_NAME}" --configuration-settings "clusterName=${KUBE_ENV_NAME}" --configuration-settings "loadBalancerIp=${K8S_PIP}" --configuration-settings "buildService.storageClassName=default" --configuration-settings "buildService.storageAccessMode=ReadWriteOnce" --configuration-settings "envoy.annotations.service.beta.kubernetes.io/azure-load-balancer-resource-group=${K8S_CLUSTER_RG_NAME}" --configuration-settings "customConfigMap=${APP_SERVICE_NAMESPACE_NAME}/kube-environment-config" --configuration-settings "logProcessor.appLogs.destination=log-analytics" --configuration-protected-settings "logProcessor.appLogs.logAnalyticsConfig.customerId=${LA_WORKSPACE_ID_ENC}" --configuration-protected-settings "logProcessor.appLogs.logAnalyticsConfig.sharedKey=${LA_WORKSPACE_KEY_ENC}"
az k8s-extension show --cluster-type connectedClusters -c $ARC_CLUSTER_NAME -g $ARC_RG_NAME --name $EXTENSION_NAME
EXTENSION_ID=$(az k8s-extension show --cluster-type connectedClusters -c $ARC_CLUSTER_NAME -g $ARC_RG_NAME --name $EXTENSION_NAME --query id -o tsv)
az provider show -n Microsoft.ExtendedLocation --query "[registrationState,resourceTypes[?resourceType=='customLocations'].locations]"
CONNECTED_CLUSTER_ID=$(az connectedk8s show -n $ARC_CLUSTER_NAME -g $ARC_RG_NAME --query id -o tsv)
az customlocation create -g $ARC_RG_NAME -n $CUSTOM_LOCATION_NAME --host-resource-id $CONNECTED_CLUSTER_ID --namespace $APP_SERVICE_NAMESPACE_NAME -c $EXTENSION_ID
CUSTOM_LOCATION_ID=$(az customlocation show -g $ARC_RG_NAME -n $CUSTOM_LOCATION_NAME --query id -o tsv)
az provider show -n Microsoft.Web --query "[registrationState,resourceTypes[?resourceType=='kubeEnvironments'].locations]"
az appservice kube create -g $ARC_RG_NAME -n $KUBE_ENV_NAME --custom-location $CUSTOM_LOCATION_ID --static-ip $K8S_PIP
az appservice kube show -g $ARC_RG_NAME -n $KUBE_ENV_NAME

K8S_ARC_PREFIX=k8sArc
ARC_RG_NAME="${K8S_ARC_PREFIX}-RG"
ARC_CLUSTER_NAME="${K8S_ARC_PREFIX}-cluster"
EXTENSION_NAME="${K8S_ARC_PREFIX}-kube"
KUBE_ENV_NAME=$(az appservice kube list -g $ARC_RG_NAME --query "[0].name" -o tsv)
CUSTOM_LOCATION_NAME="${K8S_ARC_PREFIX}-location"
CUSTOM_LOCATION_ID=$(az customlocation show -g $ARC_RG_NAME -n $CUSTOM_LOCATION_NAME --query id -o tsv)
WEBAPP_NAME=k8sarcwebapp$RANDOM$RANDOM
az webapp create -g $ARC_RG_NAME -n $WEBAPP_NAME --custom-location $CUSTOM_LOCATION_ID --runtime "NODE|12-lts"
git clone https://github.com/Azure-Samples/nodejs-docs-hello-world.git
cd nodejs-docs-hello-world
zip -r nodejs-docs-hello-world.zip .
az webapp deployment source config-zip -g $ARC_RG_NAME -n $WEBAPP_NAME --src nodejs-docs-hello-world.zip
kubectl get pods -n appservice-ns