おそまきながら OpenStack を触ってみようかなと思って始めてみたのだが、案外敷居が高かった。 ∥ Home » OpenStack Open Source Cloud Computing Software
インストーラまわりの更新が速いのか、既存の記事もコードもアテにならない感じなので、この記事の賞味期限も短いかも知れません。
なお、私の環境は Ubuntu 14.04 です。
「Single System」一台試行のお手軽環境
OpenStack 環境には、本来は 3~6 台が必要らしいし、実運用では何百台での構成に対応する。Ubuntu の公式文書でも 6 台を要求している。 ∥ Installing Ubuntu OpenStack - The Canonical Distribution | Download | Ubuntu
Red Hat 系では「PackStack」なるインストーラがあり、一台でも、トライアル的にはインストールできるらしい。
その Ubuntu 版が「Ubuntu Openstack installer」。 ∥ cloud-installer in Launchpad
Ubuntu OpenStack Installer には、Canonical 言うところの MaaS(Metal-as-a-Service)モード(物理マシン(ベアメタル)に薄いレイヤの OS をインストール)でのインストールもできるらしい。
さて、シングルホストでの試行用マシンの推奨環境が、以下のようになっている。
- 12G RAM
- 100G HDD (SSD for optimal performance)
- 8 CPUS
けっこう贅沢ね。メモリを 16GB ほど買ってくれば、うちの物理メモリは〆て 24GB か。仮想化の試行をするには、それくらい欲しいかな…。それと、4TB HDD * 3 で RAID5 だから 8TB なので、録画領域を別にしても容量はたっぷり確保できる。
そんなわけで、ちょっとアキバへ行ってくる。
いったん失敗
16GB のメモリと HDD を買ってきた(ついでに Edison も 2 つ買っちゃったんだが、ここでは関係ない)。CPU は i5 なので 4 cores だが、まあいいだろう、メモリはたっぷりだから何かとなると思われる。
以下の実行例は右記の記事に従ったのだが、どうも話が古いのか? うまく行かなかった。成功パターンは後述(本日、2014/11/15。記事は 2014/09/17 ということで、新しいと思うんだが)。 ∥ 第341回 OpenStack環境を30分で構築する:Ubuntu Weekly Recipe|gihyo.jp … 技術評論社
$ sudo apt-add-repository -y ppa:cloud-installer/ppa
sudo] password for knaka:
 Ubuntu Openstack installer is a metal to cloud image that provides an extremely
simple way to install, deploy and scale an openstack cloud on top of
Ubuntu server. Initial configurations are available for single
physical system deployments as well as multiple physical system
deployments.

This is the official stable ppa using the git branch:

https://github.com/Ubuntu-Solutions-Engineering/openstack-installer/tree/stable
 More info: https://launchpad.net/~cloud-installer/+archive/ubuntu/ppa
Press [ENTER] to continue or ctrl-c to cancel adding it

gpg: keyring `/tmp/tmpjbmyu7cn/secring.gpg' created
gpg: keyring `/tmp/tmpjbmyu7cn/pubring.gpg' created
gpg: requesting key D2FF09ED from hkp server keyserver.ubuntu.com
gpg: /tmp/tmpjbmyu7cn/trustdb.gpg: trustdb created
gpg: key D2FF09ED: public key "Launchpad PPA for Ubuntu Cloud Installer" imported
gpg: Total number processed: 1
gpg:               imported: 1  (RSA: 1)
OK
$ sudo apt update
$ sudo apt install -y cloud-installer
上記の記事にある「タイムアウト云々」の箇所は、コード上に該当する箇所が無い。バージョンが上がったか。
下記の実行は、特権が必要だが一般ユーザとして sudo で実行する必要がある。
$ sudo cloud-install
まあ、いよいよ $ cloud-install -u でアンインストールが効きます。上記を全部やりなおしにはなりますが。
失敗しました。
2014-11-15 18:05:37 + sudo -H -u root juju bootstrap
2014-11-15 18:05:38 ERROR failed verification of local provider prerequisites: kvm-ok is not installed. Please install the cpu-checker package.
2014-11-15 18:05:38     sudo apt-get install cpu-checker
2014-11-15 18:05:38 ERROR kvm-ok is not installed. Please install the cpu-checker package.
2014-11-15 18:05:38     sudo apt-get install cpu-checker
コマンド「kvm-ok」が無いだの「cpu-checker」が入っていないだの言いますが、入っています。
$ sudo kvm-ok
INFO: /dev/kvm does not exist
HINT:   sudo modprobe kvm_intel
INFO: Your CPU supports KVM extensions
INFO: KVM (vmx) is disabled by your BIOS
HINT: Enter your BIOS setup and enable Virtualization Technology (VT),
      and then hard poweroff/poweron your system
KVM acceleration can NOT be used
何てことだ、うちのインテルマシンの VT がオフになっている…。リモートから作業していたので、ここで手詰まりとなったので、帰宅する。
~
帰宅し、VT をオンにしてから再試行をしたのだが、どうしてもステータススクリーンが現れない。
こんどは成功
どうもこのプログラム(Ubuntu 用の OpenStack Single Installer)のガイドは右記のようなのだが、instruction が上記とはところどころ違うし、deb レポジトリも異なる。以下、右記に従う。 ∥ Single Installer Guide — Ubuntu Openstack Installer 0.21 documentation
$ sudo apt-add-repository -y ppa:cloud-installer/testing
$ sudo apt-get update
$ sudo apt-get install -y openstack
$ sudo openstack-install
コケた。秘密鍵 ~/.ssh/id_rsa はあったが、~/.ssh/id_rsa.pub が無かったのでコケた。親環境の持っている鍵のペアを、そのままノード間の通信に使うつもりらしいので、公開鍵も置いてやって再試行。
またコケた。いつ私が仕込んだのか忘れたが、変な sudo への変な alias のせいで失敗していた。unalias する。
$ alias sudo
alias sudo='sudo env PATH=$PATH' # 何だこれ?
$ unalias sudo
なおもコケた。/usr/share/openstack/cloudinstall/single_install.py が変じゃなかろうか? ssh に "~" を渡す際にローカルのホームディレクトリに展開されてしまっているっぽい。入った後に展開すべき?
--- /usr/share/openstack/cloudinstall/single_install.py.orig    2014-11-16 17:22:22.515794849 +0900
+++ /usr/share/openstack/cloudinstall/single_install.py 2014-11-15 21:14:48.455112818 +0900
@@ -102,7 +102,7 @@
                                 'charmconf.yaml'),
                    charm_conf_modified)

-        utils.container_run(self.container_name, 'mkdir -p ~/.cloud-install')
+        utils.container_run(self.container_name, 'mkdir -p "~/.cloud-install"')
         utils.container_run(
             self.container_name, 'sudo mkdir -p /etc/openstack')
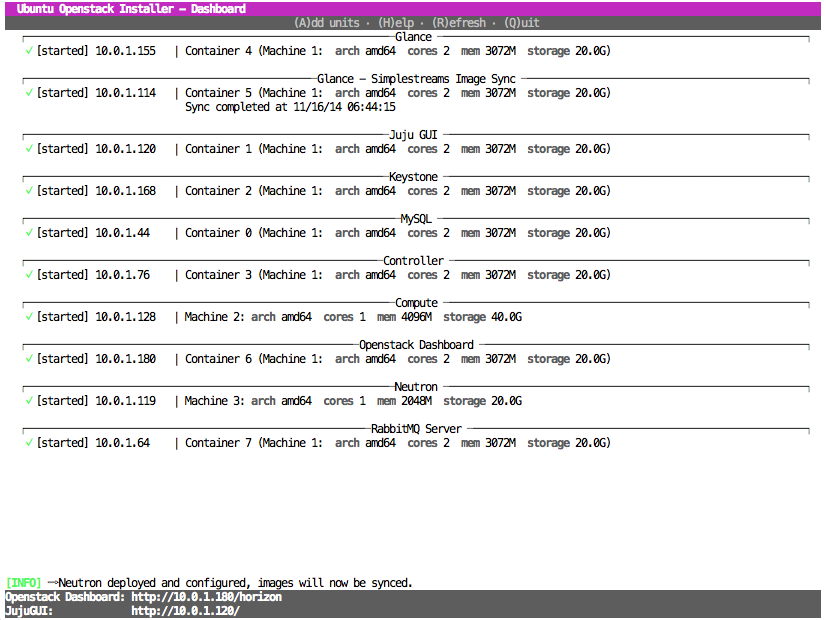
やっと入ったっぽい。20 分くらい待ったかな? 徐々にノードが増えて行って、下図のような状態に。
Quit 後に再度この画面を見るには、uoi-bootstrap のホストへ ssh して openstack-status。
$ sudo lxc-ls -f uoi-bootstrap
NAME           STATE    IPV4                       IPV6  AUTOSTART
------------------------------------------------------------------
uoi-bootstrap  RUNNING  10.0.1.181, 192.168.122.1  -     NO
$ ssh -t ubuntu@10.0.1.181 openstack-status
ホストの再起動後や「-k」での停止後は、再度入れなおしかな? しんどいな。
$ sudo openstack-install -k
$ sudo openstack-install
さて、とりあえず動いたので、OpenStack ってのがどんなものなのか、見て行こうと思います。
