はじめに
ミクシィグループ Advent Calendar 2021 の7日目の記事です。
Cognitoの構築とALB/CloudFront、Web/Mobileクライアントとの連携の紹介をします。
- Cognitoの構築
- ALB/CloudFrontとの連携
- Clientとの連携
まず、Cognitoとは認証、承認、ユーザの管理機能を提供するAWSのサービスです。
ウェブおよびモバイルアプリの認証、承認、およびユーザー管理機能を提供します。ユーザーは、ユーザー名とパスワードを使用して直接サインインするか、Facebook、Amazon、Google、Apple などのサードパーティーを通じてサインインできます。 (https://docs.aws.amazon.com/ja_jp/cognito/latest/developerguide/what-is-amazon-cognito.html)
また、CognitoではOkta, GoogleなどのOIDC認証とAmazon Cognitoで作成したユーザで認証が行えます。
使用例
- ALB/CloudFrontで公開しているアプリケーションに認証を挟む
- ex) チーム内ツールに認証を挟みたい
↓このような認証画面を挟むことができます(Cognitoが生成する認証画面: Hosted UI)
- Web/MobileからCognito認証を行う
- Amplify Libraryを使用することでWeb/Mobileアプリケーションクライアント側にCognito認証を統合することができます
- https://docs.aws.amazon.com/cognito/latest/developerguide/cognito-integrate-apps.html
- https://docs.amplify.aws/lib/auth/existing-resources/q/platform/android/#launch-web-ui-sign-in
Cognitoの構築
Amazon Cognito とは、ユーザ管理・認証機能を提供します。
Amazon Cognito は、ウェブおよびモバイルアプリの認証、承認、およびユーザー管理機能を提供します。ユーザーは、ユーザー名とパスワードを使用して直接サインインするか、Facebook、Amazon、Google、Apple などのサードパーティーを通じてサインインできます。 (https://docs.aws.amazon.com/ja_jp/cognito/latest/developerguide/what-is-amazon-cognito.html)
Cognito は以下の2つのコンポーネントを持ちます
- ユーザプール
- ユーザ管理・サインイン機能を提供
- ID プール
- 他の AWS サービスにアクセスするための一時的な AWS 認証情報を取得
今回の目的はアプリケーションに認証機能を挟むことなので、ユーザプールのみを使用します。
※ リソースはap-northeast-1リージョンで作成しています。
CloudFormationによるCognito ユーザプールの構築
以下の CloudFormation テンプレートでは、ユーザプールの作成と、MFA で SMS を送るために必要な SNS(Simple Notification Service)ロールの作成を行っています
CloudFormationテンプレート例↓
AWSTemplateFormatVersion: '2010-09-09'
Transform: AWS::Serverless-2016-10-31
Description: >
  Cognito template

Parameters:
  CognitoDomain:
    Description: "Any unique domain name of cognito"
    Type: String
  OAuthClientCredentialPath:
    Description: "Secret Manager path"
    Type: String
  CallBackURLs:
    Description: "List of call back URL."
    Type: CommaDelimitedList
  PoolName:
    Description: "Any user pool name"
    Type: String

Resources:
  # Cognito
  UserPool:
    Type: AWS::Cognito::UserPool
    Properties:
      UserPoolName: !Ref PoolName
      AdminCreateUserConfig:
        AllowAdminCreateUserOnly: true # ユーザに自己サインアップを許可する場合はFalse
      AccountRecoverySetting:
        RecoveryMechanisms:
          - Name: verified_email
            Priority: 1
      # MFA settings
      MfaConfiguration: "ON"
      EnabledMfas:
        - SMS_MFA
        - SOFTWARE_TOKEN_MFA
      AutoVerifiedAttributes:
        - phone_number
      SmsConfiguration:
        ExternalId: cognito-sms-configuration-id
        SnsCallerArn: !GetAtt SNSRole.Arn
  UserPoolDomain:
    Type: AWS::Cognito::UserPoolDomain
    Properties:
      Domain: !Ref CognitoDomain # unique domain https://<domain-name>.auth.ap-northeast-1.amazoncognito.com
      UserPoolId: !Ref UserPool
  UserPoolClient:
    Type: AWS::Cognito::UserPoolClient
    Properties:
      AllowedOAuthFlows:
        - code
      AllowedOAuthFlowsUserPoolClient: true
      AllowedOAuthScopes:
        - openid
        - email
      CallbackURLs: !Ref CallBackURLs
      GenerateSecret: false
      SupportedIdentityProviders:
        - COGNITO # For Cognito User Authentication.
      UserPoolId: !Ref UserPool
      PreventUserExistenceErrors: ENABLED
      ExplicitAuthFlows:
        - ALLOW_REFRESH_TOKEN_AUTH

  # SNS role for cognito MFA (SMS認証のため)
  SNSRole:
    Type: AWS::IAM::Role
    Properties:
      AssumeRolePolicyDocument:
        Version: "2012-10-17"
        Statement:
          - Effect: Allow
            Principal:
              Service:
                - cognito-idp.amazonaws.com
            Action:
              - 'sts:AssumeRole'
      Description: "sns-role-for-cognito-mfa"
      Path: "/service-role/"
      Policies:
        - PolicyName: "cognito-mfa-policy"
          PolicyDocument:
            Version: "2012-10-17"
            Statement:
              - Effect: Allow
                Action: "sns:publish"
                Resource: "*"

# Outputs
Outputs:
   ...
パラメータについて
| パラメータ | 説明 |
|---|---|
| CognitoDomain | 認証エンドポイントのドメイン。全世界で一意である必要があります。cognitoという文字列を含んではいけません。 |
| OAuthClientCredentialPath | OAuth Clientの情報が保存されているSecretManagerのパス |
| CallBackURLs | 認証を挟みたいアプリケーションURL。,区切りで複数指定できます |
| PoolName | 任意のユーザプール名 |
SupportedIdentityProvidersにて、使用する認証プロバイダーを設定します。
Okta などのサードパーティ OIDC を使用する場合は、後述のIdentityProviderを定義する必要があります。
ユーザプールで作成するユーザ認証を使用する場合は、COGNITO を指定します。
      SupportedIdentityProviders:
        - !Ref IdentityProvider
        - COGNITO
Oktaを使用する場合
ProviderTypeをOIDCと設定します。
client_id, client_secretについては、事前に SecretManager に保存しておき、読み込むのが望ましいです。
  IdentityProvider:
    Type: AWS::Cognito::UserPoolIdentityProvider
    Properties:
      ProviderDetails:
        attributes_request_method: GET
        authorize_scopes: 'openid email'
        client_id: !Sub "{{resolve:secretsmanager:${OktaClientCredentialPath}:SecretString:client_id}}"
        client_secret: !Sub "{{resolve:secretsmanager:${OktaClientCredentialPath}:SecretString:client_secret}}"
        oidc_issuer: https://xxx.okta.com  # domain
      ProviderName: okta-oidc
      ProviderType: OIDC
      AttributeMapping:
        email: email
      UserPoolId: !Ref UserPool
Google認証を使う場合
ProviderTypeをGoogleと設定します。
client_id, client_secretについては、事前に SecretManager に保存しておき、読み込むのが望ましいです。
  IdentityProvider:
    Type: AWS::Cognito::UserPoolIdentityProvider
    Properties:
      ProviderDetails:
        authorize_scopes: 'profile openid email'
        client_id: !Sub "{{resolve:secretsmanager:${OAuthClientCredentialPath}:SecretString:client_id}}"
        client_secret: !Sub "{{resolve:secretsmanager:${OAuthClientCredentialPath}:SecretString:client_secret}}"
      ProviderName: Google
      ProviderType: Google
      AttributeMapping:
        email: email
      UserPoolId: !Ref UserPool
また、GCP上のOAuthClientの設定を行う必要があります。(APIとサービス>認証情報>OAuth 2.0 クライアント ID)
認証を許可するユーザタイプについてはこちら
| 設定 | 値 (XXXは設定したCognitoドメイン) |
|---|---|
| 承認済みのJavaScript生成元 | https:/XXX.auth.ap-northeast-1.amazoncognito.com |
| 承認済みのリダイレクトURI | https:/XXX.auth.ap-northeast-1.amazoncognito.com/oauth2/idprespoonse |
ALB + Cognito
ALBのリスナールールにCognito認証を設定します
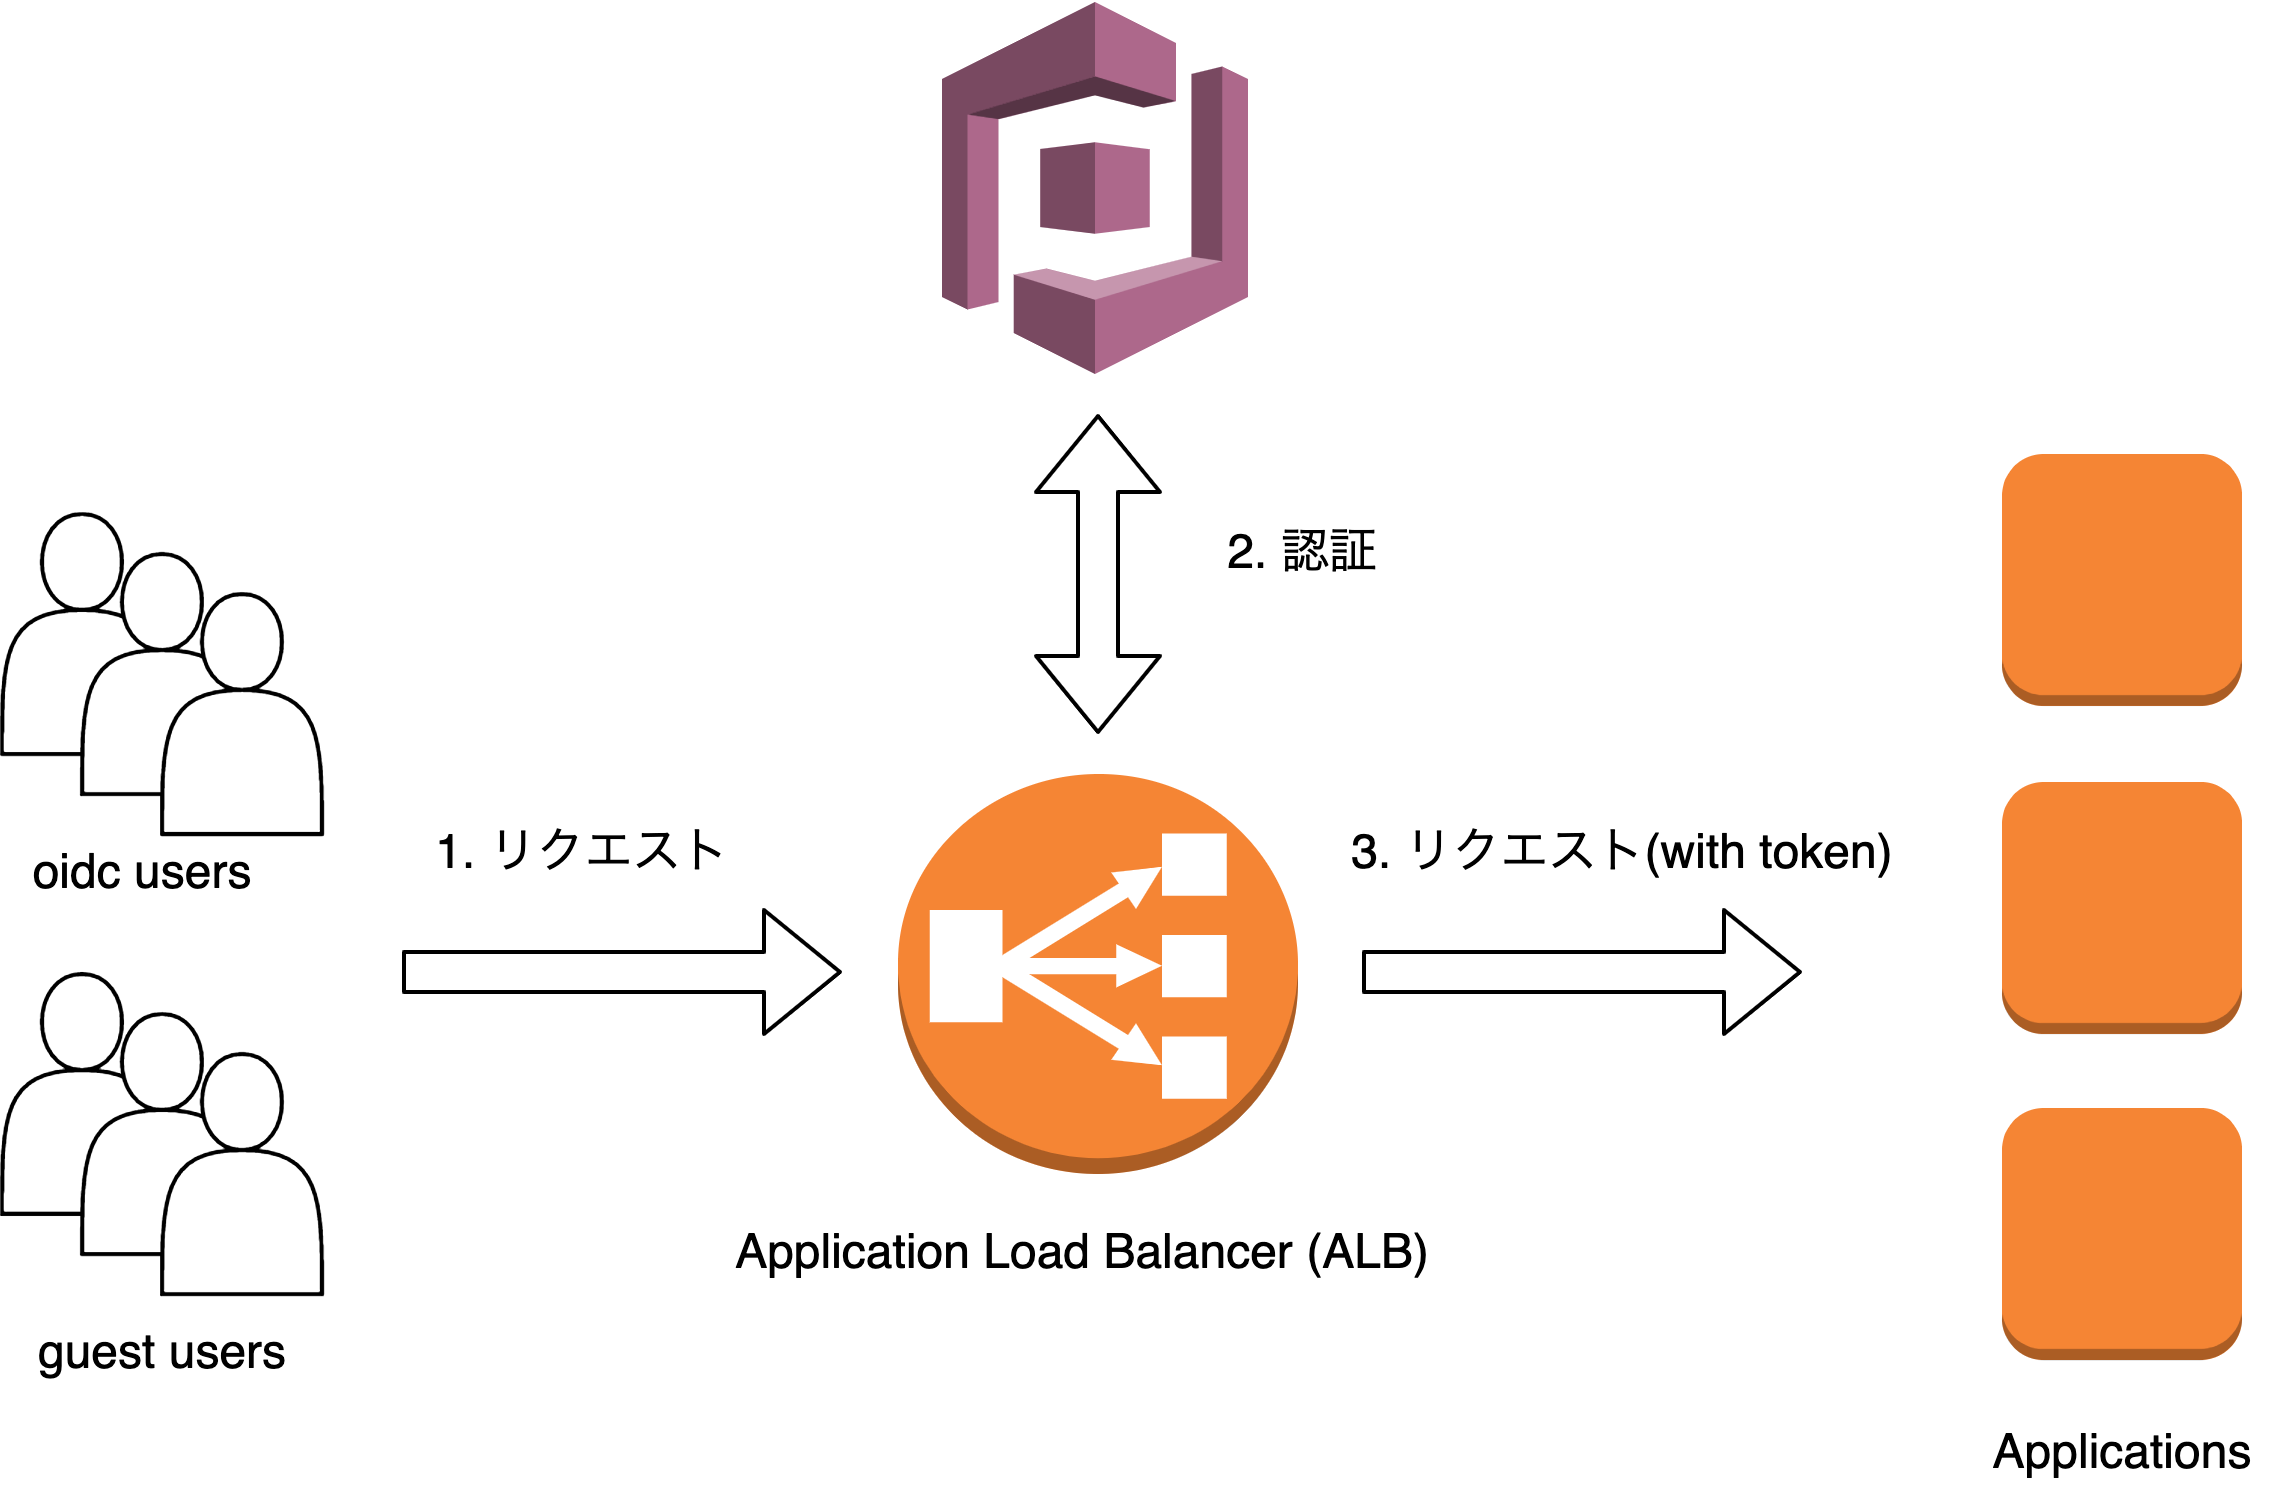
既に ALB を使っている場合、ALB のリスナーに Cognito 認証をルールを設定することで実現できます
ListenerRuleの追加
  ServiceListenerRule:
    Type: AWS::ElasticLoadBalancingV2::ListenerRule
    Properties:
      ListenerArn: !Ref CognitoListener # Listener ARN
      Priority: 1
      Conditions:
        - Field: host-header
          Values:
            - !Ref ServiceDomain # 認証を挟むドメイン
      Actions:
        - Type: authenticate-cognito
          AuthenticateCognitoConfig:
            OnUnauthenticatedRequest: authenticate
            Scope: openid
            SessionCookieName: AWSELBAuthSessionCookie
            SessionTimeout: 604800
            UserPoolArn: !ImportValue CognitoUserPoolArn # Cognito UserPool ARN
            UserPoolClientId: !ImportValue CognitoUserPoolClient # Cognito UserPool ClientID
            UserPoolDomain: !ImportValue CognitoUserPoolDomain # Cognito UserPool Domain
          Order: 1
        - Type: forward
          TargetGroupArn: !Ref ServiceTargetGroup # TargetGroup ARN
          Order: 2
CloudFront + Cognito
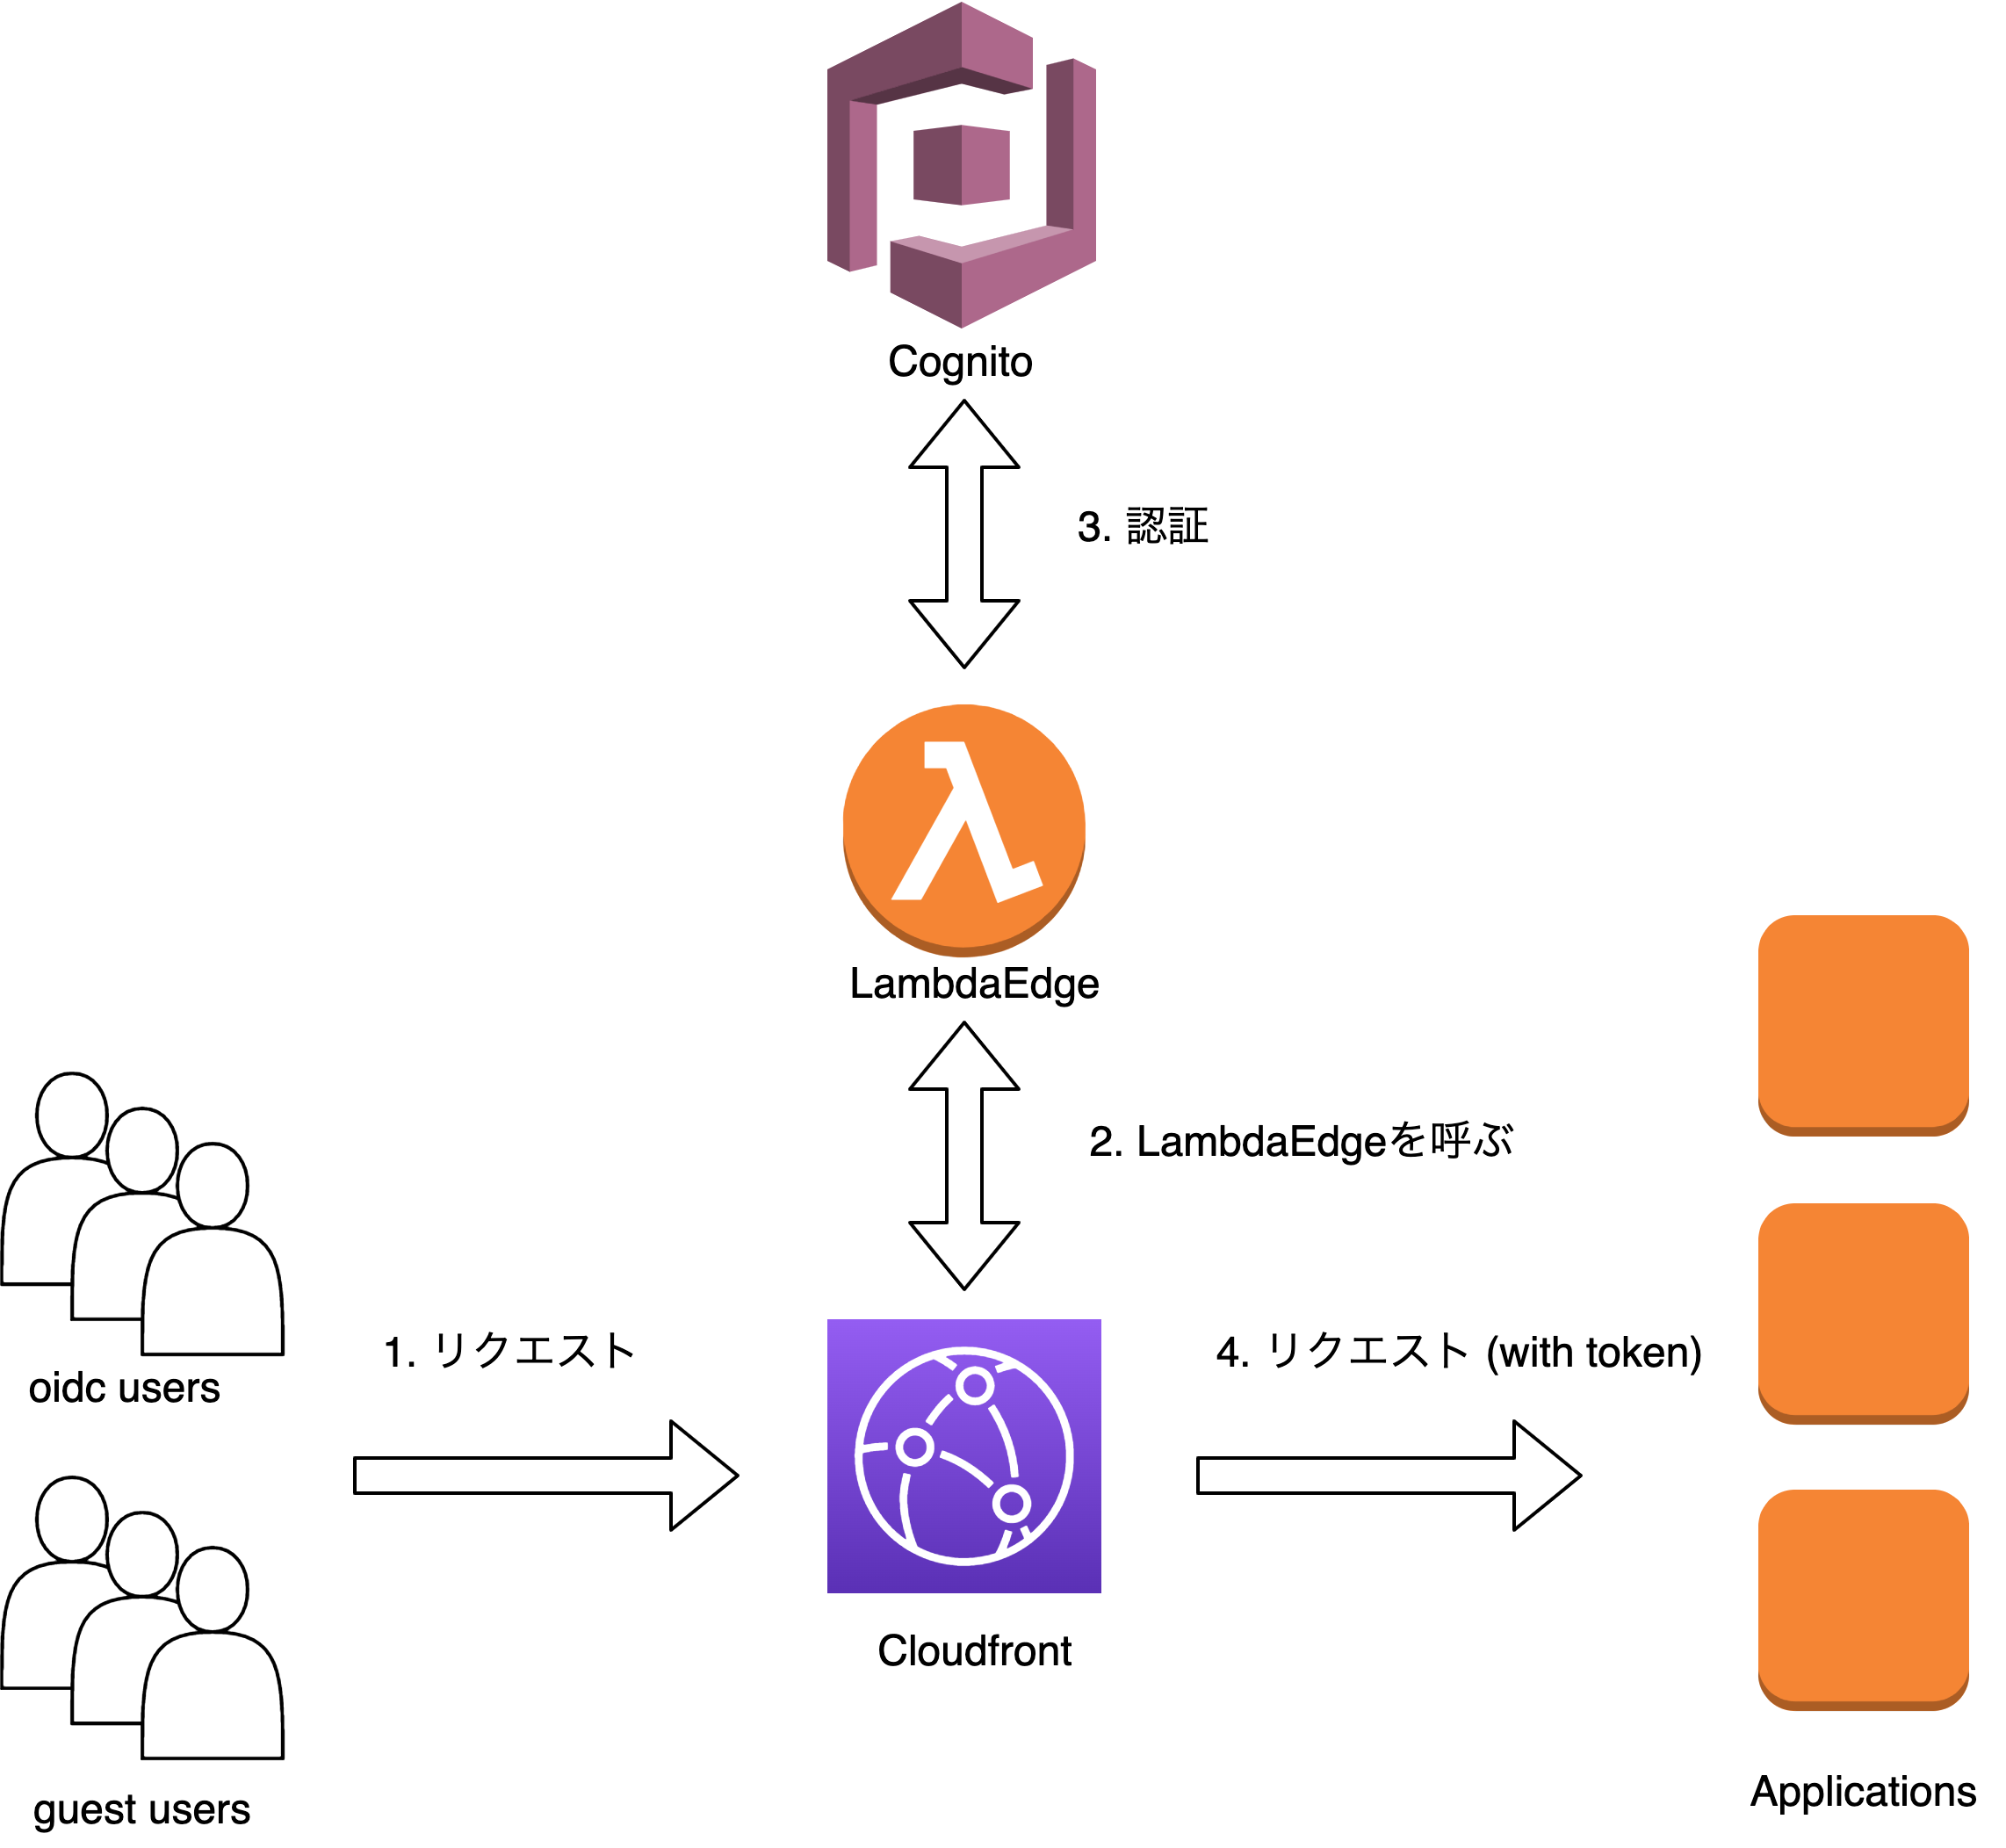
Cloudfront を使っている場合、LambdaEdge に認証用の関数 (https://github.com/awslabs/cognito-at-edge) を設定することで実現できます。
LambdaEdge では環境変数が扱えない(https://docs.aws.amazon.com/AmazonCloudFront/latest/DeveloperGuide/edge-functions-restrictions.html#lambda-at-edge-function-restrictions) ので、dotenvを使用して環境変数を読み込むようにします。
-
package.jsonに"dotenv": "10.0.0"を追記 - 以下のように
index.jsに追記し、.envファイルから読み込むようにします。
require('dotenv').config();
-
index.jsにハンドラーを追記します
module.exports.Authenticator = Authenticator;

// Lambda Handler
const authenticator = new Authenticator({
  // Replace these parameter values with those of your own environment
  region: process.env.COGNITO_REGION,// user pool region
  userPoolId: process.env.COGNITO_USER_POOL_ID, // user pool ID
  userPoolAppId: process.env.COGNITO_USER_POOL_APP_ID,// user pool app client ID
  userPoolDomain: process.env.COGNITO_DOMAIN, // user pool domain
});
exports.handler = async (request) => authenticator.handle(request);
対象のCloudFrontのViewerRequest に上記のLambdaEdgeを設定することで認証を挟むことができます。
CognitoをWeb/Mobileクライアントから使う
次に、作成済みのCognito User PoolをReact, iOS, Androidから使う方法を試してみました。
Amplify Libraryを使うことで簡単にCognitoの機能を使用できます。
AWS Mobile SDKよりもAmplify Libraryを使うことを推奨しているようです。
Should I use the Amplify libraries or AWS Mobile SDK?
Amplify libraries should be used for all new applications.
For existing applications, we recommend you evaluate migration to the Amplify libraries. The AWS Mobile SDK will continue be maintained with bug fixes and security updates.
ref: https://docs.amplify.aws/sdk/q/platform/ios/
AWS Amplify CLIまたはAmplify StudioからCognitoを作成・設定することが可能ですが、今回は既存のCognitoを使う目的のみでAmplify Libraryを使用します。
基本的にドキュメントに書いてある通りですが、それぞれ設定の書き方に癖があったので紹介します。
React Sample
create-react-appで簡単に検証
↓これだけで認証画面が挟まります (withAuthenticator)
import logo from './logo.svg';
import './App.css';
import Amplify, { Auth } from 'aws-amplify';
import { withAuthenticator } from '@aws-amplify/ui-react';
// Configure cognito
Amplify.configure({
Auth: {
region: 'XXXXX',
userPoolId: 'XXXXX',
userPoolWebClientId: 'XXXXX',
mandatorySignIn: true,
},
});
const currentConfig = Auth.configure();
function App() {
return (
<div className="App">
<header className="App-header">
<img src={logo} className="App-logo" alt="logo" />
<p>
Edit <code>src/App.js</code> and save to reload.
</p>
<a
className="App-link"
href="https://reactjs.org"
target="_blank"
rel="noopener noreferrer"
>
Learn React
</a>
</header>
</div>
);
}
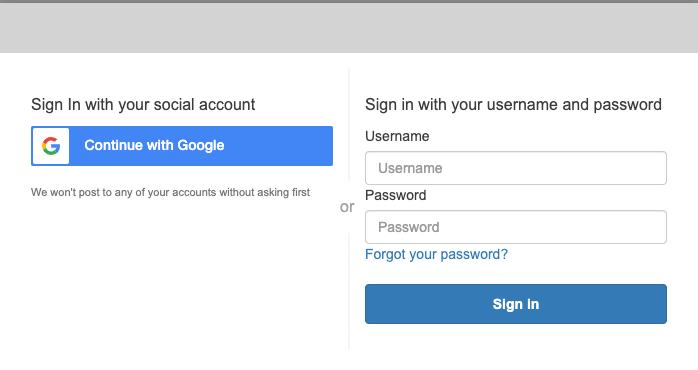
export default withAuthenticator(App);
↓こんな画面が挟まります
iOS Sample
Project setup: https://docs.amplify.aws/lib/project-setup/create-application/q/platform/ios/
AppDelegateの作成
import Foundation
import SwiftUI
import Amplify
import AWSCognitoAuthPlugin

class AppDelegate: NSObject, UIApplicationDelegate {
    func application(_ application: UIApplication, didFinishLaunchingWithOptions launchOptions: [UIApplication.LaunchOptionsKey: Any]?) -> Bool {

        do {
            try Amplify.add(plugin: AWSCognitoAuthPlugin())
            let confStr = """
                    {
                      "plugins": {
                        "awsCognitoAuthPlugin": {
                          "CognitoUserPool": {
                            "Default": {
                              "PoolId": "XXXXX",
                              "AppClientId": "XXXXX",
                              "Region": "XXXXX"
                            }
                          }
                        }
                      }
                    }
                    """
            let confData = confStr.data(using: .utf8)
            guard let data = confData else {
                return false
            }
            let authConf = try JSONDecoder().decode(AuthCategoryConfiguration.self, from: data)
            let amplifyConf: AmplifyConfiguration = AmplifyConfiguration(analytics: nil, api: nil, auth: authConf, dataStore: nil, geo: nil, hub: nil, logging: nil, predictions: nil, storage: nil)
            try Amplify.configure(amplifyConf)
            print("Amplify configured with auth plugin")
        } catch {
            print("Failed to initialize Amplify with \(error)")
        }

        return true
    }
}
rootViewにdelegateを設定
import SwiftUI

@main
struct ios_amplifyApp: App {
    @UIApplicationDelegateAdaptor(AppDelegate.self) var appDelegate

    var body: some Scene {
        WindowGroup {
            ContentView()
        }
    }
}
すると、Cognitoへの接続が行われます。
以降、SignInなどAmplify.Auth.*使用可能になります
// Ex: SignIn
func signIn(username: String, password: String) {
    print(username)
    Amplify.Auth.signIn(username: username, password: password) { result in
        switch result {
        case .success:
            print("Sign in succeeded")
        case .failure(let error):
            print("Sign in failed \(error)")
        }
    }
}
Android Sample
Project setup: https://docs.amplify.aws/lib/project-setup/create-application/q/platform/android/#next-steps
MainActivity内でセットアップ
import androidx.appcompat.app.AppCompatActivity
import android.os.Bundle
import android.util.Log
import com.amplifyframework.AmplifyException
import com.amplifyframework.auth.cognito.AWSCognitoAuthPlugin
import com.amplifyframework.core.Amplify
import com.amplifyframework.core.AmplifyConfiguration
import org.json.JSONObject

class MainActivity : AppCompatActivity() {
    override fun onCreate(savedInstanceState: Bundle?) {
        super.onCreate(savedInstanceState)
        setContentView(R.layout.activity_main)
        try {
            Amplify.addPlugin(AWSCognitoAuthPlugin())
            var jsonStr = """
                {
                    "UserAgent": "aws-amplify-cli/2.0",
                    "Version": "1.0",
                    "auth": {
                      "plugins": {
                        "awsCognitoAuthPlugin": {
                           "CognitoUserPool": {
                             "Default": {
                              "PoolId": "XXXXX",
                              "AppClientId": "XXXXX",
                              "Region": "XXXXX"
                             }
                           }
                        }
                      }
                    }
                }
        """.trimIndent()
            val confJson = JSONObject(jsonStr)
            Log.i("MyAmplifyApp", confJson.toString())
            val conf = AmplifyConfiguration.fromJson(confJson)
            Amplify.configure(conf, applicationContext)
            Log.i("MyAmplifyApp", "Initialized Amplify")
        } catch (error: AmplifyException) {
            Log.e("MyAmplifyApp", "Could not initialize Amplify", error)
        }
    }
}
すると、Cognitoへの接続が行われます。
以降、SignInなどAmpify.Auth.*使用可能になります
// Ex: SingIn
Amplify.Auth.signIn("username", "password",
    { result ->
        if (result.isSignInComplete) {
            Log.i("AuthQuickstart", "Sign in succeeded")
        } else {
            Log.i("AuthQuickstart", "Sign in not complete")
        }
    },
    { Log.e("AuthQuickstart", "Failed to sign in", it) }
)
以上のように、 Cognitoを使用することで、簡単にクライントから認証機能が使えます。
参考なれば幸いです ![]()