概要
この記事では、型消去を中心にSwiftの幾つかのテクニックを使いながら、昔ながらのデリゲートの仕組みを拡張しようと試みています。 それによって、複雑さや要件変更に対して出来る限り強い作り方ができないか探ってみました。結果としてそこそこそれっぽいものが作れたので、実装したものやそれを使った例を載せています。
はじめに
例えばWebページのような縦に長く単純でないレイアウトを実現したい時に、TableViewやCollectionViewなどで実装したとします。しかし、それでいざ作ってみるとデリゲートメソッドの実装が煩雑になってだんだんしんどくなってくるという経験をしたことがありました。また、大人数で開発していると、人によって実装方法が違ってきたり、突発的な仕様追加で分岐の中に分岐が積み重なったりと、かなりつらい状況が生まれがちでした。
こういった課題を解決したいという動機から、表示させるデータの構造と表示方法に規約を設けてそれを実装に落とし込めないか考えました。Swiftの持っている機能を活用しつつ、ただしできるだけUIKitの慣習から外れきらずに作りたかったため、(なぜか)未だに標準的な仕組みであるデリゲートは残してそれを拡張できないか検討してみました。その際にtry! Swiftでたまたま聴いた「型消去 (Type Erase)」という手法を試してデリゲートへGenericsを導入したところ、案外それっぽものを作れました。デリゲートにこだわる良し悪しはさておき、折角なので(勢いに任せて)作ったものをまとめようと思います。
仕様
以下の条件を満たすように作っています。
- UICollectionViewControllerを使って情報をグリッド形式で表示させる
- レイアウトは標準のUICollectionViewFlowLayoutで作る
- 1画面に表示させるデータは複数種類存在し、将来的に追加・削除あり
- 表示させるデータ構造は予め決められた型の2次元配列のみ
実装
作成するクラス
以下の3つのクラス・プロトコルを作成します。MyViewControllerはCollectionViewの管理クラス、MyViewControllerDelegateはMyViewControllerの一部処理をデリゲートするためのプロトコル、AnyMyViewControllerDelegateは型消去クラスです。MyViewControllerはGenericsを持っており、MyViewControllerDelegateはAssociated Typeを持っています。それらを2つを繋ぐための存在がAnyMyViewControllerDelegateになります。
-
MyViewController
- UICollectionViewControllerを継承したクラス
- CollectionViewへのデータ適用やタップした時の処理を他のクラスへ委譲する
- 型パラメータとしてデリゲート先のクラスを指定する
-
MyViewControllerDelegate
- MyViewControllerのデリゲートメソッドが定義されたプロトコル
- CollectionViewへのデータの適用と、セルをタップした時に呼ばれるメソッドを定義している
- associated typeを持たせることでデリゲートメソッドにジェネリクスを適用する
-
AnyMyViewControllerDelegate
- MyViewControllerへMyViewControllerDelegateに従ったオブジェクトを持たせるための型消去クラス
- MyViewControllerDelegateがassociated typeを持つため必要となってくる
- 型パラメータとしてデリゲート先のクラスを指定する
1. UIを表示させるためのViewControllerとそのデリゲートを準備する
まずはじめにUICollectionViewControllerを継承したMyViewControllerを作成します。
class MyViewController: UICollectionViewController, UICollectionViewDelegateFlowLayout {

}
続いてプロトコルでMyViewControllerのデリゲートであるMyViewControllerDelegateを定義します。MyViewControllerへ外から与えられる情報は、セルのサイズ・セルの指定・セルの選択時の処理の3つに加えて、MyViewControllerが個々のセルへ表示させるデータの型とします。
そして、デリゲートメソッドではそれぞれのセルに対応するデータを引数で渡されるようにすることで、indexPathを渡すよりも一段階抽象化します。
protocol MyViewControllerDelegate: class {
    associatedtype Item // セルに渡すデータの型

    func collectionView(collectionView: UICollectionView, cellFor item: Item) -> UICollectionViewCell
    func collectionView(collectionView: UICollectionView, layout collectionViewLayout: UICollectionViewLayout, sizeFor item: Item) -> CGSize
    func collectionView(collectionView: UICollectionView, didSelect item: Item)
}
そしてこのプロトコルに従うクラスをMyCollectionViewControllerのプロパティとしてもたせます。しかしここでassociated typeの型が決定していないためコンパイルエラーになってしまいます。
class MyViewController: UICollectionViewController, UICollectionViewDelegateFlowLayout {
  weak var delegate: MyViewControllerDelegate? // エラーになる
}
そこで「型消去」を使います。用語の意味に関してはこちらを御覧ください。
2. 型消去でAssociated TypeをクラスのGenericsと同等に扱う
型消去用のクラスAnyMyViewControllerDelegateを用意して、デリゲートをラップします。
// MyViewControllerDelegateの型消去クラス。
// Associated TypeをクラスのGenericsへ置き換える。
class AnyMyViewControllerDelegate<Delegate: MyViewControllerDelegate> {
    private weak var delegate: Delegate?

    init(delegate: Delegate) {
        self.delegate = delegate
    }

    // MyViewControllerDelegateのメソッドに1対1で対応するメソッドを用意していく

    func collectionView(collectionView: CollectionView, cellFor item: Delegate.Item) -> UICollectionViewCell? {
        return delegate?.collectionView(collectionView, cellFor: item)
    }

    func collectionView(collectionView: CollectionView, layout collectionViewLayout: UICollectionViewLayout, sizeFor item: Delegate.Item) -> CGSize? {
        return delegate?.collectionView(collectionView, layout: collectionViewLayout, sizeFor: item)
    }

    func collectionView(collectionView: CollectionView, didSelect item: Delegate.Item) {
        delegate?.collectionView(collectionView, didSelect: item)
    }
}
このAnyMyViewControllerDelegateをMyViewControllerのプロパティとして持たせます。
class MyViewController<Delegate: MyViewControllerDelegate>: UICollectionViewController, UICollectionViewDelegateFlowLayout {

  // デリゲート先のオブジェクトはAnyMyViewControllerDelegateが持っていて、
  // そこでweakになっているのでここをweakにする必要はない
  var delegate: AnyMyViewControllerDelegate<Delegate>?
}
更にセルに表示させるデータとして、MyViewControllerDelegateのItemを使います。Itemの2次元配列として定義します。
class MyViewController<Delegate: MyViewControllerDelegate>: UICollectionViewController, UICollectionViewDelegateFlowLayout {

  var delegate: AnyMyViewControllerDelegate<Delegate>?

  // Delegate.Itemの2次元配列とする。
  var items = [Array<Delegate.Item>]()
}
そしてCollectionViewのそれぞれのDelegate, DataSource内で、MyViewControllerDelegateのメソッドを実行するように書きます。
class MyViewController<Delegate: MyViewControllerDelegate>: UICollectionViewController, UICollectionViewDelegateFlowLayout {

    var delegate: AnyMyViewControllerDelegate<Delegate>?

    var items = [Array<Delegate.Item>]()

    override func viewDidLoad() {
        super.viewDidLoad()

        // delegateが実装されていなかった時用にとりあえず登録しておく
        collectionView?.registerClass(UICollectionViewCell.self, forCellWithReuseIdentifier: "identifier")
    }

    //sectionとrowの数はitemsを元に取る

    override func numberOfSectionsInCollectionView(collectionView: UICollectionView) -> Int {
        return items.count
    }

    override func collectionView(collectionView: UICollectionView, numberOfItemsInSection section: Int) -> Int {
        return items[section].count
    }

    // indexPathに対応するデータだけを予め取ってきて、そいつをデリゲート先に渡す。

    override func collectionView(collectionView: UICollectionView, cellForItemAtIndexPath indexPath: NSIndexPath) -> UICollectionViewCell {
        return delegate?.collectionView(collectionView, cellFor: items[indexPath.section][indexPath.row])
                ?? collectionView.dequeueReusableCellWithReuseIdentifier("identifier", forIndexPath: indexPath)
    }

    override func collectionView(collectionView: UICollectionView, didSelectItemAtIndexPath indexPath: NSIndexPath) {
        delegate?.collectionView(collectionView, didSelect: items[indexPath.section][indexPath.row])
    }

    func collectionView(collectionView: UICollectionView, layout collectionViewLayout: UICollectionViewLayout, sizeForItemAtIndexPath indexPath: NSIndexPath) -> CGSize {
        let contentSize = delegate?.collectionView(collectionView, layout: collectionViewLayout, sizeFor: items[indexPath.section][indexPath.row])
        return contentSize ?? collectionViewLayout.collectionViewContentSize()
    }

    // ついでにセル間のスペースを指定

    func collectionView(collectionView: UICollectionView, layout collectionViewLayout: UICollectionViewLayout, minimumLineSpacingForSectionAtIndex section: Int) -> CGFloat {
        return 1
    }

    func collectionView(collectionView: UICollectionView, layout collectionViewLayout: UICollectionViewLayout, minimumInteritemSpacingForSectionAtIndex section: Int) -> CGFloat {
        return 0
    }
}
3. UICollectionViewの存在を隠す
ついでに内部で扱っているUICollectionViewの存在を隠蔽してみます。
まず、セルのdequeue処理を抽象化しようと思います。
Protocolの中身を変えます。
protocol MyViewControllerDelegate: class {
    associatedtype Item // セルに渡すデータの型

    // ↓変更するメソッド。第2引数へクロージャを渡す。役割としては、identifierを渡せばdequeueする。
    func collectionView(collectionView: UICollectionView, dequeue: ((identifier: String) -> UICollectionViewCell?), cellFor item: Item) -> UICollectionViewCell

    func collectionView(collectionView: UICollectionView, layout collectionViewLayout: UICollectionViewLayout, sizeFor item: Item) -> CGSize
    func collectionView(collectionView: UICollectionView, didSelect item: Item)
}
第2引数として新たに増やしたdequeue用クロージャを作るために、カリー化という仕組みを使います。MyViewControllerでそのデリゲートメソッドを呼んでいる箇所を書き換えます。予めindexPathのみ束縛しておいたクロージャーを渡します。
class MyViewController<Delegate: MyViewControllerDelegate>: UICollectionViewController, UICollectionViewDelegateFlowLayout {
    // ...
    // 省略
    // ...
    override func collectionView(collectionView: UICollectionView, cellForItemAtIndexPath indexPath: NSIndexPath) -> UICollectionViewCell {

        // identifierのみを渡せばdequeueしてくれるクロージャを作るための関数
        func dequeue(from indexPath: NSIndexPath) -> ((identifier: String) -> UICollectionViewCell?) {
            return { (identifier: String) -> UICollectionViewCell? in
                return collectionView.dequeueReusableCellWithReuseIdentifier(identifier, forIndexPath: indexPath)
            }
        }

        let dequeueHandler = dequeue(from: indexPath)
        let cell = delegate?.collectionView(collectionView, dequeue: dequeueHandler, cellFor: items[indexPath.section][indexPath.row])
                   ?? collectionView.dequeueReusableCellWithReuseIdentifier("identifier", forIndexPath: indexPath)

        return cell
    }

}
セルの登録は初期化の時にcollectionViewを経由せずに行います。こちらもcollectionViewに対してクラスを登録するクロージャを使います。初期化の時に型消去クラスも渡してしまうようにします。
class MyViewController<Delegate: MyViewControllerDelegate>: UICollectionViewController, UICollectionViewDelegateFlowLayout {

    init(_ delegate: AnyMyViewControllerDelegate<Delegate>, configure: (register: (cellClass: AnyClass, identifier: String) -> Void) -> Void = { _ in }) {
        super.init(collectionViewLayout: UICollectionViewFlowLayout())

        // CollectionViewに対してセルを登録するクロージャー
        let register = { [weak self] (cellClass: AnyClass, identifier: String) -> Void in
            self?.collectionView?.registerClass(cellClass, forCellWithReuseIdentifier: identifier)
        }

        self.delegate = delegate
        configure(register: register)
    }
}
そして、デリゲートメソッドの第1引数も、UICollectionViewからMyViewControllerにしましょう。Genericsをもっているため単純には置き換えられませんが、Protocolの機能の一つであるSelfを使うことで無理やりできました。
protocol MyViewControllerDelegate: class {
    associatedtype Item

    // 全てのメソッドで第1引数をMyViewControllerにする
    func myViewController(vc: MyViewController<Self>, dequeue: ((identifier: String) -> UICollectionViewCell?), cellFor item: Item) -> UICollectionViewCell
    func myViewController(vc: MyViewController<Self>, layout collectionViewLayout: UICollectionViewLayout, sizeFor item: Item) -> CGSize
    func myViewController(vc: MyViewController<Self>, didSelect item: Item)
}
4. Protocol ExtensionでデリゲートメソッドをOptionalにする
最後に、セルの選択時の処理はオプショナルでいて欲しいのでメソッドをオプションにします。optionalキーワードを付けたいところですが、@objcをつけねばならず、そうするとGenericsをつかえなくなるという問題が発生します。ただし、Protocol Extensionにしてデフォルト実装を与えてしまえばオプションっぽくできるのでそうします。
extension MyViewControllerDelegate {
    func myViewController(vc: MyViewController<Self>, didSelect item: Item) {}
}
5. 全体のコード
全体のコードはこちらになります。そのままPlaygroundへコピペして実行できるようにしました。"Assistant Editor"を開くと結果がビジュアルに見れます。
結果
上記で作成したMyViewControllerを使ってみます。MyViewControllerを表示させるためのコンテナにあたるViewControlerを作成して、そいつのchildViewControllerとして表示させましょう。
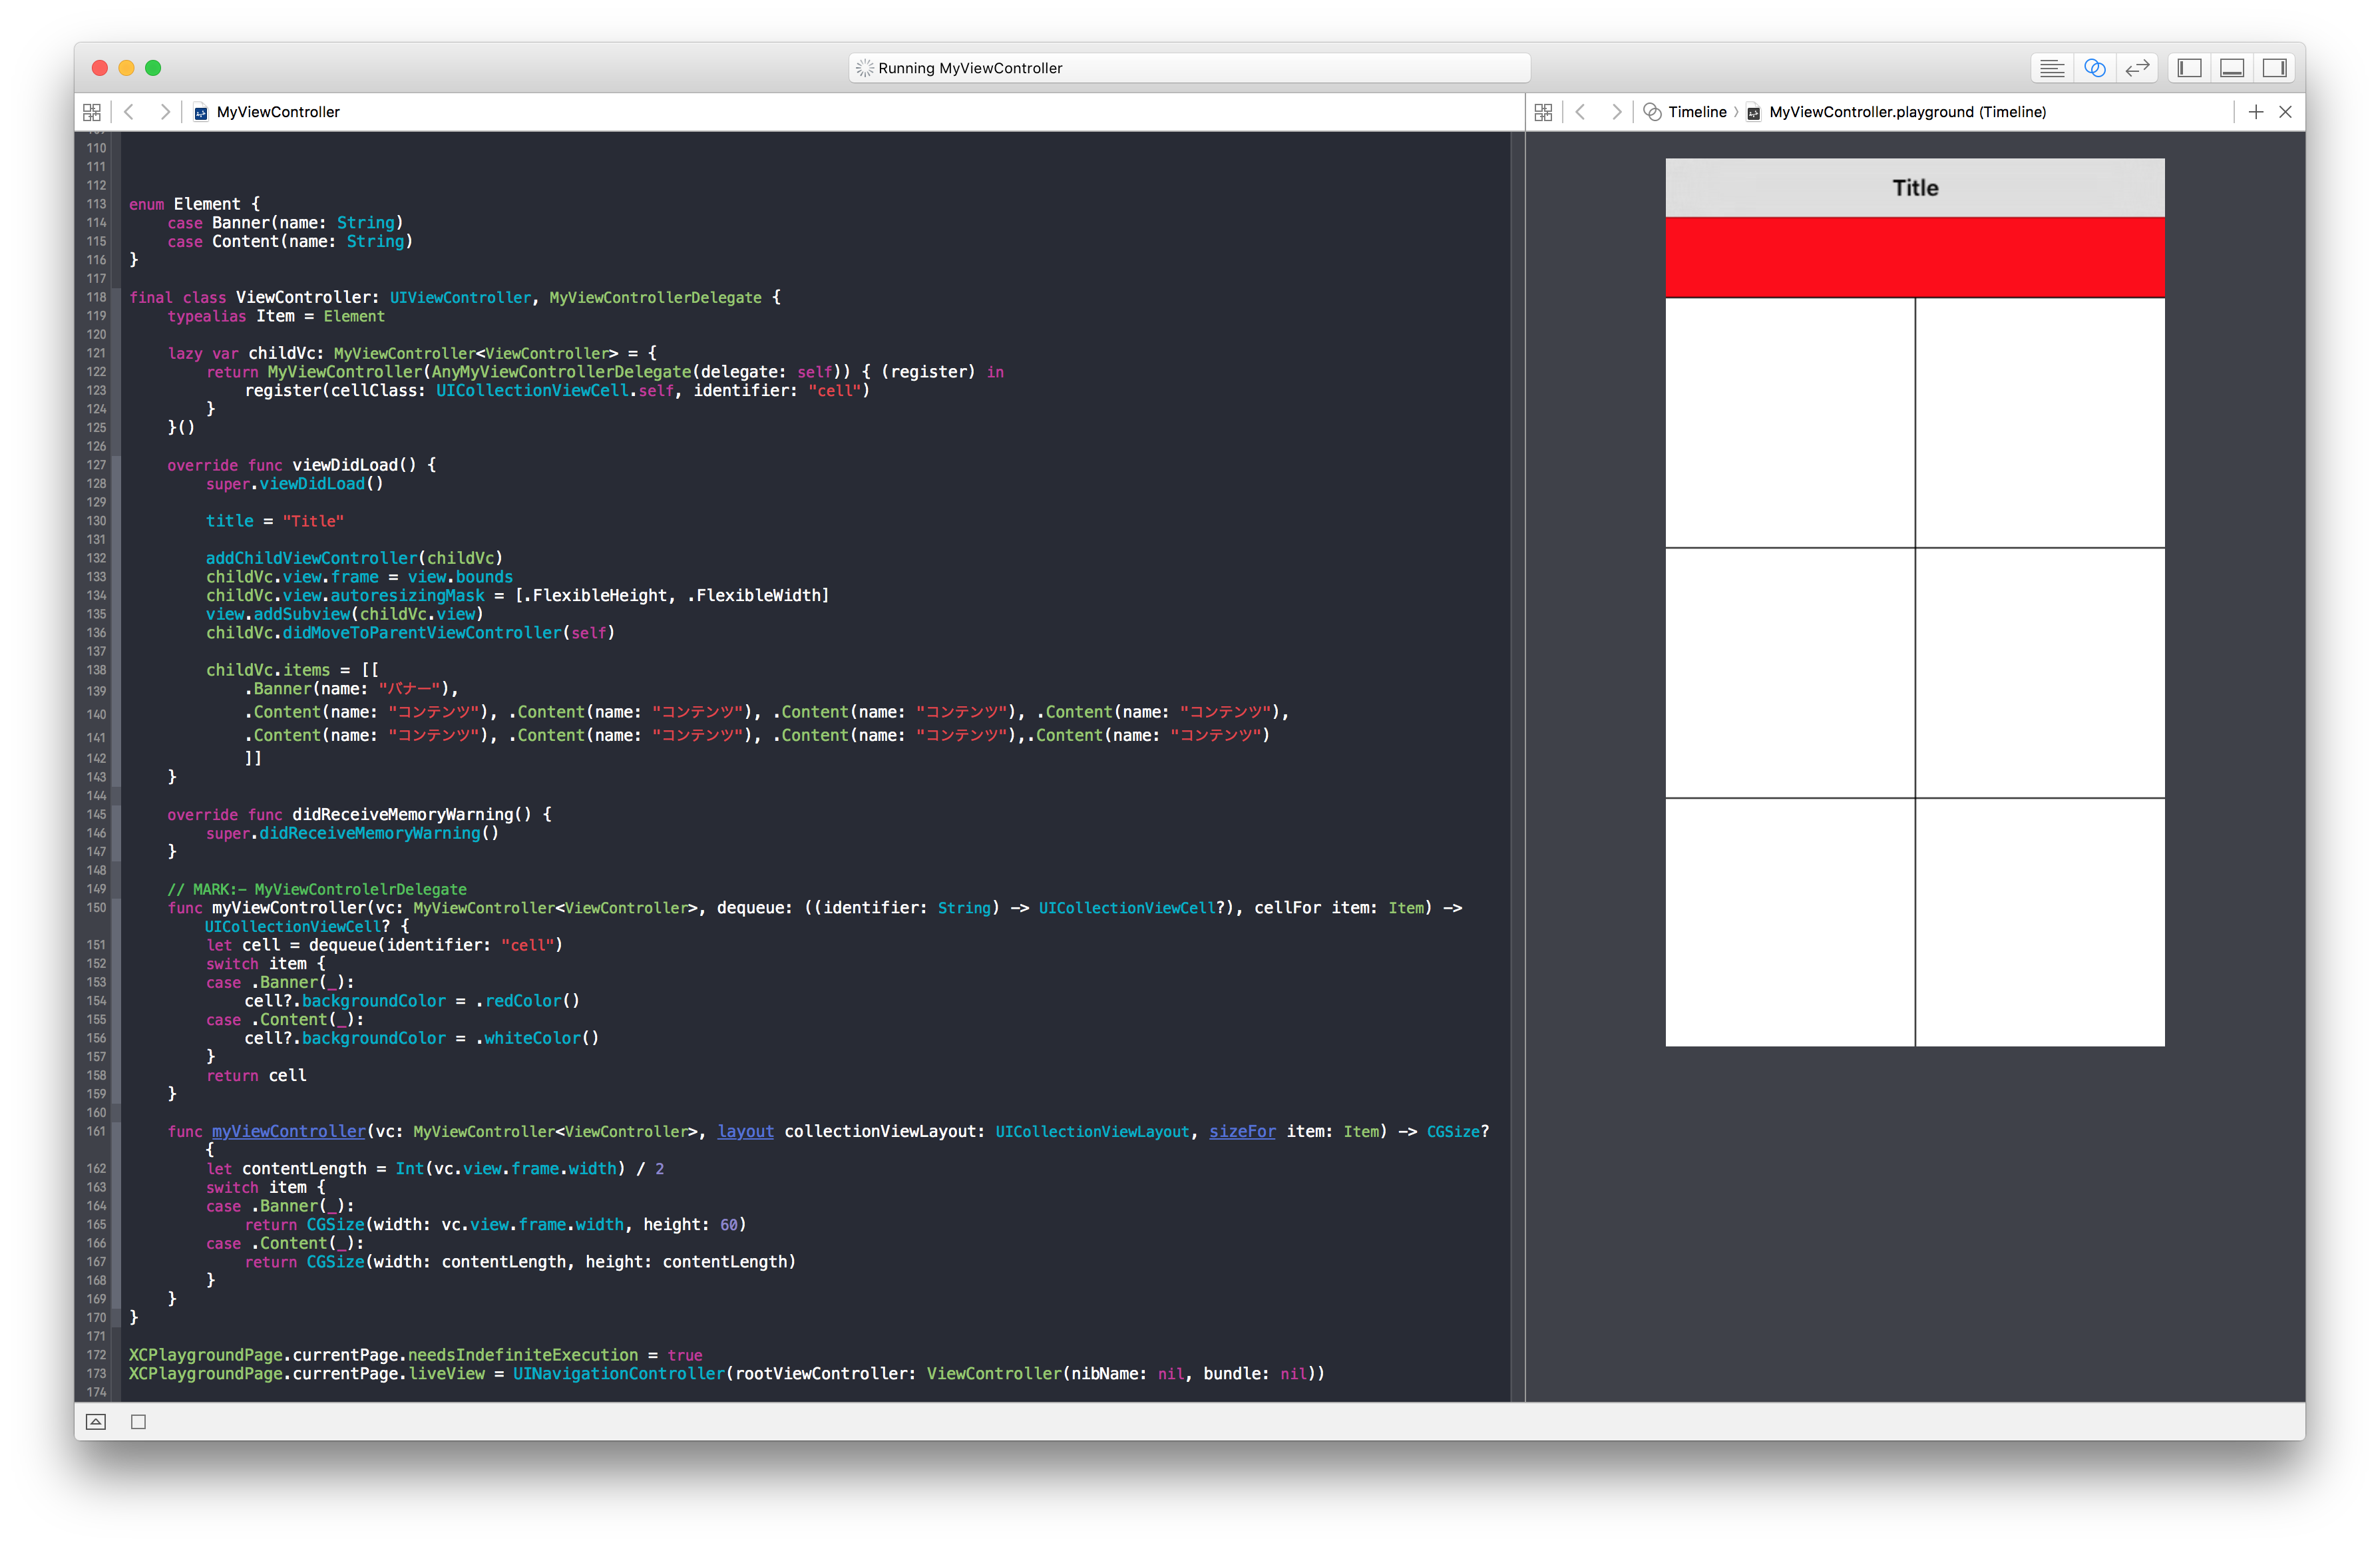
例1: 「先頭にバナーを表示させて、それからコンテンツが続く」という画面
まずは要素となるデータを作ります。ここではデリゲートメソッドとして分けられているそれぞれの処理間で不整合が発生しないよう、Enumを使うのがいいでしょう。Elementという型を作り、データの種類別にcaseを書いていきましょう。Associated Valueにして、表示に使われる値を管理します。
enum Element {
    case Banner(name: String)
    case Content(name: String)
}
続いて、MyViewControllerを子クラスとして持ち、MyViewControllerのDelegate先として使われるViewControllerを作ります。中身は凄くシンプルです。MyViewControllerをプロパティとして持たせるときに、AnyMyViewControllerDelegate経由で自分自身をデリゲート先に指定します。そして、viewDidLoadの中でMyViewControllerをaddChildViewControllerし、MyViewControllerDelegateに従ってメソッドを実装していきます。
final class ViewController: UIViewController, MyViewControllerDelegate {
    typealias Item = Element

    lazy var childVc: MyViewController<ViewController> = {
        return MyViewController(AnyMyViewControllerDelegate(delegate: self)) { (register) in
            register(cellClass: UICollectionViewCell.self, identifier: "cell")
        }
    }()

    override func viewDidLoad() {
        super.viewDidLoad()

        title = "Title"

        addChildViewController(childVc)
        childVc.view.frame = view.bounds
        childVc.view.autoresizingMask = [.FlexibleHeight, .FlexibleWidth]
        view.addSubview(childVc.view)
        childVc.didMoveToParentViewController(self)

        childVc.items = [[
            .Banner(name: "バナー"),
            .Content(name: "コンテンツ"), .Content(name: "コンテンツ"), .Content(name: "コンテンツ"), .Content(name: "コンテンツ"),
            .Content(name: "コンテンツ"), .Content(name: "コンテンツ"), .Content(name: "コンテンツ"),.Content(name: "コンテンツ")
            ]]
    }

    override func didReceiveMemoryWarning() {
        super.didReceiveMemoryWarning()
    }

    // MARK:- MyViewControlelrDelegate
    func myViewController(vc: MyViewController<ViewController>, dequeue: ((identifier: String) -> UICollectionViewCell?), cellFor item: Item) -> UICollectionViewCell? {
        let cell = dequeue(identifier: "cell")
        switch item {
        case .Banner(_):
            cell?.backgroundColor = .redColor()
        case .Content(_):
            cell?.backgroundColor = .whiteColor()
        }
        return cell
    }

    func myViewController(vc: MyViewController<ViewController>, layout collectionViewLayout: UICollectionViewLayout, sizeFor item: Item) -> CGSize? {
        let contentLength = Int(vc.view.frame.width) / 2
        switch item {
        case .Banner(_):
            return CGSize(width: vc.view.frame.width, height: 60)
        case .Content(_):
            return CGSize(width: contentLength, height: contentLength)
        }
    }
}
enumによるパターンマッチングを活用しているため、Delegateの実装内でちゃんと網羅されているのかチェックすることができます。仕様変更などに対して強い実装が可能になりました。
実際に実装した結果をPlaygroundで見てみるとこのようになります。異なるデータの種類をすっきりとグリッド表示させることができました。
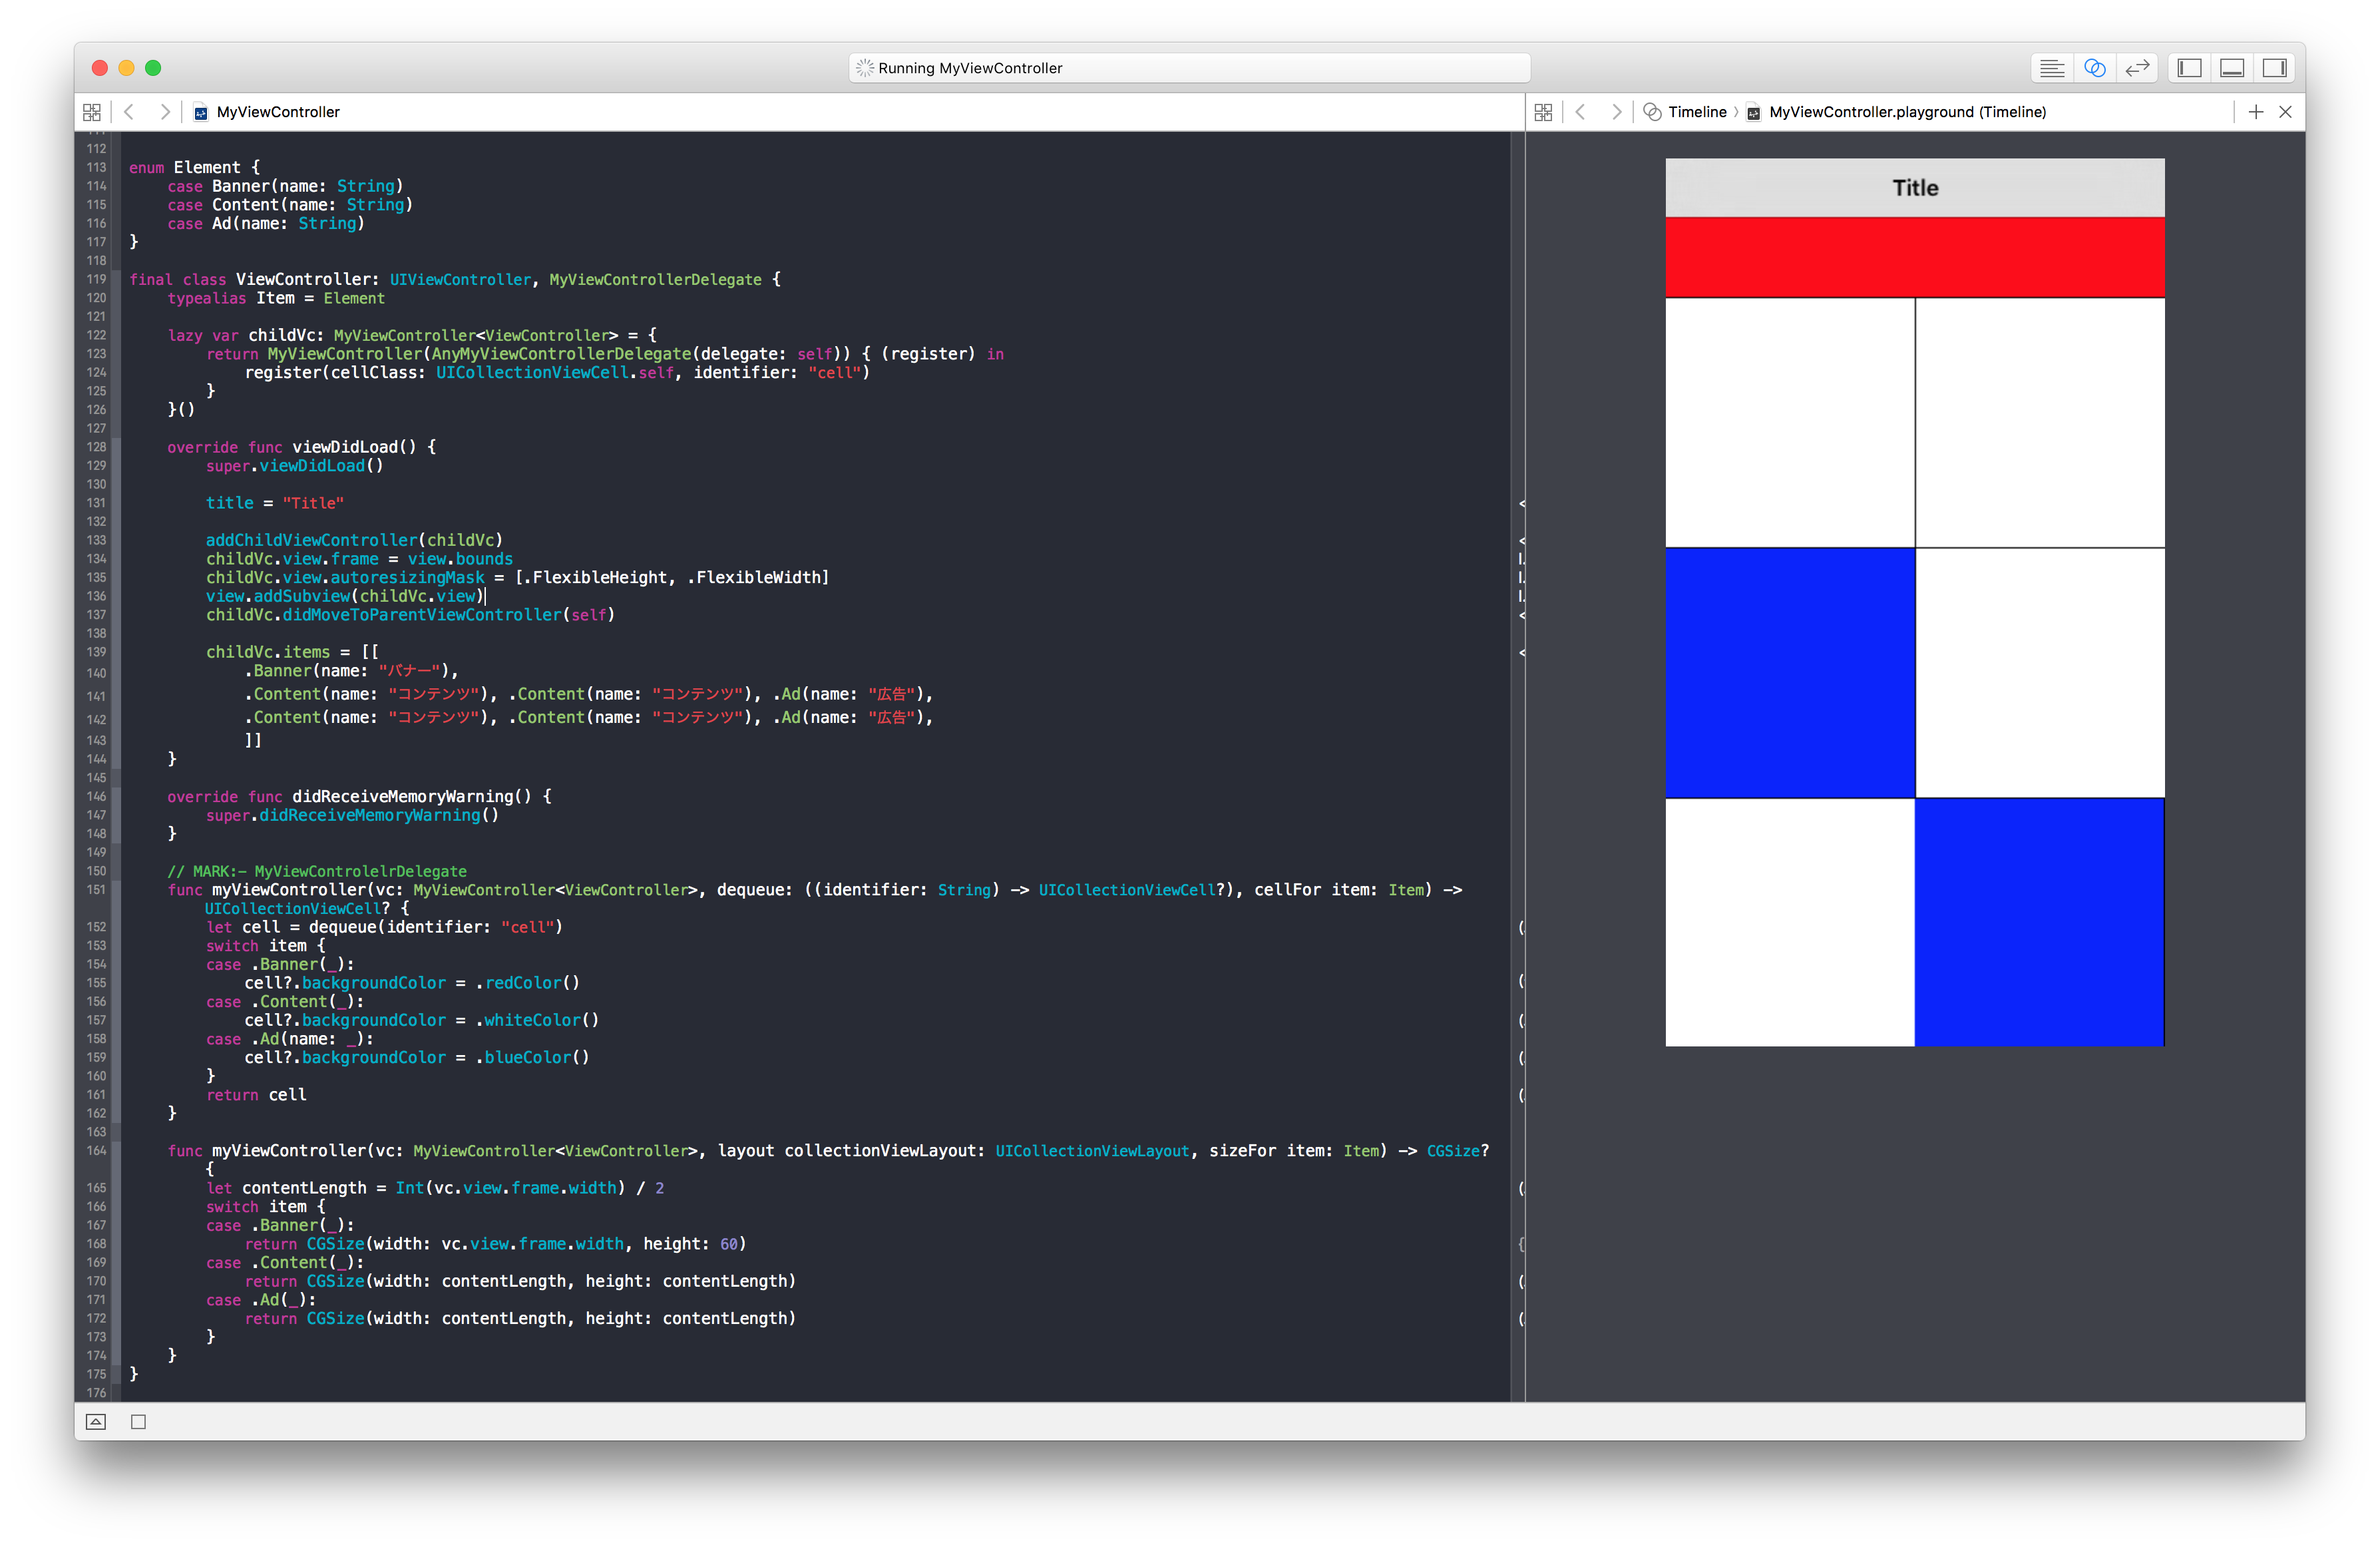
例2: その後で要件追加が発生し、3つ毎に広告コンテンツを表示させる
もともと想定していたレイアウト仕様から外れていなければ変更は容易です。まずElementに広告用のcaseを追加します。
enum Element {
    case Banner(name: String)
    case Content(name: String)
    case Ad(name: String) // 広告コンテンツを追加
}
すると、実装したMyViewControllerDelegateの各メソッドが、caseを網羅していないことによってコンパイルエラーを吐きます。
コンパイルが通るようにcaseを追加しましょう。
final class ViewController: UIViewController, MyViewControllerDelegate {
    //...
    //省略
    //...

    // MARK:- MyViewControlelrDelegate
    func myViewController(vc: MyViewController<ViewController>, dequeue: ((identifier: String) -> UICollectionViewCell?), cellFor item: Item) -> UICollectionViewCell? {
        let cell = dequeue(identifier: "cell")
        switch item {
        case .Banner(_):
            cell?.backgroundColor = .redColor()
        case .Content(_):
            cell?.backgroundColor = .whiteColor()
        case .Ad(name: _):                          // <- 広告コンテンツ用のcaseを追加
            cell?.backgroundColor = .blueColor()    // <- 広告コンテンツ用のcaseを追加
        }
        return cell
    }

    func myViewController(vc: MyViewController<ViewController>, layout collectionViewLayout: UICollectionViewLayout, sizeFor item: Item) -> CGSize? {
        let contentLength = Int(vc.view.frame.width) / 2
        switch item {
        case .Banner(_):
            return CGSize(width: vc.view.frame.width, height: 60)
        case .Content(_):
            return CGSize(width: contentLength, height: contentLength)
        case .Ad(_):                                                    // <- 広告コンテンツ用のcaseを追加
            return CGSize(width: contentLength, height: contentLength)  // <- 広告コンテンツ用のcaseを追加
        }
    }
}
これで下記のように2つ毎に広告コンテンツが来るパターンに対応できました。
まとめ
Swiftを使って、既存のUIKitのクラスに対して以下の変更をしました。
- Genericsを使ってCollectionViewが扱うデータ構造を抽象化
- Associated Typeと型消去によってデリゲートでもGenericsを扱えるようにする
- indexPathに対してではなく表示させるデータに対して各デリゲートメソッドが呼ばれるように変更
- Protocol Extensionで非必須のデリゲートメソッドを作る
- カリー化によってcollectionViewのdequeue処理を抽象化する
- CollectionViewが直接参照するデータをValue Typeにすることでクラッシュが起こりにくくする
「こんなやり方ってどうかな?」ぐらいの軽い案なので、どのくらい使い物になるかはよくわかりません。そして書いてみたら全然話がまとまってませんでした。
正直なことをいえば、型消去を知ってから何か実用的な使い道を自分なりに見つけたいという下心のほうが先行して作ったものでもあります。そもそもデリゲートはやめてクロージャーを使えばいいじゃんって考えもあると思います。
それでもデリゲートを使うメリットとしては、
- データを画面上に並べるときに使う仕組みとしてiOSエンジニアにとって馴染みがある
- 循環参照を使う側が気にしなくて良い (俺はクロージャを多段にした時見落とすことがあります...)
でしょうか。あんまよくわかりません。
他にもなにか型消去の使い道としてよさそうなものを知っている方がいらっしゃったら是非教えて下さい(結局そっち)。
参考資料
力尽きたので後で書く