*日本語へたくそです。すみません。
*追記 公式ウェブサイトが出てました https://cam-inc.github.io/riotx/ こっちのほうが分かり易いと思います。
Riotにも状態管理ライブラリがあった...!
Riotx
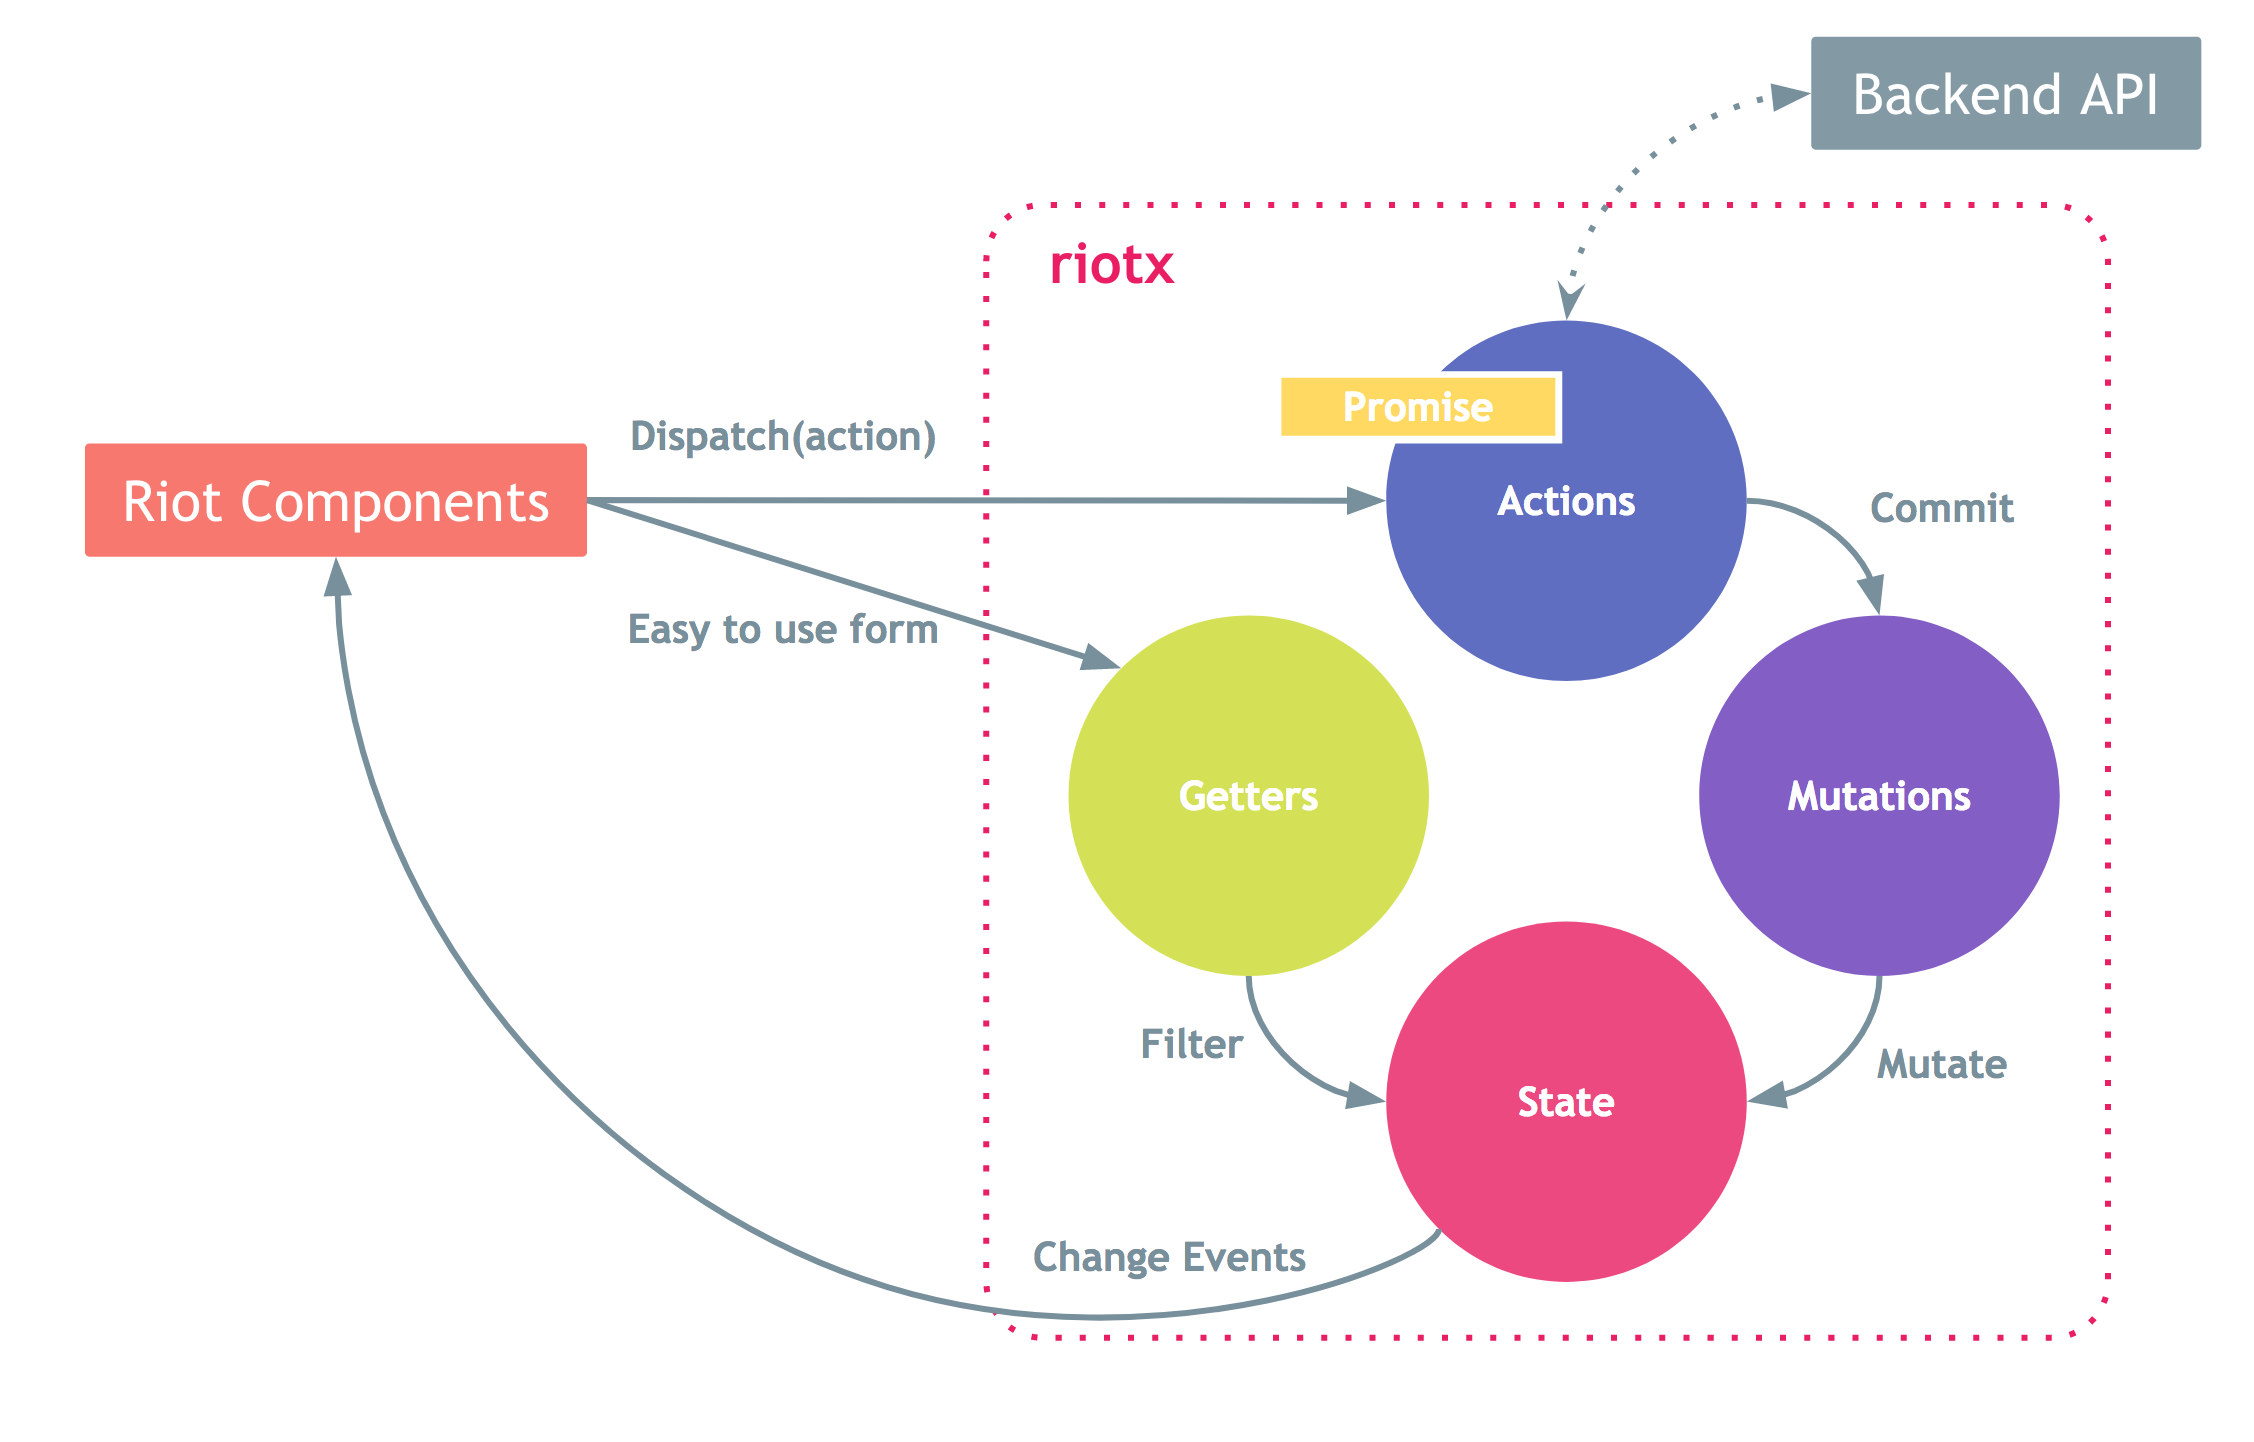
Riotxは、riot.jsアプリケーション用の状態管理パターン+ライブラリです。Vuexのアーキテクチャーパターンに触発されたライブラリなのでvuexにとても似ています(下の画像を見ていただければわかると思います。
このライブラリのsrc/下のファイルが1つしかなく、約300行しかなくてとてもシンプルなのでソースコード読めば大体理解できると思います。
ざっと解説
Riotxアプリケーションの中心にあるものは、アプリケーションの状態を保持する「ストア(以下Store)」です。
Storeは基本的にアプリケーションごとに一つしか持ちません。Storeの中に下の4つが格納されています。
* State ー アプリケーション状態の値を保持。Mutationsしか値を変更できない
* Getters ー Stateの値を返す
* Mutations ー Stateの値を変更する
* Actions ー Mutationsを呼ぶ出す。外部通信
この記事で作るサンプルの完成物
(表示に時間がかかる場合があります)
See the Pen Riotx Sample by jude (@Elastic1) on CodePen.
やります
Riotの説明は省きます。m(_ _"m) 公式
まずは、riotxを手に入れましょう。
git clone https://github.com/cam-inc/riotx.git
npm install riotx
cdn経由 <script src="https://unpkg.com/riotx@X.X.X/dist/riotx.js"></script>
この記事ではriotx 1.X.X系を使ってます・。・
Store
アプリケーションの中心。
riotx.Store()のインスタンスを生成するとStoreが作れます。引数にstate,actions,mutations,getterオブジェクトを渡せます。
そしてriotx.add(store)でriotxにstoreを登録し、そうすることでriotxを通してstoreにアクセスできるようになります。
const store = new riotx.Store({
  // name: string, 初期値 '@'
  state: object,
  actions: object,
  mutations: object,
  getters: object
})

riotx.add(store)
riotxに複数のstoreを登録することができます。その時はnameを指定して分けますが、基本的アプリケーションにstoreは一つなのであまりやらないと思います。
State
アプリケーションの状態が格納されたオブジェクトです。stateの値は基本的にgettersでのみ取得・mutationsでのみ変更することが推奨されています。
const store = new riotx.Store({
  state: {
    text: 'Riot'
    lists: []
  }
})
Getters
ここでStateの値を取得します。
const store = new riotx.Store({
  state: {
    text: 'Riot'
    lists: []
  },
  //new!
  getters: {
    state: (context) => {
      return context.state
    }
  }
})

console.log(store.getter('state')) // -> { text: 'Riot', lists: [] }
複数の関数を登録することができ、引数にcontextとgetterを使うときに渡される値を受け取ります。context.stateでstateを取得することができます。上のコードの場合は, context.state.text -> 'Riot'になりますね。
使い方はstore.getter('関数名','渡す値')です。
Mutations
ここでStateの値を変更します。
const store = new riotx.Store({
  state: {
    text: 'Riot'
    lists: []
  },

  getters: {
    state: (context) => {
      return context.state
    }
  },
  //new!
  mutations: {
    updateText: (context, text) => {
      context.state.text = text
      return ['changed']
    },
    addList: (context) => {
      const text = context.state.text
      context.state.lists.push(text)
      return ['changed']
    },
    deleteList: (context) => {
      context.state.lists.pop()
      return ['changed']
    }
  },
})

store.commit('updateText', 'hoge')
store.change('changed', (state, store) => {
  console.log(state.text) // -> hoge
})
引数はgetter同様で,contextはstates,gettersが使えます。最後にイベントを返せばそのイベントをstore.changeで監視することができるようになります。(複数イベントを返すことができます)
デバッグでログをとっているときとかに,mutationsが非同期の処理をしていると大変らしいので、mutationsは常に同期的でなければならない。(あまりよくわかってない)
使い方は、store.commit('関数名', '渡す値')。
Actions
Mutationsへ渡すデータを作成するための
const store = new riotx.Store({
  state: {
    text: 'Riot'
    lists: []
  },

  getters: {
    state: (context) => {
      return context.state
    }
  },

  mutations: {
    updateText: (context, text) => {
      context.state.text = text
      return ['changed']
    },
    addList: (context) => {
      const text = context.state.text
      context.state.lists.push(text)
      return ['changed']
    },
    deleteList: (context) => {
      context.state.lists.pop()
      return ['changed']
    }
  },
  //new!
  actions: {
    updateText: (context, text) => {
       return Promise
        .resolve()
        .then(() => {
          context.commit('updateText', text);
        })
    },
    addList: (context) => {
      return Promise
        .resolve()
        .then(() => {
          context.commit('addList')
        })
    },
    deleteList: (context) => {
      return Promise
        .resolve()
        .then(() => {
          context.commit('deleteList')
        })
    }
  }
})
引数は上と同じでcontextはstate,getter,commitが使えます。mutationsは同期的でなければいけないので非同期な処理はactionで書きます。actionはstateの値を変更できないので最後にmutationsをcommitします。
Promiseを返してますが、返さなくても動きました。githubのサンプルでは常にPromiseを返してたのでそれに倣って書いてます。
使い方はstore.action('関数名', '渡す値')
タグ内で使ってみます。
todoもどき
  <app-root>
    <h2>{ state.text }</h2>
    <input type="text" value="{ state.text }" oninput="{ onInput }" ref="str" placeholder="入力してください">
    <button onclick="{ add }">add</button>
    <button onclick="{ delete }">delete</button>
    <ul>
      <li each="{ list in state.lists }">{ list }</li>
    </ul>
    <script>
      const store = this.riotx.get(/*@*/)

      this.state = store.getter('state')

      store.change('changed', (state, store) => {
        this.state = state
        this.update()
      })

      this.onInput = () => {
        const str = this.refs.str.value
        store.action('updateText', str)
      }

      this.add = () => {
        store.action('addList')
      }

      this.delete = () => {
        store.action('deleteList')
      }
    </script>
  </app-root>
riotx.get(store名)でriotxに登録されたstoreを取得することができ、引数なしでデフォルトのstore名'@'が入ります。
riotxはriotのグローバルmixinにthis.riotxを登録してるので、タグ内であればどこでも参照できます.
riot mixinの使い方
完成物は上でcodepenで貼ってます (こちら)
最後に
記事を書いてる途中に厳格モード・plugins機能とかが追加されたり,まだ開発は進んでいてこれから色々な機能が追加されそうです。
vuexのmoduleみたいな機能がなくて、その仕組みを自分で作るしかなさそうです。
riotxはvironというツールに使われてて、githubにあがってるのでどういう感じに使われてるかが見れます。モジュールの分け方とかがとても参考になります。
日本語難しい
参考文献
Introduction・Vuex
Vue.js用のFluxライクなライブラリVuexを試してみる
https://github.com/cam-inc/viron