riotが最近自分の中でキてるのでなんか作りたいなと思って、markdownエディタを作ってみました。
riot中心なのでelectronの説明はしません(そもそも起動でしか使ってない)
自分の環境
- Windows 10 home
- node.js v8.9.1
- npm 5.5.1
どうやる
- markdown-it >> markdownパーサ
- highlight.js >> コードをハイライト表示してくれる
- ace >> web上に埋め込めるエディター
リアルタイムにプレビューさせたいので,
aceエディタの中身が変更されたら、エディタの値をmarkdown-itでパースして表示させます。そして表示されたやつにコードがあったらhighlight.jsでハイライトを付けます。
その他ファイル読み込みと上書き保存機能も付けます
やっていきましょう
ディレクトリ構成
-public
   -index.html
   -main.js
-src
   -app
     -editor
        -editor.tag
        -editor.css
     -header
        -header.tag
        -header.css
     -preview
        -preview.tag
        -preview.css
     -app.tag
     -app.css
   -main.js
パッケージと設定ファイル
package.json
{
  "name": "app",
  "version": "1.0.0",
  "description": "",
  "main": "main.js",
  "keywords": [],
  "author": "",
  "license": "ISC",
  "dependencies": {
    "electron": "^1.7.9"
  },
  "devDependencies": {
    "babel-core": "^6.26.0",
    "babel-loader": "^7.1.2",
    "babel-preset-es2015-riot": "^1.1.0",
    "bootstrap": "^3.3.7",
    "brace": "^0.11.0",
    "css-loader": "^0.28.7",
    "github-markdown-css": "^2.9.0",
    "highlight.js": "^9.12.0",
    "jquery": "^3.2.1",
    "markdown-it": "^8.4.0",
    "riot": "^3.7.4",
    "riot-tag-loader": "^1.0.0",
    "style-loader": "^0.19.0",
    "webpack": "^3.10.0"
  },
  "scripts": {
    "start": "electron ./public/main.js",
    "watch": "webpack --watch --progress --color",
    "build": "webpack --progress --color"
  }
}
webpack.config.js
const path = require('path')
const webpack = require('webpack')

module.exports = {
  entry: './src/main.js',
  output: {
    filename: 'bundle.js',
    path: path.join(__dirname, 'public/javascripts'),
  },
  module: {
    rules: [{
        enforce: 'pre',
        test: /\.tag$/,
        exclude: /node_modules/,
        loader: 'riot-tag-loader',
        query: {
          type: 'es6',
          debug: true
        }
      },
      {
        test: /\.css/,
        loaders: [
          'style-loader',
          {
            loader: 'css-loader',
            options: {
              url: false
            }
          }
        ]
      },
      {
        test: /\.(tag|js)$/,
        exclude: /node_modules/,
        loader: 'babel-loader',
        options: {
          presets: ['es2015-riot'],
        },
      },
    ],
  },
  devtool: 'source-map',
  resolve: {
    extensions: ['*', '.js'],
  },
  plugins: [
    new webpack.optimize.UglifyJsPlugin({
      sourceMap: true,
    }),
    new webpack.optimize.ModuleConcatenationPlugin(),
    new webpack.optimize.OccurrenceOrderPlugin(),
    new webpack.optimize.AggressiveMergingPlugin(),
    new webpack.ProvidePlugin({
      riot: 'riot',
      jQuery: 'jquery',
      $: 'jquery'
    }),
  ]
}
コード
まずはhtmlと起動スクリプトを書きます。
index.html
<html>
  <head>
    <meta charset="UTF-8">
    <title>Markdown Editor</title>
  </head>
  <body>
    <app-root></app-root>
    <script>
        //webpackでうまく`fs`が使えなかったのでグローバルにしました。
        window.fs = require('fs')
    </script>
    <script src="javascripts/bundle.js"></script> <!--webpackで出力されたファイル-->
  </body>
</html>
public/main.js
// Electron起動スクリプト。
const { app, BrowserWindow } = require('electron')

const path = require('path')
const url = require('url')

let mainWindow

function createWindow() {
  mainWindow = new BrowserWindow({ width: 1200, height: 1000 })
  mainWindow.loadURL(url.format({
    pathname: path.join(__dirname, 'index.html'),
    protocol: 'file:',
    slashes: true
  }))
  mainWindow.on('closed', () => {
    mainWindow = null
  })
}

app.on('ready', createWindow)

app.on('window-all-closed', () => {
  if (process.platform !== 'darwin') {
    app.quit()
  }
})

app.on('activate', () => {
  if (win === null) {
    createWindow()
  }
})
npm startで動作確認
アプリが立ち上がれば大丈夫です![]()
riot側のコード
コンポーネント指向なので
- ヘッダーコンポーネント (app-header)
- エディタコンポーネント (app-editor)
- プレビューコンポーネント (app-preview)
の三つのコンポーネントに分けます。
後は、ヘッダー用とエディター用のオブザーブルを作って、コンポーネント間の値渡しやイベント検知などもしやすくします。
src/main.js
//bootstrapとmarkdownのcss等。デザイン部分なのであまり重要ではない
import '../node_modules/bootstrap/dist/css/bootstrap.min.css'
import '../node_modules/github-markdown-css/github-markdown.css'
import '../node_modules/highlight.js/styles/github.css'
import '../node_modules/bootstrap'

//app-rootタグを読み込む
import './app/app.css'
import './app/app.tag'

riot.mount('app-root')
app.tag
<!--app.tag-->
<app-root>
  <!--ヘッダー部分-->
  <app-header header="{ header }"></app-header>

  <div class="container-fluid">

    <!--エディタ部分-->
    <div class="col-sm-6">
      <app-editor editor="{ editor }" header="{ header }"></app-editor>
    </div>

    <!--プレビュー部分-->
    <div class="col-sm-6">
      <app-preview editor="{ editor }"></app-preview>
    </div>

  </div>

  <script>
    import './editor/editor.tag'
    import './editor/editor.css'

    import './preview/preview.tag'
    import './preview/preview.css'

    import './header/header.tag'
    import './header/header.css'

    //エディタ用のオブザーブル
    this.editor = riot.observable()
    //ヘッダー用のオブザーブル
    this.header = riot.observable()

  </script>
</app-root>
header.tag
<!--header.tag-->
<app-header>
  <div class="group-button">

    <label>
      <span class="btn btn-default">load
        <input type="file" id="file" onchange="{ load }">
      </span>
    </label>

    <button class="btn btn-default" onclick="{ save }">save</button>

  </div>

  <script>

    this.load = () => {
      const path = $('#file')[0].files[0].path
      this.opts.header.trigger('load', path)  //loadイベント発火
    }

    this.save = () => {
      this.opts.header.trigger('save')  //saveイベント発火
    }

  </script>
</app-header>
editor.tag
<!--editor.tag-->
<app-editor>
  <div id="editor"></div>
  <script>
    import ace from 'brace'
    import 'brace/mode/markdown'  //markdownのハイライト
    import 'brace/theme/monokai'  //エディタのテーマ(sublimeっぽくした)

    $(document).ready(() => {
   //エディタ設定
      this.editor = ace.edit('editor')
      this.editor.$blockScrolling = Infinity
      this.editor.setTheme('ace/theme/monokai')
      this.editor.getSession().setMode('ace/mode/markdown')
      this.editor.setFontSize(14)
      this.editor.getSession().setUseWrapMode(true)
      this.editor.getSession().setTabSize(2)

      // エディタに変更を検知したとき、editorオブザーブルにchangeイベントを発火
      // エディタの値も渡すよ
      this.editor.getSession().on('change', () => {
        this.opts.editor.trigger('change', this.editor.getValue())
      })

    })

    //headerオブザーブルのloadイベントを検知したら、ファイルの読み込み処理
    this.opts.header.on('load', path => {
      this.path = path
      fs.readFile(this.path, 'utf8', (err, data) => {
        this.editor.setValue(data)
      })
    })

    //headerオブザーブルのsaveイベントを検知したら、上書き保存処理
    this.opts.header.on('save', () => {
      fs.writeFile(this.path, this.editor.getValue(), err => {
        if(!err)
          alert('せいこう!')
      });
    })
  </script>
</app-editor>
preview.tag
<!--preview.tag-->
<app-preview>
  <article class="markdown-body"></article>
  <script>
    import MarkDownIt from 'markdown-it'
    import hljs from 'highlight.js'
    hljs.initHighlightingOnLoad()

    //editorオブザーブルのchangeイベントを検知したら
    this.opts.editor.on('change', data => {
      const md = new MarkDownIt()
      const result = md.render(data) //エディタの値をパース

      $('article').html(result)
      $('pre code').each((i, block) => {
        hljs.highlightBlock(block)
      })
    })
  </script>
</app-preview>
cssコード
適当です。
app.css
.container-fluid {
  padding: 0px;
  width: 100%;
  height: 100%;
}

.col-sm-6 {
  padding: 0px;
}
preview.css
app-preview article {
  padding: 5px;
  margin: 10px;
  height: 100%;
  overflow: auto;
}
header.css
app-header #file {
  display: none;
}
editor.css
app-editor #editor {
  position: relative;
  height: 100%;
}
動作確認
npm run buildしてからnpm startを実行してください。
結果
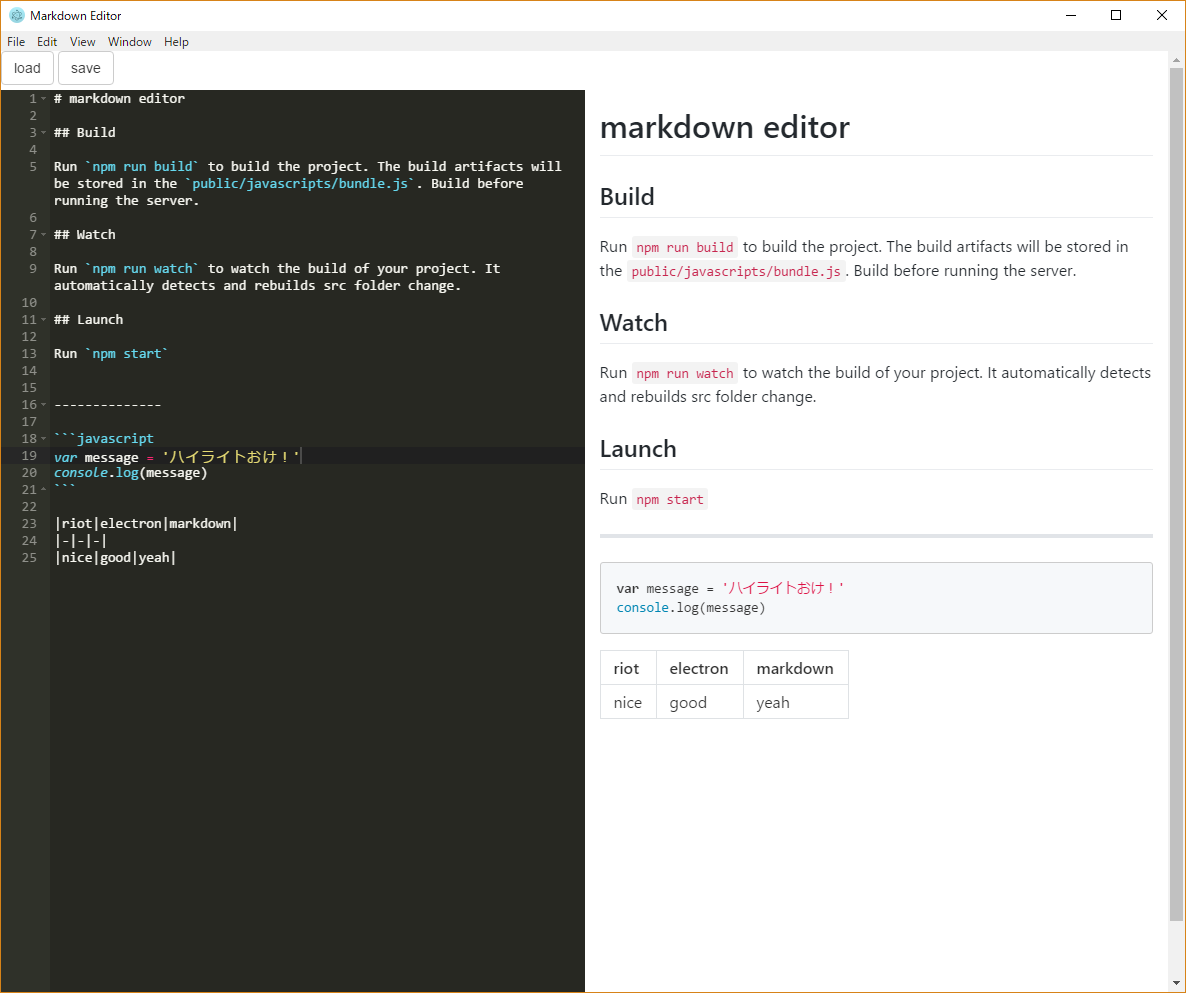
![]()
![]()
![]()
![]()
![]()
![]()
![]()
![]()
![]()
![]()
![]()
最後に
- riotのobservable機能がとても便利だということが分かった。
- webpackでなぜかfsがうまく使えなかったし、electronをimportしようとするとエラーが出ちゃう。。。