VISITS Technologies Advent Calendar 2019 3日目は@istshが担当します。
最近業務で、echoからgRPC-Gatewayに移行することになり、interceptorやmetadataについていろいろ調べたので、
gRPC Serverの実装(前編)とgRPC Clientの実装(後編)に分けてお送りしようと思います。
以降の説明は、サンプルコードを使って行います。
gRPC-Gatewayとは
gRPC-Gatewayとは、gRPCで書かれたAPIを、JSON over HTTPのAPIに変換して提供するためのミドルウェアです。
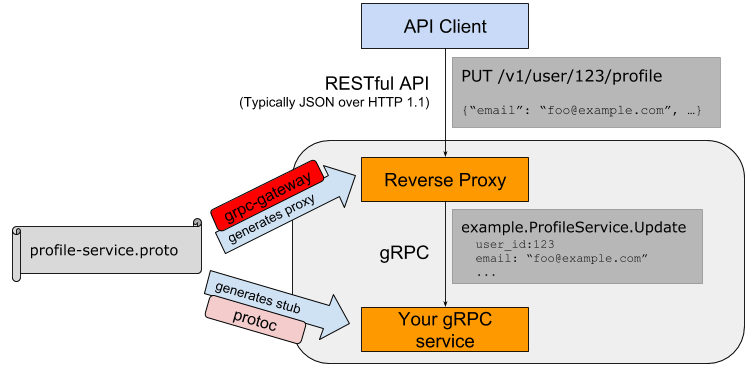
(よく見る図)
インストール
$ go get -u -v github.com/grpc-ecosystem/grpc-gateway/protoc-gen-grpc-gateway
$ go get -u -v github.com/golang/protobuf/protoc-gen-go
$ # fetches this repo into $GOPATH
$ go get -d github.com/envoyproxy/protoc-gen-validate
$ # installs PGV into $GOPATH/bin
$ make build
protoファイル
syntax = "proto3";

package v1;
option go_package = "github.com/istsh/go-grpc-sample/app/pb/v1";

import "google/api/annotations.proto";
import "validate/validate.proto";

service UserService {
    rpc CreateUser(CreateUserRequest) returns (CreateUserResponse) {
        option (google.api.http) = {
            post: "/v1/user"
            body: "*"
        };
    }
}

message CreateUserRequest {
    string email = 1 [(validate.rules).string = { min_len: 3, max_len: 254 }];
    string password = 2 [(validate.rules).string = { min_len: 8, max_len: 64 }];
}

message CreateUserResponse {
}
goファイルを生成
$ protoc \
    proto/v1/login.proto \
    -I . \
    -I $GOPATH/src/github.com/envoyproxy/protoc-gen-validate \
    -I $GOPATH/src/github.com/grpc-ecosystem/grpc-gateway/third_party/googleapis \
    -I $GOPATH/src/github.com/grpc-ecosystem/grpc-gateway \
    --go_out=plugins=grpc:$GOPATH/src \
    --validate_out="lang=go:$GOPATH/src" \
    --grpc-gateway_out=logtostderr=true:$GOPATH/src
これを実行すると、login.pb.goとlogin.pb.validate.goが生成されるはずです。
gRPC Serverの実装
ここからは実際のコードを見ながら解説していきます。
一部抜粋して説明するので、コード全体が見たい場合はサンプルコードを見てください。
package main

// 省略...

func main() {
    db := connectDB()
    defer db.Close()

    r := persistence.NewDBRepository(db)
    u := usecase.NewUserUsecase()

    listenPort, err := net.Listen("tcp", ":9090")
    if err != nil {
        logrus.Fatalln(err)
    }

    s := newGRPCServer(r, u)
    reflection.Register(s)
    s.Serve(listenPort)
}
上記のコードは、gRPC Serverをポート9090で起動するコードです。
DBの部分は説明する必要はないと思うので割愛します。
newGRPCServerが*grpc.Serverを返してくれるので、それを用いて任意のポートでサーバーを起動します。
ではnewGRPCServerの実装を見てみましょう。
func newGRPCServer(r repository.Repository, u usecase.UserUserCase) *grpc.Server {
    s := grpc.NewServer(
        grpc.UnaryInterceptor(grpc_middleware.ChainUnaryServer(
            interceptor.RequestIDInterceptor(),
            interceptor.AuthenticationInterceptor(),
            grpc_validator.UnaryServerInterceptor(),
            grpc_recovery.UnaryServerInterceptor(),
        )),
    )

    pbv1.RegisterLoginServiceServer(s, server.NewLoginServiceServer(r, u))
    pbv1.RegisterUserServiceServer(s, server.NewUserServiceServer(r, u))

    return s
}
上記のコードは、インターセプターを4種類定義し、loginとuserで使うように設定しています。
RegisterLoginServiceServerとRegisterUserServiceServerは、前述のコマンドで生成したgoファイルに実装されているので、それを呼び出すだけです。
また、生成されたgoファイルには、LoginServiceServerやUserServiceServerといったインターフェースが定義されいます。
それを実装したうえでそれぞれを初期化する関数がNewLoginServiceServerやNewUserServiceServerになっています。
ここまではいろんな解説ページに載っていることですが、インターセプターに関しては情報が少ないのと、導入するプロジェクトに必要なインターフェースを選択したり、場合によっては実装することになるので、以降は上記の4種類のインターセプターについて解説します。
RequestIDInterceptor
const (
    // XRequestIDKey is a key for getting request id.
    XRequestIDKey    = "X-Request-ID"
    unknownRequestID = "<unknown>"
)

// RequestIDInterceptor is a interceptor of access control list.
func RequestIDInterceptor() grpc.UnaryServerInterceptor {
    return func(ctx context.Context, req interface{}, info *grpc.UnaryServerInfo, handler grpc.UnaryHandler) (interface{}, error) {
        requestID := requestIDFromContext(ctx)
        ctx = context.WithValue(ctx, log.CtxRequestIDKey, requestID)
        return handler(ctx, req)
    }
}

func requestIDFromContext(ctx context.Context) string {
    md, ok := metadata.FromIncomingContext(ctx)
    if !ok {
        return unknownRequestID
    }

    key := strings.ToLower(XRequestIDKey)
    header, ok := md[key]
    if !ok || len(header) == 0 {
        return unknownRequestID
    }

    requestID := header[0]
    if requestID == "" {
        return unknownRequestID
    }

    return requestID
}
上記のインターセプターは、contextからmetadataを取得し、そこにx-request-idというキーがあれば、その値を返し、なければ<unknown>を返すというコードです。
後編で不足分は解説しますが、gRPC ClientとHTTP Request Headerなどの情報を連携する為にmetadataを使います。
AuthenticationInterceptor
// Authenticator provides Authenticate method.
// Each service should implement this interface, otherwise, all requests will be rejected with authentication error.
type Authenticator interface {
    Authenticate(ctx context.Context, req interface{}) (context.Context, error)
}

// AuthenticationInterceptor is a interceptor of authentication.
func AuthenticationInterceptor() grpc.UnaryServerInterceptor {
    return func(ctx context.Context, req interface{}, info *grpc.UnaryServerInfo, handler grpc.UnaryHandler) (interface{}, error) {
        authenticator, ok := info.Server.(Authenticator)
        if !ok {
            // If Service doesn't implement Authenticator, return InternalServerError always.
            return nil, status.New(codes.Internal, "Authenticator is not implemented").Err()
        }

        ctx, err := authenticator.Authenticate(ctx, req)
        if err != nil {
            return nil, status.New(codes.Unauthenticated, fmt.Sprintf("Not authenticated: %v", err)).Err()
        }

        return handler(ctx, req)
    }
}
上記のインターセプターは、Authenticateインターフェースを実装したサービスで認証の処理を実行するコードです。
非常にシンプルですが、各サービス毎に認証の処理を実装できるようになっています。
grpc_validator.UnaryServerInterceptor
これはgithub.com/grpc-ecosystem/go-grpc-middleware/validatorのインターセプターです。
goファイルの生成コマンドで、--validate_outオプションをつけることで生成される*.pb.validate.goの検証処理をやってくれます。
protoファイルでvalidateを使っている場合はこのインターフェースは必ず使いましょう。
grpc_recovery.UnaryServerInterceptor
これはgithub.com/grpc-ecosystem/go-grpc-middleware/recoveryのインターセプターで、panicをハンドリングしてくれます。
ChainUnaryServer
s := grpc.NewServer(
    grpc.UnaryInterceptor(grpc_middleware.ChainUnaryServer(
        interceptor.RequestIDInterceptor(),
        interceptor.AuthenticationInterceptor(),
        grpc_validator.UnaryServerInterceptor(),
        grpc_recovery.UnaryServerInterceptor(),
    )),
)
これまでの4つのインターセプターを順番に実行するために、grpc_middleware.ChainUnaryServerを使います。
まとめ
これでgRPC Server側の実装は一通り解説しました。
大切なのは、これはgRPC Serverについての説明であって、gRPC Client(gRPC-Gateway)についての説明は別ということです。
また、コードをみて気がついたかもしれませんが、紹介したインターセプターはgRPC Server用のものです。
後編でgRPC Clientのインターセプター(ログ、リクエストIDの採番など)も解説するので、お楽しみに。