ZOZOテクノロジーズの制御エンジニアをやっています池田です。
前回に引き続き、画像処理の代表的なアルゴリズムをGO言語で実装しながら復習したいと思います。
はじめに
前回は平滑化について実装をメインで書かせてもらいました。
※ 前回の記事はこちらから。
本記事では、輪郭抽出のアルゴリズムについて振り返っていきたいと思います。
尚、実装したソースコードの内容はあくまでも一例になります。
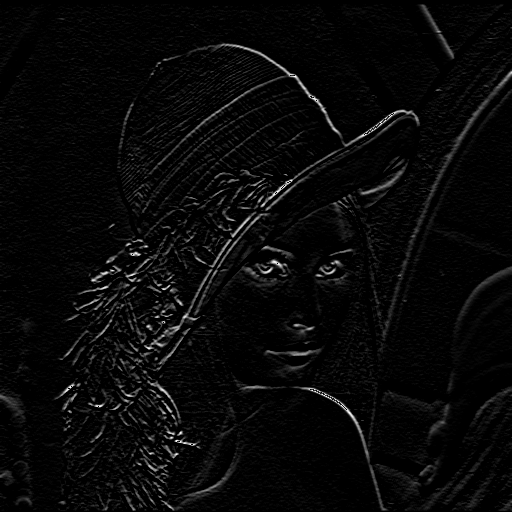
一次微分フィルタ
一次微分フィルタは、画像から輪郭を抽出する空間フィルタのことで、計算によって注目画素の左右・上下の画素値の変化の傾きが求まります。
画像の輪郭は、隣同士の画素を比べた時の変化が大きく、微分した画素値が大きい箇所が輪郭と判断出来ます。
ソースコード
FirstDerivative.go
package FirstDerivative

import "gocv.io/x/gocv"

var filterWeight = map[int]map[int]float64{}

func Init() {

    // フィルタ処理で使用する重み値
    filterWeight[-1] = make(map[int]float64)
    filterWeight[0] = make(map[int]float64)
    filterWeight[1] = make(map[int]float64)
    filterWeight[-1][-1] = 0
    filterWeight[-1][0] = -1
    filterWeight[-1][1] = 0
    filterWeight[0][-1] = 0
    filterWeight[0][0] = 0
    filterWeight[0][1] = 0
    filterWeight[1][-1] = 0
    filterWeight[1][0] = 1
    filterWeight[1][1] = 0

}

func Execution(preImg gocv.Mat, inputImageRows int, inputImageCols int) gocv.Mat {

    // 初期化
    Init()
    // アウトプット画像を定義
    outputImg := gocv.NewMatWithSize(inputImageRows, inputImageCols, gocv.IMReadGrayScale)

    // 画像のどこまで処理するか定義
    processRows := preImg.Rows() - inputImageRows
    processCols := preImg.Cols() - inputImageCols

    // 画像の左上から順に画素を読み込む
    for imgRows := inputImageRows; imgRows < processRows; imgRows++ {
        for imgCols := inputImageCols; imgCols < processCols; imgCols++ {

            attentionPixel := int(0)

            // 3 × 3の平滑化フィルタ
            for filterRows := -1; filterRows < 2; filterRows++ {
                for filterCols := -1; filterCols < 2; filterCols++ {

                    // 注目画素からみた画素を取得
                    inputPixel := float64(preImg.GetUCharAt(imgRows + filterRows, imgCols + filterCols))
                    // 取得した画素に重み値を掛け、足し合わせる
                    attentionPixel += int(inputPixel * filterWeight[filterRows][filterCols])
                }
            }

            if attentionPixel < 0 {
                // 結果が0以下の場合
                outputImg.SetUCharAt(imgRows - inputImageRows, imgCols - inputImageCols, 0)
            } else {
                // エッジを記録
                outputImg.SetUCharAt(imgRows - inputImageRows, imgCols - inputImageCols, uint8(attentionPixel))
            }
        }
    }

    return outputImg
}
実行結果
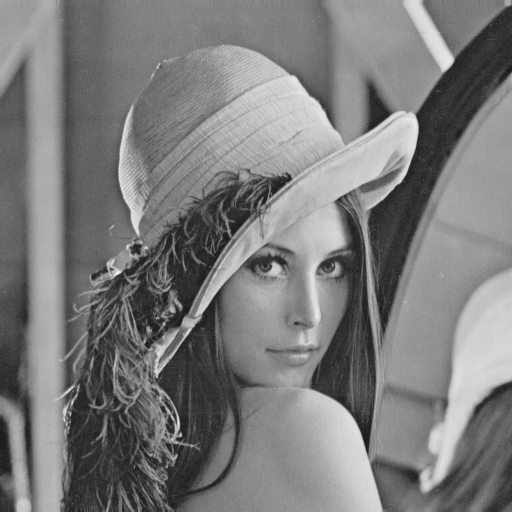
元画像

実行後画像

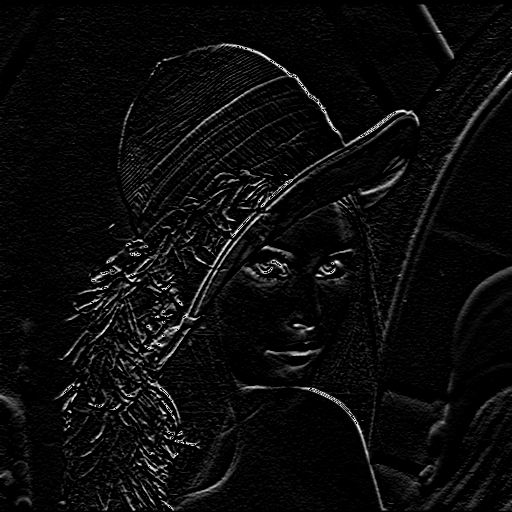
プレヴィットフィルタ
このフィルタは、上記で紹介した一次微分フィルタを、ノイズの影響を受けにくいように、平滑化処理を加えた処理です。
ソースコード
Prewitt.go
package Prewitt

import "gocv.io/x/gocv"

var filterWeight = map[int]map[int]float64{}

func Init() {

    // フィルタ処理で使用する重み値
    filterWeight[-1] = make(map[int]float64)
    filterWeight[0] = make(map[int]float64)
    filterWeight[1] = make(map[int]float64)
    filterWeight[-1][-1] = -1
    filterWeight[-1][0] = -1
    filterWeight[-1][1] = -1
    filterWeight[0][-1] = 0
    filterWeight[0][0] = 0
    filterWeight[0][1] = 0
    filterWeight[1][-1] = 1
    filterWeight[1][0] = 1
    filterWeight[1][1] = 1

}

func Execution(preImg gocv.Mat, inputImageRows int, inputImageCols int) gocv.Mat {

    // 初期化
    Init()
    // アウトプット画像を定義
    outputImg := gocv.NewMatWithSize(inputImageRows, inputImageCols, gocv.IMReadGrayScale)

    // 画像のどこまで処理するか定義
    processRows := preImg.Rows() - inputImageRows
    processCols := preImg.Cols() - inputImageCols

    // 画像の左上から順に画素を読み込む
    for imgRows := inputImageRows; imgRows < processRows; imgRows++ {
        for imgCols := inputImageCols; imgCols < processCols; imgCols++ {

            attentionPixel := int(0)

            // 3 × 3の平滑化フィルタ
            for filterRows := -1; filterRows < 2; filterRows++ {
                for filterCols := -1; filterCols < 2; filterCols++ {

                    // 注目画素からみた画素を取得
                    inputPixel := float64(preImg.GetUCharAt(imgRows + filterRows, imgCols + filterCols))
                    // 取得した画素に重み値を掛け、足し合わせる
                    attentionPixel += int(inputPixel * filterWeight[filterRows][filterCols])
                }
            }

            if attentionPixel < 0 {
                // 結果が0以下の場合
                outputImg.SetUCharAt(imgRows - inputImageRows, imgCols - inputImageCols, 0)
            } else {
                // エッジを記録
                outputImg.SetUCharAt(imgRows - inputImageRows, imgCols - inputImageCols, uint8(attentionPixel))
            }
        }
    }

    return outputImg
}
実行後
元画像
実行後結果
ソーベルフィルタ
ソーベルフィルタは、上記で紹介プレウィットフィルタを更に改良したもので、平滑化フィルタと微分フィルタを合わせて処理を行います。これにより、ノイズの影響をプレウィットフィルタよりも抑えながら輪郭を抽出します。
ソースコード
Sobel.go
package Sobel

import "gocv.io/x/gocv"

var filterWeight = map[int]map[int]float64{}

func Init() {

    // フィルタ処理で使用する重み値
    filterWeight[-1] = make(map[int]float64)
    filterWeight[0] = make(map[int]float64)
    filterWeight[1] = make(map[int]float64)
    filterWeight[-1][-1] = -1
    filterWeight[-1][0] = -2
    filterWeight[-1][1] = -1
    filterWeight[0][-1] = 0
    filterWeight[0][0] = 0
    filterWeight[0][1] = 0
    filterWeight[1][-1] = 1
    filterWeight[1][0] = 2
    filterWeight[1][1] = 1

}

func Execution(preImg gocv.Mat, inputImageRows int, inputImageCols int) gocv.Mat {

    // 初期化
    Init()
    // アウトプット画像を定義
    outputImg := gocv.NewMatWithSize(inputImageRows, inputImageCols, gocv.IMReadGrayScale)

    // 画像のどこまで処理するか定義
    processRows := preImg.Rows() - inputImageRows
    processCols := preImg.Cols() - inputImageCols

    // 画像の左上から順に画素を読み込む
    for imgRows := inputImageRows; imgRows < processRows; imgRows++ {
        for imgCols := inputImageCols; imgCols < processCols; imgCols++ {

            attentionPixel := int(0)

            // 3 × 3の平滑化フィルタ
            for filterRows := -1; filterRows < 2; filterRows++ {
                for filterCols := -1; filterCols < 2; filterCols++ {

                    // 注目画素からみた画素を取得
                    inputPixel := float64(preImg.GetUCharAt(imgRows + filterRows, imgCols + filterCols))
                    // 取得した画素に重み値を掛け、足し合わせる
                    attentionPixel += int(inputPixel * filterWeight[filterRows][filterCols])
                }
            }

            if attentionPixel < 0 {
                // 結果が0以下の場合
                outputImg.SetUCharAt(imgRows - inputImageRows, imgCols - inputImageCols, 0)
            } else {
                // エッジを記録
                outputImg.SetUCharAt(imgRows - inputImageRows, imgCols - inputImageCols, uint8(attentionPixel))
            }
        }
    }

    return outputImg
}
実行結果
元画像

実行後画像
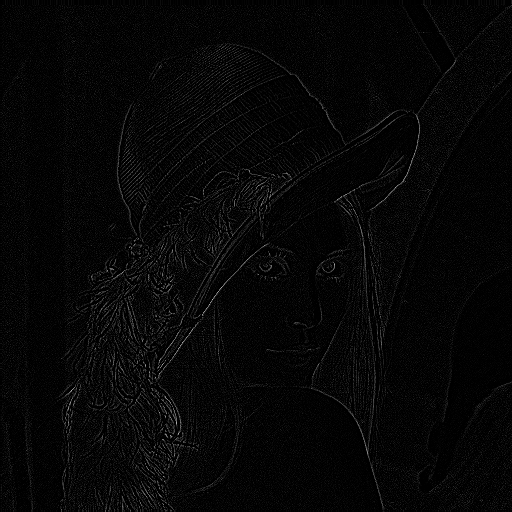
ラプラシアンフィルタ
ラプラシアンフィルタは、二次微分を使い、画像から輪郭を抽出する空間フィルタです。
ソースコード
Laplacian.go
package Laplacian

import "gocv.io/x/gocv"

var filterWeight = map[int]map[int]float64{}

func Init() {

    // フィルタ処理で使用する重み値
    filterWeight[-1] = make(map[int]float64)
    filterWeight[0] = make(map[int]float64)
    filterWeight[1] = make(map[int]float64)
    filterWeight[-1][-1] = 0
    filterWeight[-1][0] = 1
    filterWeight[-1][1] = 0
    filterWeight[0][-1] = 1
    filterWeight[0][0] = -4
    filterWeight[0][1] = 1
    filterWeight[1][-1] = 0
    filterWeight[1][0] = 1
    filterWeight[1][1] = 0

}

func Execution(preImg gocv.Mat, inputImageRows int, inputImageCols int) gocv.Mat {

    // 初期化
    Init()
    // アウトプット画像を定義
    outputImg := gocv.NewMatWithSize(inputImageRows, inputImageCols, gocv.IMReadGrayScale)

    // 画像のどこまで処理するか定義
    processRows := preImg.Rows() - inputImageRows
    processCols := preImg.Cols() - inputImageCols

    // 画像の左上から順に画素を読み込む
    for imgRows := inputImageRows; imgRows < processRows; imgRows++ {
        for imgCols := inputImageCols; imgCols < processCols; imgCols++ {

            attentionPixel := int(0)

            // 3 × 3の平滑化フィルタ
            for filterRows := -1; filterRows < 2; filterRows++ {
                for filterCols := -1; filterCols < 2; filterCols++ {

                    // 注目画素からみた画素を取得
                    inputPixel := float64(preImg.GetUCharAt(imgRows + filterRows, imgCols + filterCols))
                    // 取得した画素に重み値を掛け、足し合わせる
                    attentionPixel += int(inputPixel * filterWeight[filterRows][filterCols])
                }
            }

            if attentionPixel < 0 {
                // 結果が0以下の場合
                outputImg.SetUCharAt(imgRows - inputImageRows, imgCols - inputImageCols, 0)
            } else {
                // エッジを記録
                outputImg.SetUCharAt(imgRows - inputImageRows, imgCols - inputImageCols, uint8(attentionPixel))
            }
        }
    }

    return outputImg
}
実行結果
元画像

実行後画像
最後に
一次微分フィルタ、プレヴィットフィルタ、ソーベルフィルタは処理が変わるにつれエッジがはっきりと強調されているのが分かります。また、ラプラシアンフィルタになると、エッジが一本の線で表されているように見え、前者3つの処理とはまた違った結果が現れています。
エッジ検出の処理はライブラリのものを使うことが多かったので、処理の中身を理解するという意味で勉強になりました。
また、その他のアルゴリズムに関しても実装ベースであげていけたらと思います。