🤔NativeScriptを選んだ理由
- マルチプラットフォームなアプリを作ろうと思い、
XamarinとCordovaで検討した - 結果、学習コストの事を考えて
Cordovaになった - ただ、速度周りが気になったので
NativeScriptにした
✏️この記事を書いた理由
- 日本語ドキュメント少な過ぎ
-
Hello world.までは余裕だけど、ディレクトリ構成とかファイル追加とか画面遷移とかデータの受け渡し方とかが分からん - 手探りでやって、やっと「これで行こう」と思える形になったので共有
「環境構築〜Hello world」まで書かれてる手順書って多いけど、実際に躓くのって「ディレクトリ構成」だったり「ファイル追加」だったり「画面遷移(データの受け渡し)」だったりなんだよね。
保守とか拡張とか考えたら一番重要なはずなのに、何であんまり手順書ないんだろう。
って事で書きました。
🛠セットアップ手順
公式を見て下さい。
https://docs.nativescript.org/angular/start/quick-setup
手順的には以下の順序ですが、Step3のインストールは結構時間かかるので頑張って下さい。
- Step 1: Install Node.js
- Step 2: Install the NativeScript CLI
- Step 3: Install iOS and Android requirements
- Step 4: Verify the setup
📱アプリ作成
公式のCreating appsに書かれてるコマンドで作成すると、初期段階が味気ないアプリになります。
これは『blank』テンプレートであり、これからの説明に使いづらいので、別のテンプレート『Tab Navigation』を使用します。
ちなみに他のテンプレートはこちらにあります。
# 公式ドキュメントには以下を実行するように書かれてるが、今回は使わない
# tns create HelloWorld --template tns-template-blank-ng

# テンプレート『Tab Navigation』で作成する
$ tns create HelloWorld --template tns-template-tab-navigation-ng

# 移動
$ cd HelloWorld

# エミュレータで起動(Android/iOS)。最初は時間かかるので頑張って下さい。
$ tns run android
$ tns run ios
ちなみにこの手順で実施するとAngularでのプロジェクトとなります。
NativeScriptはVue.jsも使用できますが、本記事では説明を省きます。ごめんなさい。
📁ディレクトリ構成
さて、ここからが公式には乗ってない部分。
素のままだと以下のディレクトリ構成となってます。(アプリ開発に必要な箇所だけ抽出している)
# ルートディレクトリはこんな感じ
$ ll
total 768
drwxr-xr-x    4  xxxx  yyyy  Users     128 10 24 17:44 App_Resources
-rw-r--r--    1  xxxx  yyyy  Users    6451 10 26  1985 CODE_OF_CONDUCT.md
-rwxr-xr-x    1  xxxx  yyyy  Users   11348 10 26  1985 LICENSE
-rw-r--r--    1  xxxx  yyyy  Users    3473 10 26  1985 README.md
-rw-r--r--    1  xxxx  yyyy  Users     376 10 26  1985 angular.json
drwxr-xr-x   11  xxxx  yyyy  Users     352 10 24 17:44 hooks
drwxr-xr-x  592  xxxx  yyyy  Users   18944 10 24 17:44 node_modules
-rw-r--r--    1  xxxx  yyyy  Users      62 10 26  1985 nsconfig.json
-rw-r--r--    1  xxxx  yyyy  Users  328953 10 24 17:44 package-lock.json
-rw-r--r--    1  xxxx  yyyy  Users    1308 10 24 17:44 package.json
drwxr-xr-x   10  xxxx  yyyy  Users     320 10 24 17:44 src
-rw-r--r--    1  xxxx  yyyy  Users     628 10 24 17:44 tsconfig.json
-rw-r--r--    1  xxxx  yyyy  Users     127 10 24 17:44 tsconfig.tns.json
-rw-r--r--    1  xxxx  yyyy  Users    1677 10 26  1985 tslint.json
-rw-r--r--    1  xxxx  yyyy  Users   10322 10 24 17:44 webpack.config.js

# アプリに使う部分はこんな感じ
$ tree src/
src/
├── _app-common.scss
├── _app-variables.scss
├── app
│   ├── _app.component.scss
│   ├── app-routing.module.ts
│   ├── app.component.android.scss
│   ├── app.component.html
│   ├── app.component.ios.scss
│   ├── app.component.ts
│   ├── app.module.ts
│   ├── browse
│   │   ├── browse.component.html
│   │   └── browse.component.ts
│   ├── core
│   │   ├── core.module.ts
│   │   └── data.service.ts
│   ├── home
│   │   ├── home.component.html
│   │   └── home.component.ts
│   ├── item-detail
│   │   ├── item-detail.component.html
│   │   └── item-detail.component.ts
│   └── search
│       ├── search.component.html
│       └── search.component.ts
├── app.android.scss
├── app.ios.scss
├── fonts
│   └── FontAwesome.ttf
├── main.ts
└── package.json
Angularは「MVCモデル」のはずなんですけど、このディレクトリ構成だとよく分からない...
ディレクトリ構成についてはのびすけさんの投稿でもいくつか紹介されてますが、JavaとRuby on Rails(以下、RoR)でしかWebアプリを作った事がない僕には心配...(理解はできるがメンテナンスが出来るか心配)
なので、僕の独断と偏見によりRoRに倣ったディレクトリ構成を作ります。
# ./src/app/配下に移動
$ cd src/app/

# 空のディレクトリを作成
$ mkdir models
$ mkdir views
$ mkdir controllers

# ファイルを移動
$ mv */*.module.ts models/
$ mv */*.service.ts models/
$ mv */*.html views/
$ mv */*.component.ts controllers/

# ゴミディレクトリの削除
$ rm -rf browse/ core/ home/ item-detail/ search/

# ディレクトリ構成の確認
$ tree
.
├── _app.component.scss
├── app-routing.module.ts
├── app.component.android.scss
├── app.component.html
├── app.component.ios.scss
├── app.component.ts
├── app.module.ts
├── controllers
│   ├── browse.component.ts
│   ├── home.component.ts
│   ├── item-detail.component.ts
│   └── search.component.ts
├── models
│   ├── core.module.ts
│   └── data.service.ts
└── views
    ├── browse.component.html
    ├── home.component.html
    ├── item-detail.component.html
    └── search.component.html
RoRっぽくなって分かりやすくなった!(RoR開発者、大歓喜)
ただ、これだけだとルーティングとか参照とかが死んでるので、それを直していきます。
...
// fromを修正
// import { BrowseComponent } from "./browse/browse.component";
// import { HomeComponent } from "./home/home.component";
// import { ItemDetailComponent } from "./item-detail/item-detail.component";
// import { SearchComponent } from "./search/search.component";
import { BrowseComponent }     from "./controllers/browse.component";
import { HomeComponent }       from "./controllers/home.component";
import { ItemDetailComponent } from "./controllers/item-detail.component";
import { SearchComponent }     from "./controllers/search.component";
...
...
// fromを修正
// import { CoreModule } from "./core/core.module";
import { CoreModule } from "./models/core.module";
...
...
// fromを修正
// (同じ修正を「item-detail.component.ts」にも実施)
// import { DataService, IDataItem } from "../core/data.service";
import { DataService, IDataItem } from "../models/data.service";
...
...
// templateUrlを修正
// (同じ修正を「home.component.ts」「item-detail.component.ts」「search.component.ts」にも実施)
@Component({
    ...
    // templateUrl: "./browse.component.html"
    templateUrl: "../views/browse.component.html"
})
...
ここまで出来たら、エミュレータを起動して、さっきと同じ動作になる事を確認します。
# エミュレータ起動(とりあえずiOS)
$ tns run ios
🔀画面遷移とデータの受け渡し
今回使っているテンプレート『Tab Navigation』を実行すると分かる通り、homeからitem-detailへの遷移はできます。
「え、それでいいじゃん」と思われるかもしれませんが、これはURLのパスを使う方法。(url/:id)
僕がやりたかったのは、URLのパラメータを使う方法。(url?hoge=piyo)
色々調べてみて、シンプルで直感的に分かりやすい方法でやります。
言ってしまえばAngularのこれです。
今回はbrowseからsampleに遷移してみたいと思います。
(動き的には、browse.component.html→sample.component.ts→sample.component.html)
まずはファイル作成。
# ./src/app/配下での作業になるのでカレントディレクトリを確認しておく
$ pwd
/path/to/project/HelloWorld/src/app

# ViewとControllerを作成(空のファイル)
$ echo > controllers/sample.component.ts
$ echo > views/sample.component.html

# ファイルが作成された事の確認
$ ls controllers/
browse.component.js     home.component.js       item-detail.component.js    sample.component.ts     search.component.ts
browse.component.ts     home.component.ts       item-detail.component.ts    search.component.js
$ ls views/
browse.component.html       home.component.html     item-detail.component.html  sample.component.html       search.component.html
次に、遷移元のView。
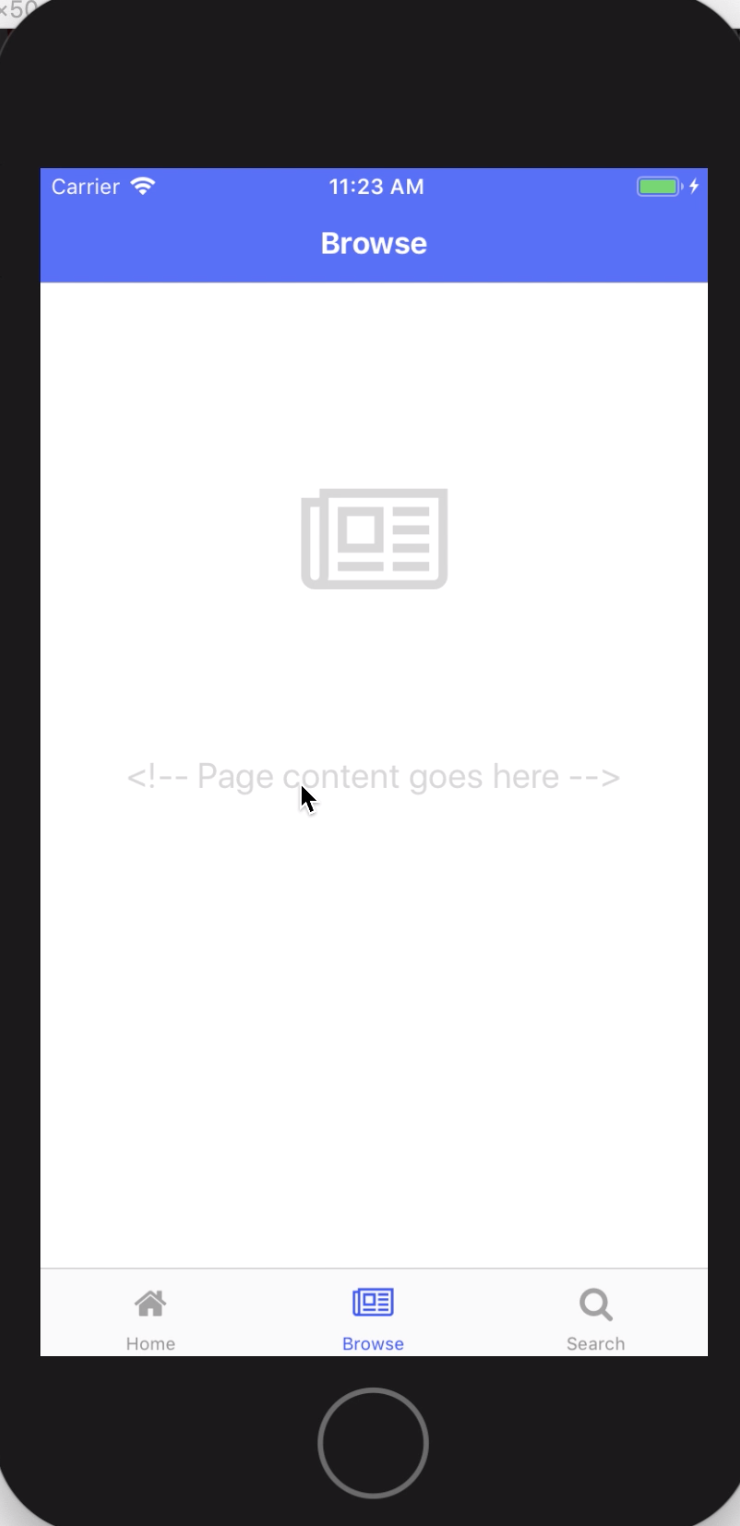
<ActionBar class="action-bar">
<Label class="action-bar-title" text="Browse"></Label>
</ActionBar>
<!-- 要素を追加するの面倒なので()、テンプレートで用意されてるラベルから遷移できるようにする -->
<!-- [nsRouterLink]を使って、「第一引数にpath」「第二引数にdata(hash)」でOK。シンプルですね。 -->
<GridLayout class="page page-content">
<Label class="page-icon fa" text=""></Label>
<Label class="page-placeholder" text="<!-- Page content goes here -->" [nsRouterLink]="['../sample', {hoge: 'piyo'}]"></Label>
</GridLayout>
次に、遷移先のController。
// インポートに、ActivatedRouteを追加。これを使って遷移元からデータを受取る
import { Component, OnInit } from "@angular/core";
import { ActivatedRoute }    from "@angular/router";

// コンポーネントは、他のcontrollerと同じ粒度
@Component({
    selector: "Sample",
    moduleId: module.id,
    templateUrl: "../views/sample.component.html"
})

// フィールドに、画面側で使う変数を定義
// コンストラクタに、ActivatedRouteを追加
// フックメソッド(初期処理)で、遷移元から受取ったデータをフィールドに格納
export class SampleComponent implements OnInit {
    hoge: String;

    constructor(
        private route: ActivatedRoute) {
    }

    ngOnInit(): void {
        this.hoge = this.route.snapshot.params['hoge'];
    }
}
次に、遷移先のView。
<ActionBar class="action-bar">
    <Label class="action-bar-title" text="Sample"></Label>
</ActionBar>

<!-- Controllerに定義されてるフィールドは使えるので、hogeを要素に当て込む -->
<StackLayout>
    <Label [text]="'Hello ' + hoge"></Label>
</StackLayout>
最後に、ルーティング設定。
...
// インポートに、Sampleを追加
import { BrowseComponent }     from "./controllers/browse.component";
import { HomeComponent }       from "./controllers/home.component";
import { ItemDetailComponent } from "./controllers/item-detail.component";
import { SearchComponent }     from "./controllers/search.component";
import { SampleComponent }     from "./controllers/sample.component";  // ←追加

// コンポーネント(定数)に、Smapleを追加
export const COMPONENTS = [BrowseComponent, HomeComponent, ItemDetailComponent, SearchComponent, SampleComponent];  // ←追加

// ルーティングに、Sampleを追加
const routes: Routes = [
    { path: "", redirectTo: "/(homeTab:home//browseTab:browse//searchTab:search)", pathMatch: "full" },

    { path: "home", component: HomeComponent, outlet: "homeTab" },
    { path: "browse", component: BrowseComponent, outlet: "browseTab" },
    { path: "search", component: SearchComponent, outlet: "searchTab" },

    { path: "item/:id", component: ItemDetailComponent, outlet: "homeTab" },  // ←終端にカンマを追加

    { path: "sample", component: SampleComponent, outlet: "browseTab" }  // ←追加
];
...
さあ!!!動作確認!!!
# エミュレータ起動(とりあえずiOS)
$ tns run ios
 →
→ 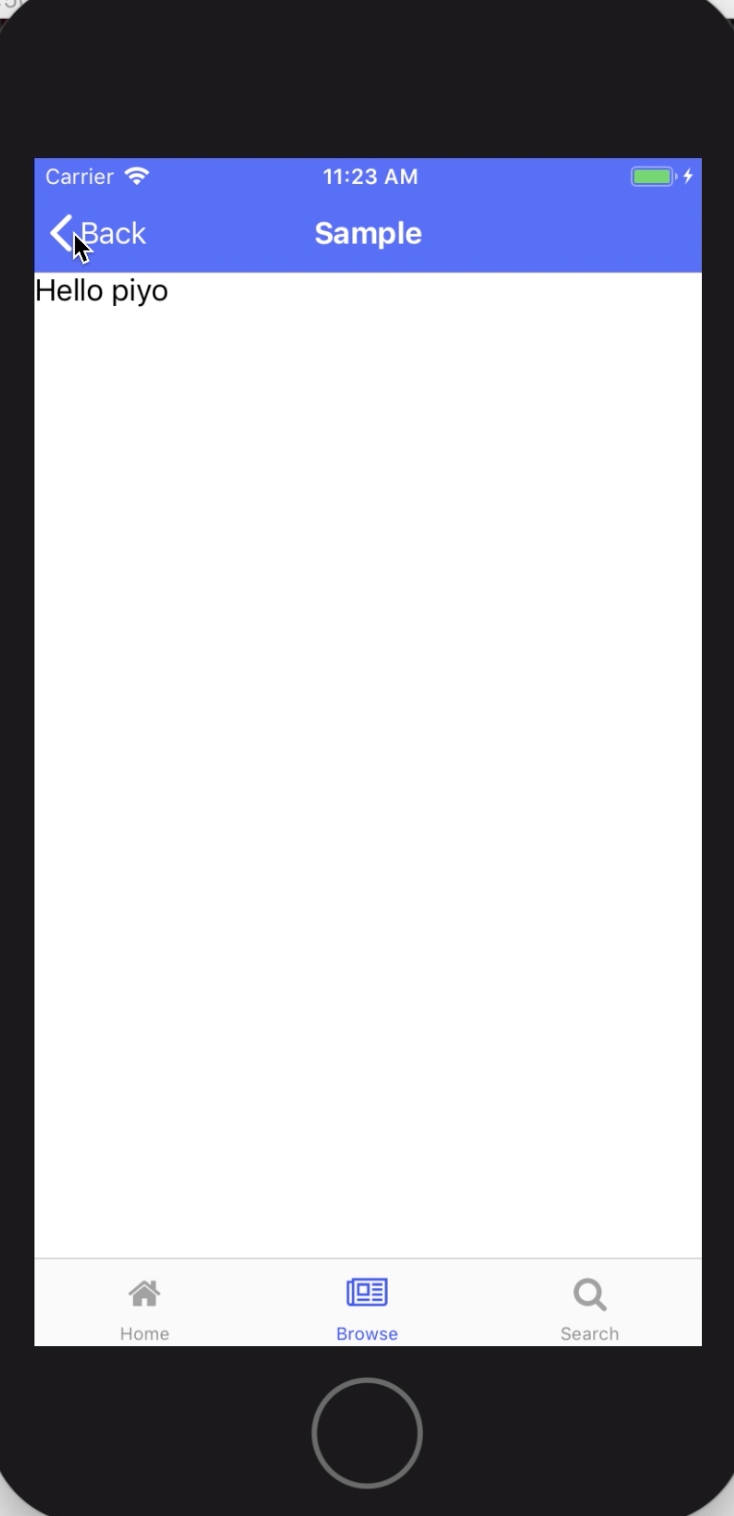
画面遷移できる事と、GET通信でデータを受け渡しができる事が、何となく分かりました。
今回はハードコーディングで{hoge: 'piyo'}としましたが、後はこれを応用して、TextFieldを使ったり何なりできそう・・・??
ベストプラクティスではないと思うので、もっとシンプルな方法あったら教えて下さい(´・ω・`)
というかPOST通信ってどうやったらできます...??
いくら調べても出てこなかったんですが......
👨👦モーダル表示
要望「画面遷移じゃなくてモーダル表示したい。モーダル内でセレクトボックスとかラジオボタンとか使いたい。」
-
公式ドキュメント見てみよう
- どこに何が書いてあってどうすれば良いのか直感的に分かりづらい(死亡)
-
他の人の技術ブログも見てみよう
- 新しいプロジェクト作って、手順通りにやったらできた!
- ただ、ディレクトリ構成が違ったりするから、今回のRoR構成に併せて作ってみよう←今ここ
今回は、「画面遷移とデータの受け渡し」で作成したsampleからmodalを表示させるようにします。
(sampleを親、modalを子とします。)
まずは、ファイル作成。
# ./src/app/配下での作業になるのでカレントディレクトリを確認しておく
$ pwd
/path/to/project/HelloWorld/src/app

# 子のViewとControllerを作成(空のファイル)
$ echo > controllers/modal.component.ts
$ echo > views/modal.component.html

# ファイルが作成された事の確認
$ ls controllers/
browse.component.js             home.component.js               item-detail.component.js        modal.component.js              sample.component.js             search.component.js
browse.component.ts             home.component.ts               item-detail.component.ts        modal.component.ts              sample.component.ts             search.component.ts
$ ls views/
browse.component.html           home.component.html             item-detail.component.html      modal.component.html            sample.component.html           search.component.html
次に、親のController。
...
// インポートに、以下を追加(`ModalDialogService`と`ViewContainerRef`はモーダル表示に必要なクラス。`ModalComponent`はさっき作った子Controller。)
import { ViewContainerRef }   from "@angular/core";
import { ModalDialogService } from "nativescript-angular/directives/dialogs";
import { ModalComponent }     from "./modal.component";
...
export class SampleComponent implements OnInit {
    ...
    // コンストラクタに、`ModalDialogService`と`ViewContainerRef`を追加
    constructor(
        private route: ActivatedRoute,
        private modal: ModalDialogService,  // ←追加
        private vcRef: ViewContainerRef) {  // ←追加
    }
    ...
    // 以下のメソッドを追加
    //  - `.showModal()`で、指定した子Controllerに値を引渡す
    //  - `.then()`で、子Controllerで選択された値を受取る
    public showModal() {
        let options = {
            context: {},
            fullscreen: true,
            viewContainerRef: this.vcRef
        };
        this.modal.showModal(ModalComponent, options).then(res => {
            alert(res);
        });
    }
    ...
}
...
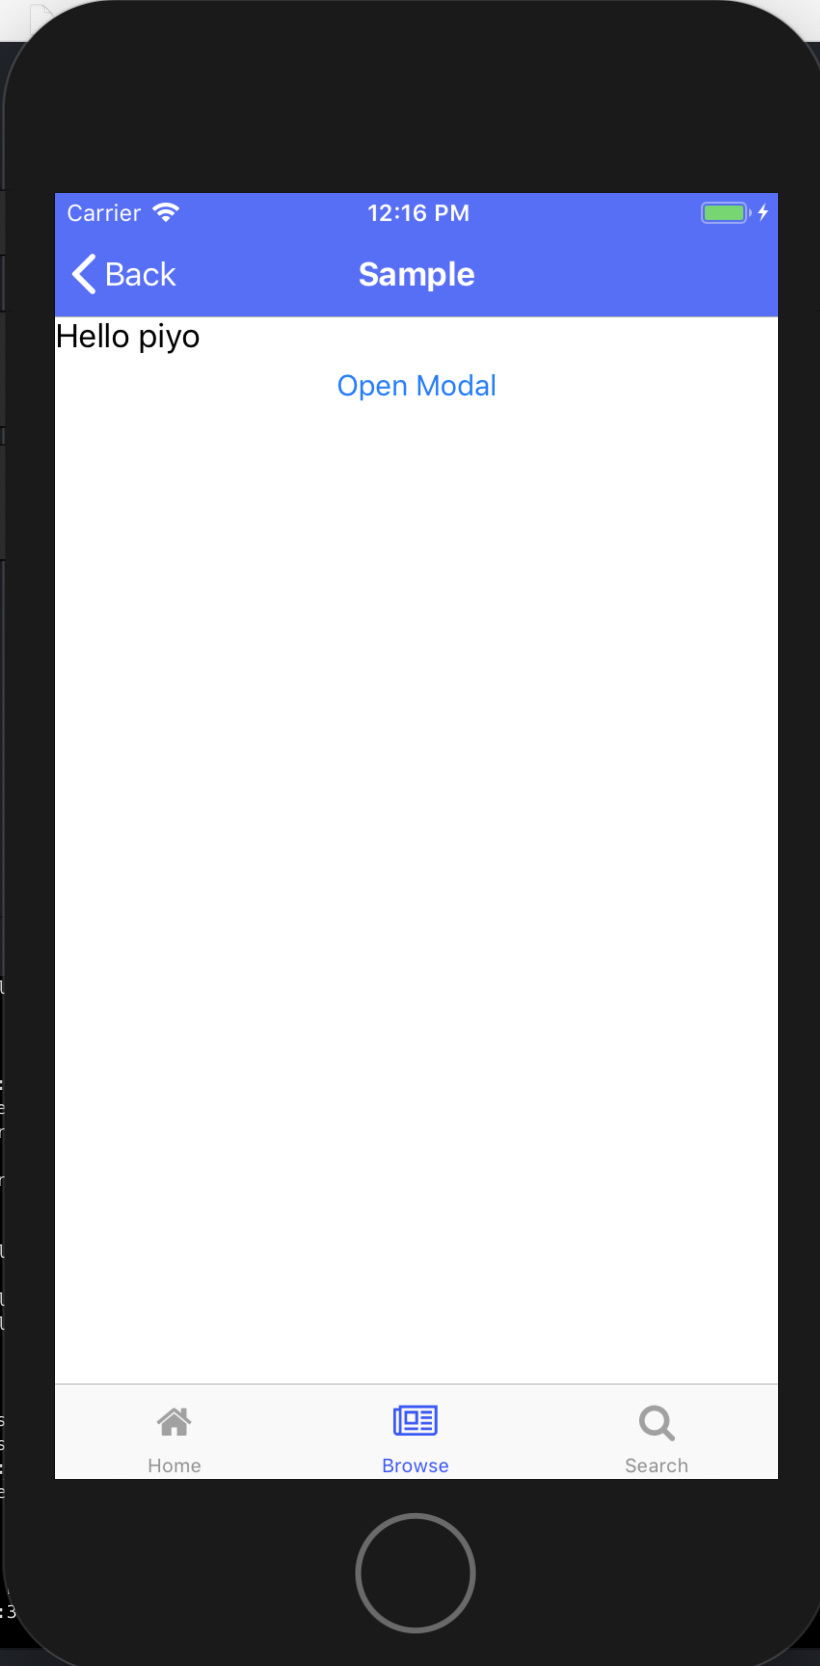
次に、親のView。
...
<!-- Button要素を追加し、`showModal()`でモーダル表示する -->
<StackLayout>
    <Label [text]="'Hello ' + hoge"></Label>
    <Button text="Open Modal" (tap)="showModal()"></Button>
</StackLayout>
...
次に、子のController。
// インポートは、こんな感じ。`ModalDialogParams`を使う事でviews側にパラメータを引渡す。
import { Component }         from "@angular/core";
import { ModalDialogParams } from "nativescript-angular/directives/dialogs";

// コンポーネントは、他のcontrollerと同じ粒度
@Component({
    selector: "Modal",
    moduleId: module.id,
    templateUrl: "../views/modal.component.html",
})

// フィールドに、view側で使う変数を定義
// コンストラクタに、ModalDialogParamsを追加し、値を設定(今回はハードコーディング)
export class ModalComponent {

    public languages: Array<string>;

    public constructor(
      private params: ModalDialogParams) {
        this.languages = [
            "NativeScript",
            "AngularJS",
            "Java",
            "Xcode",
        ];
    }

    // 以下のメソッドを追加
    //  - `closeCallback()`で、親controllerに値を返す
    public close(res: string) {
        this.params.closeCallback(res);
    }
}
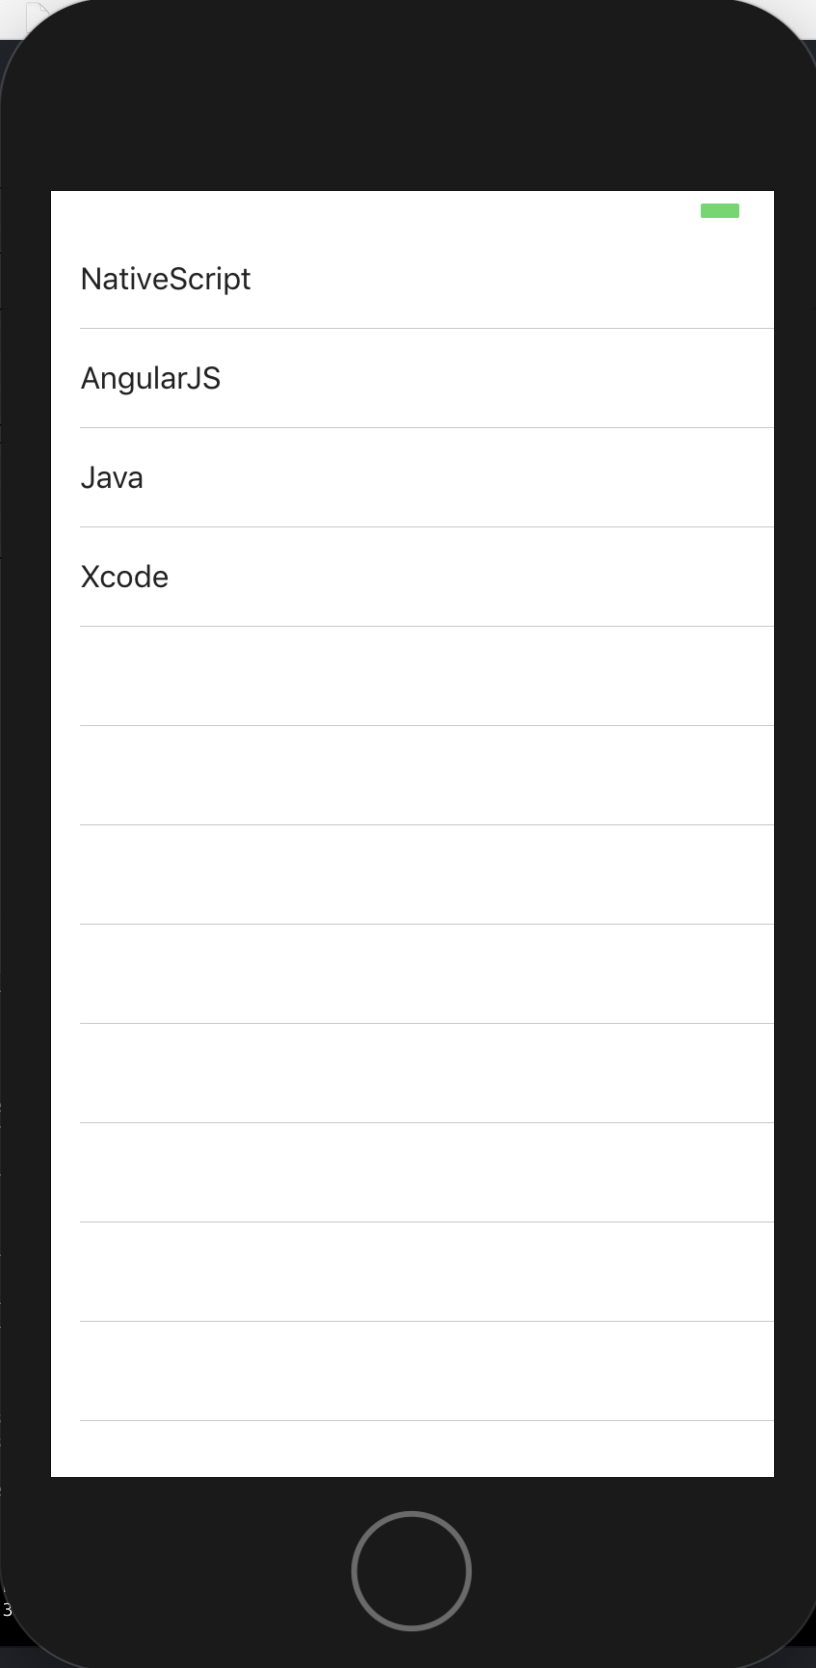
次に、子のView。
<!-- 白背景のモーダル -->
<GridLayout backgroundColor="white">
    <!-- 子のControllerから受取った値を表示。(今回はListで一覧表示しているが、`TextField`や`Button`も使える。) -->
    <ListView [items]="languages" class="list-group">
        <ng-template let-item="item">
            <Label (tap)="close(item)" [text]="item" class="list-group-item"></Label>
        </ng-template>
    </ListView>
</GridLayout>
次に、ルーティング設定。
(ルーティングを追加するわけではなく、定数に入れたいだけ)
...
// インポートに、モジュールを追加
import { ModalComponent } from "./controllers/modal.component";
...
// コンポーネント(定数)に、モジュールを追加
export const COMPONENTS = [BrowseComponent, HomeComponent, ItemDetailComponent, SearchComponent, SampleComponent, ModalComponent];
...
// 定数を新規追加し、モーダル用のコンポーネントを追加しておく。(今後増えていく可能性があるため)(当定数の使用箇所は`app.module.ts`)
export const ENTRY_COMPONENTS = [ModalComponent];
...
最後に、モジュール設定。
...
// インポートに、以下を追加。
import { ModalDialogService } from "nativescript-angular/modal-dialog";
...
// インポートの「app-routing.module」に、`ENTRY_COMPONENTS`を修正
// import { AppRoutingModule, COMPONENTS } from "./app-routing.module";
import { AppRoutingModule, COMPONENTS, ENTRY_COMPONENTS } from "./app-routing.module";
...
// `NgModule`の、`providers`にサービスを、`entryComponents`にコンポーネントを追加。(`providers`や`entryComponents`がなかったら自分で追加してね)
@NgModule({
    ...
    providers: [
        ModalDialogService
    ],
    entryComponents: [
        ...ENTRY_COMPONENTS
    ],
    ...
})
...
さあ、動作確認!
# エミュレータ起動(とりあえずiOS)
$ tns run ios
 →
→ →
→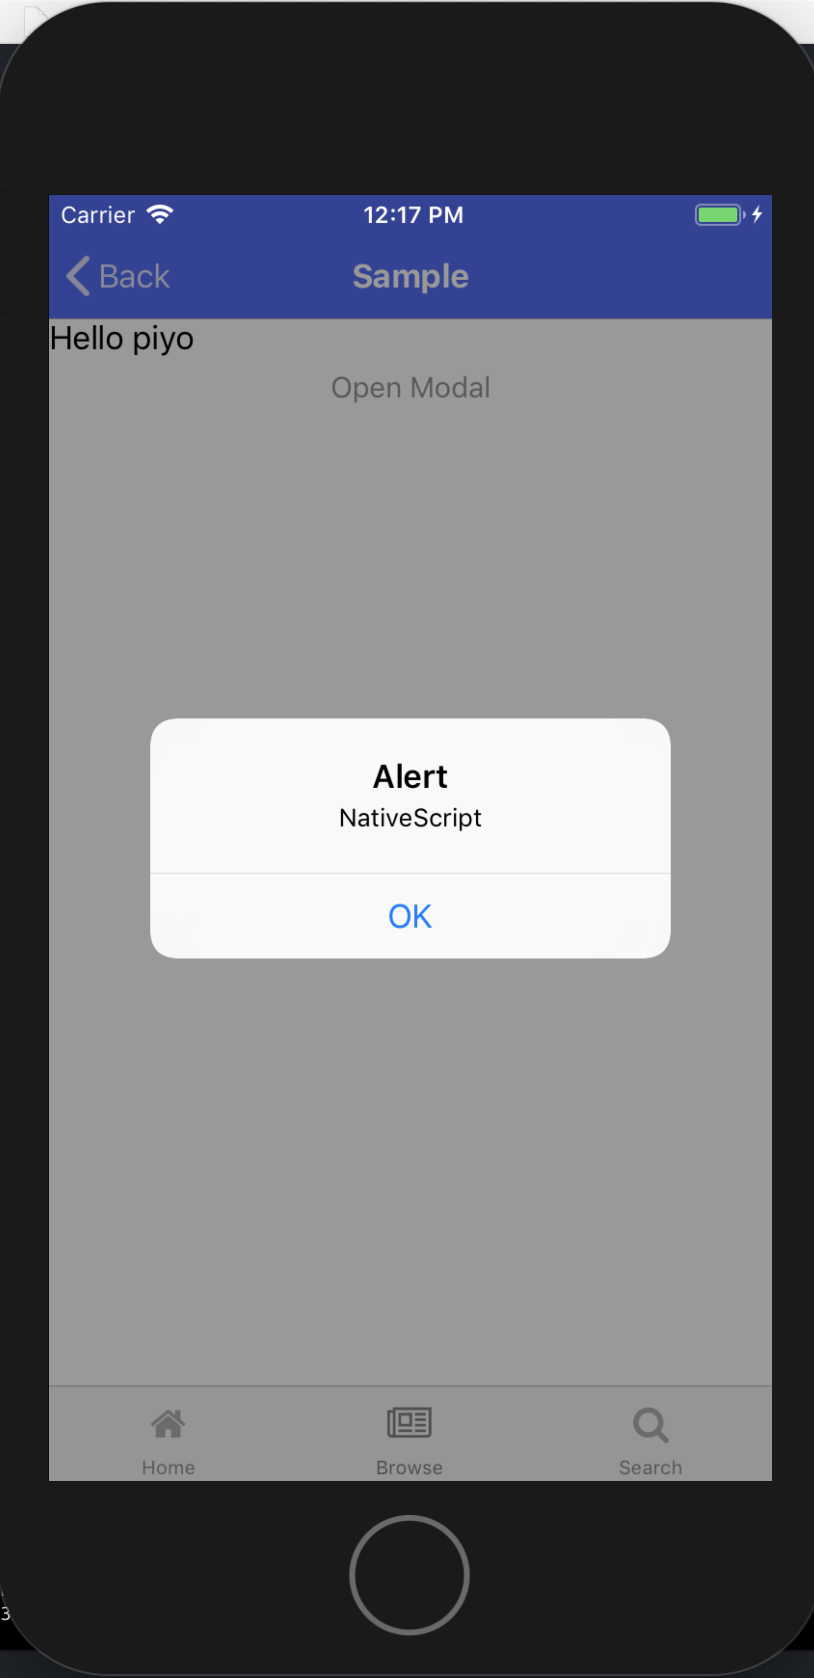
sample.component.htmlに設置したボタンを押下するとモーダルが開いて、モーダル内の要素をタップすると親画面に値が返されてアラートで確認できるところまでできました。(拍手)
ソースコード内(modal.component.html)にも書きましたが、今回はListの各要素をタップするとアクションが走るようになってますが、TextFieldやButtonを配置する事もできるので、modal.component.htmlを綺麗にしてやればもっとやれる事は増えそうですね!(今回はそこまでやらない)
💭余談
普段はサーバサイドばかりやってるので、Angularはおろか、フロント側の知識がほとんどないから、とても疲れた...
しかもNativeScriptは日本語ドキュメントだけじゃなくて英語ドキュメントも少ない感じするし.....
とりあえず、NativeScriptで参考になる文献は「公式ドキュメント」「NativeScript開発者の技術ブログ」
- Docs: https://docs.nativescript.org/angular/start/introduction
- Blog: https://www.nativescript.org/blog/
あと、『Sidekick』ってのがあるけど、あんまり使えない。
IDEでも付いてくれればいいけど、操作は基本的にコマンドで事足りるから必要性を感じない。
以上!