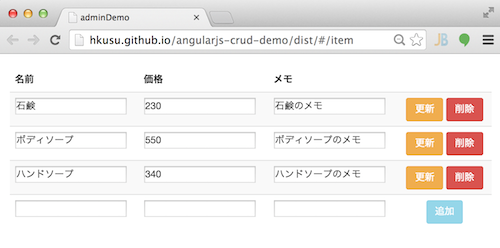
AngularJS はサーバサイドのマスタデータを操作するような"管理画面"の開発に向いているのかなと思います。
具体的には、RESTful な API を利用してのマスタデータの CRUD 操作や、一覧のような複数データの扱いが容易である。
試しに、次のような簡単なものを作ってみました。
デモはこちら(GitHub Pages)
⇒ http://hkusu.github.io/angularjs-crud-demo/dist
API は擬似的に用意しているので
追加/更新/削除してもサーバ側には反映されません。
ソースコード
前提となる AngularJS のバージョンは 1.3.8 です。
View
ng-repeat で一覧を生成しています。変数は ng-model でバインドします。ポイントとしては $index で何列目のデータが操作の対象かを、Controller へ渡しているところ。
<div class="container">
  <br>
  <table class="table table-striped">
    <thead>
    <tr>
      <th>名前</th>
      <th>価格</th>
      <th>メモ</th>
      <th></th>
    </tr>
    </thead>
    <tbody>
    <tr ng-repeat="item in items">
      <td>
        <input ng-model="item.name">
      </td>
      <td>
        <input ng-model="item.price">
      </td>
      <td>
        <input ng-model="item.memo">
      </td>
      <td align="center">
        <button type="button" class="btn btn-warning" ng-click="update($index)">更新</button>
        <button type="button" class="btn btn-danger" ng-click="delete($index)">削除</button>
      </td>
    </tr>
    <tr>
      <td>
        <input ng-model="newName">
      </td>
      <td>
        <input ng-model="newPrice">
      </td>
      <td>
        <input ng-model="newMemo">
      </td>
      <td align="center">
        <button type="button" class="btn btn-info" ng-click="add()" ng-disabled="!newName">追加</button>
      </td>
    </tr>
    </tbody>
  </table>
</div>
Controller
説明はコメントに書いてますが、ポイントとしては View から $index を受け取って操作対象のデータを特定しているところと、$scope.items.push() や $scope.items.splice() で View側の列を足したり引いたりしているところ。
'use strict';

angular.module('adminDemo')
  .controller('ItemCtrl', function ($scope, $http) {

    // 初期表示でアイテム一覧の取得
    // (API は GET /api/items で提供されるものとする)
    $http.get('/api/items').success(function(data) {
      $scope.items = data;
    });

    // アイテムの追加
    // (API は POST /api/items で提供されるものとする)
    $scope.add = function() {
      $http.post('/api/items', {
        name: $scope.newName,
        price: $scope.newPrice,
        memo: $scope.newMemo
      }).success(function(data) {
        // 画面にも反映する(配列へ追加)。サーバから払い出されたidが欲しいのでレスポンス結果から取得
        $scope.items.push(data);
      });
      // 入力欄をクリア
      $scope.newName = '';
      $scope.newPrice = '';
      $scope.newMemo = '';
    };

    // アイテムの更新
    // (API は PUT /api/items/:id で提供されるものとする)
    $scope.update = function(index) {
      $http.put('/api/items/' + $scope.items[index].id, {
        name: $scope.items[index].name,
        price: $scope.items[index].price,
        memo: $scope.items[index].memo
      });
    };

    // アイテムの削除
    //(API は DELETE /api/items/:id で提供されるものとする)
    $scope["delete"] = function(index) {
      $http["delete"]('/api/items/' + $scope.items[index].id);
      // 画面にも反映する(配列から削除)
      $scope.items.splice(index, 1);
    };
  });
プロダクション(本番)で利用するなら、APIアクセスを Factory 経由にしたり、HTTPレスポンスのエラー処理、クライアント側の入力バリデーションが必要になるかと思います。
おわりに
ソースコード全体については、GitHub に置きました。
⇒ https://github.com/hkusu/angularjs-crud-demo
