はじめに
Gitをそこそこ使いこなすにあたって必要な基礎知識やコマンドをまとめました。
Gitは少しかじったけど挫折したくらいの人が対象レベルになるかと思います。
当方、Subversionをまともに触ったことないゆとり世代なので集中管理型との違いとかはよく分かりません。
一部諸事情のため、XXXXXで情報を隠蔽しています。
この記事長いです。。。
Gitとは
分散型バージョン管理システム。
今時ソースコードなどをバージョン管理するってなったらGitを使うことになるでしょう。
GitHub(Enterprise含む)とかGitLabとかGitBucketとかBitBucketとかGitのサービスは複数ありますが、どれを使うかはチーム事情や会社事情などから決まる。
ローカルにリモートリポジトリの複製を作成するため、複数人が各々のローカルで変更履歴を利用して自由にファイルの編集やローカルコミットができるのが特徴。
clone
リモートリポジトリをローカルにダウンロードする。
リモートブランチ上で複数ブランチが存在する場合は全てのブランチも一括でダウンロードする。
リモートリポジトリのURLは下記のようにWEB画面から取得できます。
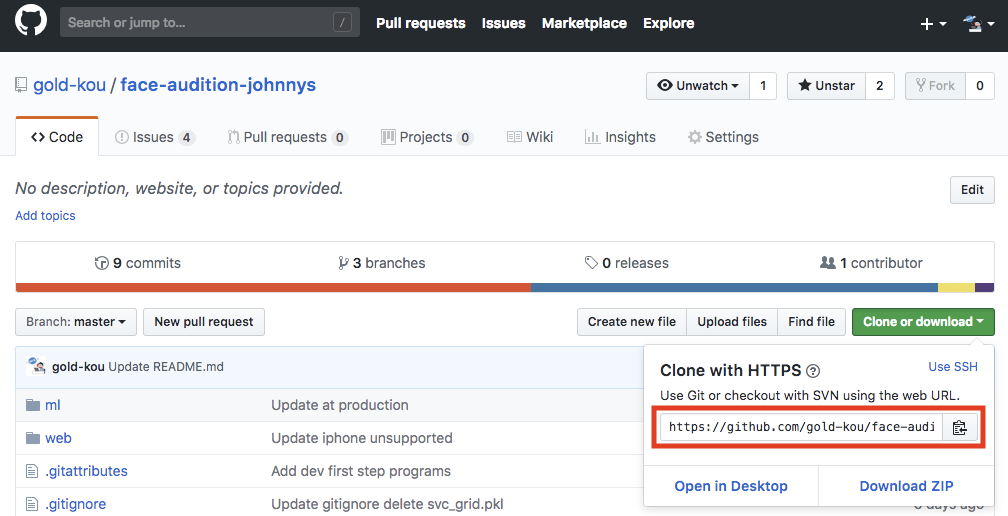
$ git clone <URL>
ブランチ
ブランチは作業履歴を枝分かれさせて記録していくためのもの。
ブランチ上での変更は統合されるまで他ブランチに影響しないしされない。
ブランチモデル
ブランチモデルとはブランチをどのように切って運用するかをまとめたもの。
git-flowとGitHub Flowが一般的に有名であり、さらにそれを派生させたチーム独自のモデルがある。
いずれにせよ、どのようなブランチモデルを採用するかのルールをチーム内で統一する必要がある。
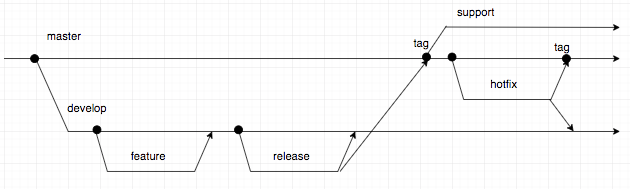
git-flowモデル
細かくブランチを切った厳格な運用モデル。
masterブランチ、developブランチ、releaseブランチ、featureブランチ、hotfixブランチ、supportブランチの6種類を用意する。
masterブランチ
リリース可能な完全品質を保証するブランチ。
releaseブランチからのマージのみで更新される。
masterブランチ上で直接作業したりコミットするのはNG。
tagはmasterブランチ上でのみ存在する。
developブランチ
開発の主軸になるブランチ。
masterブランチから派生させる。
developブランチ上で直接作業したりコミットするのはNG。
developブランチからfeatureブランチやreleaseブランチを切る。
releaseブランチ
リリース作業を行うためのブランチ。
developブランチから派生させる。
リリース作業が完了したらmasterブランチとdevelopブランチにマージする。
masterブランチにマージする際のコミットではtagを打つ。
マージされたら該当のreleaseブランチは削除する。
featureブランチ
機能追加および修正作業を行うためのブランチ。
developブランチから派生させる。
作業完了してレビューが通ったら、developブランチにマージする。
どのような機能追加を行うブランチなのかが一目で分かるようなブランチ名を心がける。
マージされたら該当のfeatureブランチは削除する。
hotfixブランチ
リリース済みのものの緊急修正用の作業を行うブランチ。
masterブランチから派生させる。
修正作業完了後はmasterブランチとdevelopブランチにマージする。
また、masterブランチにマージする際のコミットではリリースタグを打つ。
マージされたら該当のhotfixブランチは削除する。
supportブランチ
旧バージョンをサポートするためのブランチ。
必須ではないが、旧バージョンをサポートする必要がある場合は、masterブランチのtagからsupportブランチを派生させる。
旧バージョンでバグが発生した場合は、supportブランチ上で直接バグフィックス作業を行いコミットする。
また、バグが過去の複数バージョンにまたがる場合は、修正コミットは対象の全てのバージョンのsupportブランチにcherry-pickする。
サポートが完了したら該当のsupportブランチは削除する。
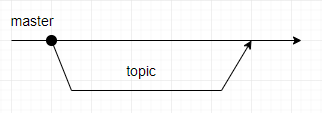
GitHub Flowモデル
簡略化されたブランチ運用モデル。
masterブランチ、topicブランチの2種類を用意する。
masterブランチ
リリース可能な完全品質を保証するブランチ。
git-flowでいうmasterブランチ+developブランチ相当。
masterブランチ上で直接作業したりコミットするのはNG。
リリース作業はmasterブランチ上で行う。(releaseブランチは別途用意しない。)
topicブランチ
機能追加やバグ修正を行うブランチ。
実際のファイル編集作業はこのブランチ上で行う。
masterブランチから枝分かれする唯一のブランチ。
git-flowでいうfeatureブランチ+hotfixブランチ相当。
masterブランチにマージされたらtopicブランチは削除する。
ブランチ作成
$ git branch sample1
ブランチ一覧確認
*印が現在いるブランチを示す。
$ git branch
* master
  sample1
ブランチ一覧確認(リモート追跡ブランチも出力)
$ git branch --all
* master
  sample1
  remotes/origin/HEAD -> origin/master
  remotes/origin/master
remotesって何?
remotesはリモート追跡ブランチのこと。
リモート追跡ブランチはブランチモデルによらずに存在する。
ローカルリポジトリ上にリモートリポジトリの情報を保持している。
ただし自動で最新状態に更新されるようなものではなく自分で適宜更新していく必要がある。
originって何?
originはリモートリポジトリのURLの別名を指す。
gitのコンフィグで設定可能であり、originの現在の値は以下で確認可能。
$ git remote get-url origin
XXXXX
HEADって何?
HEADは現在のブランチの先頭を意味する。
1つ前のHEAD位置の指定の仕方
HEAD^
HEAD~
2つ前のHEAD位置の指定の仕方
HEAD^^
HEAD~~
HEAD~2
origin/masterって何?
origin/masterはoriginというリモートリポジトリのmasterブランチであることを意味する。
originを省略した場合(単なるmaster)はローカルリポジトリのmasterブランチを意味することになる。
ブランチ変更(チェックアウト)
$ git checkout sample1
Switched to branch 'sample1'

$ git branch
  master
* sample1
ブランチ作成+チェックアウト
ブランチの新規作成とチェックアウトを同時に実行。
$ git checkout -b sample2
Switched to a new branch 'sample2'

$ git branch
  master
  sample1
* sample2
ブランチ名変更
$ git branch -m sample2 sample3

$ git branch
  master
  sample1
* sample3
ブランチ削除
$ git branch
* master
sample1

$ git branch -d sample1
Deleted branch sample1 (was b1eca08).

$ git branch
* master
強制削除したい場合は-dオプションでなく-Dオプションにする。
リモートリポジトリ
リモートリポジトリ一覧
一覧表示(オプションなし)
$ git remote
origin
一覧表示(URLも表示)
$ git remote -v
origin  http://XXXXX (fetch)
origin  http://XXXXX (push)
リモートリポジトリの追加
任意の名前でリモートリポジトリを登録する。
$ git remote add sample_remote https://XXXXX

$ git remote -v
origin  http://XXXXX (fetch)
origin  http://XXXXX (push)
sample_remote   https://XXXXX (fetch)
sample_remote   https://XXXXX (push)
リモートリポジトリ削除
$ git remote rm sample_remote
$ git remote -v
origin  http://XXXXX (fetch)
origin  http://XXXXX (push)
ワーキングツリーからリモートリポジトリまでの流れ
ローカルでの作業からリモートにアップロードするまでの流れを示します。
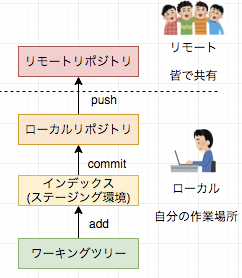
ワーキングツリー
ファイルの編集作業場所。
ここでファイルの編集や追加や削除などを行う。
インデックス(ステージング環境)
コミットするためのファイルを記録する場所。
ワーキングツリーで編集したファイルはaddコマンドでインデックスへ移動させる。
ローカルリポジトリ
リモートリポジトリにアップロードするためのコミット履歴とファイルを記録する場所。
インデックス上のファイルをcommitコマンドでローカルリポジトリにコミットする。
リモートリポジトリ
複数人で共有する場所。
ローカルコミットしたファイルをpushコマンドでリモートリポジトリにアップロードする。
status
statusは前回のコミットと比較した変更内容を表示する。
何もない場合は何も表示しない。
$ git status
add
ワーキングツリー上で編集および追加したファイルをステージング環境へ追加する。
$ touch a.txt

$ git add a.txt

$ git status
On branch sample
Changes to be committed:
  (use "git reset HEAD <file>..." to unstage)

        new file:   a.txt
commit
ローカルコミットを実行する。
新規コミット
-mオプションで新規コミット作成する。
""(ダブルクォテーション)内にはコミットメッセージを記載する。
コミットメッセージの書き方はチームやコミュニティそれぞれの流儀があるが、とりあえずこちらの記事を参考にすればよさそう。
また、GitのIssueでタスクやバグを管理している場合は、#を記載すると関連付けが自動で行われ、クリックでIssueの詳細ページにリンクに飛べるので便利。(言葉じゃ説明しにくい。。。)
$ git commit -m "[add]refs #1 a.txtの追加"
[sample a8a060c] [add]refs #1 a.txtの追加
 1 file changed, 0 insertions(+), 0 deletions(-)
 create mode 100644 a.txt
直前のコミットを上書きする
--amendオプションで直前のコミットを上書きする。
ファイルの追加漏れがあった、コミットメッセージを修正したくなった、レビュー対応したなどのときに使う。
ところで、直前でないコミットを変更したい場合は、rebaseの-iオプションで順番を入れ替えるか、editにする。
$ git commit --amend
viで以下が表示される。ここで保存すれば変更した内容をここで上書きすることになる。コミットメッセージもここで変更できる。
----------------------
[add]refs #1 a.txtの追加

# Please enter the commit message for your changes. Lines starting
# with '#' will be ignored, and an empty message aborts the commit.
#
# Date:      Wed Jun 13 10:54:28 2018 +0900
#
# On branch sample
# Changes to be committed:
#       new file:   a.txt
#
----------------------
push
ローカルリポジトリのブランチをリモートリポジトリへアップロードする。
-fオプションで強制的にpushできる。rebase後は-fオプションが必須。
$ git branch
  master
* sample1

$ git push origin sample1
Counting objects: 6, done.
Delta compression using up to 4 threads.
Compressing objects: 100% (4/4), done.
Writing objects: 100% (6/6), 512 bytes | 0 bytes/s, done.
Total 6 (delta 2), reused 0 (delta 0)
remote: Resolving deltas: 100% (2/2)
remote: Updating references: 100% (1/1)
To http://XXXXX
 * [new branch]      sample1 -> sample1
tag
tagはリリースバージョンなど重要なタイミングで印をつけるためのもの。
例えば、git-flowモデルではreleaseブランチ上でtag作成を行うことになる。
tagを作成し、リモートリポジトリにpushすることで、tagを作成した状態でのブランチの状態がリモートリポジトリ上にまるでブランチのように保存される。
tag作成
ローカルでtagを作成する。
$ git tag
v1.0
tag一覧確認
$ git tag
v1.0
作成したtagをリモートリポジトリに反映
$ git push origin v1.0
Total 0 (delta 0), reused 0 (delta 0)
remote: Updating references: 100% (1/1)
To http://xxxxx
 * [new tag]         v1.0 -> v1.0
tag削除
ローカルで作成したtagを削除する。
$ git tag -d v1.0
Deleted tag 'v1.0' (was b1eca08)
tag削除をリモートリポジトリに反映
$ git push origin :v1.0
remote: Updating references: 100% (1/1)
To http://xxxxx
 - [deleted]         v1.0
log
コミット履歴を表示する。
上に表示されるものほど新しいコミット履歴となる。
オプションなし
全てのコミット履歴一覧を表示する。
$ git log
commit 6252d598af59722a5646c710442479e84a1987a0
Merge: 66ea8cb 6c92a36
Author: XXXXX
Date:   Mon Jun 11 16:22:16 2018 +0900

    Merge branch 'sample'

commit 6c92a360506786a8b3d734da61fd7fea2927319a
Author: XXXXX
Date:   Mon Jun 11 16:20:09 2018 +0900

    Add a.txt
--mergesオプション
マージコミットだけを表示。
$ git log --merges
commit 6252d598af59722a5646c710442479e84a1987a0
Merge: 66ea8cb 6c92a36
Author: XXXXX
Date:   Mon Jun 11 16:22:16 2018 +0900

    Merge branch 'sample'
--no-mergesオプション
マージコミットは表示しない。
$ git log --no-merges
commit 6c92a360506786a8b3d734da61fd7fea2927319a
Author: XXXXX
Date:   Mon Jun 11 16:20:09 2018 +0900

    Add a.txt
--oneline
--onelineオプションのlogコマンドで各コミットを一行でスマートに表示する。
$ git log --oneline
6252d59 Merge branch 'sample'
6c92a36 Add a.txt
reflog
HEADの履歴一覧を表示する。
コミットだけじゃなくてresetとかcherry-pickとかrebaseとか全ての履歴を確認できる。
resetコマンドによる戻り先を探すために使うことが多いと思う。
$ git reflog
6252d59 HEAD@{0}: merge sample: Merge made by the 'recursive' strategy.
66ea8cb HEAD@{1}: checkout: moving from sample to master
6c92a36 HEAD@{2}: commit: Add b.txt
7525ea8 HEAD@{3}: checkout: moving from master to sample
66ea8cb HEAD@{4}: commit: Add a.txt
(省略)
reset
HEADの位置を変更する。
3種類のオプション(--softオプションと--mixedオプションと--hardオプション)でHEADの位置を変更した際の戻し方を選択する。
--softオプション
コミットのみを取り消す。
ステージング環境にあるファイルはそのまま。
^の数で戻る位置を指定する。
以下はb.txtを作成するコミットを新規作成してそれを取り消す例。コミットだけが取り消され、ステージング環境にはb.txtは残ったままであることを確認する。
・b.txtを作ってaddしてコミット
$ touch b.txt
$ git add b.txt
$ git commit -m "Add b.txt"
[master 63678f0] Add b.txt
 1 file changed, 1 insertion(+)
 create mode 100644 b.txt

・log確認
$ git log --oneline
63678f0 Add b.txt ★今回取り消す履歴
6252d59 Merge branch 'sample'
6c92a36 Add a.txt
(省略)

・reflog確認
$ git reflog
63678f0 HEAD@{0}: commit: Add b.txt
6252d59 HEAD@{1}: merge sample: Merge made by the 'recursive' strategy.
66ea8cb HEAD@{2}: checkout: moving from sample to master
6c92a36 HEAD@{3}: commit: Add a.txt
(省略)

・reset実行
$ git reset --soft HEAD^

・reflog確認。HEADの位置が変わったのでreflogが一行追加されている。
$ git reflog
6252d59 HEAD@{0}: reset: moving to HEAD^ ★履歴が1つ増えた
63678f0 HEAD@{1}: commit: Add b.txt
6252d59 HEAD@{2}: merge sample: Merge made by the 'recursive' strategy.
66ea8cb HEAD@{3}: checkout: moving from sample to master
6c92a36 HEAD@{4}: commit: Add a.txt

・log確認。さきほどあった"63678f0 Add b.txt"のコミットログがなくなっている。
$ git log
6252d59 Merge branch 'sample'
6c92a36 Add a.txt
(省略)

・ステージング環境確認。b.txtはステージング環境には残っている。
$ git status
On branch sample
Changes to be committed:
  (use "git reset HEAD <file>..." to unstage)

        new file:   b.txt

・ファイル一覧確認。b.txtは残っている。
$ ls
README.md  a.txt  b.txt
オプション無し(--mixedオプション)
コミットとaddを取り消す。
ステージング環境に置かれたファイルはワーキングツリーに戻り、削除はされない。
以下はb.txtを作成するコミットを新規作成してそれを取り消す例。コミットは取り消され、ステージング環境からもb.txtは消えるが、ファイル自体は残ることを確認する。
・b.txtを作ってaddしてコミット
$ touch b.txt
$ git add b.txt
$ git commit -m "Add b.txt"
[master 63678f0] Add b.txt
 1 file changed, 1 insertion(+)
 create mode 100644 b.txt

・log確認
$ git log --oneline
63678f0 Add b.txt ★今回取り消す履歴
6252d59 Merge branch 'sample'
6c92a36 Add a.txt
(省略)

・reflog確認
$ git reflog
63678f0 HEAD@{0}: commit: Add b.txt
6252d59 HEAD@{1}: merge sample: Merge made by the 'recursive' strategy.
66ea8cb HEAD@{2}: checkout: moving from sample to master
6c92a36 HEAD@{3}: commit: Add a.txt
(省略)

・reset実行
$ git reset HEAD^

・reflog確認。HEADの位置が変わったのでreflogが一行追加されている。
$ git reflog
6252d59 HEAD@{0}: reset: moving to HEAD^ ★履歴が1つ増えた
63678f0 HEAD@{1}: commit: Add b.txt
6252d59 HEAD@{2}: merge sample: Merge made by the 'recursive' strategy.
66ea8cb HEAD@{3}: checkout: moving from sample to master
6c92a36 HEAD@{4}: commit: Add a.txt

・log確認。"63678f0 Add b.txt"のコミットログがなくなっている。
$ git log
6252d59 Merge branch 'sample'
6c92a36 Add a.txt
(省略)

・ステージング環境確認。b.txtはステージング環境からも外れている。
$ git status
On branch master
Your branch is up-to-date with 'origin/master'.
Untracked files:
  (use "git add <file>..." to include in what will be committed)

        b.txt

・ファイル一覧確認。b.txtは残っている。
$ ls
README.md  a.txt  b.txt
--hardオプション
コミットとaddを取り消したうえでワーキングツリー上のファイルも削除する。
以下はb.txtを作成するコミットを新規作成してそれを取り消す例。コミットは取り消され、ステージング環境からもb.txtは消える、ファイル自体も消えていることを確認。
・b.txtを作ってaddしてコミット
$ touch b.txt
$ git add b.txt
$ git commit -m "Add b.txt"
[master 63678f0] Add b.txt
 1 file changed, 1 insertion(+)
 create mode 100644 b.txt

・log確認
$ git log --oneline
63678f0 Add b.txt ★今回取り消す履歴
6252d59 Merge branch 'sample'
6c92a36 Add a.txt
(省略)

・reflog確認
$ git reflog
63678f0 HEAD@{0}: commit: Add b.txt
6252d59 HEAD@{1}: merge sample: Merge made by the 'recursive' strategy.
66ea8cb HEAD@{2}: checkout: moving from sample to master
6c92a36 HEAD@{3}: commit: Add a.txt
(省略)

・reset実行
$ git reset --hard HEAD^

・reflog確認。HEADの位置が変わったのでreflogが一行追加されている。
$ git reflog
6252d59 HEAD@{0}: reset: moving to HEAD^ ★履歴が1つ増えた
63678f0 HEAD@{1}: commit: Add b.txt
6252d59 HEAD@{2}: merge sample: Merge made by the 'recursive' strategy.
66ea8cb HEAD@{3}: checkout: moving from sample to master
6c92a36 HEAD@{4}: commit: Add a.txt

・log確認。"63678f0 Add b.txt"のコミットログがなくなっている。
$ git log
6252d59 Merge branch 'sample'
6c92a36 Add a.txt
(省略)

・ステージング環境確認。b.txtはステージング環境からも外れていることが分かる。
$ git status
On branch master
nothing to commit, working tree clean

・ファイル一覧確認。b.txtファイルもなくなっている。
$ ls
README.md  a.txt
resetの取り消し
reset自体をresetで取り消すことができる。
これがあるからresetしてミスっても怖くないよー!
ただし、HEAD自体は動くのでreflogの履歴上には残る。
以下はa.txtをaddしたコミットのreset(--hardオプション)をresetする例。
・a.txtが取り消された状態。
$ ls
README.md

・reflog確認。HEAD@{0}にresetした履歴が残っている。
$ git reflog
63678f0 HEAD@{0}: reset: moving to HEAD@{1}
08f9902 HEAD@{1}: commit: Add a.txt
63678f0 HEAD@{2}: clone: from http://XXXXX

・HEAD@{0}のresetより前に戻ることでresetを取り消す。
$ git reset --hard HEAD@{1}
HEAD is now at 08f9902 Add a.txt

・a.txtファイルが戻ったことを確認
$ ls
README.md  a.txt

・reflog確認。新たなresetの履歴が増えている。
$ git reflog
08f9902 HEAD@{0}: reset: moving to HEAD@{1} ★履歴が増えた
63678f0 HEAD@{1}: reset: moving to HEAD@{1}
08f9902 HEAD@{2}: commit: Add a.txt
63678f0 HEAD@{3}: clone: from http://XXXXX
revert
revertから修正反映まで
PRをマージ後にPRの内容に問題があることが発覚した場合に、revertしてパッチ修正反映するまでの手順をまとめます。
Step1. remoteでrevert
Web-UI上で、問題となっているPRをrevertします。

Step2. ローカルを最新化
remoteのrevertされた状態をローカルに反映させます。
$ git pull --rebase origin develop
Step3. ローカルでrevertを取り消す
revertのrevertをすることで、バグを含んだ元の状態に戻します。
revertするコミットIDはrevertをマージプルリクのコミットではなく、revert自体のコミットであることに注意してください。。
一見、Step2~3は無駄なように感じますが、コミットを整理するために必要な行為です。
$ git revert <commit_id>
Step4. パッチ修正
ローカルで、最初のrevertをせざるおえない原因となった箇所を修正してください。
Step5. リモートブランチへの反映
ローカルでの修正をリモートにも反映させます。
$ git push origin <branch> -f
Step6. PR作成
対象のブランチを選択し、新たにPRを作成します。
fetch
リモートリポジトリの最新の状態をローカルリポジトリのリモート追跡ブランチにダウンロードする。
リモート追跡ブランチにダウンロードするだけなのでワーキングツリーに影響はない。
$ git fetch
remote: Counting objects: 1, done
remote: Finding sources: 100% (1/1)
remote: Total 1 (delta 0), reused 0 (delta 0)
Unpacking objects: 100% (1/1), done.
From http://xxxxx
   b1eca08..0b04b9f  master     -> origin/master
merge
指定したブランチを現在のブランチに統合する。
fast-forwardとnon-fast-forwardの2種類でmergeの処理の仕方が異なる。
fast-forward
fast-forwardは派生元がブランチ作成時と比べて進んでいない状態でmergeしたときの処理の仕方。
fast-forward可能な状態でmergeする場合は、コミットがそのまま統合先へ統合されるだけで、あらたにマージコミットを積む必要がない。
ただし、no-ffオプションをつけるとfast-forwardであっても必ずマージコミットを積むマージにできる。
A--B ←master
    \
     C ←sample
A--B---C ←master
    \ /
     C ←sample
以下はsampleブランチ上でのコミット内容(a.txtの作成)をmasterブランチ上に統合する例。
・sampleブランチ作成してチェックアウト
$ git checkout -b sample

・ブランチ確認
$ git branch
  master
* sample

・ファイル一覧確認
$ ls
README.md

・sampleブランチでa.txtを作成してコミット
$ touch a.txt
$ git add a.txt
$ git commit -m "Add a.txt"
[sample5 7525ea8] Add a.txt
 1 file changed, 1 insertion(+)
 create mode 100644 a.txt

・masterブランチに移動
$ git checkout master
Switched to branch 'master'
Your branch is up-to-date with 'origin/master'.

・sampleブランチのコミットを現ブランチ(master)にmerge
$ git merge sample
Updating cfec4a3..7525ea8
Fast-forward
 a.txt | 1 +
 1 file changed, 1 insertion(+)
 create mode 100644 a.txt

・ファイル一覧確認。a.txtがmasterブランチにも反映されている。
$ ls
README.md  a.txt
non-fast-forward
non-fast-forwardは派生元がブランチ作成時と比べて進んでいる状態でmergeしたときの処理の仕方。
non-fast-forward可能な状態でmergeする場合は、merge先であらたにマージコミット(下図ではE)を積む必要がある。
A--B--D ←master
    \
     C ←sample
A--B--D--E ←master
     \  /
      C ←sample
以下は、masterブランチから一つ遅れているsampleブランチ上で積んだコミットをmasterブランチにマージする例。
・sampleブランチ作成
$ git branch sample

・ブランチ確認
$ git branch
* master
  sample

・ファイル一覧確認
$ ls
README.md

・masterブランチでa.txtを作成してコミット。sampleブランチからするとmasterブランチが1つ進んでいてる状態になる。
$ touch a.txt
$ git add a.txt
$ git commit -m "Add a.txt"
[master 66ea8cb] Add a.txt
 1 file changed, 1 insertion(+)
 create mode 100644 a.txt

・sampleブランチをチェックアウト
$ git checkout sample

・sampleブランチでb.txtを作成してコミット
$ touch b.txt
$ git add b.txt
$ git commit -m "Add b.txt"
[sample 6c92a36] Add b.txt
1 file changed, 1 insertion(+)
create mode 100644 b.txt

・masterブランチに移動。
$ git checkout master
Switched to branch 'master'
このブランチは 'origin/master' よりも1コミット進んでいます。
  (use "git push" to publish your local commits)

・sampleブランチのコミットを現ブランチ(master)にmergeする。non-fast-forwardのためマージコミットを積むことになる。
$ git merge sample
--------------------------------------------
マージコミットを積むためにviで以下が表示される。今回はそのまま保存。
Merge branch 'sample'

# Please enter a commit message to explain why this merge is necessary,
# especially if it merges an updated upstream into a topic branch.
#
# Lines starting with '#' will be ignored, and an empty message aborts
# the commit.
--------------------------------------------
Merge made by the 'recursive' strategy.
 b.txt | 1 +
 1 file changed, 1 insertion(+)
 create mode 100644 b.txt

・ファイル一覧確認。b.txtが追加されていることを確認。
$ ls
README.md a.txt b.txt
rebase
履歴を変更する。
たくさんオプションがあるが、主にオプションなしかiオプションかcontinueオプションかabortオプションを使用する。
オプションなし
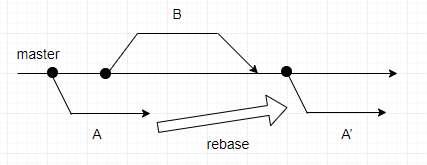
派生ブランチの根本を最新のものに付け替える。
下図でいうと、派生ブランチAで作業をしている間に別の派生ブランチBがmasterブランチにマージされたことによりmasterブランチが進んだ場合、ローカルリポジトリ内のブランチA上で進んだ分のコミットを反映させる必要がある。その際に、オプションなしのrebaseが有効になってくる。
コンフリクトがありかなしかで対応が少し変わってくるので、場合分けして説明します。
コンフリクトなしの場合
コンフリクトなしの場合は難しくありません。
以下はsample1ブランチのコミットがmasterブランチへマージされたことで遅れが生じたsample2ブランチでrebaseを実施する例。
sample1ブランチとsample2ブランチでは編集対象ファイルが異なるためコンフリクトは発生しない。
・派生ブランチ作成
$ git branch
* master
$ git branch sample1
$ git branch sample2

・sample1ブランチにチェックアウト
$ git checkout sample1
Switched to branch 'sample1'

・a.txtを作成してaddしてcommitしてpush
$ vi a.txt
$ cat a.txt
aaa
$ git add a.txt
$ git commit -m "Add a.txt"
$ git push origin sample1
Counting objects: 3, done.
Delta compression using up to 4 threads.
Compressing objects: 100% (2/2), done.
Writing objects: 100% (3/3), 271 bytes | 0 bytes/s, done.
Total 3 (delta 0), reused 0 (delta 0)
remote: Updating references: 100% (1/1)
To http://xxxxx
 * [new branch]      sample1 -> sample1

・pushした内容をリモートリポジトリ側でマージ。sample2ブランチからすると、遅れている状態になる。

・sample2ブランチにチェックアウト
$ git checkout sample2
Switched to branch 'sample2'

・b.txtを作成してaddしてcommitしてpush
$ vi b.txt
$ git add b.txt
$ git commit -m "Add b.txt"
[sample2 b08565c] Add b.txt
 1 file changed, 1 insertion(+)
 create mode 100644 b.txt
$ git push origin sample2
Counting objects: 3, done.
Delta compression using up to 4 threads.
Compressing objects: 100% (2/2), done.
Writing objects: 100% (3/3), 273 bytes | 0 bytes/s, done.
Total 3 (delta 0), reused 0 (delta 0)
remote: Updating references: 100% (1/1)
To http://XXXXX
 * [new branch]      sample2 -> sample2
ここで、Gitのブラウザ画面からプルリクを出そうとすると下のように遅れが発生していると警告がでる。

そこで、以下のように遅れを解消する。
・現在のoriginリモートリポジトリのmasterブランチにrebaseする
$ git rebase origin/master
First, rewinding head to replay your work on top of it...
Applying: Add b.txt

・sample1ブランチで作成したa.txtが取り込まれていることを確認
$ ls
README.md  a.txt b.txt

・再push。rebaseした後のpushはf(force)オプションを付ける必要がある。
$ git push origin sample2 -f
Counting objects: 3, done.
Delta compression using up to 4 threads.
Compressing objects: 100% (2/2), done.
Writing objects: 100% (3/3), 304 bytes | 0 bytes/s, done.
Total 3 (delta 0), reused 0 (delta 0)
remote: Updating references: 100% (1/1)
To http://xxxxx
 + b08565c...1910d84 sample2 -> sample2 (forced update)
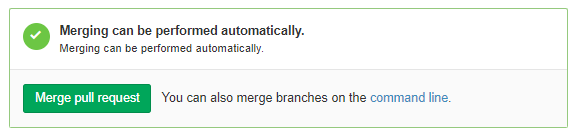
次はきちんと緑色になりました。
また、以下のように忘れずにローカルリポジトリのmasterブランチを最新化しておこう。
$ git checkout master
$ git pull
コンフリクトありの場合
コンフリクトが発生した場合の対応は初心者がつまずきやすいポイントです。
以下はさきほどと同様にsample1ブランチのコミットがmasterブランチへマージされたことで遅れが生じたsample2ブランチでrebaseを実施する例。
ただし、sample1ブランチとsample2ブランチで同一ファイルを編集し、コンフリクトを発生させる。
・派生ブランチ作成
$ git branch
* master
$ git branch sample1
$ git branch sample2

・sample1ブランチをチェックアウト
$ git checkout sample1
Switched to branch 'sample1'

・a.txtを編集してaddしてcommitしてpush
$ vi a.txt
$ cat a.txt
aaa
ccc
$ git add a.txt
$ git commit -m "Modify a.txt ccc"
[sample1 417b2d8] Modify a.txt ccc
 1 file changed, 1 insertion(+)
$ git push origin sample1
Counting objects: 6, done.
Delta compression using up to 4 threads.
Compressing objects: 100% (4/4), done.
Writing objects: 100% (6/6), 584 bytes | 0 bytes/s, done.
Total 6 (delta 0), reused 0 (delta 0)
remote: Updating references: 100% (1/1)
To http://XXXXX
 * [new branch]      sample1 -> sample1

・ブラウザ上でリモートリポジトリのマージ。sample2ブランチからすると、遅れている状態になる。

・sample2ブランチをチェックアウト
$ git checkout sample2

・a.txtを編集してaddしてcommitしてpush
 $ vi a.txt
 $ cat a.txt
 aaa
 ddd
$ git add a.txt
$ git commit -m "Modify a.txt ddd"
[sample2 58af6b0] Modify a.txt ddd
1 file changed, 1 insertion(+)
$ git push origin sample2
Counting objects: 3, done.
Delta compression using up to 4 threads.
Compressing objects: 100% (2/2), done.
Writing objects: 100% (3/3), 311 bytes | 0 bytes/s, done.
Total 3 (delta 0), reused 0 (delta 0)
remote: Updating references: 100% (1/1)
To http://XXXXX
  * [new branch]      sample2 -> sample2
この状態でPRをつくると下記のようにconflictが発生していることが分かる。

なぜならば、既にリモートのmasterブランチにマージされたsample1ブランチでa.txtを編集しており、その変更を取り込まないままsample2ブランチで同一ファイルのa.txtを異なる内容で編集したからである。
遅れとコンフリクトを以下のように解消する。
・rebase実行すると、コンフリクトのため失敗する。
$ git rebase origin/master
First, rewinding head to replay your work on top of it...
Applying: Modify a.txt ddd
Using index info to reconstruct a base tree...
M       a.txt
Falling back to patching base and 3-way merge...
Auto-merging a.txt
CONFLICT (content): Merge conflict in a.txt
error: Failed to merge in the changes.
Patch failed at 0001 Modify a.txt ddd
The copy of the patch that failed is found in: .git/rebase-apply/patch

When you have resolved this problem, run "git rebase --continue".
If you prefer to skip this patch, run "git rebase --skip" instead.
To check out the original branch and stop rebasing, run "git rebase --abort".

・ブランチ一覧確認。rebase中であることを確認。
$ git branch
* (no branch, rebasing sample2)
  master
  sample1
  sample2

・該当ファイルのコンフリクト解消。
$ vi a.txt
下記のようにdiffが表示される。
---------------------------vi編集画面----------------------------
  aaa
  <<<<<<< 3639ad3cc4a0208ba8201ad074accdb31d9348d8
  ccc
  =======
  ddd
  >>>>>>> Modify a.txt ddd
----------------------------------------------------------------

これを正しい状態に変更(今回は両者の変更を取り込むとする)
---------------------------vi編集画面----------------------------
aaa
ccc
ddd
----------------------------------------------------------------

・編集したファイルをadd
$ git add a.txt

・rebase完了
$ git rebase --continue
Applying: Modify a.txt ddd

・ブランチ一覧確認。rebase状態でなくなっていることを確認。
$ git branch
  master
  sample1
* sample2

・再push。rebaseした後のpushはf(force)オプションを付ける必要がある。
$ git push origin sample2 -f
Counting objects: 3, done.
Delta compression using up to 4 threads.
Compressing objects: 100% (2/2), done.
Writing objects: 100% (3/3), 318 bytes | 0 bytes/s, done.
Total 3 (delta 0), reused 0 (delta 0)
remote: Updating references: 100% (1/1)
To http://XXXXX
 + 58af6b0...0731fcc sample2 -> sample2 (forced update)
下記のとおりマージが可能になったため、マージ。

また、以下のように忘れずにローカルリポジトリのmasterブランチを最新化しておこう。
$ git checkout master
$ git pull
continueオプション
現在のrebaseを完了する。
コンフリクト解消した後に使うことが多いと思う。
iオプション
過去のコミットを以下のいずれかの方法で変更する。
また、行の順番を入れ替えることでコミットの順番を入れ換えることもできる。複数コミットを積んで作業をしている場合、あるコミットでの変更をたくさんしたければそのコミットを一番下に持ってくると、git commit --amendが使えるため楽。
- squash(s):1つ前のコミットに統合する。
- reword(r):コミットメッセージを修正する。
- edit(e):コミットを修正する。
- drop(d):コミットを削除する。
- pick(p):デフォルト。コミットをそのまま残す。
squash
以下は3つ前と4つ前のコミットを統合する例。
・どこまで戻りたいかを確認するためにログ一覧表示。今回は9dbf04f6と1910d84のコミットを統合してみる。
$ git log --oneline
7610802 Merge pull request #4 from XXXXX/sample2
0731fcc Modify a.txt ddd
3639ad3 Merge pull request #3 from XXXXX/sample1
417b2d8 Modify a.txt ccc
9dbf04f Add b.txt ★統合対象
37dcd2f Merge pull request #2 from nfv/sample2
1910d84 Add b.txt ★統合対象
(省略)

・rebase実行。
HEADから3つ前のコミットまでを確認してみる。(Merge pull requestはカウントしない)
viで編集画面がでてくる。git logとは逆で、下ほど新しいので要注意。

$ git rebase -i HEAD~3
---------------------------vi編集画面----------------------------
pick 1910d84 Add b.txt
pick 9dbf04f Add b.txt ★squash対象
pick 417b2d8 Modify a.txt ccc
pick 0731fcc Modify a.txt ddd

# Rebase 0b04b9f..7610802 onto 0b04b9f (4 command(s))
#
# Commands:
# p, pick = use commit
# r, reword = use commit, but edit the commit message
# e, edit = use commit, but stop for amending
# s, squash = use commit, but meld into previous commit
# f, fixup = like "squash", but discard this commit's log message
# x, exec = run command (the rest of the line) using shell
# d, drop = remove commit
#
# These lines can be re-ordered; they are executed from top to bottom.
#
# If you remove a line here THAT COMMIT WILL BE LOST.
#
# However, if you remove everything, the rebase will be aborted.
#
# Note that empty commits are commented out
----------------------------------------------------------------


・今回は下から3番目をsquashにして保存する。つまり、9dbf04fのコミットを1910d84のコミットに統合することになる。
---------------------------vi編集画面----------------------------
pick 1910d84 Add b.txt
squash 9dbf04f Add b.txt ★squashに変更
pick 417b2d8 Modify a.txt ccc
pick 0731fcc Modify a.txt ddd
(省略)
----------------------------------------------------------------

・さきほどとは別にviが新規表示される。
---------------------------vi編集画面----------------------------
# This is a combination of 2 commits.
# The first commit's message is:

Add b.txt

# This is the 2nd commit message:

Add b.txt

(省略)
----------------------------------------------------------------


・今回は2つめのコミットの方の行を削除して1つのコミットメッセージに統合する。
viは保存して終了。
---------------------------vi編集画面----------------------------
# This is a combination of 2 commits.
# The first commit's message is:

Add b.txt

(省略)
----------------------------------------------------------------

・logを確認すると、コミットが統合されて"Add b.txt"のコミットが1つだけになっていることが分かる。
また、コミットのUUIDが全て変更されている。
$ git log --oneline
ee17571 Modify a.txt ddd
9a8e17d Modify a.txt ccc
020e895 Add b.txt
(省略)
ちなみに一番上のコミットをsquashしようとすると下記の通りエラーになる。(仕様上一番上のコミットはsquashできない)
・rebase実行
$ git rebase -i HEAD~3
---------------------------vi編集画面----------------------------
pick 1910d84 Add b.txt
pick 9dbf04f Add b.txt
pick 417b2d8 Modify a.txt ccc
pick 0731fcc Modify a.txt ddd
(省略)
----------------------------------------------------------------

・一番上をsquashにして保存を試みる
---------------------------vi編集画面----------------------------
squash 1910d84 Add b.txt
pick 9dbf04f Add b.txt
pick 417b2d8 Modify a.txt ccc
pick 0731fcc Modify a.txt ddd
(省略)
----------------------------------------------------------------

・下記のように警告が表示されて失敗する。
Cannot 'squash' without a previous commit
reword
以下は1つ前と2つ前のコミットメッセージを修正する例。
・ログ一覧確認
$ git log --oneline
ee17571 Modify a.txt ddd
9a8e17d Modify a.txt ccc
020e895 Add b.txt
(省略)

・2つ前のコミットまでに関してrebase開始
$ git reabse -i HEAD@~2
pick 9a8e17d Modify a.txt ccc
pick ee17571 Modify a.txt ddd
(省略)

・2つともrewordに変更して保存。
reword 9a8e17d Modify a.txt ccc
reword ee17571 Modify a.txt ddd
(省略)

・1つ目のコミットがviで表示される。
-------------------------------------------------------
Modify a.txt ccc
(省略)
-------------------------------------------------------

・コミットメッセージを変更して保存。
-------------------------------------------------------
Modify a.txt of adding ccc
(省略)
-------------------------------------------------------

・続いて2つ目のコミットがviで表示される。
-------------------------------------------------------
Modify a.txt ddd
(省略)
-------------------------------------------------------

・これも同様に編集して保存。
-------------------------------------------------------
Modify a.txt of adding ddd
(省略)
-------------------------------------------------------

・以下のような実行結果が表示され、rebaseが完了となる。
[detached HEAD 70d4f9b] Modify a.txt of adding ccc
 Date: Tue Jun 5 18:38:27 2018 +0900
 1 file changed, 1 insertion(+)
[detached HEAD e8da03d] Modify a.txt of adding ddd
 Date: Tue Jun 5 18:44:54 2018 +0900
 1 file changed, 1 insertion(+)
Successfully rebased and updated refs/heads/master.

・logを確認するとコミットメッセージがちゃんと変更されていることが確認できる。
$ git log --oneline
e8da03d Modify a.txt of adding ddd ★変更されている
70d4f9b Modify a.txt of adding ccc ★変更されている
(省略)
edit
以下は2つ前のコミットを修正する例。
$ git log --oneline
e8da03d Modify a.txt of adding ddd
70d4f9b Modify a.txt of adding ccc
(省略)

・rebase開始
$ git reabse -i HEAD@~2
pick 70d4f9b Modify a.txt of adding ccc ★変更対象
pick e8da03d Modify a.txt of adding ddd

# Rebase 020e895..e8da03d onto 020e895 (2 command(s))

・70d4f9bのコミットをeditに変更して保存。
edit 70d4f9b Modify a.txt of adding ccc ★editに変更
pick e8da03d Modify a.txt of adding ddd

# Rebase 020e895..e8da03d onto 020e895 (2 command(s))

・ファイル編集してcommit
$ cat a.txt
aaa
ccc
$ vi a.txt
aaa
cccccc
$ git add a.txt
$ git commit --amend
Modify a.txt of adding cccccc

・今回は下記のようにこのままrebaseを終了しようとすると怒られた。
もともと今回修正しようとしたコミットの後にa.txtに関する別のコミット(e8da03d Modify a.txt of adding ddd)がたまたま存在したからだ。
$ git rebase --continue
error: could not apply e8da03d... Modify a.txt of adding ddd

When you have resolved this problem, run "git rebase --continue".
If you prefer to skip this patch, run "git rebase --skip" instead.
To check out the original branch and stop rebasing, run "git rebase --abort".
Could not apply e8da03d2e82f163705cfb5c2b26687fe084bccd9... Modify a.txt of adding ddd

・コンフリクト内容を確認してみる。
$ cat a.txt
aaa
<<<<<<< HEAD
cccccc
=======
ccc
ddd
>>>>>>> e8da03d... Modify a.txt of adding ddd

・該当部分を修正してaddしてcommit
$ vi a.txt
aaa
cccccc
ddd
$ git add a.txt
$ git commit --amend
[detached HEAD e054ea0] Modify a.txt of adding cccccc
 Date: Tue Jun 5 18:38:27 2018 +0900
 1 file changed, 2 insertions(+)

・rebase完了
$ git rebase --continue
Successfully rebased and updated refs/heads/master.

・ファイルが編集されている(コミット内容そのものが変更されている)ことを確認
$ cat a.txt
aaa
cccccc
ddd
abortオプション
現在実行中のrebaseを中断して、rebase実行前に戻る。
・rebase中の状態であることを確認
$ git branch
* (no branch, rebasing master)
  master
  sample1
  sample2

・abortで中断する
$ git rebase --abort

・ブランチ確認。rebase状態から抜けたのが分かる。
$ git branch
* master
  sample1
  sample2
rebaseとmergeの違い
一言でいうとコミット履歴が異なる。
mergeは統合ブランチが1つ増えるが、rebaseは自分で綺麗にコミット履歴をまとめることができる。
どちらを採用すべきかはチームの方針により異なる。
pull
最新のリモートリポジトリの内容をローカルリポジトリに反映する。
オプションなし
fetchでリモートリポジトリの最新の状態をローカルリポジトリのリモート追跡ブランチにダウンロードして、mergeで最新化されたリモート追跡ブランチの内容をローカルのブランチに反映するという作業をpullの1コマンドで自動化する。
つまり、「pull = fetch + merge」である。
・sampleブランチにいることを確認
$ git branch
  master
* sample

・a.txtを作ってaddしてcommitしてpush
$ touch a.txt
$ git add a.txt
$ git commit -m "Add a.txt"
$ git push origin sample

・リモートリポジトリ側でmasterへsampleブランチをマージ。

・masterブランチへ移動
$ git checkout master

・pull実行。ローカルのmasterブランチとリモートのmasterブランチで乖離があるため、変更部分をローカルに取り込むことになる。
$ git pull
Updating 829d6f3..2612d8c
Fast-forward
a.txt | 0
1 files changed, 1 insertion(+)
create mode 100644 a.txt
rebaseオプション
fetchでリモートリポジトリの最新の状態をローカルのリモート追跡ブランチにダウンロードして、rebaseで最新化されたリモート追跡ブランチの内容をローカルのブランチに反映するという作業が1コマンドで自動化される。
つまり、「pull --rebase = fetch + rebase」である。
オプションなしと比べた違いは統合をmergeで行うかrebaseで行うかになる。
つまり、non-fast-forwardの場合、rebaseオプションをつけてpullするとマージコミットが積まれずにコミット履歴が綺麗になるというメリットがある。
世の中には、pullをオプションなしで使うなんてありえなくて、全部--rebaseオプションで実行すべきであると主張される人もいる。
・sampleブランチにいることを確認
$ git branch
  master
* sample

・a.txtを作ってaddしてcommitしてpush
$ touch a.txt
$ git add a.txt
$ git commit -m "Add a.txt"
$ git push origin sample

・リモートリポジトリ側でmasterへsampleブランチをマージ。

・masterブランチへ移動
$ git checkout master

・pull実行。
$ git pull --rebase
remote: Counting objects: 1, done
remote: Finding sources: 100% (1/1)
remote: Total 1 (delta 0), reused 0 (delta 0)
Unpacking objects: 100% (1/1), done.
From http://XXXXX
   2612d8c..09fa8fa  master     -> origin/master
First, rewinding head to replay your work on top of it...
Fast-forwarded master to 09fa8fa1058236675e702efec9e529bc3c81bfee.
stash
まだローカルコミットしていない内容(ステージングにいるかどうかは関係なし)を一時的に避難する。
例えば、いますぐ別のブランチで作業したいことができたけど現在の作業内容をローカルコミットしたくないときとか、作業ブランチを間違えたときに今までの作業(ローカルコミットしていないものに限る)を正しいブランチに適用したいときなどに使う。
- stash: stash実行
- stash list: stash履歴一覧
- stash show: stash履歴詳細
- stash apply: stashしたのものを戻す (履歴から削除しない)
- stash pop: stashしたのものを戻す (履歴から削除する)
- stash drop: stash削除(履歴も削除)
stashしたものを戻す方法はapplyとpopの2種類が存在し、applyはstashした内容がstashの履歴にはそのまま残る。popはstashした内容がstashの履歴から消える。
・sample1ブランチにいることを確認
$ git branch
  master
* sample1

・a.txtを作成してadd
$ touch a.txt
$ git add a.txt

・status確認。ステージング環境にa.txtが存在すること分かる。
$ git status
On branch sample1
Changes to be committed:
  (use "git reset HEAD <file>..." to unstage)

        new file:   a.txt

・stash実行
$ git stash
Saved working directory and index state WIP on sample1: b1eca08 Initial commit
HEAD is now at b1eca08 Initial commit

・status確認。ステージング環境からa.txtが外れた。
$ git status
On branch sample1
nothing to commit, working directory clean

・stash履歴一覧確認。stash前のcommitが表示される。
$ git stash list
stash@{0}: WIP on sample1: b1eca08 Initial commit

・stash詳細確認。stashしたa.txtを確認。
$ git stash show stash@{0}
 a.txt | 1 +
 1 file changed, 1 insertion(+)

・sample2ブランチを作成してチェックアウト
$ git checkout -b sample2
Switched to a new branch 'sample2'

・sample2ブランチ上でstashしたものを復活する(apply)
$ git stash apply stash@{0}
On branch sample2
Changes to be committed:
  (use "git reset HEAD <file>..." to unstage)

        new file:   a.txt

・stashの履歴はそのままであることを確認
$ git stash list
stash@{0}: WIP on sample1: b1eca08 Initial commit

・もういちどstash実行
$ git stash
Saved working directory and index state WIP on sample2: b1eca08 Initial commit
HEAD is now at b1eca08 Initial commit

・stash履歴一覧確認。履歴が1つ増えている。
$ git stash list
stash@{0}: WIP on sample2: b1eca08 Initial commit
stash@{1}: WIP on sample1: b1eca08 Initial commit

・stashしたものを復活する(pop)
$ git stash pop stash@{0}
On branch sample2
Changes to be committed:
  (use "git reset HEAD <file>..." to unstage)

        new file:   a.txt

・今度はpopなのでstashの履歴は一つ消えたことが分かる
$ git stash list
stash@{0}: WIP on sample1: b1eca08 Initial commit

・stash履歴を削除
$ git stash drop stash@{0}
Dropped stash@{0} (b3517f5e25fbbb27b36b7c36191b06f15e41ca98)

・stash履歴に何もないことを確認
$ git stash list
cherry-pick
他ブランチの特定のコミットを現在のブランチに取り込む。
例えば、「間違えて別のブランチで作業してコミットまでしちゃった」とやらかした時に、本来のブランチにそのコミットを取り込むことができる。
・ブランチ一覧確認。sample2にチェックされている。
$ git branch
  master
  sample1
* sample2

・a.txtを作成してaddしてcommit
$ touch a.txt
$ git add a.txt
$ git commit -m "Add a.txt"
[sample2 dd70054] Add a.txt
 1 file changed, 1 insertion(+)
 create mode 100644 a.txt

 ・a.txtに関するコミットが増えていることを確認
 $ git log
 commit dd70054d84d6da3583e01097db09793c987ae6fe
 Author: XXXXX
 Date:   Tue Jun 12 20:07:00 2018 +0900

     Add a.txt

・sample1ブランチにチェックアウト
 $ git checkout sample1
 Switched to branch 'sample1'

 ・ファイル一覧確認。sample1ブランチにはa.txtは当然ながら無いことを確認。
 $ ls
 README.md

 ・cherry-pick実行。sample2ブランチのa.txtに関するコミットをsample1ブランチに取り込む。
 $ git cherry-pick dd70054d84d6da3583e01097db09793c987ae6fe
 [sample1 3698bc0] Add a.txt
 Date: Tue Jun 12 20:07:00 2018 +0900
 1 file changed, 1 insertion(+)
 create mode 100644 a.txt

 ・a.txtがsample1ブランチに取り込まれていることを確認。
 $ ls
 README.md  a.txt
mv
ファイル名変更する。
linuxのmvコマンドは単なるファイル名変更だけだが、gitのmvコマンドはそれだけでなく新しいファイル名でファイルをステージング環境にaddして、古いファイルをステージング環境から外してくれるところまでやってくれる。
$ git mv a.txt a_new.txt

$ git status
On branch sample
Changes to be committed:
  (use "git reset HEAD <file>..." to unstage)

        renamed:    a.txt -> a_new.txt
rm
ファイル削除する。
linuxのrmコマンドは単なるファイル削除だけだが、gitのrmコマンドはステージング環境上の情報もまとめて削除してくれる。
・ファイル自身もインデックス環境からも削除
$ git rm a.txt

・インデックス環境からのみ削除(ファイル自身は残る)
$ git rm --cached a.txt
grep
文字列検索
リポジトリ内でヒットしたファイル名と該当行を出力する。
$ git grep aaa
a.txt:aaa
文字列置換
リポジトリ内でヒットした文字列を置換する。
$ git grep -l <置換前文字列> | xargs perl -pi -e 's@<置換前文字列>@<置換後文字列>@g'
$ git grep -l aaa | xargs perl -pi -e 's@aaa@AAA@g'

$ git grep AAA
a.txt:AAA
ls-files
リポジトリのファイル行数を確認する
$ git ls-files | xargs -n1 git --no-pager blame -w | wc -l
自分の成果を感じたいのであれば、これ。
$ git ls-files | xargs -n1 git --no-pager blame -f -w|grep <ユーザ名> |wc -l
config
コンフィグ設定一覧確認
$ git config --global --list
エディタをvimに設定する
デフォルトでコミットログのエディタがnanoに設定されていてうざい場合はvimに設定する。
$ git config --global core.editor 'vim -c "set fenc=utf-8"'
プロキシ設定
$ git config --global http.proxy http://<proxy_ip>:<proxy_port>
ユーザ名とメールアドレス設定
$ git config --global user.name <username>
$ git config --global user.email <mail_address>
.gitignoreファイル
Gitで管理したくないファイルやディレクトリを定義するファイル。
# exeファイルは無視
*.exe

# tmp.exeファイルは無視しない
!tmp.exe

# workディレクトリは無視
work/
既にあるgitignoreサンプル
既に先人が用意してくれているものがあるので、それらをベースに使うのが効率的かと思う。
gitignoreサンプル
windowsの場合の注意
Windowsでは.(ドット)始まりのファイルは通常作れないが、ファイルの末尾に.(ドット)をつけることで作成できる。(つまり、.gitignore.ファイルを作る。)
.gitkeepファイル
空ディレクトリをGitで管理できるようにするファイル。
空ディレクトリはそのままではGitで管理されないため、管理対象にしたい空ディレクトリがある場合は、対象ディレクトリ内に.gitkeepファイルを作成する。
ファイル名は.gitkeepでなくても構わないが、通例.gitkeepとする。
windowsの場合の注意
.gitignoreと同様。
(番外編)私の開発中の主な流れ
自分の中での開発中のよくある流れとコマンドをメモっておきます。
前提として、developブランチから切っていくスタイル。
【Step1】リモートリポジトリ作成
GitのWEB-UIで作成
【Step2】clone
リモートリポジトリをローカルにclone
$ git clone <url>
【Step3】ローカルでブランチきる
ブランチの命名規則はチームやコミュニティそれぞれの流儀があるためそれに従う。
タスク番号とか書いてあれば分かりやすいと思う。
$ git checkout -b <branch name>
【Step4】ファイル編集
機能実装などそのブランチで必要なファイル編集をワーキングツリー上で行う。
【Step5】変更ファイルの確認
現在ブランチでaddやコミットが実施されていないファイルの一覧を表示。
$ git status
【Step6】ステージング環境に追加
ワーキングツリー上で編集したファイルをステージング環境に追加する。
変に-allオプションとかつかわずに焦らず1つ1つaddしていく方がいいと思う。
$ git add <file>
【Step7】ローカルコミット
コミットメッセージの書き方はチームやコミュニティそれぞれの流儀があるためそれに従う。
$ git commit -m "<commit message>"
【Step8】最新リモートリポジトリの内容をローカルリポジトリに適用
pushの前に最新状態があれば取得しておく。
$ git pull --rebase origin develop
(上記で競合が発生した場合)
競合したファイルの修正
競合したファイルを適切に修正する。
他人のコミット内容を変更することになるので修正内容はメンバと確認した方がよい場合もある。
修正したファイルをステージング環境へ移動
$ git add <修正済みファイル>
rebaseを完了する
$ git rebase --continue
【Step9】リモートリポジトリにアップロードする
$ git push origin <local branch>
【Step10】pull request
GitのWEB-UIでレビューアにpull request送信。
【Step11】(必要あれば)レビュー対応してマージまで繰り返す
pull requestに関していただいたレビューに対応する。
Step4から終わるまで繰り返し、最終的にリモートリポジトリ上でマージされる。
【Step12】ローカルを最新化
リモートリポジトリ上でマージされると、コミットが進むため、ローカルの情報をリモートリポジトリに合わせるために最新化する。
$ git checkout develop
$ git pull
(番外編)こういう時どうすればいいの?
まだリモートでMGされていないブランチの内容を使って新規開発したい場合
集団で開発していると、「Aさんの開発している機能を使って、別の機能を作りたいんだよなー。でも、まだMGされるのに時間かかりそうだなー」とか「私のあのPRまだapproveされないけど、あれの続きで開発したいんだよなー。」とか結構あると思います。
作業の流れは以下です。
- 対象ブランチにcheckout
- 新規ブランチ作成
- 新規ブランチ上で開発
- もし開発途中で派生元ブランチがリモートで修正されたら
pull --rebase origin feature/XXXなどで最新情報を反映する
- もし開発途中で派生元ブランチがリモートで修正されたら
- PRだす
- この時、派生元ブランチがまだリモートでMGされていなければbaseブランチを派生元ブランチとする
- MGされているのであればいつも通りbaseブランチはdevelopとする
リモートリポジトリで進んだ内容をローカルのfeatureブランチに反映したい
例えば、Web-UI上でSuggestionをCommitしたり、CIでpushしたものが自動修正されることにより、リモートリポジトリに比べてローカルリポジトリのfeatureブランチのCommitの進みが遅れているケースがあります。また、チームメンバのPRをRVするためにローカルで対象ブランチをcheckoutしていて、RVの途中でリモートレポジトリが更新されるケースもあります。そのような時に、ローカルをリモートに追従するには以下のコマンドを実行します。
$ git pull --rebase origin <feature_branch>
Gitの運用面に関してチームで話し合っておくべきだなと思う項目
- ブランチモデル
- ブランチ単位
- ブランチ命名規則(特にfeatureブランチやtopicブランチ)
- コミットメッセージの書き方
- pull requestの書き方
- テンプレート用意してもいいかも
- rebaseとmergeとpullの宗教論