Androidエンジニアの私が、iOSを開発したいと思いせっかくなので
両方開発できるXamarinに手を出したので色々まとめていきます(☝ ՞ਊ ՞)☝
作成したアプリはビューが3つしかない簡単なアプリですので、
初めてXamarinに触れる方、プログラム初心者が対象です!!
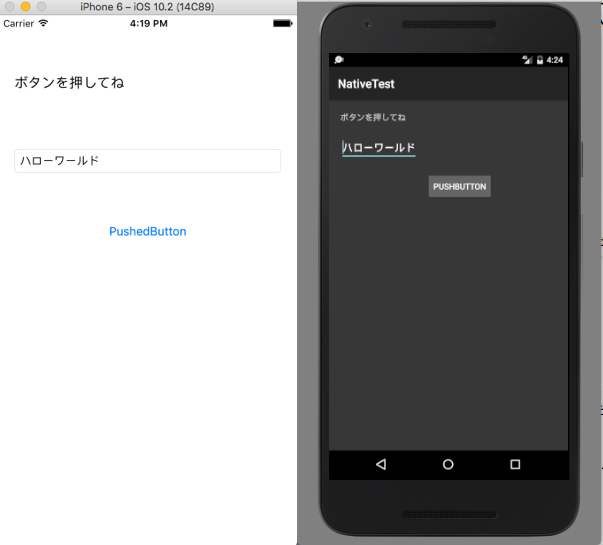
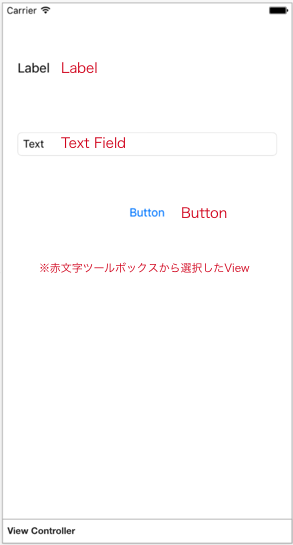
こんな感じのアプリです☜(◔◞౪◟◔)☞
1. インストール
下記URLからインストールできます!
https://store.xamarin.com/
私はmacを使用しているので、Xamarin Studioをインストールしました☜(◔◞౪◟◔)☞
Windowsの方はVisual Studioをインストールするみたいです
※インストールの手順は省きます(՞ټ՞) さーせん
2. プロジェクトの作成
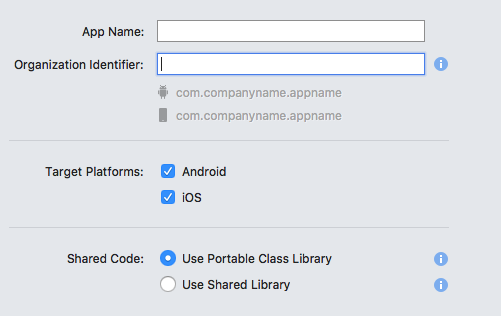
プロジェクト作成画面説明
Shift + ⌘ + N ➡︎ 新規プロジェクトを開発する画面にいきます
UIからだと「新しいソリューションを開く」をクリックすれば大丈夫です
※ Xamarin.Formsとは
android,iosのUI部分を共通で書けるようにしたフレームワーク
※ Native(iOS,Android)とは
android,iosのUIをそれぞれ別に書く、しかしそれぞれのデザインガイドに沿った
細かいレイアウトが作成できる
今回はNativeで開発していこうと思います☚(꒪ټ꒪☚)
プロジェクト作成手順
Native(iOS,Android)
Single View App
にフォーカス当てて ➡︎ 次へボタン押す
App Name, Organization Identifierは任意で大丈夫です
今回はApp Name : NativeTestで作成します☚(꒪ټ꒪☚)
Target Platformsは両方開発するならチェックしておきましょう
Shared CodeはUse Portable Class Libraryがオススメです
全て入力したら次へボタンを押す
新しいプロジェクトを構成します画面に移動します
全てデフォルトで良ければ、作成ボタンを押す
あとはビルドをひたすら待ちましょうʅ( ՞ਊ՞)ʃ
これで新規プロジェクトを作成できました!!
ここまでは簡単だー✌( ≖。≖ )✌
3. 開発
ここからはお待ちかねの開発を行っていこうと思います✨
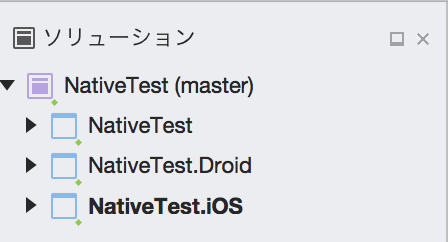
画面はこんな感じです
NativeTest ➡︎ 共通ロジックを書く
NativeTest.Droid ➡︎ Androidのレイアウトなどを書く
NativeTest.iOS ➡︎ iOSのレイアウトなどを書く
iOS
iosのレイアウトは2通りありコードでゴリゴリと、storyboardのやり方があるみたいです
今回はstoryboardで作っていこうと思います<( ΄ ^◞౪◟^ ` )>
1. 不要なコードの削除
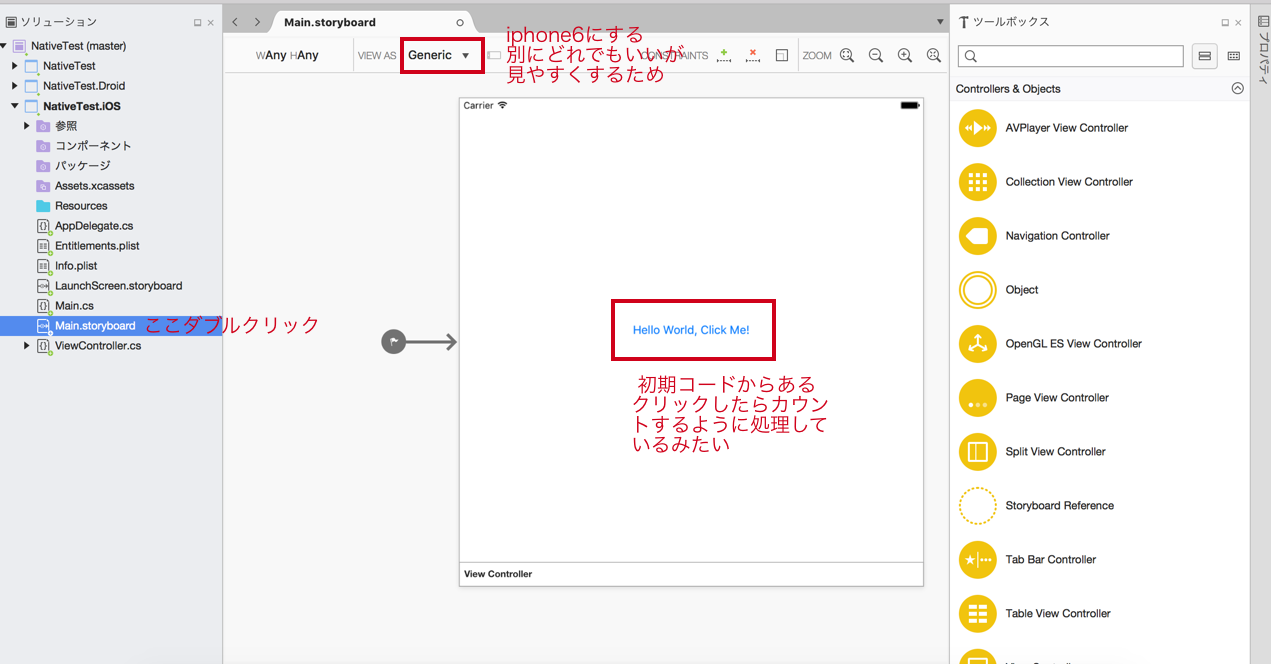
画面はこんな感じです!
まずはボタンがいらないので削除します!
storyboardからボタンを削除したら、次はコードを削除します
コメントアウトしているコードを削除してください
これで空のプロジェクトの出来上がり!!
using System;

using UIKit;

namespace NativeTest.iOS
{
    public partial class ViewController : UIViewController
    {
        // int count = 1;

        public ViewController(IntPtr handle) : base(handle)
        {
        }

        public override void ViewDidLoad()
        {
            base.ViewDidLoad();

            // Perform any additional setup after loading the view, typically from a nib.
            // hello worldのボタンなので削除する
            // Button.AccessibilityIdentifier = "myButton";
            // Button.TouchUpInside += delegate
            // {
                // var title = string.Format("{0} clicks!", count++);
                // Button.SetTitle(title, UIControlState.Normal);
            // };
            // hello worldのボタンなので削除する
        }

        public override void DidReceiveMemoryWarning()
        {
            base.DidReceiveMemoryWarning();
            // Release any cached data, images, etc that aren't in use.
        }
    }
}
2. ビューの作成(配置)
storyboardでレイアウトを作成していきます
ツールボックスから配置したいビューをドラッグ&ドロップで持ってきます
大まかな配置は、UI操作だけで出来ちゃいます!
Androidエンジニアの自分としては超絶楽チンです(//΄◞◟‵//)♡
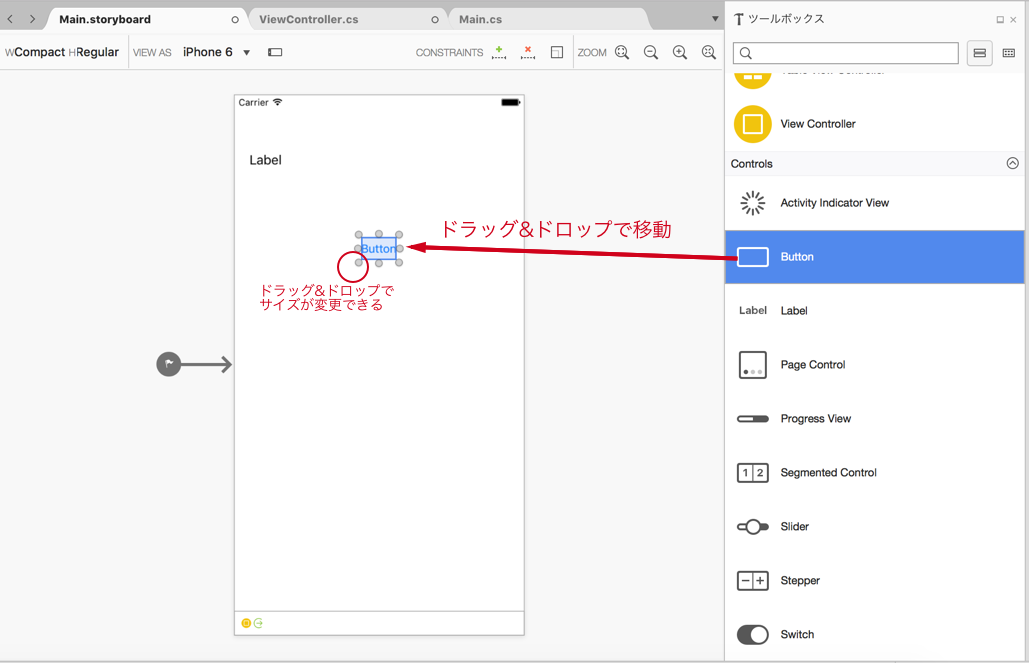
レイアウトを配置しました!!
AutoLayoutとか色々あるのですが、、、そのあたりはスルーします
また時間あるときに書こうと思います(⑅∫°ਊ°)∫
3. ビューの作成(プロパティ)
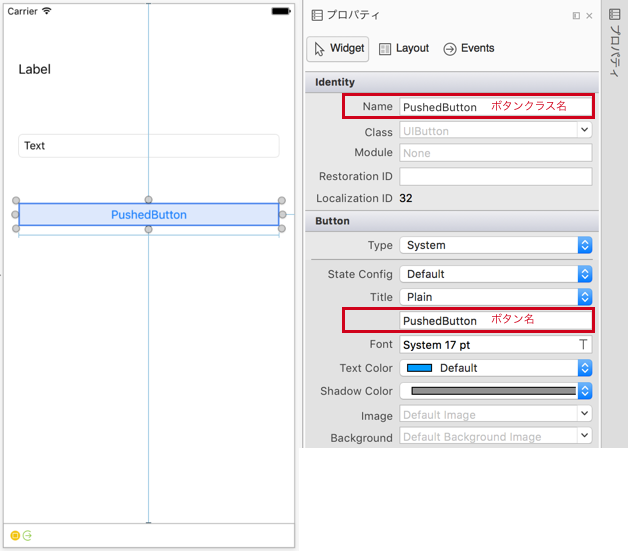
storyboardにビューを配置するだけでは文字の位置、クラス名、イベント処理やら、、、何もできないのでプロパティに細かい値を設定していきます
ボタンのクラス名、タイトルをプロパティから設定しています
その他にも様々な値を設定できるので気になる方は調べてください(՞ټ՞) さーせん
4. コード(ファイルの作成、説明)
いよいよコードを書いていきます!
めげずに頑張っていきましょー☜(◔◞౪◟◔)☞
下記ファイルを修正していきますー♪
StringUtil.cs
ViewController.cs
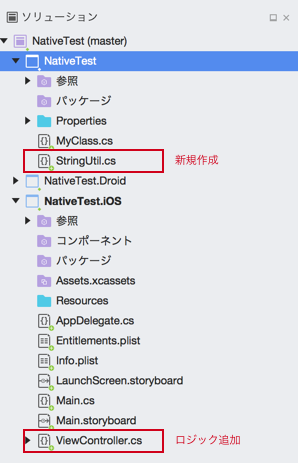
StringUtil.csは新規ファイル作成です
NativeTestの階層で
追加
⬇︎
新しいファイル
⬇︎
空のクラスを選択し
名前:StringUtilを記述する(クラス名は任意なのでなんでも良い)
新規
⬇︎
新規ファイルの作成ができましたー✌( ≖。≖ )✌
ViewController.csは既存のファイルでViewを操作しているクラスです
修正内容は後ほど楽しみに✌( ≖。≖ )✌
5. コード(修正内容)
今度こそ、コードの修正です
長かった。。。。。ʅ( ՞ਊ՞)ʃ≡ ≡ʅ( ՞ਊ՞)ʃ きええええええええええぃ
まずは、StringUtil.cs
なんだこの程度と思った人は次にいってください!
とりあえずC#で空文字チェックをしているだけのクラスです
iOS,Android両方で使用できます
using System;
namespace NativeTest
{
    public static class StringUtil
    {

        // 空文字チェック
        public static string emptyCheck(String checkStr)
        {
            if (string.IsNullOrWhiteSpace(checkStr))
            {
                return "空文字";
            }

            return checkStr;
        }
    }
}
次に、ViewController.cs
なんだこの程度と思った人は次にいってください!
ボタンのタッチイベント後
⬇︎
テキストフィールドから文字列を取得
⬇︎
共通ロジックで空文字チェック
⬇︎
ラベルに文字列をセット
の流れです
ちなみにViewDidLoad()とは、iOSのライフサイクルの処理で
初期設定を行う場所みたいです
AndroidでいうonCreate()みたいなやつですかねー
詳しくは公式サイトを見てください(՞ټ՞) さーせん
public override void ViewDidLoad()
{
    base.ViewDidLoad();

    // ボタンのタッチイベント
    PushedButton.TouchUpInside += (object sender, EventArgs e) =>
    {
        // TextFieldから文字列を取得
        string str = PushedTextField.Text;
        // ios, android 共通ロジックを使用
        str = StringUtil.emptyCheck(str);
        // Labelに文字列をセット
        PushedLabel.Text = str;
    };

}
コードは以上です!
短いと思った人は、バリバリ実装していけると思うのでXamarin街道を一緒に突き進みましょう♪
Android
Androidのレイアウトは2通りありコードでゴリゴリと、.axmlファイルでゴリゴリとのやり方があります
今回は.axmlで作っていこうと思います<( ΄ ^◞౪◟^ ` )>
1. 不要なコードの削除
AndroidのレイアウトファイルはMain.axml
iOSと同じく不要なコード削除する
コメントアウト部分がボタンですので削除しましょう
<?xml version="1.0" encoding="utf-8"?>
<LinearLayout xmlns:android="http://schemas.android.com/apk/res/android"
    android:orientation="vertical"
    android:layout_width="match_parent"
    android:layout_height="match_parent">
    <!--<Button
        android:id="@+id/myButton"
        android:layout_width="match_parent"
        android:layout_height="wrap_content"
        android:text="@string/hello" />-->

</LinearLayout>
Main.axmlからボタンを削除したら、次はコードを削除します
コメントアウトしているコードを削除してください
これで空のプロジェクトの出来上がり!!
using Android.App;
using Android.Widget;
using Android.OS;

namespace NativeTest.Droid
{
    [Activity(Label = "NativeTest", MainLauncher = true, Icon = "@mipmap/icon")]
    public class MainActivity : Activity
    {
        int count = 1;

        protected override void OnCreate(Bundle savedInstanceState)
        {
            base.OnCreate(savedInstanceState);

            // Set our view from the "main" layout resource
            SetContentView(Resource.Layout.Main);

            // Get our button from the layout resource,
            // and attach an event to it

            // ここがボタンの処理 削除
            //Button button = FindViewById<Button>(Resource.Id.myButton);
            //button.Click += delegate { button.Text = string.Format("{0} clicks!", count++); };
            // ここがボタンの処理 削除
        }
    }
}
2. ビューの作成(配置)
Main.axmlでレイアウトを作成していきます
ゴリゴリ書きます!
Androidエンジニアの自分としてはいつも通りの手順でしたー(//΄◞◟‵//)♡
iOSで言うプロパティはここで定義できます!
<?xml version="1.0" encoding="utf-8"?>
<LinearLayout xmlns:android="http://schemas.android.com/apk/res/android"
    android:orientation="vertical"
    android:layout_width="match_parent"
    android:layout_height="match_parent">

    <TextView
            android:id="@+id/text_view"
            android:layout_marginTop="20dp"
            android:layout_marginLeft="20dp"
            android:layout_width="wrap_content"
            android:layout_height="wrap_content"
            android:text="ボタンを押してね"/>

    <EditText
            android:id="@+id/edit_text"
            android:layout_marginTop="20dp"
            android:layout_marginLeft="20dp"
            android:layout_width="wrap_content"
            android:layout_height="wrap_content"
            android:text="ハローワールド"/>

    <Button
            android:id="@+id/button"
            android:layout_marginTop="20dp"
            android:layout_marginLeft="20dp"
            android:layout_width="wrap_content"
            android:layout_height="wrap_content"
            android:text="PushButton"
            android:layout_gravity="center_horizontal"/>

</LinearLayout>
3. コード(ファイルの作成、説明)
コードを書いていきます!
頑張っていきましょー☜(◔◞౪◟◔)☞
下記ファイルを修正していきますー♪
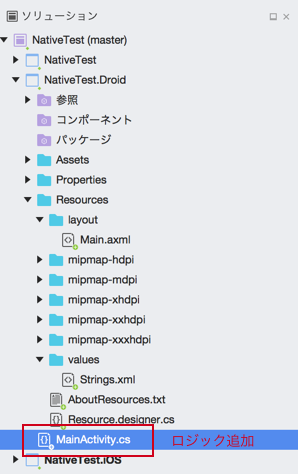
MainActivity.cs
MainActivity.csは既存のファイルでViewを操作しているクラスです
修正内容は後ほど楽しみに✌( ≖。≖ )✌
4. コード(修正内容)
コードの修正です
Androidまで長かった。。。。。ʅ( ՞ਊ՞)ʃ≡ ≡ʅ( ՞ਊ՞)ʃ きええええええええええぃ
MainActivity.cs
なんだこの程度と思った人は次にいってください!
ボタンのタッチイベント後
⬇︎
エディットテキストから文字列を取得
⬇︎
共通ロジックで空文字チェック
⬇︎
テキストビューに文字列をセット
の流れです
ライフサイクルを詳しく知りたい人は公式サイトを見てください(՞ټ՞) さーせん
protected override void OnCreate(Bundle savedInstanceState)
        {
            base.OnCreate(savedInstanceState);

            // Set our view from the "main" layout resource
            SetContentView(Resource.Layout.Main);

            // Get our button from the layout resource,
            // and attach an event to it

            // レイアウトの定義
            TextView textView = FindViewById<TextView>(Resource.Id.text_view);
            EditText editText = FindViewById<EditText>(Resource.Id.edit_text);
            Button button = FindViewById<Button>(Resource.Id.button);

            // ボタンのクリックイベント
            button.Click += delegate {
                // EditTextから文字列を取得
                string str = editText.Text;
                // ios, android 共通ロジックを使用
                str = StringUtil.emptyCheck(str);
                // TextViewに文字列をセット
                textView.Text = str;
            };
        }
コードは以上です!
短いと思った人は、バリバリ実装していけると思うのでXamarin街道を一緒に突き進みましょう♪
以上です(⑅∫°ਊ°)∫
これからもXamarinで開発していこうと思います!!
4. iOS,Androidの実装を終えて
共通ロジックを一つにまとめれるのは便利だと思いました
ただ、iOS,Androidについてどちらも詳しくないと学習コストが高いと思います!
複数人開発だとロジック、iOSレイアウト、Androidレイアウトと完全に分離できるので
そこはやりやすいのかなーと思います(⑅∫°ਊ°)∫
さぁ皆さんもXamarinを始めませんか??
参考URL
・Xamarin公式
https://www.xamarin.com/
・Xamarin界のアイドルちょまどさんの記事 かなり丁寧に書いているので分かりやすい!
https://blogs.msdn.microsoft.com/chomado/
・Androidのビルドができない時に助かりました!感謝です。
http://loumo.jp/wp/archive/20161209220056/
