はじめに
今回は、ImageViewに表示した画像のタップした場所からRBG値を取ってみたいと思います。
デモ動画

やること
- ImageViewに表示した画像のタプした場所からRGB値を取り、NavigationBarに表示する。
やらないこと
- 画像の拡大、縮小
- タップした場所の表示
環境
- Swift4
- Xcode 9.4.1
StoryBoard

左上にカメラボタンを配置するためにNavigation Controllerを設置。
それと画像を表示するImageVIewを置きます。その際、
- ImageVIewの「User Interaction Enabled」にチェックマークをつけましょう。
- Content Modeを「Aspect Fit」に変更。
- 「Tap Gesture Recognizer」をImageVIew上に設置。(設置すると下の画像の青い四角のアイコンが追加されます。)

コード
import UIKit

class TapViewController: UIViewController {

    @IBOutlet var imageView: UIImageView!
    var image = UIImage()
    //表示されている画像のタップ座標用変数
    var tapPoint = CGPoint(x: 0, y: 0)

    override func viewDidLoad() {
    }

    override func didReceiveMemoryWarning() {
        super.didReceiveMemoryWarning()
        // Dispose of any resources that can be recreated.
    }

    //imageviewをタップした時に色を判別
    @IBAction func getImageRGB(_ sender: UITapGestureRecognizer) {

        guard imageView.image != nil else {return}

        //タップした座標の取得
        tapPoint = sender.location(in: imageView)

        let cgImage = imageView.image?.cgImage!
        let pixelData = cgImage?.dataProvider!.data
        let data: UnsafePointer = CFDataGetBytePtr(pixelData)
        //1ピクセルのバイト数
        let bytesPerPixel = (cgImage?.bitsPerPixel)! / 8
        //1ラインのバイト数
        let bytesPerRow = (cgImage?.bytesPerRow)!
        print("bytesPerPixel=\(bytesPerPixel) bytesPerRow=\(bytesPerRow)")
        //タップした位置の座標にあたるアドレスを算出
        let pixelAd: Int = Int(tapPoint.y) * bytesPerRow + Int(tapPoint.x) * bytesPerPixel
        //それぞれRGBAの値をとる
        let r = Int( CGFloat(data[pixelAd]))
        let g = Int( CGFloat(data[pixelAd+1]))
        let b = Int( CGFloat(data[pixelAd+2]))
        let a = CGFloat(Int( CGFloat(data[pixelAd+3])/CGFloat(255.0)*100)) / 100

        print([r,g,b,a])
        //navigationbarに結果を表示
        let R = "R:" + String(Int(r))
        let G = " G:" + String(Int(g))
        let B = " B:" + String(Int(b))
        let A = " A:" +  String(format: "%.1f", a)
        navigationItem.title = R + G + B + A
    }


}


//画像を選択
extension TapViewController: UIImagePickerControllerDelegate, UINavigationControllerDelegate {

    //画像を選んだ時の処理
    func imagePickerController(_ picker: UIImagePickerController, didFinishPickingMediaWithInfo info: [String : Any]) {

        let selectedImage = info[UIImagePickerControllerOriginalImage] as! UIImage
        //サイズを圧縮する
        // let resizedImage = selectedImage.scale(byFactor: 0.4)

        image = selectedImage

        var imageHeight = image.size.height
        var imageWidth = image.size.width

        let navigationBarHeight = navigationController?.navigationBar.frame.height
        let width = self.view.frame.width
        let height = self.view.frame.height
        let centerX = self.view.center.x
        let centerY = self.view.center.y
        let widthRatio = imageWidth
        let heightRatio = imageHeight
        //画像の大きさに応じてiamgeviewのサイズを変える
        if imageHeight > self.view.frame.height || imageWidth > self.view.frame.width {
            imageWidth = width
            imageHeight = width*heightRatio/widthRatio

        } else if imageHeight > self.view.frame.height {
            imageHeight = height
            imageWidth = height*widthRatio/heightRatio

        } else if imageWidth > self.view.frame.width {
            imageWidth = width
            imageHeight = width*heightRatio/widthRatio

        } else {
        }

        imageView.contentMode = UIViewContentMode.scaleAspectFill
        imageView.frame.size = CGSize(width: imageWidth, height: imageHeight)
        //画像がnavigationbarに被らないようにする
        if imageHeight/2 > (height/2 - navigationBarHeight!) {
            imageView.center = CGPoint(x: centerX, y: centerY + navigationBarHeight!)
        } else {
            imageView.center = CGPoint(x: centerX, y: centerY)
        }

        imageView.image = image

        picker.dismiss(animated: true, completion: nil)
    }


    // 撮影がキャンセルされた時に呼ばれる
    func imagePickerControllerDidCancel(_ picker: UIImagePickerController) {
        picker.dismiss(animated: true, completion: nil)
    }

    func tappedlibrary() {
        let sourceType:UIImagePickerControllerSourceType =
            UIImagePickerControllerSourceType.photoLibrary

        if UIImagePickerController.isSourceTypeAvailable(
            UIImagePickerControllerSourceType.photoLibrary){
            // インスタンスの作成
            let cameraPicker = UIImagePickerController()
            cameraPicker.sourceType = sourceType
            cameraPicker.delegate = self
            self.present(cameraPicker, animated: true, completion: nil)
        }
        else{
            print("error")

        }
    }

    func tappedcamera() {
        let sourceType:UIImagePickerControllerSourceType =
            UIImagePickerControllerSourceType.camera
        // カメラが利用可能かチェック
        if UIImagePickerController.isSourceTypeAvailable(
            UIImagePickerControllerSourceType.camera){
            // インスタンスの作成
            let cameraPicker = UIImagePickerController()
            cameraPicker.sourceType = sourceType
            cameraPicker.delegate = self
            self.present(cameraPicker, animated: true, completion: nil)

        }
        else{
            print("error")
        }
    }

    @IBAction func selecteImageButton(_ sender: UITapGestureRecognizer) {
        //アラート表示のために
        let actionSheet = UIAlertController(title: "", message: "写真の選択", preferredStyle: UIAlertControllerStyle.actionSheet)

        let tappedcamera = UIAlertAction(title: "カメラで撮影する", style: UIAlertActionStyle.default, handler: {
            (action: UIAlertAction!) in
            self.tappedcamera()
        })

        let tappedlibrary = UIAlertAction(title: "ライブラリから選択する", style: UIAlertActionStyle.default, handler: {
            (action: UIAlertAction!) in
            self.tappedlibrary()
        })

        let cancel = UIAlertAction(title: "キャンセル", style: UIAlertActionStyle.cancel, handler: {
            (action: UIAlertAction!) in
            print("キャンセル")
        })

        actionSheet.addAction(tappedcamera)
        actionSheet.addAction(tappedlibrary)
        actionSheet.addAction(cancel)

        present(actionSheet, animated: true, completion: nil)
    }

}
注意点
今回、画像の縦横比を元の画像に合わせつつ、画像とImageVeiwの大きさが常に一致するようにしている。
理由はタップした座標を取得する際に、ImageViewとImageで座標の原点が変わってしまうからだ。
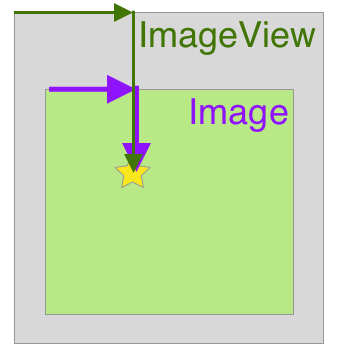
図のような場合を想定する。
灰色がImageViewで、ライトグリーンがImageだとすると、
星の位置をタップした際に、ImageViewとImageそれぞれ緑色と紫色の矢印のように座標を特定する。
つまり、2つの左上の座標がぴったりあっていないと異なる座標が取得され、意図した場所のRGB値が取れなくなってしまう。
関連付け
普通に関連付けすれば大丈夫ですが、1つだけ注意点があります。
ImageViewをタップした時に動作する
@IBAction func getImageRGB(_ sender: UITapGestureRecognizer)
はImageViewと繋がずに、「Tap Gesture Recognizer」と繋いでください!(画像の青色の四角)