色々情報がありますが、断片化されてたので纏めました。
もしこんな環境で開発する人がいれば参考にして下さい。
というか1つの記事に詰め込み過ぎたかもしれません。
ちなみにこの環境構築は以下の記事を参考に作成されています。
WebPackを使ってRailsからJavaScriptを楽に良い感じに分離する
Rails + モダンJS環境(Webpack)で新規アプリ作成
RailsでReduxコンテナをサーバサイドレンダリング (use Hypernova by airbnb)
素晴らしい記事に感謝。
今回書いた記事のソースはこちらです。
前提条件
本記事では以下のような開発環境を想定して記載します。
バックエンド:Rails(API)
フロントエンド:React(+Redux)
(JS)ビルド:Webpack
よく、browserifyとRailsを組み合わせた記事とかは見ますが、Webpackはまだ少ない感じがします。(browserify-railsのgemは偉大だってことでしょうか)
Railsを基礎とした全体環境構築
読み飛ばして頂いても結構です。
Rails4でもRails5(APIモード)でも好きに作ってといった感じです。
ただし、画面表示のリクエストとAPIのリクエストを同じRailsに投げるなら以下のgemだけは入れておいた方がいいです。
gem 'react-rails'
//= require react_ujs
ただし、本記事ではAPIには触れませんのであしからず。
では、全体環境となるRailsを作成するために以下のコマンドでGemfileさくっと作ります。
mkdir react_on_rails_template
cd react_on_rails_template
bundle init
で、作成されたGemfileの中のrails部分を修正(コメントを除くだけ)
- #gem 'rails'
+ gem 'rails'
んでもってbundle install --path vendor/bundle -j4すればOK
後はRailsを作るので、
bundle exec rails new . --skip-bundle
を叩いてRailsを作ります。
最後に冒頭に書いたGemfileのreact_railsの追加をしbundle install後に、application.jsの修正をすれば完了です。
フロントの環境構築
packageのインストール
Railsフォルダにてpackageのインストール等を行っていきます。(Railsのルートフォルダで実行)
npm initを叩いてpackage.jsonを作成してから以下のコマンドを実行。
# webpack関係
npm install --D webpack webpack-dev-server webpack-manifest-plugin babel-loader babel-preset-es2015 babel-preset-stage-2 glob

# React
npm install --S react react-dom
npm install --D babel-preset-react react-hot-loader
# Redux
npm install --S react-redux redux-actions redux-thunk
ルート直下に.babelrcを作って、以下のように記述
{
  "presets": ["es2015", "stage-2", "react"]
}
webpackの設定
次にwebpack関係の設定を行っていきます。
まずは開発用のwebpackの設定をします。設定例を以下に記載します。
const path = require('path');
const webpack = require('webpack');
const glob = require("glob");

module.exports = {
  entry: glob.sync("./frontend/js/*.js"),
  output: {
    path: path.join(__dirname, 'public/dist'),
    filename: '[name].js',  // このままならmain.jsが作成される
    publicPath: 'http://localhost:4000/',
    hot: true
  },
  module: {
    loaders: [
      {
        loaders: ['react-hot', 'babel?cacheDirectory=true,presets[]=es2015,presets[]=stage-2,presets[]=react'],
        exclude: /node_modules/,
        test: /\.js[x]?$/
      }
    ]
  },
  plugins: [
    new webpack.HotModuleReplacementPlugin(),
    new webpack.NoErrorsPlugin()
  ],
  resolve: {
    extensions: ['', '.js', '.json']
  },
  devServer: {
    contentBase: '../public/dist',
    port: 4000
  },
};
まず特徴的なのはRailsでJavaScriptを配置するのはapp/assets/javascripts/配下に置くのが普通ですが、今回はRailsから切り離し、frontend/js/配下に置くものとします。
また、上記の例ではfrontend/js/配下のJavaScriptすべてを1つのファイルに吐く設定(entry部分)になっています。ここは好みがあるでしょうから好きなように変更して下さい。
webpackのconfigを読み込んでwebpack-dev-serverを起動するようにpackage.jsonに追記。
{
  ...
  "scripts": {
    "dev": "NODE_ENV=development webpack-dev-server --config frontend/config/development/webpack.config.js --progress --colors --inline --hot",
    ...
  }
  ...
}
上記を設定さればnpm run devでwebpack-dev-serverが起動するはずです。
ついでに本番用のwebpack設定例を以下に記載します。
npm install --save-dev rimraf
const webpack = require('webpack')
const path = require('path')
const ManifestPlugin = require('webpack-manifest-plugin');
const glob = require("glob");

module.exports = {
  entry: glob.sync("./frontend/js/*.js"),
  output: {
    path: './public/dist',
    filename: '[name]-[hash].js'
  },
  plugins: [
    new webpack.optimize.UglifyJsPlugin({
      minimize: true,
      compress: {
        warnings: false,
      },
    }),
    new ManifestPlugin()
  ],
  module: {
    loaders: [
      {
        loader: 'babel',
        exclude: /node_modules/,
        test: /\.js[x]?$/,
        query: {
          cacheDirectory: true,
          presets: ['react', 'es2015',"stage-2"]
        }
      }/*他のローダが必要ならこんな感じに,
      {
        test: /\.scss$/,
        loaders: ["style", "css", "sass"]
      },
      {
        test: /\.(jpg|png)$/,
        loader: 'url-loader'
      }*/
    ]
  }
};
{
  ...
  "scripts": {
    "clean": "rimraf public/dist",
    "webpack": "NODE_ENV=production webpack --config frontend/config/production/webpack.config.js",
    "build": "npm run clean && npm run webpack",
    ...
  }
  ...
}
本番は開発環境と違ってダイジェスト付きのファイルを出力するようにします。
これは後述するRails側で必要になるからです。
ここまでくれば後はfrontend/js/内に好きなだけJavaScript等を書けば動くはずです。
バックの環境構築
続いてはRails側の設定を行っていきます。
JavaScriptの読み込み設定
まずは冒頭に記載した参考記事にしたがってassets_pathのメソッドを作成
module ApplicationHelper
  def assets_path(path)
    return "http://localhost:4000/#{path}" if Rails.env.development?
    manifest = Rails.application.config.assets_manifest
    path = manifest[path] if manifest && manifest[path].present?
    "/dist/#{path}"
  end
end
で読み込むmanifest.jsonのファイル設定をinitializersに突っ込んでおきます。
Rails.application.config.assets_manifest =
  if File.exist?(Rails.root.join('public', 'dist', 'manifest.json'))
    JSON.parse(File.read(Rails.root.join('public', 'dist', 'manifest.json')))
  end
参考の記事にも書いてますが、developmentの場合だけはwebpack-dev-serverから取得し、それ以外は作成したmanifest.jsonを読んでパスを返すということです。
JavaScriptの自動コンパイル(2016.7.15追記)
これ書くの忘れてました。
本番リリースの際はRailsのassets precompileを行う場合は以下の設定をし、上記のwebpackのビルドを自動的に走らせるようにします。
task :build_frontend do
  cd "frontend" do
    sh "npm install"
    sh "npm run build"
  end
end

Rake::Task["assets:precompile"].enhance(%i(build_frontend))
Railsの起動設定
これで一通り完了なんですが、開発時にはbin/rails sとnpm run devの2つのコマンドを実行しないと動かないのでわざわざ打つのが面倒なので以下のgemを入れて一度に立ち上げます。
group :development do
+  gem 'foreman'
end
bundle install後に以下のファイルを作成します。
+ web: bin/rails s
+ webpac-dev: npm run dev
#!/usr/bin/env ruby
require 'pathname'
ENV['BUNDLE_GEMFILE'] ||= File.expand_path("../../Gemfile",
  Pathname.new(__FILE__).realpath)

require 'rubygems'
require 'bundler/setup'

load Gem.bin_path('foreman', 'foreman')
これでbin/foreman startで一度に立ち上がります。
付録その1:React(Redux)を書いてみよう
ここからの付録が参考記事とは違って実際に書いてみたイメージってことです。
環境の話は上記で完結していますが、じゃあ実際に書いてみようってことで以下のファイルをコピペして配置してみて下さい。
Rails側
# -*- coding: utf-8 -*-
class SampleController < ApplicationController
  def index
  end
end
<div id="sample-container" />

<%= javascript_include_tag assets_path("main.js") %>
Rails.application.routes.draw do
  resources :sample, only: [:index]
end
React(Redux)側
こちらのソースは冒頭の参考記事のJavaScriptを綺麗?に分割してみたソースです。
面倒なら冒頭の参考記事から1ファイルバージョンをコピペしても結構です。
import React from 'react'
import ReactDOM from 'react-dom'
import { Provider } from 'react-redux'

import AppContainer from './containers/Sample'
import configureStore from './store/sample.js'

const store = configureStore()

ReactDOM.render(
  <Provider store={store}>
    <AppContainer />
  </Provider>,
  document.getElementById('sample-container')
)
import { createAction } from 'redux-actions'
export const INCREMENT_COUNTER = 'INCREMENT_COUNTER'
export const DECREMENT_COUNTER = 'DECREMENT_COUNTER'

export const increment = createAction(INCREMENT_COUNTER)
export const decrement = createAction(DECREMENT_COUNTER)

/*
// not use redux-actions
export const increment = {
  type: 'INCREMENT_COUNTER'
}
export const decrement = {
  type: 'DECREMENT_COUNTER'
}
*/
import React, { Component } from 'react'

export default class Counter extends Component {
  componentDidMount() {
    //SSRではここは呼ばれない(クライアント側では呼ばれる)なので実質2回呼ばれる
    console.log('componentDidMount')
  }

  componentWillMount() {
    //SSRでもここは呼ばれる
    console.log('componentWillMount')
  }

  render() {
    const { count, onIncrement, onDecrement } = this.props
    return (
      <div>
        <p>カウント: {count}回</p>
        <button onClick={onIncrement}>++</button>
        <button onClick={onDecrement}>--</button>
      </div>
    )
  }
}

/*
//ライフサイクルメソッド今回の例では「componentDidMount」や「componentWillMount」が必要ない場合は
//以下のように簡略してかける。
const Counter = (props) => {
  return(
    <div>
      <p>カウント: {props.count}回</p>
      <button onClick={props.onIncrement}>++</button>
      <button onClick={props.onDecrement}>--</button>
    </div>
  )
}

export default Counter
*/
import React, { Component } from 'react'
import { Provider, connect } from 'react-redux'
import { bindActionCreators } from 'redux'
import * as Actions from '../../actions/Sample'
// not use redux-actions
//import {increment, decrement} from '../../actions/Sample'

import Counter from '../../components/Sample'

class App extends Component {
  constructor(props) {
    super(props)
//    this.state = {data: {}}
  }

  render() {
    const { data, actions } = this.props
    return (
      <Counter {...data} onIncrement={actions.increment} onDecrement={actions.decrement} />
    )
  }
}

const mapStateToProps = (state) => {
  return {
    data: state
  }
}

const mapDispatchToProps = (dispatch) => {
  return {
    actions: bindActionCreators(Actions, dispatch)
  }
/*
// not use redux-actions
  return {
    onIncrement() { return dispatch(increment) },
    onDecrement() { return dispatch(decrement) }
  }
*/
}

export default connect(mapStateToProps, mapDispatchToProps)(App)
import { handleActions } from 'redux-actions'

export const initialState = {count: 0}

const reducerMap = {
  INCREMENT_COUNTER(state, action) {
    return {...state, count: state.count + 1}
  },
  DECREMENT_COUNTER(state, action) {
    return {...state, count: state.count - 1}
  },
}

export default handleActions(reducerMap, initialState)

/*
// not use redux-actions
export default (state = { count: 0 }, action) => {
  switch(action.type) {
  case 'INCREMENT_COUNTER':
    return { count: state.count + 1 };
  case 'DECREMENT_COUNTER':
    return { count: state.count - 1 };
  default:
    return state;
  }
}
*/
import { createStore } from 'redux'
import counterReducer, {initialState} from '../reducers/Sample'

export default (preloadState = {}) => {
  return createStore(counterReducer, {...initialState, ...preloadState})
}
ちょっと自分用のメモ的なコメントも入ってますが無視して下さいw
これらを配置してからbin/foreman start後にhttp://localhost:5000/sampleを開くと…
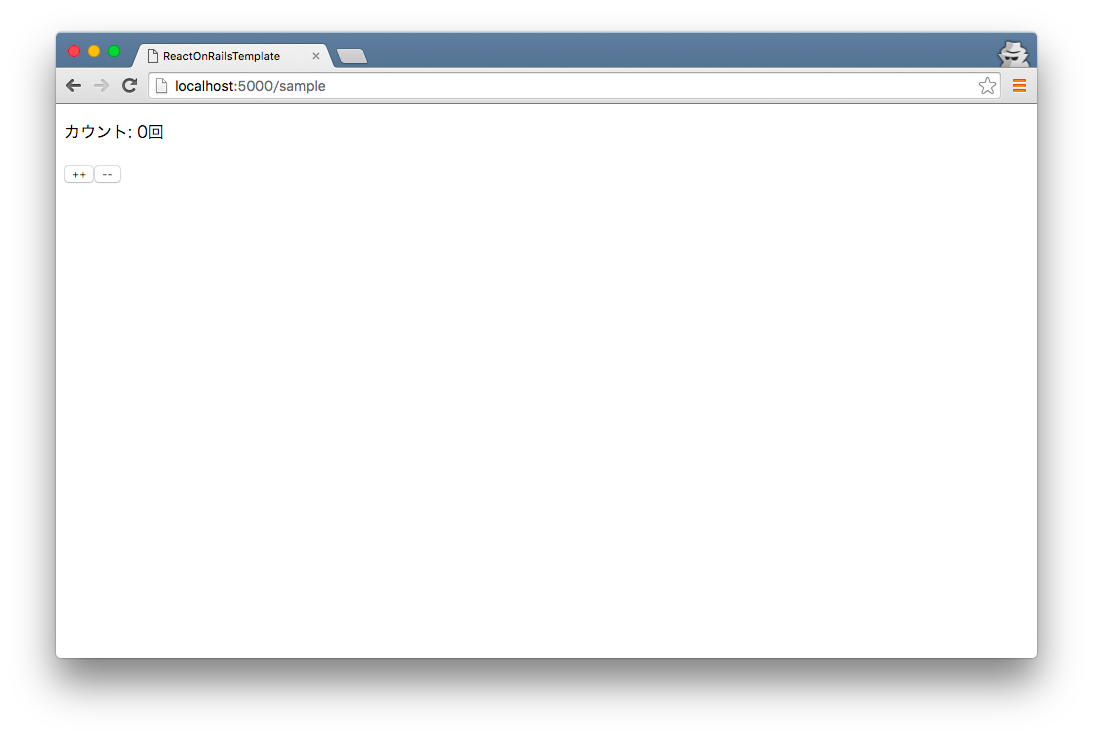
めでたくRailsで生成したHTMLの一部にReactを埋め込むことができました。
(ポートが5000になっているのはforemanのデフォルトです)
付録その2:React(Redux)をサーバサイドレンダリングしてみよう
このSSRを行うよりこちらの記事のSSRをオススメします。こちらはあまり参考にしない方がよいです。
必要ない人は全然必要ない話ですが、SEOとかその辺を気にする必要がある場合はここを意識しないといけないでしょうか。
てことで上の付録その1で作ったものをSSR対応してみましょう。
Rails側
追加でgemが必要になるので、以下のgemを入れて、bundle installを実行します。
gem 'hypernova'
このhypernovaの設定ファイルを以下のように作ります。
require 'hypernova'

Hypernova.configure do |config|
  config.host = 'localhost'
  config.port = 3030
end
次にcontrollerに以下の記述を入れておいて、hypernovaのhelperを使えるようにします。
# -*- coding: utf-8 -*-
class SampleController < ApplicationController
+  around_filter :hypernova_render_support
+
  def index
  end
end
で、最後にviewのJavaScriptを呼ぶ記述を変更します。
- <div id="sample-container" />
+ <%= render_react_component('sample.js', count: 1) %>

<%= javascript_include_tag assets_path("main.js") %>
今回は初期のstateとしてcount:1を渡しています。
React(Redux)側
こちらも必要packageが増えるので以下のコマンドでpackageのインストールを実行します。
npm install -S hypernova hypernova-react-redux
npm install -D babel-cli
npm install -S chokidar #2016.07.18追記
こちらもhypernova用の設定ファイルをルート直下に作ります。
※@noriaki さんの指摘によりhypernova.jsを書き換えました。これでディスクIOも気にせずhypernovaの再起動もいらないはずです。
const hypernova = require('hypernova/server')
const fs = require('fs')
const chokidar = require('chokidar')
const path = "./frontend/js/"
var fileList = []

const makeFileList = () => {
  fileList = []
  fs.readdir(path, (err, files) => {
    if (err) throw err

    files.filter((file) => {
      return fs.statSync(`${path}${file}`).isFile() && /.*\.js$/.test(path+file) //絞り込み
    }).forEach((file) => {
      if (fileList.indexOf(file) === -1){
        fileList.push(file)
      }
    })
  })
}

var watcher = chokidar.watch(path, {    //watch対象ディレクトリorファイル
  ignored: /[\/\\]\./,  //無視する対象
  persistent:true   //監視を継続するかどうか
})

watcher.on('ready', (path) => { makeFileList() })
  .on('add', (path) => { makeFileList() })        // ファイルが追加された場合
  .on('unlink', (path) => { makeFileList() })     // ファイルが削除された場合

hypernova({
  devMode: true,

  getComponent(name) {

    if (fileList.indexOf(name) > -1){
      return require(`${path}${name}`)
    }

    return null;
  },

  port: 3030,
})
要はfrontend/js/に配置しているJavaScriptファイルがあればそれを返す処理です。
ここがRails側で書いたrender_react_component('sample.js', count: 1)の第一引数が関係します。
2016.07.18追記
上記のhypernova.jsはfrontend/js/配下のJavaScriptを読み込んでいますが、getComponentはリクエスト毎に動くので対象ファイルを予めリストに展開しています。ただ、開発中はJavaScriptファイルの増減があるので、ファイルの増減がある場合はリストを更新するようになっております。
最後にこのhypernovaが起動するようにpackage.jsonとProcfileに仕込んで起きます。
{
  ...
  "scripts": {
    "hypernova": "babel-node hypernova.js --presets es2015,react,stage-2",
    ...
  }
  ...
}
web: bin/rails s
webpac-dev: npm run dev
+ hypernova: npm run hypernova
最後に先ほどのsampleのメインとなるJavaScriptファイルを以下のように書き換えます。
- import React from 'react'
- import ReactDOM from 'react-dom'
- import { Provider } from 'react-redux'
+ import { renderReactRedux } from 'hypernova-react-redux'

import AppContainer from './containers/Sample'
import configureStore from './store/sample.js'

- const store = configureStore()
-
- ReactDOM.render(
-   <Provider store={store}>
-     <AppContainer />
-   </Provider>,
-   document.getElementById('sample-container')
+ module.exports = renderReactRedux(
+   'sample.js',
+   AppContainer,
+   configureStore
)
これで先ほどと同様にbin/foreman startをしてからhttp:localhost:5000/sampleを叩いても同じ結果になると思います。
ただし、curlコマンド等で確認してくれたらわかりやすいですが、リクエストで返ってくるHTMLが完成された状態で返ってきているため、サーバサイドでレンダリングしていることがわかると思います。
でもhypernovaが起動しててもSSRしないようにしたい場合はどうしましょうか。
react_railsみたいにtrue/falseで切り替えれるのが嬉しいですね。
重ねて書きますが、今回書いた記事のソースをGithubに挙げておりますので参考にどうぞ。
https://github.com/chimame/react_on_rails_template
指摘事項あれば遠慮なく下さい。