0.初めに
私はエンジニアではないただのドシロウトです。GASを最近勉強しています。
Googleの有名なURL短縮サービス「Google URL Shortener」の終了が発表されてしばらく経ちました。
GoogleのURL短縮サービスが終了。代わりとなるサービスはどれ?
https://webtan.impress.co.jp/u/2018/04/05/28895
別の短縮サービスもありますがなんか不便です。
少しググると以下の英文記事を見つけました。
Google Sheets Advanced Google Services URL Shortener 403 Error: Forbidden
https://stackoverflow.com/questions/50769197/google-sheets-advanced-google-services-url-shortener-403-error-forbidden
要約すると「Firebase Dynamic Links」をGASで使えるよと書いてあります。
そこで試してみることにしました。
GASに関してはとても簡単なのですが、むしろ「Firebase Dynamic Links」の登録の方が面倒だったのでそちらがメインの内容になります。
1.作ったもの
以下の画像の通りです。パスワード入れて短縮元URLを入れて生成ボタンを押すだけです。
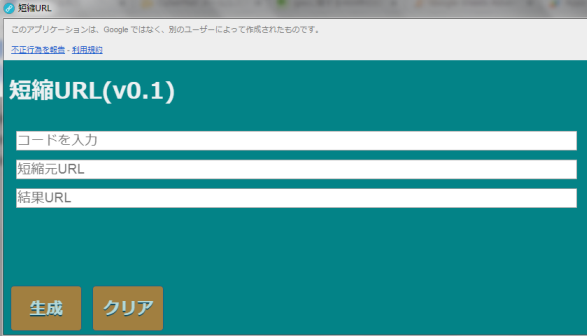
こんな感じのURLが生成されます。そんなに短くないですが…
https://basictomonokai.page.link/CvfZ
2.Firebase Dynamic Linksの登録
基本的にはStackoverflowの記事の通りですがとても判りづらいです。
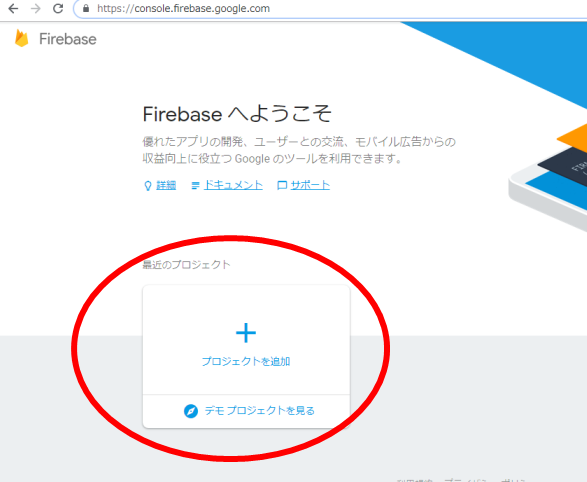
2-1.Firebase consoleでプロジェクトの追加をクリック
Firebase console
https://console.firebase.google.com/
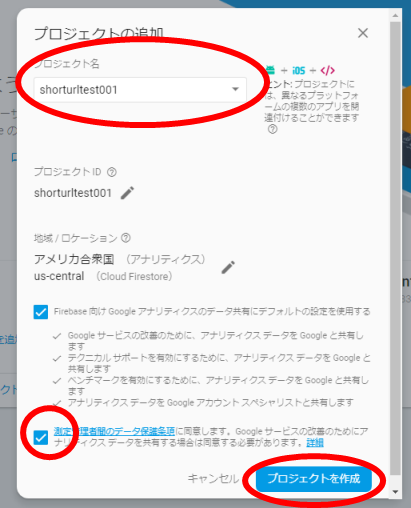
2-2.好きなプロジェクト名と同意のチェックをして作成をクリック
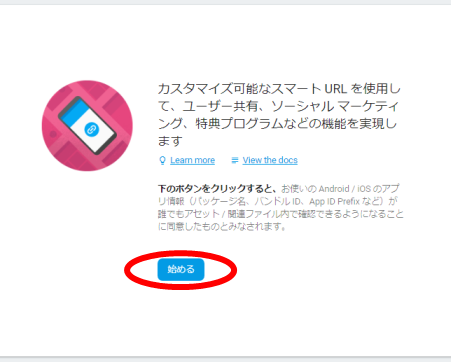
2-3.Dynamic Linksをクリック

2-4.始めるをクリック
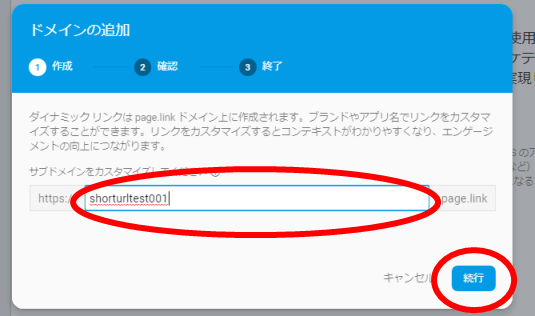
2-5.好きなサブドメイン名をセットして続行をクリック
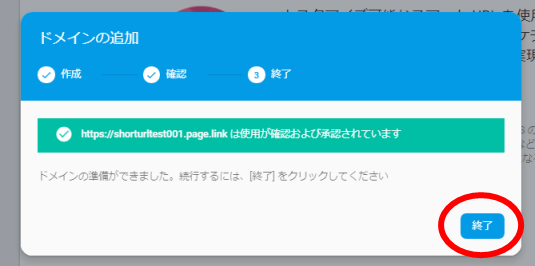
2-6.終了をクリック
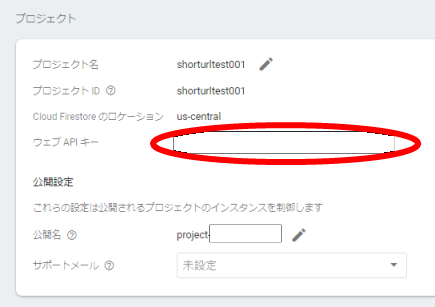
2-7.Project Overviewからプロジェクトの設定をクリック

2-8.ウェブAPIキーが取得できたのでこれをGASで使う
3.コード
gsファイル1本、HTMLファイル2本です。
HTMLファイルの内一つは画面用、残りはJSを外出しする為のGAS固有のindex.js.htmlファイルです。
まずはgsファイル
function doGet() {
  // HTML画面の表示
  return HtmlService.createTemplateFromFile('urlshort').evaluate().setTitle('短縮URL');
}

function include(filename) {
  // index.js.html読込用
  return HtmlService.createHtmlOutputFromFile(filename)
      .getContent();
}


function urlmake(codex,naiyou) {
  // メイン関数
  var ansurlmake = 'ng'

  // パスワードチェック
  if (codex == "xxxxx") {
  } else {
    var passng = ":パスワードが正しくありません";
    return ansurlmake+passng;
  };

  // 短縮元URLチェック
  if (naiyou == "") {
    var passng = ":URLが未入力です";
    return ansurlmake+passng;
  };


  // 短縮URL生成
  ansurlmake = api_call(naiyou);

  return ansurlmake;
}


function api_call(url){
  // 短縮URL生成関数
  // POST URL
  var req='https://firebasedynamiclinks.googleapis.com/v1/shortLinks?key=あなたのAPIキー';
  // form data
  // 短縮元URLをencodeURIComponentする
  var formData = {
    "longDynamicLink": "https://basictomonokai.page.link?link=" + encodeURIComponent(url),
    "suffix" : {
      "option" : "SHORT"
    }
  };
  var options = {
    'method': 'post',
    'contentType': 'application/json',
    'payload': JSON.stringify(formData)

  };

  // POSTの実行
  var response = UrlFetchApp.fetch(req, options);
  var res=JSON.parse(response);

  return res.shortLink;
}
次に画面用HTMLファイルです
<!DOCTYPE html>
<html>
<head>
  <meta http-equiv="content-type" content="text/html; charset=UTF-8">
    <meta name="viewport" content="initial-scale=1.0, user-scalable=no">

<link href="https://fonts.googleapis.com/earlyaccess/mplus1p.css" rel="stylesheet" />
<style>
body {
   font-family: "Rounded Mplus 1c";
   font-size: 100%;
   color: #ecf0f1;
   background: #038387;
}

#kkaf {
   font-size: 1.5em;
   margin: 10px;
}

.cont1 {
   font-size: 1.2em;
}

.comm1 {
   font-size: 0.8em;
   margin: 5px 5px;
}

.contx {
   color: #f1c40f;
   font-size: 1.2em;
}

</style>

  <title>url shortner</title>

<style type="text/css">
<!--

#buttonx {
  width:100px;
  color:#ffffff;
  background:#e67e22;
  font-family: fantasy,sans-serif;
  font-size:24px;
  font-weight:bold;
  text-shadow:0 1px 0px #143352,0 2px 0px #143352;
  text-align:center;
  display:inline-block;
  text-decoration:none;
  border:1px solid #225588;
  padding:15px 0 12px 0;
  border-radius:5px;
  margin-bottom:20px;
  margin-left:10px;
  opacity: 0.7;
}

-->


</style>

<style>

div#footer-fixed
{
    position: fixed;            /* フッターの固定 */
    bottom: 0px;                /* 位置(下0px) */
    left: 0px;                  /* 位置(左0px) */
    width: 100%;                /* 横幅100% */
    height: 70px;              /* 縦幅70px */
}


div#body-bk{
    padding: 0px 0 80px 0;    /* 下に80pxを余白を取る */
}

input,textarea {
  width: 80%;
  margin-top: 10px;
  font-size: 0.8em;
}

</style>

</head>

<body>
     <h1>短縮URL(v0.1)</h1>

<div id="body-bk">

<div id="kkaf">
    <input type="text" id="xcode" name="xcode" placeholder="コードを入力">
    <input id="naiyou" name="naiyou" placeholder="短縮元URL">
    <input id="kekka" name="kekka" placeholder="結果URL" readonly>
</div>

</div>

<div id="footer-fixed">

<a id="buttonx" onmouseover="this.style.background='#e67e22'" onmouseout="this.style.background='#d35400'" onclick="this.style.background='#e74c3c';urlget()">生成</a>
<a id="buttonx" onmouseover="this.style.background='#e67e22'" onmouseout="this.style.background='#d35400'" onclick="this.style.background='#e74c3c';urlclr()">クリア</a>

</div>
<?!= include('index.js'); ?>

</body>
</html>
最後にJSを外出しする為のGAS固有のindex.js.htmlファイルです
<script>
function urlclr() {
  // クリアボタンを押したときの処理
  document.getElementById('naiyou').value = "";
  document.getElementById('kekka').value = "";
}

function urlget() {
    // 短縮URL取得処理
    // 画面からパスワード、短縮元URLを取得
    var pass = document.getElementById('xcode').value;
    var naiyou = document.getElementById('naiyou').value;
    document.getElementById('kekka').value = "";

    // GASで処理した後のコールバック後の処理
    var callback = function(result) {
       document.getElementById('kekka').value = result;
    };

    // GASの関数urlmake呼出
    google.script.run.withSuccessHandler(callback).urlmake(pass,naiyou);
}

</script>
4.WEBアプリケーションの公開について
ネット上に沢山紹介している記事がありますのでそちらをご覧ください。代表的な記事は以下。
Google Apps Scriptで最も簡単なWebページを作成して公開する
https://tonari-it.com/gas-html-web-page/
5.まとめ
Firebase Dynamic Linksの登録は面倒ですがGAS自体は簡単です。
たったこれだけでサーバー無しでWEBアプリケーションとして公開できます。
GASって便利だと思いました。
以 上