各パッケージ(拡張機能)が右クリックメニュー(ContextMenu)に項目を追加するが、気に食わない部分に追加されることがある。設定ファイルを編集して、整理をする。
SublimeText
SublimeText 公式サイト https://www.sublimetext.com/
動作環境
- Windows 10 Pro 1703 (64bit)
- Sublime Text Version 3.0, Build 3143 (64bit)
SublimeText2のころでも、おそらく可能。クロスプラットフォームテキストエディタであるため、Linux、MacOS用のSublimeTextでもできるかもしれない。
念の為ファイルのバックアップをしてから行うように。以下自己責任で。
右クリックメニューにIDを設定
メニューの Preference > Packagesフォルダ でパッケージフォルダを開く。
Japanizeなどのパッケージを追加した時に、設定したDefaultフォルダの Context.sublime-menu に以下のように項目を追加する。"caption": "-" は右クリックメニューの区切り線を意味する。それぞれの区切り線にIDを設定している。
{ "caption": "-", "id": "a" },
{ "caption": "-", "id": "b" },
{ "caption": "-", "id": "c" },
{ "caption": "-", "id": "d" },
{ "caption": "-", "id": "e" }
例えばContext.sublime-menuは以下のようになる。
[
    { "command": "open_context_url" },
    { "command": "context_goto_definition", "caption": "Goto Definition" },
    { "caption": "-", "id": "clipboard" },
    { "command": "copy" },
    { "command": "cut" },
    { "command": "paste" },
    { "caption": "-", "id": "selection" },
    { "command": "select_all" },
    { "caption": "-", "id": "file" },
    { "command": "open_in_browser", "caption": "Open in Browser" },
    { "command": "open_dir", "args": {"dir": "$file_path", "file": "$file_name"}, "caption": "Open Containing Folder…" },
    { "command": "copy_path", "caption": "Copy File Path" },
    { "command": "reveal_in_side_bar", "caption": "Reveal in Side Bar" },

    { "caption": "-", "id": "a" },
    { "caption": "-", "id": "b" },
    { "caption": "-", "id": "c" },
    { "caption": "-", "id": "d" },
    { "caption": "-", "id": "e" }
]
各パッケージの右クリックメニューの設定
各パッケージの Context.sublime-menu を開き { "caption": "-", "id": "a" }, などを追加する。
以下に例を示す。
ColorHighlighter
- Package Control : [ https://packagecontrol.io/packages/Color%20Highlighter ]
- GitHub : [ https://github.com/Monnoroch/ColorHighlighter ]
ColorHighlighterの場合、デフォルトの右クリックメニューの設定Context.sublime-menuは以下のようになっている。
[
    { "caption": "-", "id": "Color Highlighter" },
    { "command": "color_highlighter_pick_color", "caption": "Insert color with color picker"},
    { "command": "color_highlighter_next_color", "caption": "Convert color to the next format"},
    { "command": "color_highlighter_previous_color", "caption": "Convert color to the previous format"}
]
デフォルトの右クリックメニューの設定を次のように編集する。
{ "caption": "-", "id": "a" }, を追加し、上記で設定したIDを指定し表示する位置を設定する。
元々の設定を { "caption": "Color Highlighter", "children": [ ] } で囲み Color Highlighterという名前で子要素化をする
[
    { "caption": "-", "id": "a"},
    { "caption": "Color Highlighter", "children": [
        { "caption": "-", "id": "Color Highlighter" },
        { "command": "color_picker", "caption": "Choose color" },
        { "command": "color_convert", "caption": "Convert color" },
        { "command": "go_to_var_definition", "caption": "Go to variable definition" }
    ]}
]
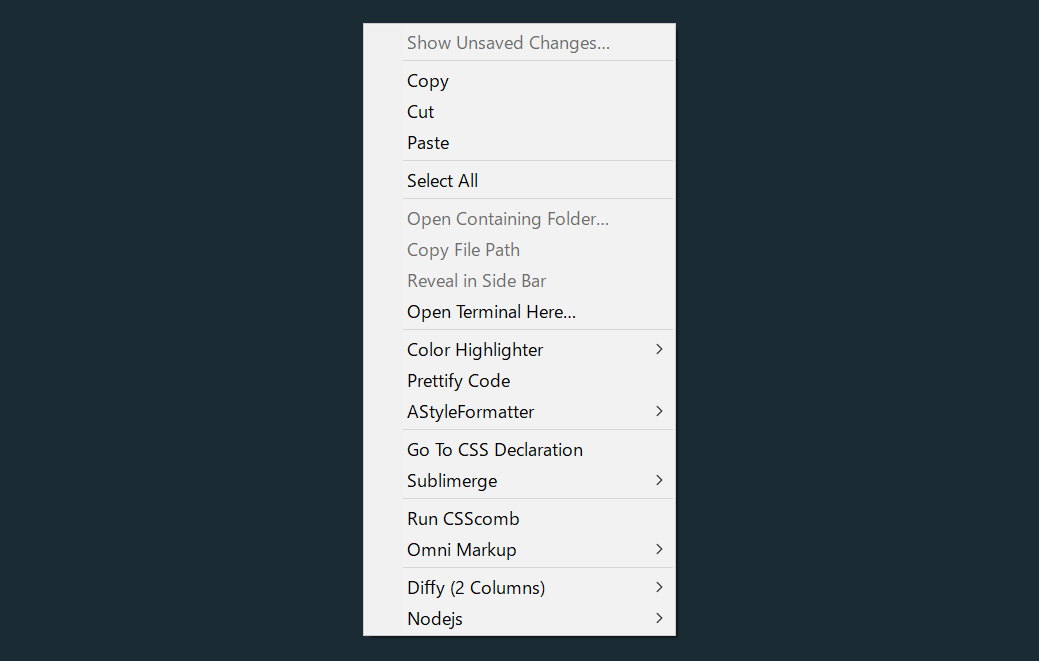
以下の画像は各パッケージの設定を編集し、IDをA~Dで整理した場合である。
参考
Sublime Text Unofficial Documentation Menu
[ http://docs.sublimetext.info/en/latest/customization/menus.html ] (2018.04.18参照)