概要
前書いたの記事の改良版です。
が、完璧な解説ではないので新人エンジニアの方や、「nuxt.jsを触り始めたけど、Vuexってなんなん?」って人がニュアンスだけ掴む用に読んでいただけると嬉しいです。
前書いた黒歴史ばりの記事はこちらです。
Vuexとは
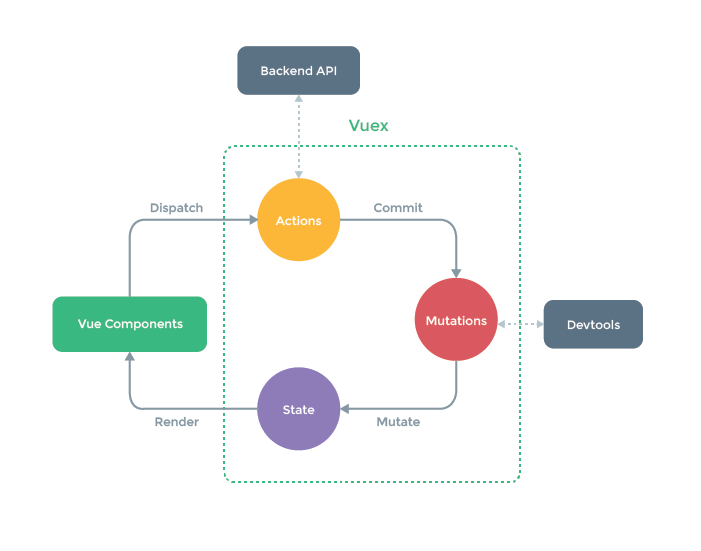
VuexはVueComponents, Actions, Mutations, Stateの順番でデータが回っていきます。
データの流れが一方向になる為、単一データフローなんて呼ばれたりもしています。
単一データフローや、元になっているFluxなどについてはググってください。(小声)
ちなみにVuexはリロードがかかるまで値が破棄されないです。
例えばAPIを叩いてエラーになった時に、$router.replaceなどでエラー画面に移動させる前にエラーコードとエラーメッセージをVuexに渡して描画させることもできます。
例外なのが、fetchやasync dataなどでAPIコールを行なってエラー画面に移動したい場合には$router.replaceやpushが使用できず、redirectで画面遷移する事にになってしまいます。
その為、Vuexに値を渡しても初期化されてしまうので注意が必要です。
では、サンプル付きで詳しくVuexの使い方を説明していきます。
Vuexの使い方
今回のサンプルはNuxt.jsを使用して説明していきます。
あと、UIコンポーネントでelement-uiも使用しています。
サンプルの実行方法は
-
create-nuxt-appでテンプレを作る。(ここの説明は割愛します。) - 下の説明で出てくる
index.jsとindex.vueをサンプルのパスと同じところにコピペ。
で、動くと思います。
動かなかった場合は、ちょこちょこ設定していただければと思います。。。(動かなかったらすみません。)
Vuexの記述
Vuexの各フローについての記述はapp/store/index.jsに処理を書いていきます。
今回は以下の様な構成のindex.jsを使用します。
export const state = () => ({
    user: {
        name: 'sample name',
        age: 'sample age',
        job: 'sample job'
    }
})

export const mutations = {
    setName (state, value) {
        state.user.name = value
    },
    setAge (state, value) {
        state.user.age = value
    },
    setJob (state, value) {
        state.user.job = value
    },
}

export const actions = {
    setName (context, value) {
        context.commit('setName', value)
    },
    setAge (context, value) {
        context.commit('setAge', value)
    },
    setJob (context, value) {
        context.commit('setJob', value)
    }
}

export const getters = {
    getUser (state) {
        return state.user
    }
}
State
Stateは、データの置き場所と覚えておけばとりあえず大丈夫です。
Stateでは最低限のデータの受け皿だけあればいいので、今回はuser.nameなどにsampleと初期値を入力していますが、初期値が必要ない場合は空やnullで初期化だけ行なっておいても大丈夫です。
Mutations
Mutationsは、Stateの値を書き換えられる唯一の場所です。
ここ以外でStateの値を書き換えると怒られます。
Actions
Actionsは、Vueコンポーネントから値を受け取り、Mutationsに受け渡してあげる場所です。
ただ受け取った値をMutationsにスルーパスするだけではなく、Actions内で値をごにょごにょしてMutationsに渡すことも可能です。
Getters
Gettersは、Stateの値をVueコンポーネントに配信する場所です。
Vueコンポーネント側ではgettersからStateの値にアクセスして、処理を行ったり、描画させたりします。
vueファイルの記述。
では、vue側のコードをみていきましょう。
<template>
    <section class="container">
        <div>
            <logo/>
            <h1 class="title">
                Vuex Sample
            </h1>
            <h2 class="subtitle">
                Wally's Sample for Nuxt.js project
            </h2>
            <div class="sample">
                <div class="content">
                    <p>Name: {{ $store.getters.getUser.name }}</p>
                    <p>Age: {{ $store.getters.getUser.age }}</p>
                    <p>Job: {{ $store.getters.getUser.job }}</p>
                </div>
                <div class="input">
                    <el-input placeholder="Please input" v-model="input"></el-input>
                    <el-button type="primary" @click="changeState('name')">Name</el-button>
                    <el-button type="primary" @click="changeState('age')">Age</el-button>
                    <el-button type="primary" @click="changeState('job')">Job</el-button>
                </div>
            </div>
        </div>
  </section>
</template>

<script>
import Logo from '~/components/Logo.vue'

export default {
    components: {
        Logo
    },
    data () {
        return {
            input: null
        }
    },
    methods: {
        changeState (mode) {
            console.log('change ' + mode + ' value.')
            const changeValue = this.input
            if (mode === 'name') {
                this.$store.dispatch('setName', changeValue)
            } else if (mode === 'age') {
                this.$store.dispatch('setAge', changeValue)
            } else {
                this.$store.dispatch('setJob', changeValue)
            }
            this.input = ''
        }
    }
}
</script>

<style>

.container {
    min-height: 100vh;
    display: flex;
    justify-content: center;
    align-items: center;
    text-align: center;
}

.title {
    font-family: 'Quicksand', 'Source Sans Pro', -apple-system, BlinkMacSystemFont,
        'Segoe UI', Roboto, 'Helvetica Neue', Arial, sans-serif;
    display: block;
    font-weight: 300;
    font-size: 100px;
    color: #35495e;
    letter-spacing: 1px;
}

.subtitle {
    font-weight: 300;
    font-size: 42px;
    color: #526488;
    word-spacing: 5px;
    padding-bottom: 15px;
}

.links {
    padding-top: 15px;
}

div.sample {
    margin-top: 64px;
}

div.input {
    display: flex;
    margin-top: 32px;
}
</style>
実際の動きはこんな感じです。
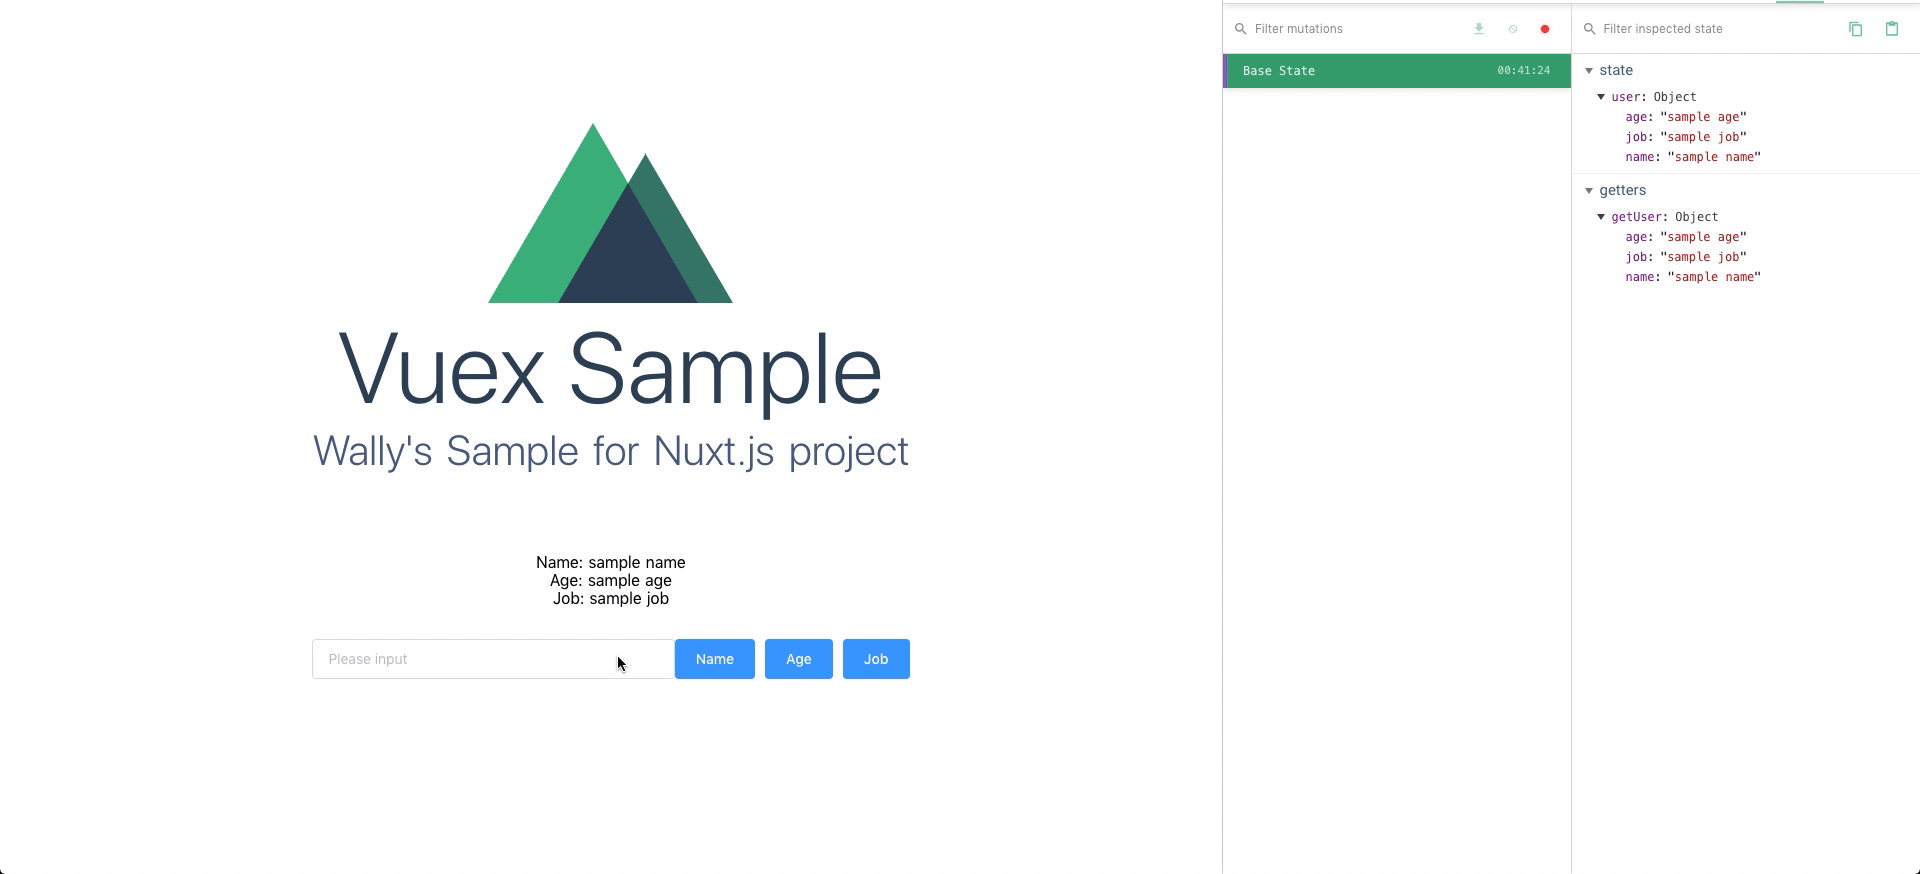
処理としては、インプットボックスに入力された値で、Stateを書き換える簡単なサンプルです。
Nameなどのボタンを押してもらうと、inputに入力された値でボタンに対応したStateを書き換えます。
VueDevToolのVuexの項目を確認しながら操作してもらうとわかりやすいと思います。
まとめ
Vuexはnuxtプロジェクトで必ずと言っていいほど使用します。
うまく使いこなせば、離れられないです。(まだまだうまく使えてないです。。。)