Unityで開発をしていると,時々他のプログラムの機能をUnity上で動かしたい場合などがあります.
そのような時にネイティブプラグインを使用する場合があるのですが,今回は特に画像データを扱う場合について書いてみました.
OpenCVなどと併用する場合に活用できると思います.
(実行結果は一番下に動画を用意しています)
環境
- Windows10 Pro 64bit
- Unity 2017.3.0f3
- Visual Studio 2017
dllの作成
参考: Windows で Unity の Native Plugin を作成する
Visual Studioでプロジェクトを作成します.
[Visual C++]→[Windowsデスクトップ]→[ダイナミックリンクライブラリ(DLL)]を選択し,プロジェクトを作ります.今回は"testDLL"という名前にしました.
ソリューション構成を"Release"に,ソリューションプラットフォームを使用するUnityと同じもの(今回はx64)にします.

画像を生成する関数の作成
今回は,RGB画像とRGBA(透明度あり)画像の2種類を作成します.
画像データはBYTE型配列でRGBRGBRGB... またはRGBARGBARGBA...の順にデータが並んでいきます.
// testDLL.cpp : DLL アプリケーション用にエクスポートされる関数を定義します。
//

#include "stdafx.h"
#include "testDLL.h"

BYTE* image01 = nullptr;
BYTE* image02 = nullptr;

const int IMAGE_SIZE = 256;

// テクスチャ1(RGB)
TESTDLL BYTE* GetTexture01(int count) {
    if (image01 != nullptr)delete image01;


    image01 = new BYTE[IMAGE_SIZE*IMAGE_SIZE *3]; // 縦x横xRGB

    int index;
    for (int y = 0;y < IMAGE_SIZE;y++) {
        for (int x = 0;x < IMAGE_SIZE;x++) {
            index = (y*IMAGE_SIZE + x) * 3;
            image01[index + 0] = static_cast<BYTE>((x + count) % 256);
            image01[index + 1] = static_cast<BYTE>((y + count) % 256);
            image01[index + 2] = static_cast<BYTE>((x * y + count * 2) % 256);
        }
    }

    return image01;
}

// テクスチャ2(RGBA)
TESTDLL BYTE* GetTexture02(int count) {
    if (image02 != nullptr)delete image02;

    image02 = new BYTE[IMAGE_SIZE*IMAGE_SIZE * 4]; // 縦x横xRGBA

    int index;
    for (int y = 0;y < IMAGE_SIZE;y++) {
        for (int x = 0;x < IMAGE_SIZE;x++) {
            index = (y*IMAGE_SIZE + x) * 4;
            image02[index + 0] = 255;
            image02[index + 1] = 255;
            image02[index + 2] = 255;

            // 円が広がるように透明部分を設定する
            float fx = (x - IMAGE_SIZE / 2) / static_cast<float>(IMAGE_SIZE) * 2; // -1 ~ +1 の範囲にする
            float fy = (y - IMAGE_SIZE / 2) / static_cast<float>(IMAGE_SIZE) * 2;
            float length = fx * fx + fy * fy;
            image02[index + 3] = ((count % 100) / 10.0f < length && length < ((count + 10) % 100) / 10.0f) ? 255 : 0;
        }
    }

    return image02;
}
ヘッダファイルには,Unity側から呼び出すための設定を用意します.
今回のプロジェクトの場合,TESTDLLをつけた関数がUnity側で呼び出し可能になります
#pragma once

#ifdef TESTDLL_EXPORTS
#define TESTDLL __declspec(dllexport)
#else
#define TESTDLL __declspec(dllimport)
#endif

extern "C" {
    TESTDLL BYTE* GetTexture01(int);
    TESTDLL BYTE* GetTexture02(int);
}
ビルドするとtestDLL.dllが作成されます.
Unityプロジェクトの作成
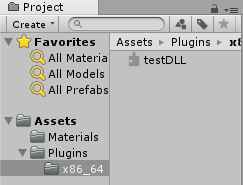
Unity側では,作成したdllファイルを置く場所が決められています.
Pluginsフォルダを作成し,64bitならx86_64フォルダを更に作り,その中にdllファイルを置きます.
今回は使用しませんが,作成したdllが他のライブラリに依存している場合(例:OpenCVなど),そのdllも同じフォルダに入れる必要があります.(opencv_341core.dllなど)
dllを呼び出すスクリプトの作成
今回は以下のようなSetTexture.csを作成しました.
using System;
using System.Collections;
using System.Collections.Generic;
using System.Runtime.InteropServices;
using UnityEngine;

public class SetTexture : MonoBehaviour {
  [DllImport ("testDLL")]
  private static extern IntPtr GetTexture01 (int count);

  [DllImport ("testDLL")]
  private static extern IntPtr GetTexture02 (int count);

  [SerializeField]
  private Material mat1;
  [SerializeField]
  private Texture2D texRGB;
  private byte[] imageRawDataRGB; // 画像の生データを格納する配列

  [SerializeField]
  private Material mat2;
  [SerializeField]
  private Texture2D texRGBA;
  private byte[] imageRawDataRGBA; // 画像の生データを格納する配列

  private int frameCount;

  // Use this for initialization
  void Start () {
    this.frameCount = 0;
    this.texRGB = new Texture2D (256, 256, TextureFormat.RGB24, false); // RGB画像
    this.imageRawDataRGB = new byte[256 * 256 * 3];

    this.texRGBA = new Texture2D (256, 256, TextureFormat.RGBA32, false); // RGBA画像
    this.imageRawDataRGBA = new byte[256 * 256 * 4];
  }

  // Update is called once per frame
  void Update () {
    this.frameCount++;
    IntPtr imageDataRGB = SetTexture.GetTexture01 (this.frameCount);
    Marshal.Copy (imageDataRGB, this.imageRawDataRGB, 0, 256 * 256 * 3);
    this.texRGB.LoadRawTextureData (this.imageRawDataRGB);
    this.texRGB.Apply ();
    this.mat1.mainTexture = this.texRGB;

    IntPtr imageDataRGBA = SetTexture.GetTexture02 (this.frameCount);
    Marshal.Copy (imageDataRGBA, this.imageRawDataRGBA, 0, 256 * 256 * 4);
    this.texRGBA.LoadRawTextureData (this.imageRawDataRGBA);
    this.texRGBA.Apply ();
    this.mat2.mainTexture = this.texRGBA;
  }
}
DLLImportを記述することで,dllのその関数がC#のスクリプトから呼び出せます.
適当なMaterialを2つ作成し(片方は透過するためRenderingModeをFadeに),インスペクタのMat1,Mat2に投げます.
2つのMaterialを適当なオブジェクトに貼り付けて,実行します.
実行結果

C++で作成したネイティブプラグインで画像データを生成し,Unityのマテリアル,Texture2Dに適用することができました.
今回の例はシェーダだけでも実現できる内容ですが,OpenCVなどの画像処理ライブラリと併用すると,更に有効活用できると思います.