概要
- Androidのミラーリングをサクッと出来るようにしたい!
- Oculus Questに入れても動く!
成果物
こんなものを作ってみました。
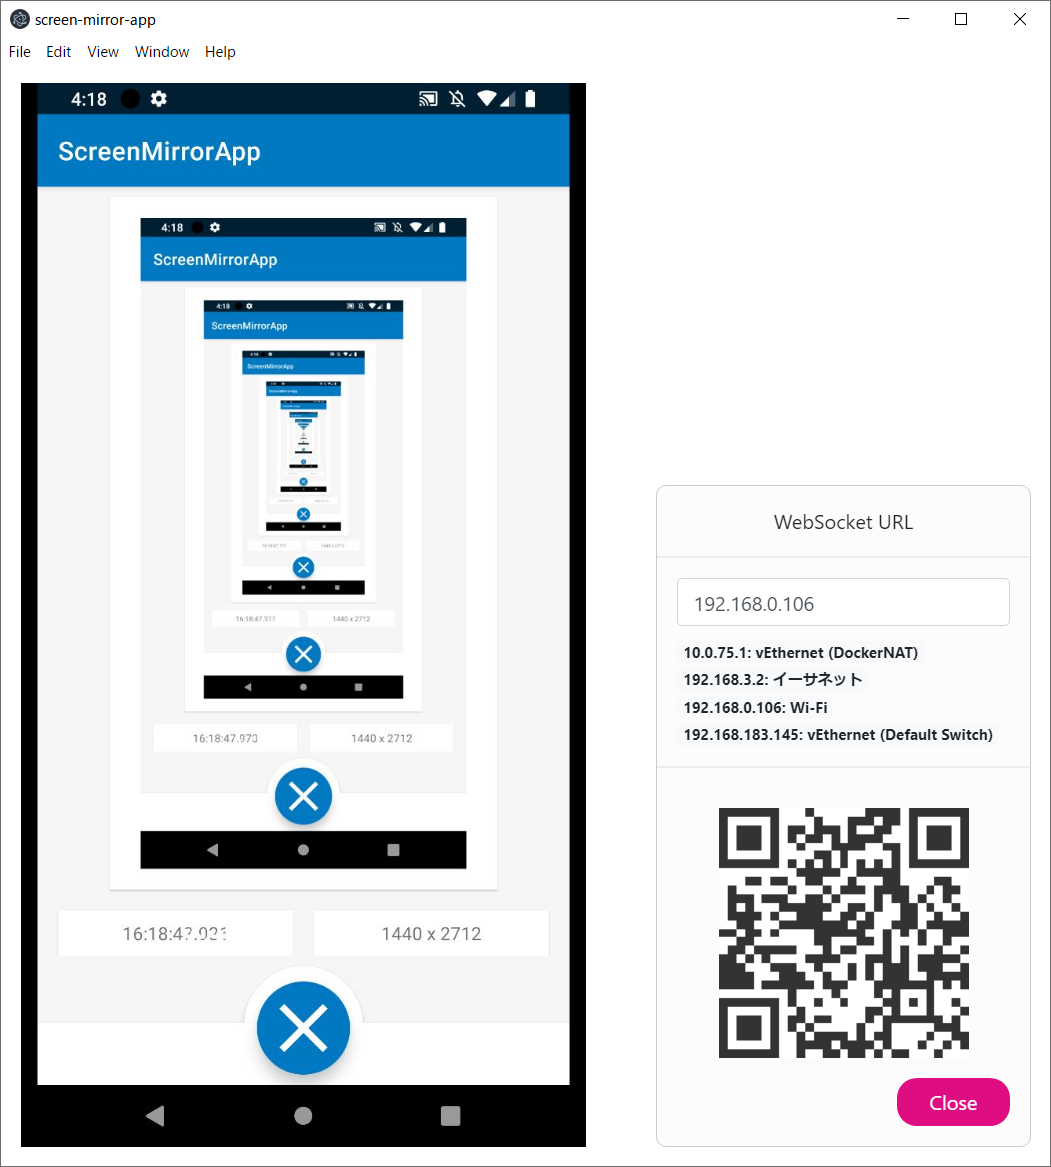
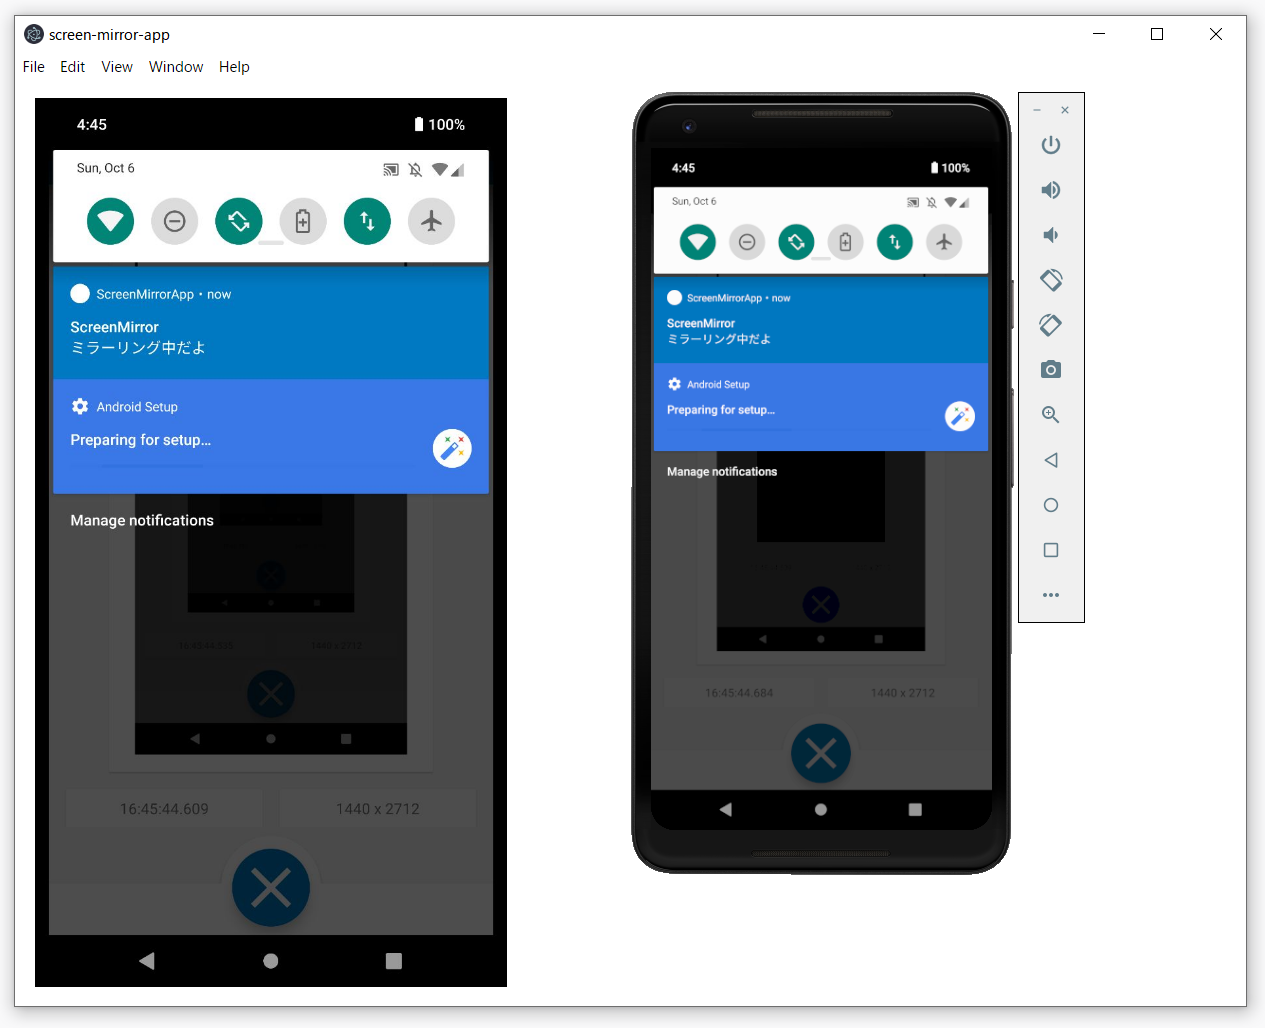
ミラーリング先(デスクトップアプリ)
src: https://github.com/TakenokoTech/ScreenMirrorAndroid/tree/master/server
ミラーリング元(Androidアプリ)
動作確認 pic.twitter.com/qvgKfKhn6X
— たけのこ (@TakenokoTech) October 6, 2019
src: https://github.com/TakenokoTech/ScreenMirrorAndroid
MediaProjection API とは?
Android 5.0 (Lollipop / SDK Level 21) で追加された別アプリのスクリーンショットを撮影できる機能。
Android の画面キャストの機能なんかで使われます。
リファレンス: https://developer.android.com/reference/android/media/projection/MediaProjection
今回作ったアプリの構成
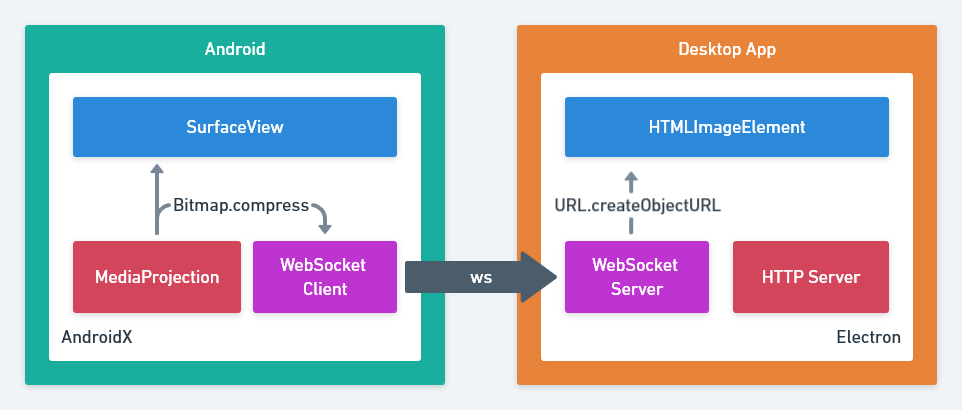
- デスクトップアプリは Electron を使用してみました。
-
H.264などの動画圧縮の規格を使用することも出来ますが扱いが難しいのでJPEGを投げてます。 - 無線化が目的なのでローカルにサーバーを立てて、Wi-Fi経由で接続するようにしてます。
【実装編: Android】
全体的なフローはこんな感じ
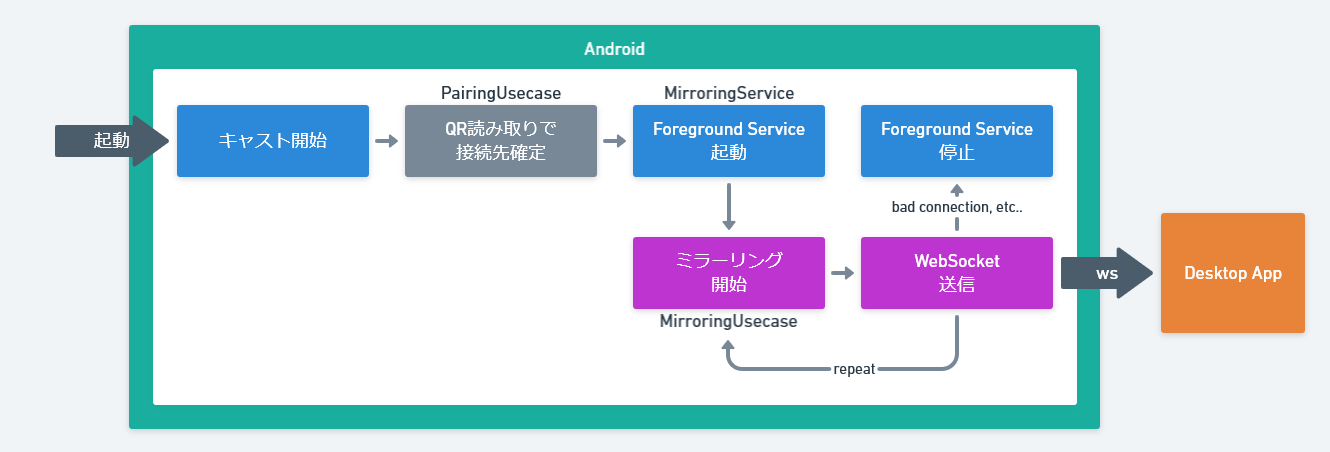
今回QR読み取りする部分は省きます。(ZXing Android Embeddedを使用しました)
MediaProjectionの取得
    <application>
        <activity android:name=".MainActivity" ... />
+       <activity
+           android:name=".model.MediaProjectionModel"
+           android:theme="@android:style/Theme.Translucent" />
class MediaProjectionModel : Activity() {
    private lateinit var mediaProjectionManager: MediaProjectionManager

    override fun onCreate(savedInstanceState: Bundle?) {
        super.onCreate(savedInstanceState)
        mediaProjectionManager = getSystemService(Service.MEDIA_PROJECTION_SERVICE) as MediaProjectionManager
        startActivityForResult(mediaProjectionManager.createScreenCaptureIntent(), REQUEST_CAPTURE)
    }

    override fun onActivityResult(requestCode: Int, resultCode: Int, data: Intent?) {
        if (requestCode == REQUEST_CAPTURE && resultCode == RESULT_OK && data != null) {
            projection(mediaProjectionManager.getMediaProjection(resultCode, data))
        }
        finish()
    }

    companion object {
        private const val REQUEST_CAPTURE = 1

        private var projection: (MediaProjection?) -> Unit = {}
        val run: (context: Context, (MediaProjection?) -> Unit) -> Unit = { context, callback ->
            projection = callback
            context.startActivity(Intent(context, MediaProjectionModel::class.java).addFlags(Intent.FLAG_ACTIVITY_NEW_TASK))
        }
    }
}
- 透明なActivityを使って
onActivityResultを拾ってます。(たぶん危険)
WebSocketを実装
src: WebSocketModel.kt
class WebSocketModel (uri: URI) : WebSocketClient(uri) {
    override fun onOpen(handshakedata: ServerHandshake?) {}
    override fun onClose(code: Int, reason: String?, remote: Boolean) {}
    override fun onMessage(message: String?) {}
    override fun onError(ex: Exception?) {}
}
- 一旦は空実装
ミラーリングする部分
src: MirrorModel.kt
class MirrorModel(private val metrics: DisplayMetrics, private val callback: MirrorCallback) : ImageReader.OnImageAvailableListener {
    enum class StatesType { Stop, Running }

    private var mediaProjection: MediaProjection? = null
    private var virtualDisplay: VirtualDisplay? = null

    private lateinit var heepPlane: Image.Plane
    private lateinit var heepBitmap: Bitmap

    private val scale = 0.5 // 端末ごとに調整して下さい

    fun setMediaProjection(mediaProjection: MediaProjection?) {
        this.mediaProjection = mediaProjection
    }

    fun disconnect() {
        runCatching {
            virtualDisplay?.release()
            mediaProjection?.stop()
        }.exceptionOrNull()?.printStackTrace()
        callback.changeState(StatesType.Stop)
    }

    @SuppressLint("WrongConstant")
    fun setupVirtualDisplay(): ImageReader? {
        val width = (metrics.widthPixels * scale).toInt()
        val height = (metrics.heightPixels * scale).toInt()
        val reader = ImageReader.newInstance(width , height, PixelFormat.RGBA_8888, 2).also { it.setOnImageAvailableListener(this, null) }
        virtualDisplay = mediaProjection?.createVirtualDisplay(
            "Capturing Display",
            width,
            height,
            metrics.densityDpi,
            DisplayManager.VIRTUAL_DISPLAY_FLAG_AUTO_MIRROR,
            reader!!.surface,
            null,
            null
        )
        callback.changeState(StatesType.Running)
        return reader
    }

    override fun onImageAvailable(reader: ImageReader) {
        reader.acquireLatestImage().use { img ->
            runCatching {
                heepPlane = img?.planes?.get(0) ?: return@use null
                val width = heepPlane.rowStride / heepPlane.pixelStride
                val height = (metrics.heightPixels * scale).toInt()
                heepBitmap = Bitmap.createBitmap(width, height, Bitmap.Config.ARGB_8888).apply { copyPixelsFromBuffer(heepPlane.buffer) }
                callback.changeBitmap(heepBitmap)
            }
        }
    }

    interface MirrorCallback {
        fun changeState(states: StatesType)
        fun changeBitmap(image: Bitmap?)
    }
}
-
createVirtualDisplayの width, height は端末によっては大きすぎる事があるので、スケーリング出来るようにした方が良さそう。
作ったロジックを合体
src: MirroringUsecase.kt
class MirroringUsecase(private val context: Context): MirrorModel.MirrorCallback {

    private var mirrorModel: MirrorModel = MirrorModel(context.resources.displayMetrics, this)
    private var webSocketModel: WebSocketModel = WebSocketModel(URI("ws://10.0.2.2:8080"))

    private var reader: ImageReader? = null
    private var sending: Boolean = false

    init {
        changeState(MirrorModel.StatesType.Stop)
    }

    fun start() {
        MediaProjectionModel.run(context) {
            runCatching {
                mirrorModel.setMediaProjection(it)
                webSocketModel.connect()
                reader = mirrorModel.setupVirtualDisplay()
            }.exceptionOrNull()?.printStackTrace()
        }
    }

    fun restart() {
        runCatching {
            reader = mirrorModel.setupVirtualDisplay()
        }.exceptionOrNull()?.printStackTrace()
    }

    fun stop() {
        mirrorModel.disconnect()
        webSocketModel.close()
    }

    override fun changeState(states: MirrorModel.StatesType) {
        stateLivaData.value = states
    }

    override fun changeBitmap(image: Bitmap?) {
        if(!webSocketModel.isOpen) MirroringService.stop(context)
        sending = if(!sending) true else return
        GlobalScope.launch(Dispatchers.Main) {
            ByteArrayOutputStream().use { stream ->
                image?.compress(Bitmap.CompressFormat.JPEG, 80, stream).also {
                    sending = false
                    webSocketModel.send(stream.toByteArray())
                }
            }
        }
        imageLivaData.value = image
    }

    companion object {
        val stateLivaData: MutableLiveData<MirrorModel.StatesType> = MutableLiveData()
        val imageLivaData: MutableLiveData<Bitmap> = MutableLiveData()
    }
}
フォアグラウンドサービスの作成
src: MirroringService.kt
class MirroringService : Service() {

    lateinit var mirroringUsecase: MirroringUsecase

    override fun onBind(intent: Intent?): IBinder? {
        return null
    }

    @RequiresApi(Build.VERSION_CODES.O)
    override fun onStartCommand(intent: Intent?, flags: Int, startId: Int): Int {

        (getSystemService(Context.NOTIFICATION_SERVICE) as NotificationManager?).also { manager ->
            kotlin.runCatching {
                if (manager?.getNotificationChannel(CHANNEL_ID) == null) manager?.createNotificationChannel(
                    NotificationChannel(CHANNEL_ID, CHANNEL_NAME, NotificationManager.IMPORTANCE_HIGH).apply {
                        description = CHANNEL_DESC
                    }
                )
            }
        }

        startForeground(ID, NotificationCompat.Builder(this, CHANNEL_ID).apply {
            color = ContextCompat.getColor(applicationContext, R.color.colorNotificationBack)
            setColorized(true)
            setSmallIcon(R.mipmap.ic_launcher)
            setStyle(NotificationCompat.DecoratedCustomViewStyle())
            setContentTitle(NOTIFY_TITLE)
            setContentText(NOTIFY_TEXT)
        }.build())

        return START_NOT_STICKY
    }

    override fun onCreate() {
        super.onCreate()
        mirroringUsecase = MirroringUsecase(this)
        mirroringUsecase.start()
        registerReceiver(configChangeBroadcastReciver, IntentFilter("android.intent.action.CONFIGURATION_CHANGED"))
    }

    override fun onDestroy() {
        unregisterReceiver(configChangeBroadcastReciver)
        mirroringUsecase.stop()
        super.onDestroy()
    }

    private val configChangeBroadcastReciver = object: BroadcastReceiver(){
        override fun onReceive(context: Context?, intent: Intent?) {
            mirroringUsecase.restart()
        }
    }

    companion object {
        const val ID = 1
        const val CHANNEL_ID = "mirrorForeground"
        const val CHANNEL_NAME = "ミラーリング"
        const val CHANNEL_DESC = "録画するよ"
        const val NOTIFY_TITLE = "ScreenMirror"
        const val NOTIFY_TEXT = "ミラーリング中だよ"

        val start: (Context) -> Unit = {
            val intent = Intent(it, MirroringService::class.java)
            if (Build.VERSION.SDK_INT >= 26) it.startService(intent)
            else it.startService(intent)
        }

        val stop: (Context) -> Unit = {
            val intent = Intent(it, MirroringService::class.java)
            it.stopService(intent)
        }
    }
}
ミラーリング開始
MirroringService.start(context)
- ActivityでもFragmentでもどこでもいいので作ったサービスを起動する。
ミラーリング終了
MirroringService.stop(context)
【実装編: Electron】
全体的なフローはこんな感じ
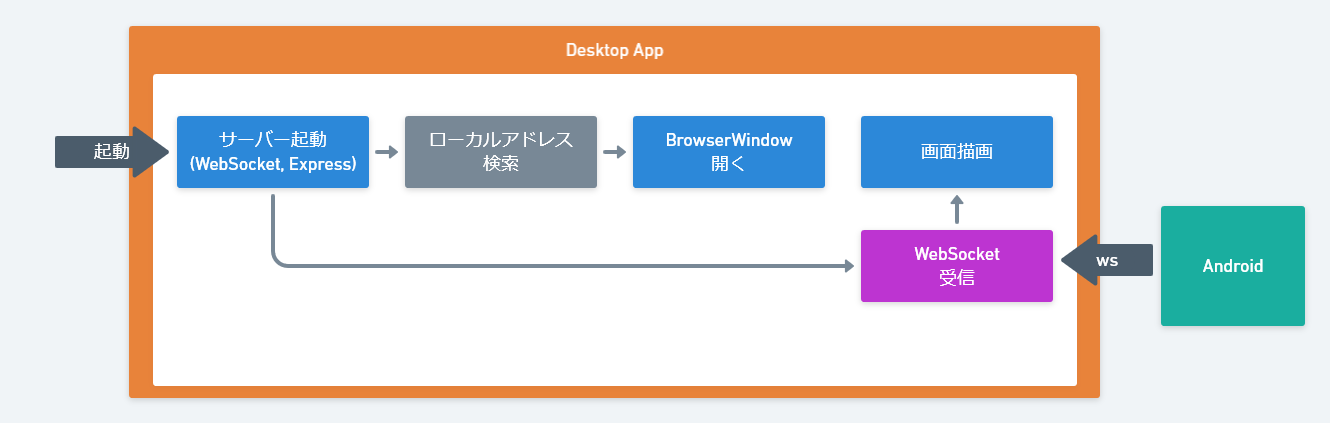
今回は省略しますが、使えるローカルアドレスをQRで表示しておくと
AndroidアプリからWebSocketに接続するときのアドレスがスムーズに渡せれるのでお勧めです。
(jquery.qrcode.jsを使用しました)
Electronのインストール
「はじめての Electron アプリ」 を参考にElectronでデスクトップアプリを動かせるようにする。
(Typescript用に webpack.config.js も作成したので必要なら使ってください)
WebSocket(Server)を実装
src: Websocket.ts
import WebSocket from 'ws';

const server = new WebSocket.Server({ port: 8080 });
let tempMessage = '';

export function startWebsocket() {
    server.on('connection', ws => {
        ws.on('message', message => {
            if (message == 'polling') {
                if (tempMessage != '') ws.send(tempMessage);
                return;
            }
            tempMessage = message;
        });
    });
}
アプリ開始時にWebSocket(Server)を起動させる
src: main.ts
app.on('ready', () => {

+   startWebsocket();
ウェブページを作成
src: index.html
<html>
    <head>
        <base href="./" />
        <meta
           http-equiv="Content-Security-Policy"
           content="default-src 'self' data: gap: ws: blob: http://localhost:* 'unsafe-inline'; " />
        <link href="./style.css" rel="stylesheet" />
    </head>
    <body>
        <img id="image" />
        <script type="text/javascript" src="renderer.js"></script>
    </body>
</html>
WebSocket(Client)を実装
src: renderer.ts
const image = document.getElementById('image');

class WebSocketClient {
    private socket = null;
    private timer = null;

    open(url) {
        this.close();
        this.socket = new WebSocket(url);
        this.socket.addEventListener('open', e => {
            console.log('open');
            this.timer = setInterval(() => this.socket.send('polling'), 60);
        });
        this.socket.addEventListener('message', e => (image.src = URL.createObjectURL(e.data)));
        this.socket.addEventListener('close', e => console.log('close', e));
        this.socket.addEventListener('error', e => console.log('error', e));
    }

    close() {
        clearInterval(this.timer);
        if (this.socket) this.socket.close();
    }
}

new WebSocketClient().open(`ws://localhost:8080`);
最後に動作確認
アプリを同時に起動させればミラーリング出来ているかと思います!
Oculus Quest でも動作確認
SideQuest を使ってOculus Questで動かしてみた。
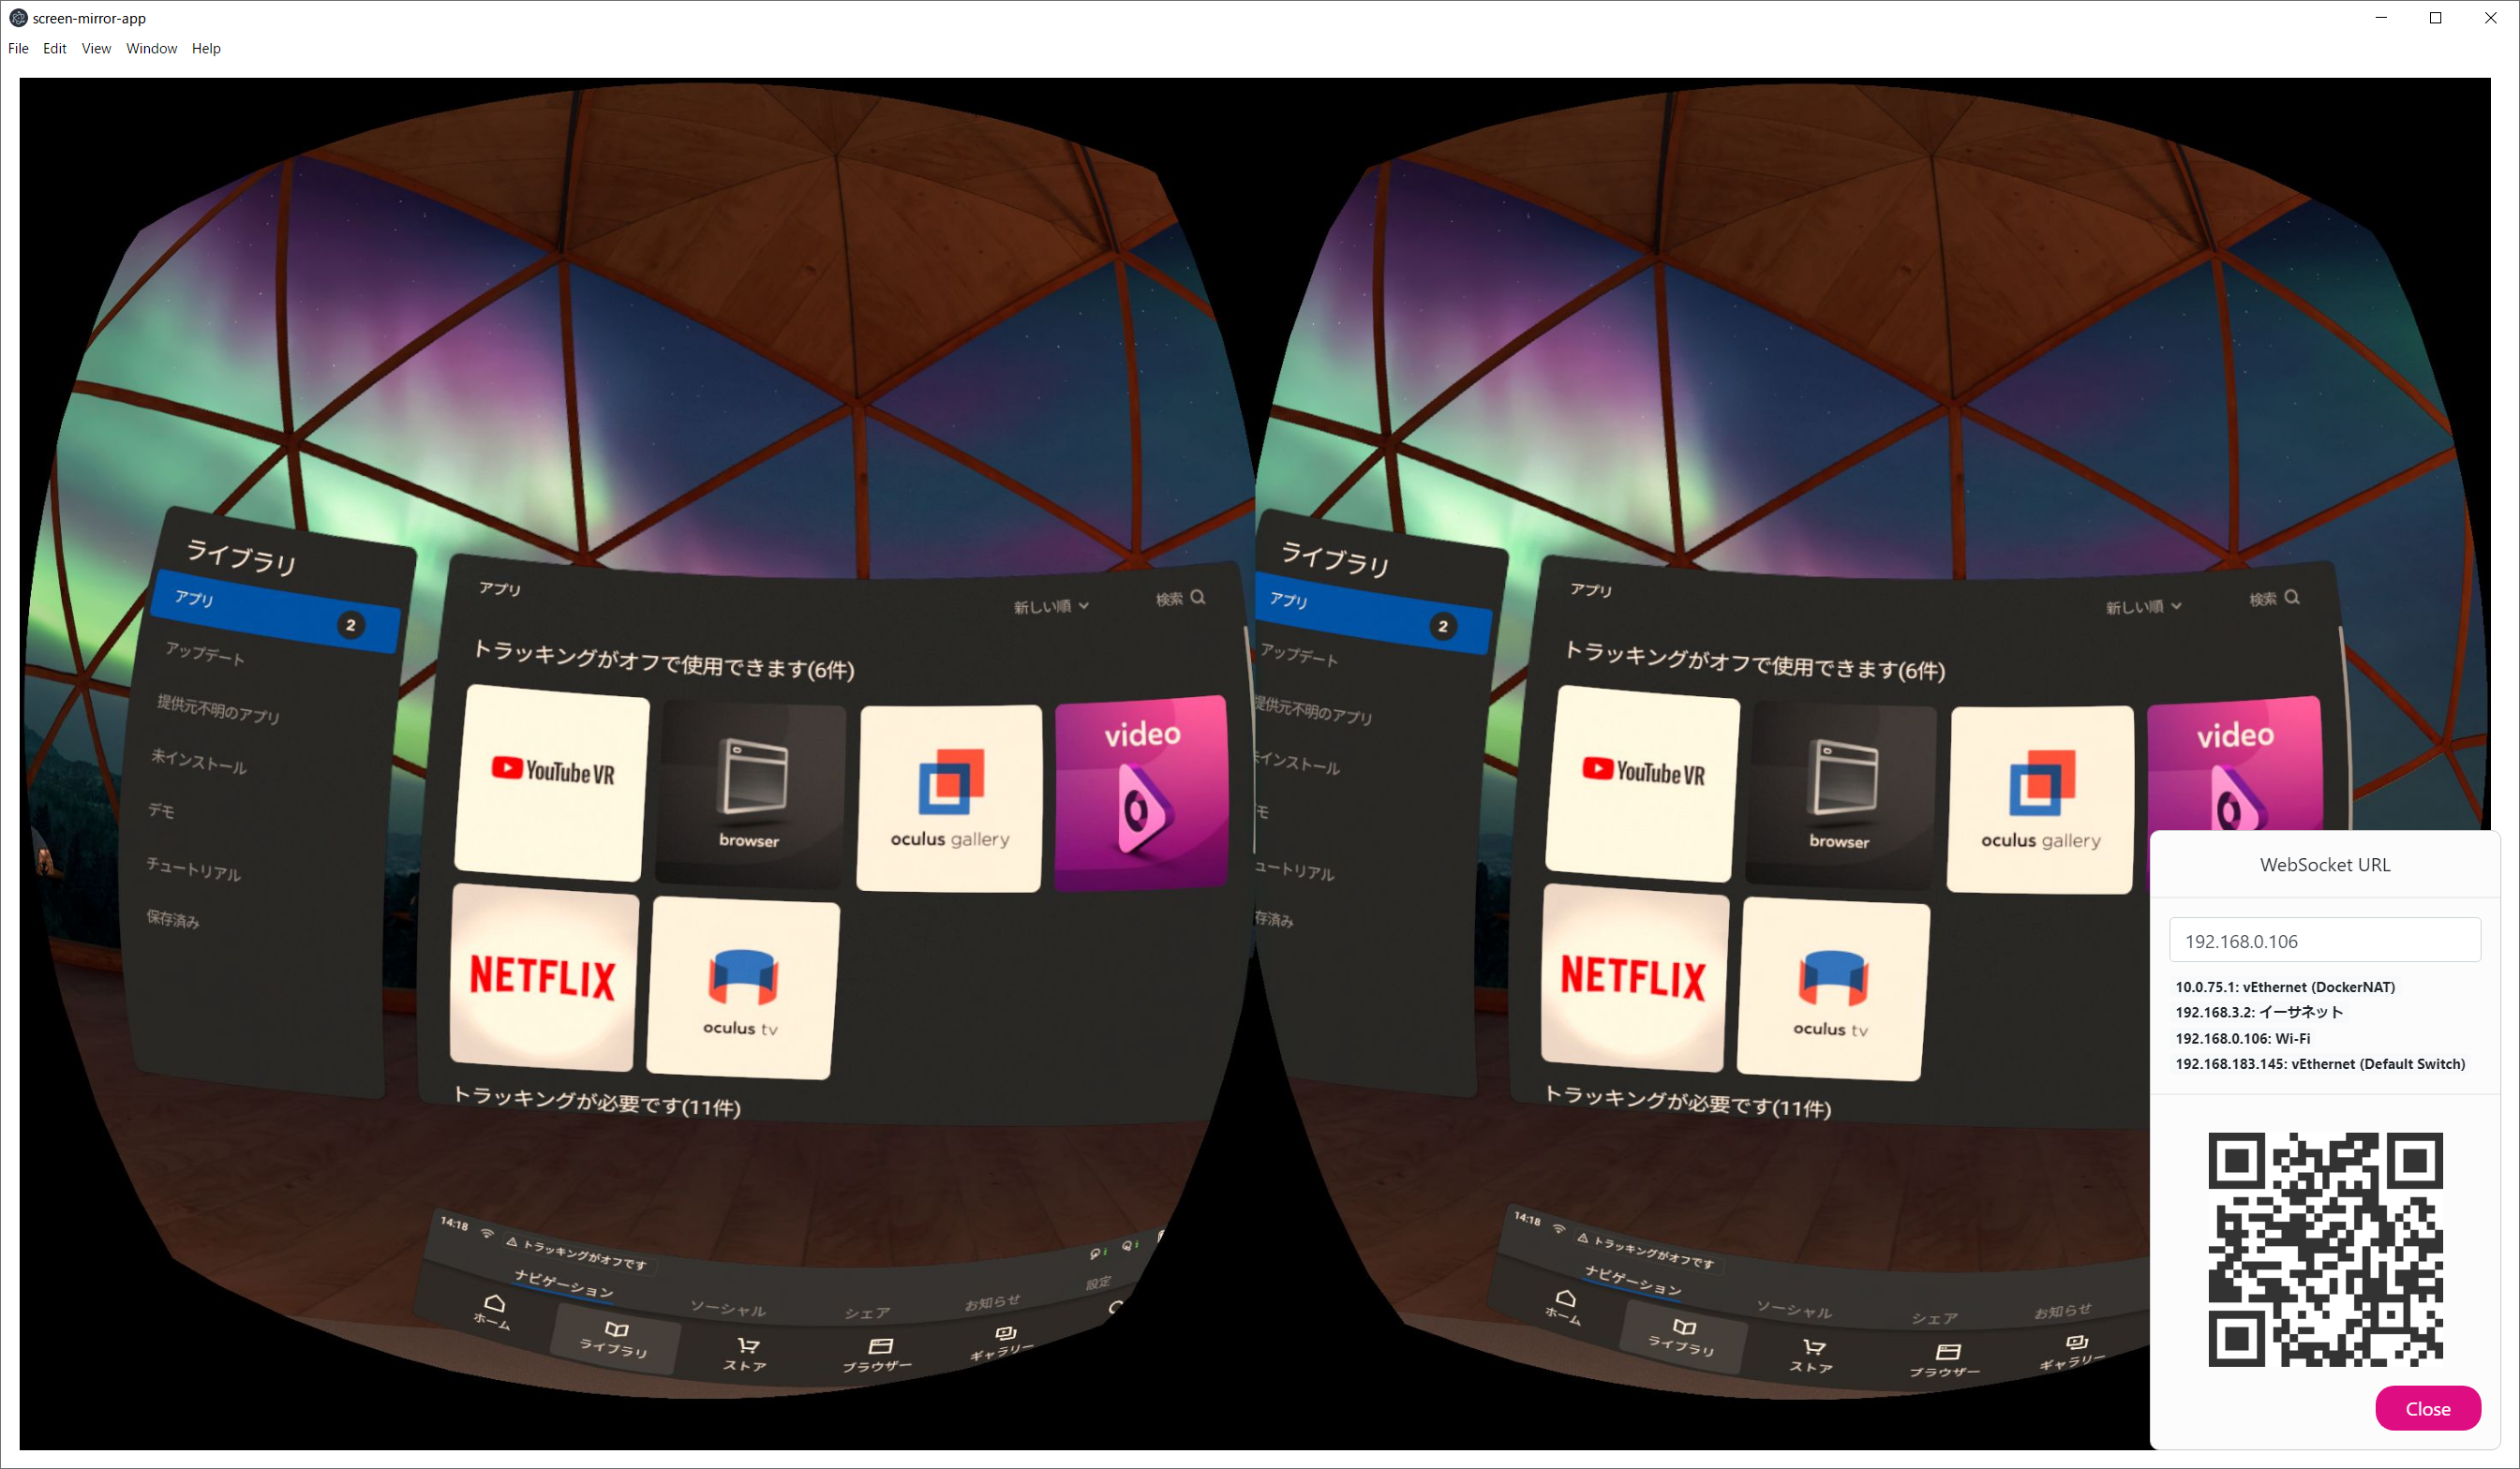
お見事!
まとめ
何となく手探りで作ってみましたが、意外と形になりました。
パフォーマンス面は不安がまだまだあるので、これからも試行錯誤していきたいと思います。
OculusQuestのキャストが不安定で何とかならんかな~って思い立ったのがきっかけで作り始めたので動作確認まで出来て良かったです。
ネイティブAndroid もフル活用して Good な VR Life を!