概要
Webブラウザ(+α)でVRM形式のキャラクターを動かしてみた!
成果物
こんなものを作ってみました。
three.js + Cannon.js でめり込ませない!

preview: https://takenokotech.github.io/ts-vrm
code: https://github.com/TakenokoTech/ts-vrm
three.js + Leap Motion で動かす!
Unity + Leap Motion + VRM → WebSocket → three.js
— たけのこ🙏 (@TakenokoT42) 2019年3月3日
WebVRを触っていきたかったのでVrmAvaterのアニメータをjsonで投げまくってモーションデータ共有できるようにした。 pic.twitter.com/kCodKoQ8jt
そもそもVRMとは?
VRアプリケーション向けの人型3Dアバター(3Dモデル)データを扱うためのファイルフォーマット
— https://dwango.github.io/vrm/
ファイル自体は、JSONで書かれた3Dモデルやシーンを表現するフォーマット「glTF2.0」のデータにVRMの拡張情報を追加したデータです。
three.jsでVRMを表示
three.jsにはGLTFLoaderというgltfファイルを読み込めるローダーがあるので何も考えずに表示してみます。
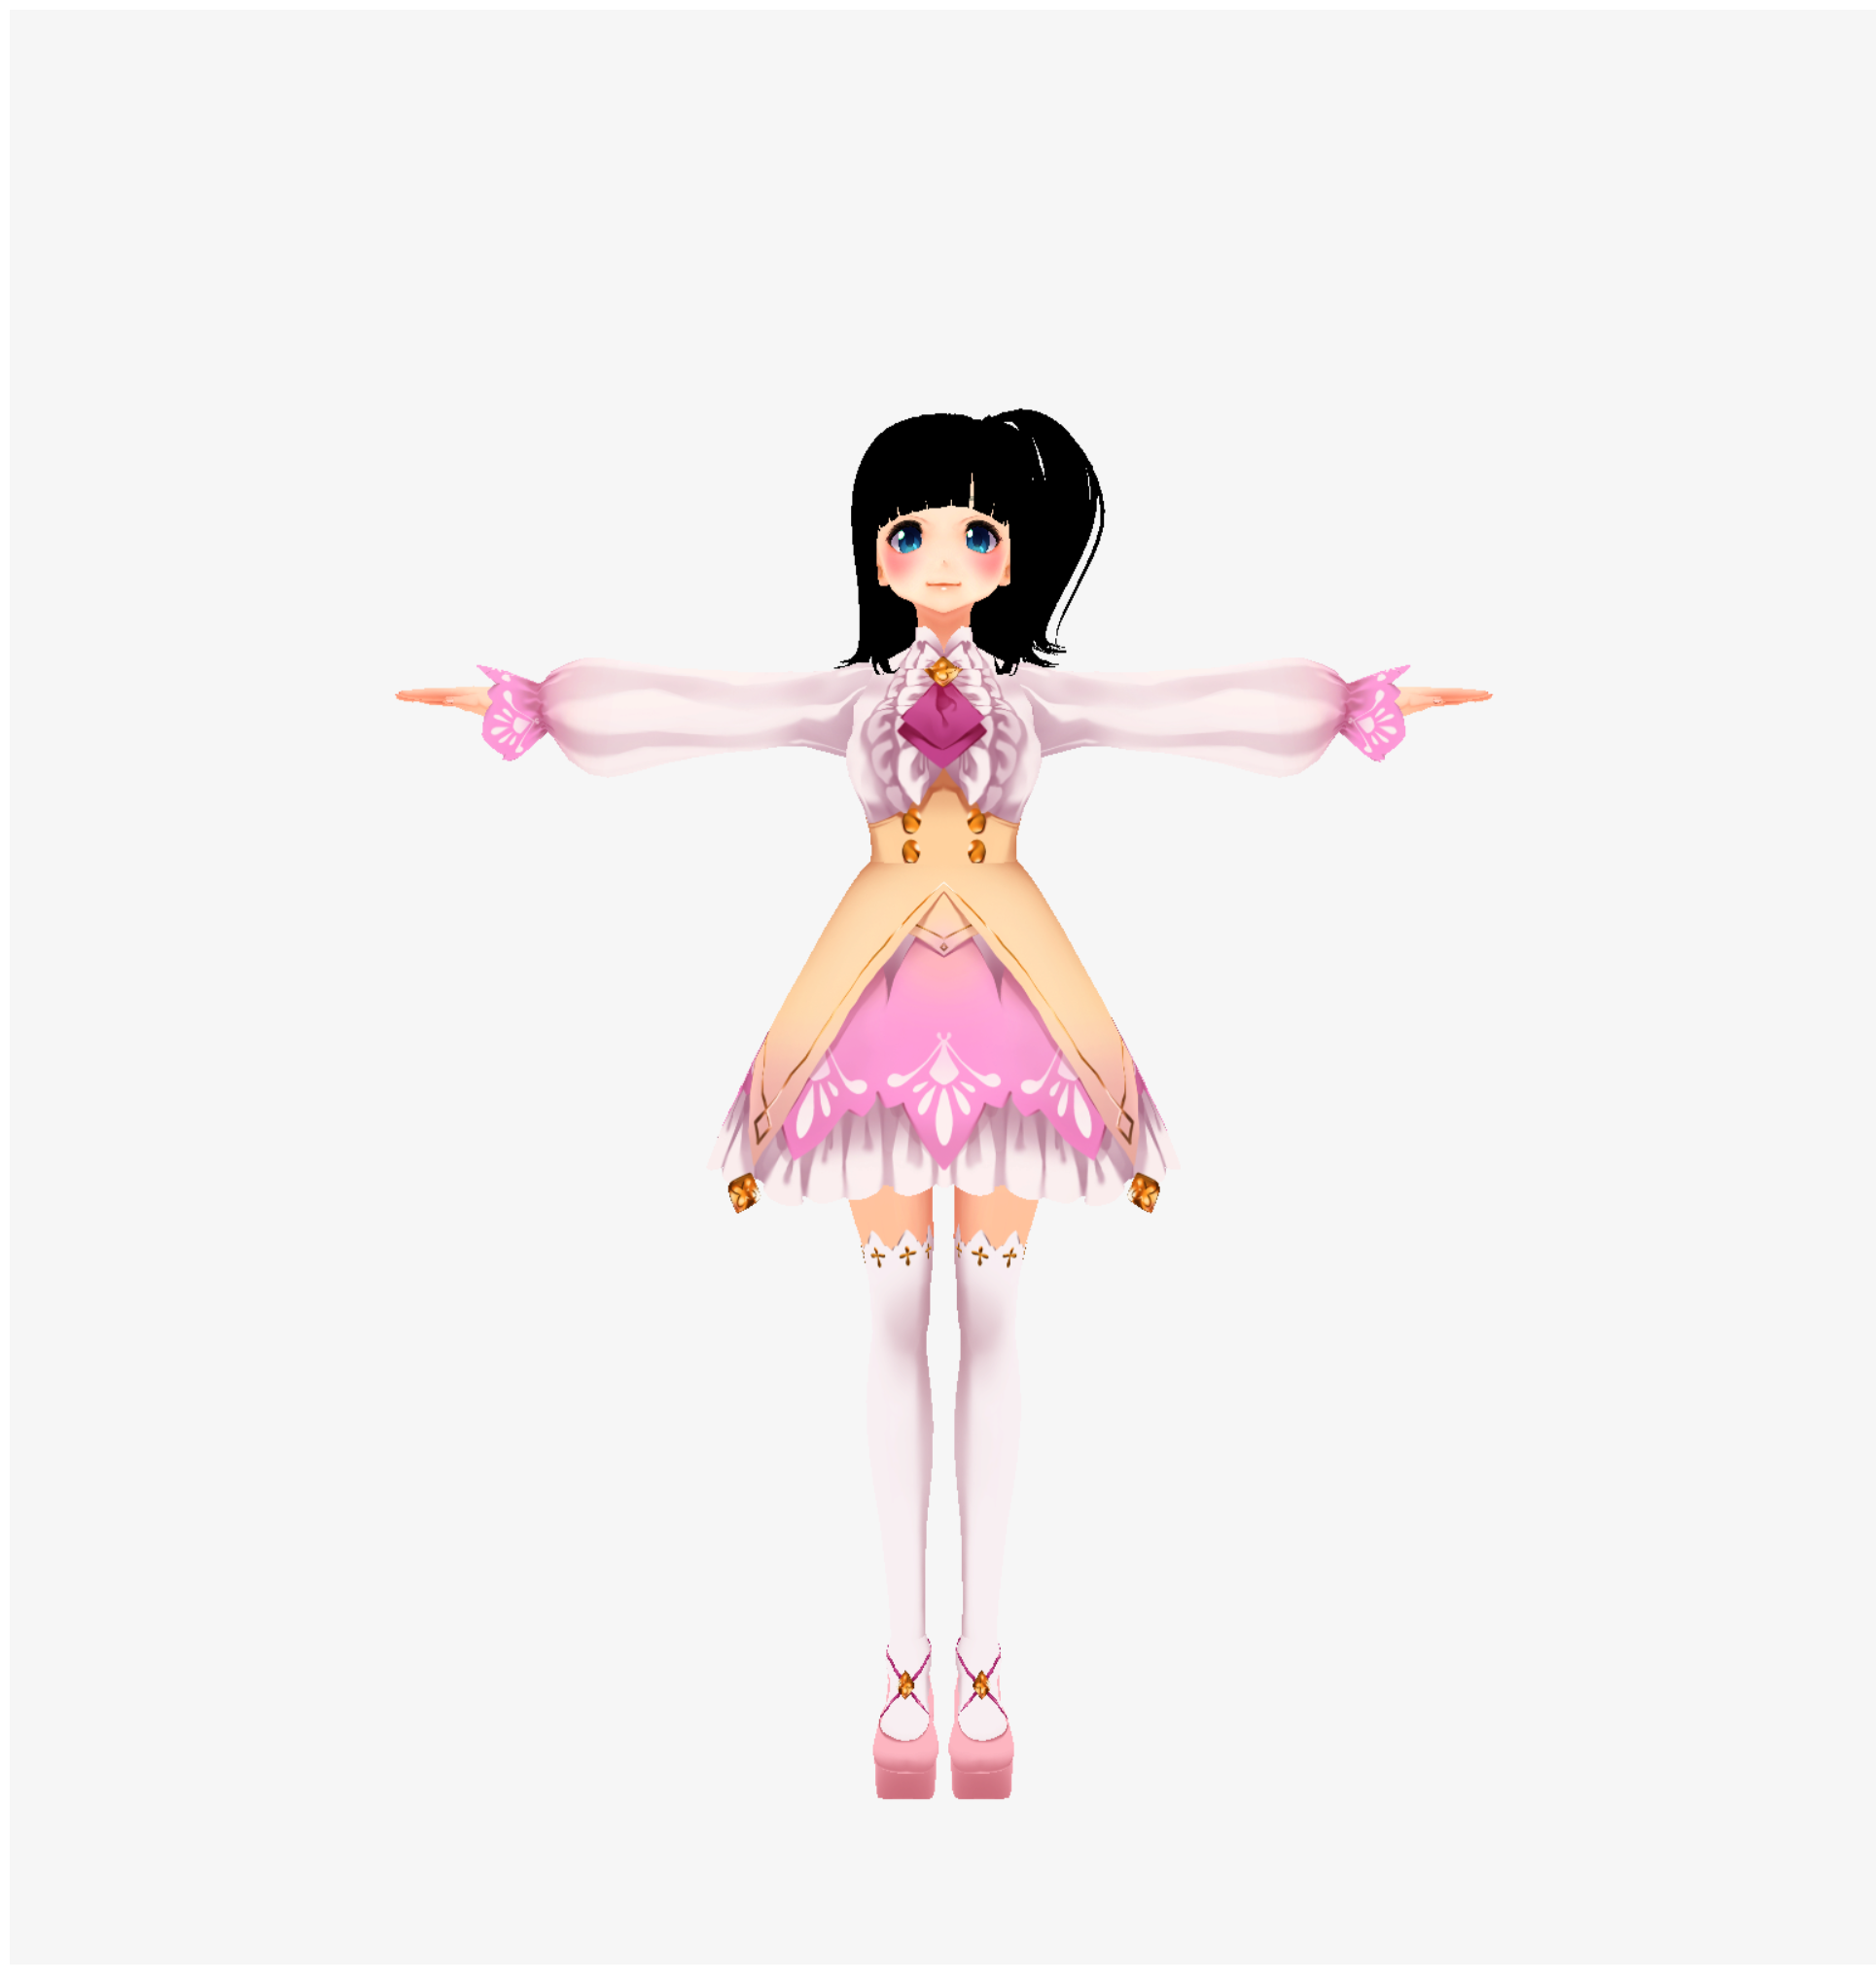
モデルにはルービンちゃんをお借りしてます。
import * as THREE from "three";
import GLTFLoader from "three-gltf-loader";
import OrbitControls from "three-orbitcontrols";

// 幅、高さ取得
const width = window.innerWidth;
const height = window.innerHeight;

// レンダラの作成、DOMに追加
const renderer = new THREE.WebGLRenderer();
renderer.setSize(width, height);
renderer.setClearColor(0xf6f6f6, 1.0);
document.body.appendChild(renderer.domElement);

// シーンの作成、ライトの作成と追加
const scene = new THREE.Scene();
scene.add(new THREE.AmbientLight(0xffffff, 1));

// カメラの作成と追加、OrbitControlsの追加
const camera = new THREE.PerspectiveCamera(45, width / height, 1, 100);
camera.position.set(0, 1, -3);
const controls = new OrbitControls(camera, renderer.domElement);
controls.target.set(0, 1, 0);
controls.update();

// VRMのファイルをロード
new GLTFLoader().load("vrm/Victoria_Rubin.vrm", (data) => {
    scene.add(data.scene);
});

// レンダリング
const render = () => {
    renderer.render(scene, camera);
    requestAnimationFrame(render);
};
render();
残念ながら、VRM拡張のマテリアルが当たらなくて髪が真っ黒になってしまいました![]()
VRMが表示できるローダーを作ってみる
https://github.com/Keshigom/WebVRM/blob/master/docs/src/WebVRM.js
こちらを参考にさせていただきました。
import * as THREE from "three";

export default class VrmLoader {
    load(url: string, callback: (vrm: THREE.GLTF) => void) {
        new GLTFLoader(THREE.DefaultLoadingManager).load(url, (vrm: THREE.GLTF) => {
            vrm.scene.name = "VRM";
            vrm.scene.castShadow = true;
            vrm.scene.traverse(this.attachMaterial);
            callback(vrm);
        });
    }

    private attachMaterial(object3D: THREE.Object3D) {
        const createMaterial = (material: any): THREE.MeshLambertMaterial => {
            let newMaterial: any = new THREE.MeshLambertMaterial();
            newMaterial.name = material.name;
            newMaterial.color.copy(material.color);
            newMaterial.map = material.map;
            newMaterial.alphaTest = material.alphaTest;
            newMaterial.morphTargets = material.morphTargets;
            newMaterial.morphNormals = material.morphNormals;
            newMaterial.skinning = material.skinning;
            newMaterial.transparent = material.transparent;
            // newMaterial.wireframe = true;
            return newMaterial;
        };

        let mesh = object3D as THREE.Mesh;
        if (!mesh || !mesh.material) return;
        mesh.castShadow = true;

        if (Array.isArray(mesh.material)) {
            const list: THREE.Material[] = mesh.material;
            list.forEach((m: THREE.Material, index: number) => (list[index] = createMaterial(m)));
        } else {
            mesh.material = createMaterial(mesh.material);
        }
    }
}
- new GLTFLoader().load("vrm/Victoria_Rubin.vrm", (data) => {
+ new VrmLoader().load("vrm/Victoria_Rubin.vrm", (data) => {
VRM拡張: /extensions/VRM/materialProperties あたりのUnity依存のマテリアル情報を無視してthree.jsのマテリアルを当てなおしました。
あと、テカりの出ないMeshBasicMaterialを使っていたりするので、MeshLambertMaterialで作り直しています。
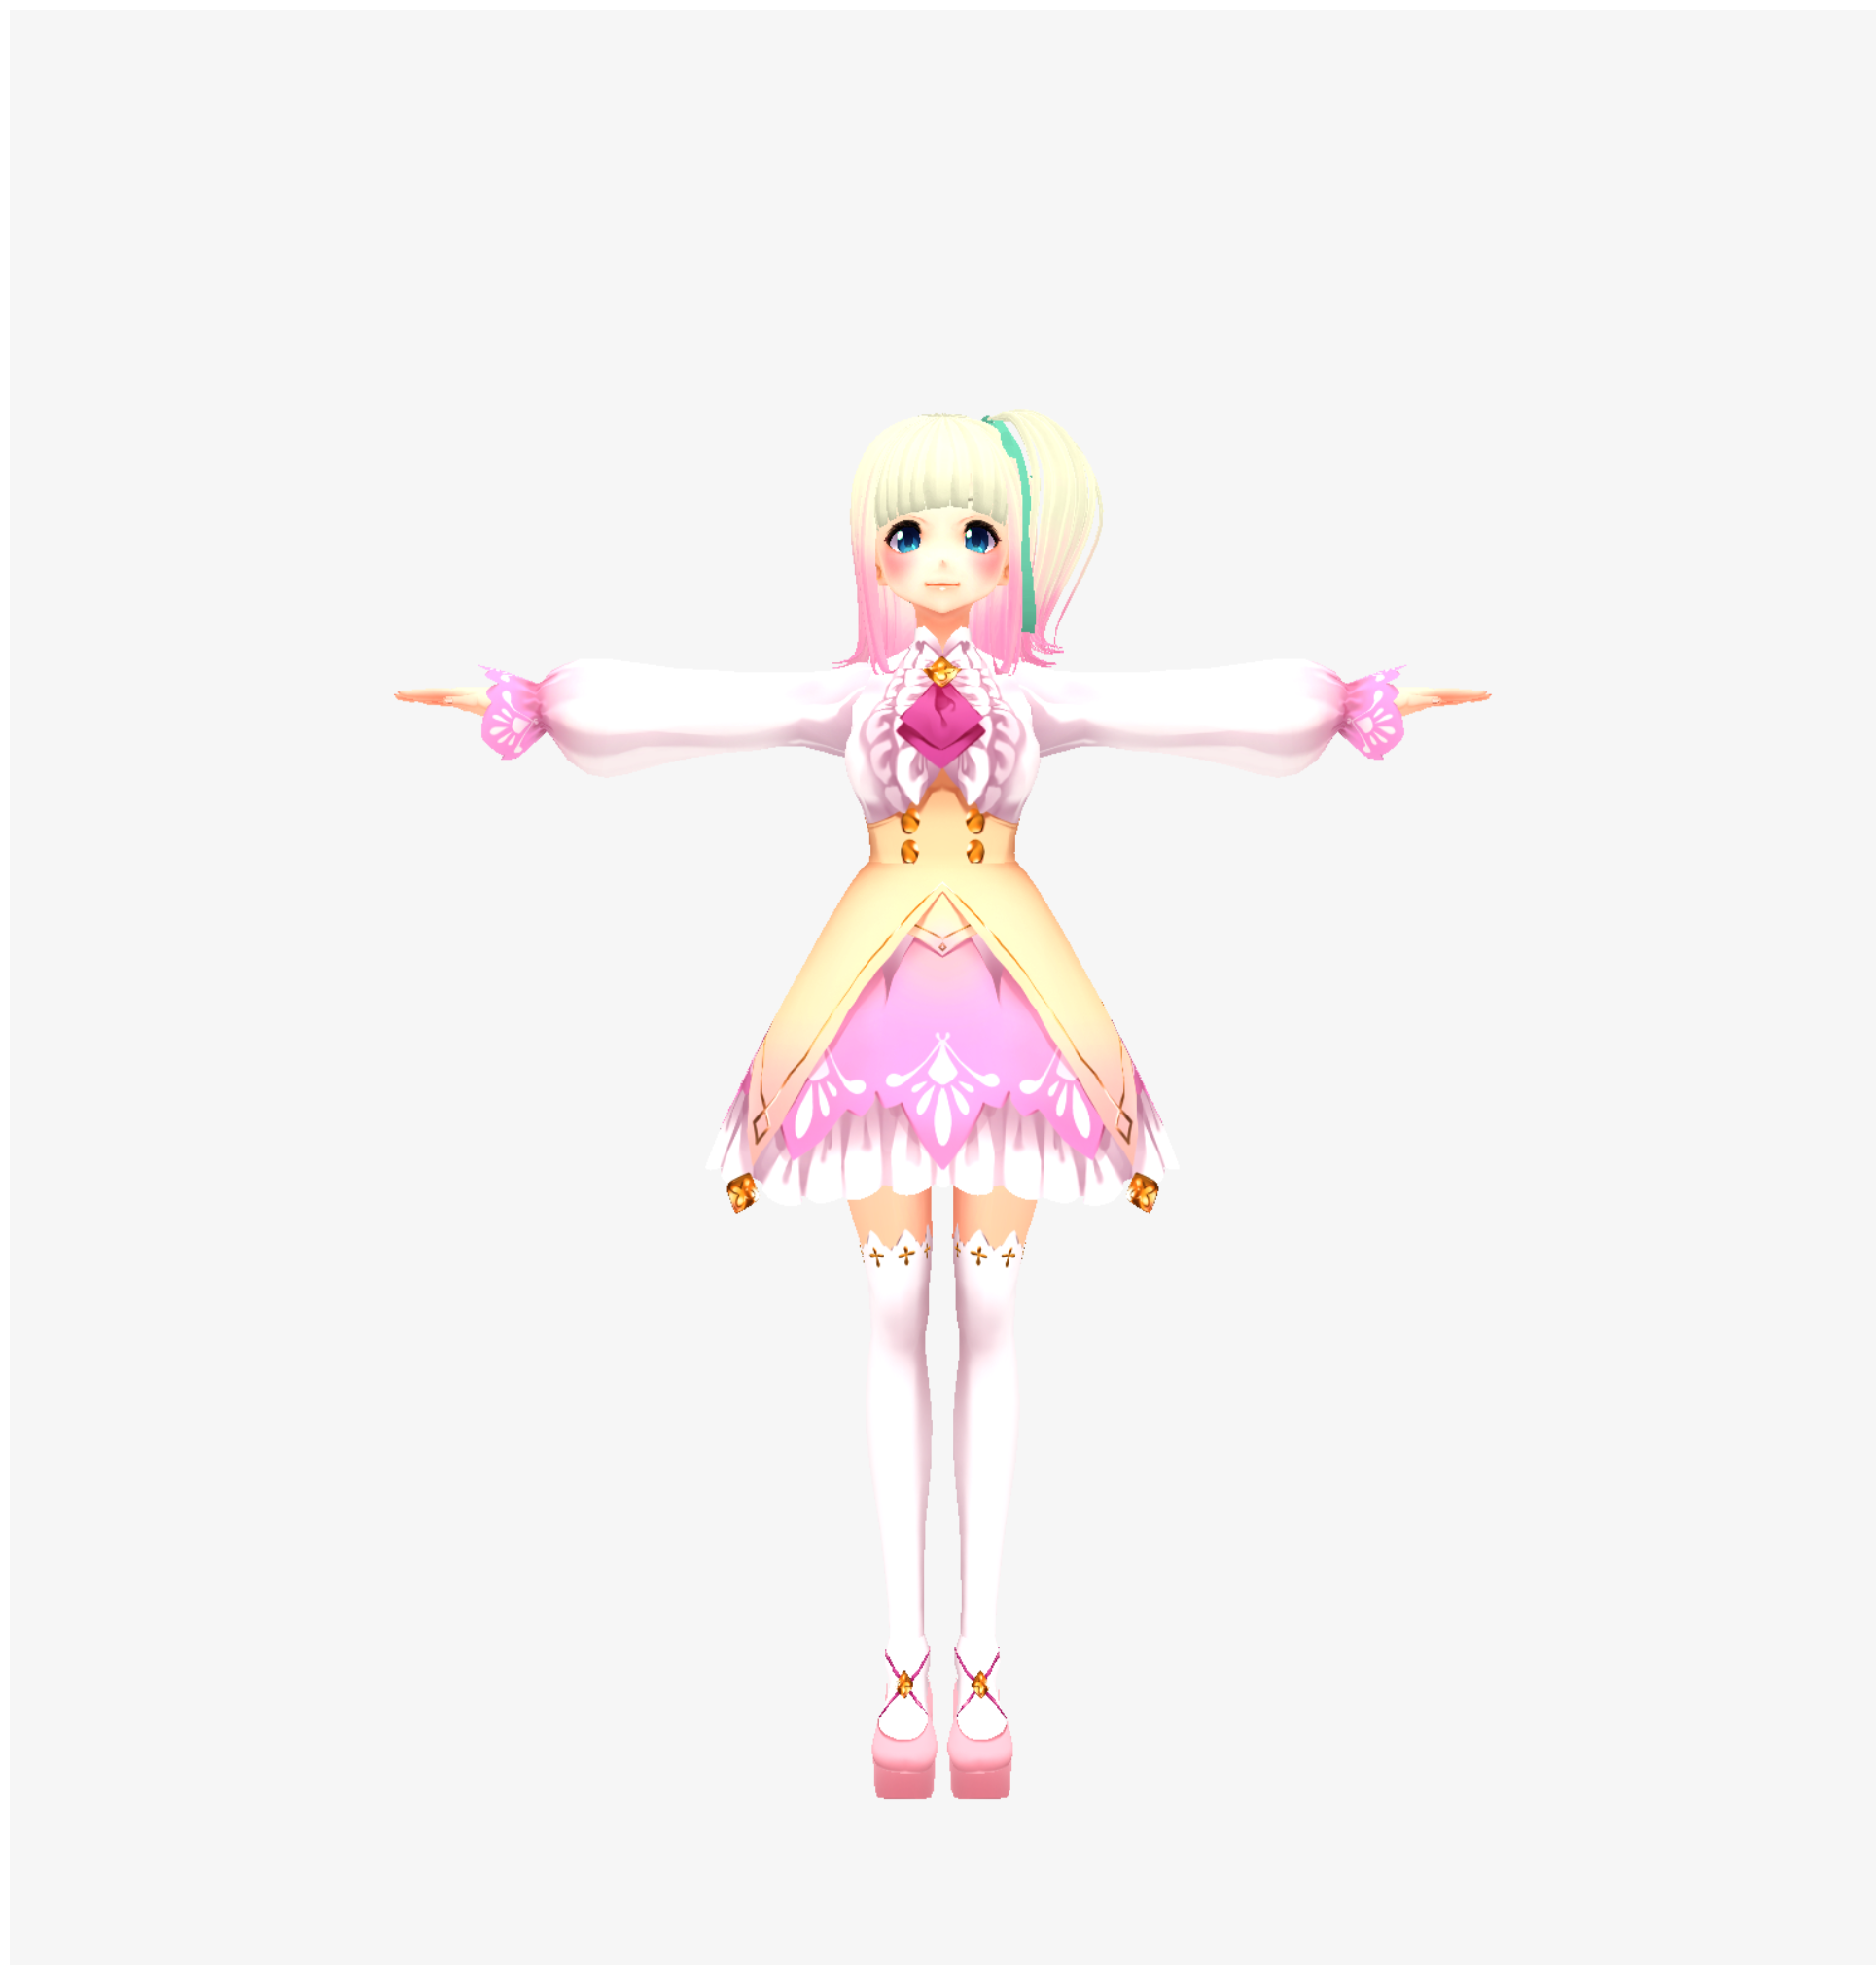
イイ感じ![]()
three.jsで表示したVRMモデルを動かす
今回はUnityでVRMモデルの動きをアニメーションデータとして出力したものをthree.jsで読み込んで動かしてみます。
VRMでは「VRM拡張: モデルのボーンマッピング(json.extensions.VRM.humanoid)」という項目でnodeとHumanoidが紐づいたボーン構造が取得できます。
schema/humanoid.json はHumanBodyBonesをjsonファイルに変換したものです。
Appendixにファイルを置いておきますね。
import humanoidBone from "schema/humanoid.json"

// VRMのファイルをロード
new VrmLoader().load("vrm/Victoria_Rubin.vrm", (data) => {
    scene.add(data.scene);
+   attachHumanoidBone(data)
});

//=== 追加 ===
function attachHumanoidBone(vrm: Vrm): { [n: number]: THREE.Bone } {
    const humanoidMap: { [n: number]: THREE.Bone } = {};
    for (const [i, humanBone] of vrm.userData.gltfExtensions.VRM.humanoid.humanBones.entries()) {
        for (const [j, node] of vrm.parser.json.nodes.entries()) {
            if (humanBone.node == j) {
                vrm.scene.traverse((object: any) => {
                    if (object.name == node.name) humanoidMap[humanoidBone[humanBone.bone]] = object;
                });
            }
        }
    }
    return humanoidMap;
}
これで、UnityのHumanoidと同じボーン構造として扱えるようになります。
| three.js | Unity |
|---|---|
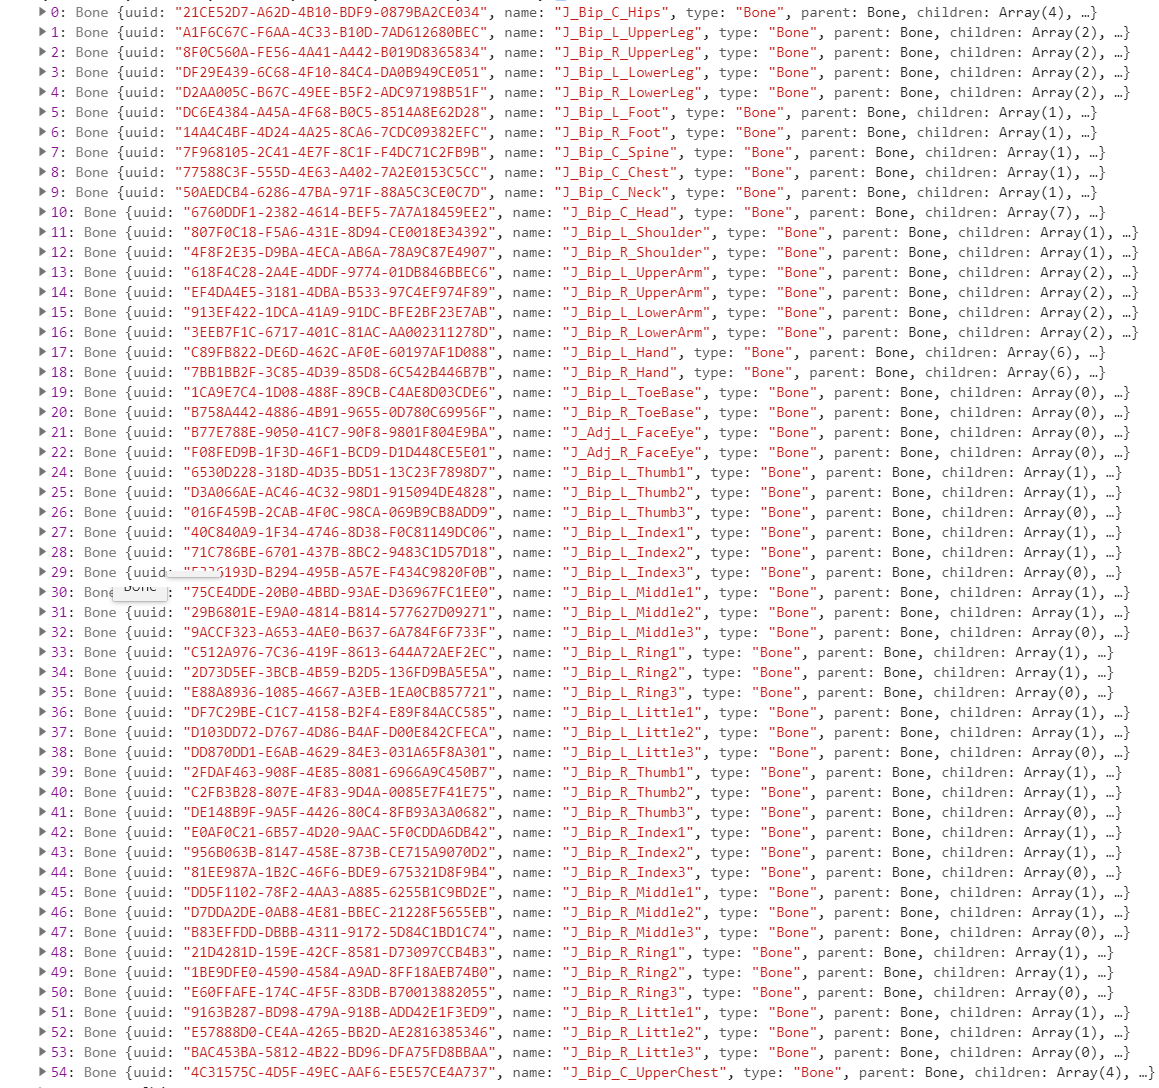 |
 |
あとは、マッスルを当てるだけ!
Unity側でアニメーションデータを作る
それでは、Unityでthree.jsで扱えるアニメーションデータを作ってみましょう。
通信にはwebsocket-sharpを使ってみます。
送信元
using System;
using System.Collections.Generic;
using UnityEngine;
using WebSocketSharp;
using static VrmAnimationJson;

public class WebSocketSender : MonoBehaviour {

    [SerializeField] private string characterName;
    [SerializeField] private Animator animator;
    [SerializeField] private Transform rootBone;

    private WebSocket webSocket;
    private HumanPose humanPose = new HumanPose ();
    private readonly VrmAnimationJson anime = new VrmAnimationJson ();

    void Start () {
        this.LoadBone ();
        this.StartWebsocket ();
    }

    void Update () {
        if (!webSocket.IsAlive) {
            webSocket.Connect ();
            return;
        }
        this.UpdateBone ();
        this.UpdateWebsocket ();
    }

    private void OnDestroy () {
        if (webSocket != null) webSocket.Close ();
    }

    private void StartWebsocket () {
        Debug.Log ("WebsocketAccessor Start");
        webSocket = new WebSocket ("ws://localhost:5001/");
        webSocket.OnOpen += (sender, e) => { Debug.Log ("Opended"); };
        webSocket.OnMessage += (sender, e) => { };
        webSocket.Connect ();
    }

    private void UpdateWebsocket () {
        Debug.Log ("WebsocketAccessor Update");
        try {
            webSocket.Send (JsonUtility.ToJson (this.anime));
        } catch (Exception e) {
            Debug.Log (e);
        }
    }

    private void LoadBone () {
        for (int i = 0; i <= 54; i++) {
            Transform bone = GetComponent<Animator> ().GetBoneTransform ((HumanBodyBones) i);
            this.anime.vrmAnimation.Add (new VrmAnimation ());
            this.anime.vrmAnimation[i].keys.Add (new Key ());
        }
    }

    private void UpdateBone () {
        Animator animator = GetComponent<Animator> ();
        HumanPoseHandler humanPoseHandler = new HumanPoseHandler (animator.avatar, this.rootBone);
        humanPoseHandler.GetHumanPose (ref humanPose);

        for (int i = 0; i <= 54; i++) {
            Transform bone = GetComponent<Animator> ().GetBoneTransform ((HumanBodyBones) i);
            if (bone == null) continue;
            float[] pos = new float[3] { bone.localPosition.x, bone.localPosition.y, bone.localPosition.z };
            float[] rot = new float[4] { bone.localRotation.x, bone.localRotation.y, bone.localRotation.z, bone.localRotation.w };
            float[] scl = new float[3] { bone.localScale.x, bone.localScale.y, bone.localScale.z };
            this.anime.vrmAnimation[i].name = "" + i;
            this.anime.vrmAnimation[i].bone = bone.name;
            this.anime.vrmAnimation[i].keys[0] = new Key (pos, rot, scl, 0);
        }
    }
}
- StartでWebsocketサーバーの接続とVrmAnimatorからボーン構造の取得
- Updateでボーン状態の取得とWebsocketサーバーへの送信
送信するアニメーションのモデル
[Serializable]
public class VrmAnimationJson {

    public List<VrmAnimation> vrmAnimation = new List<VrmAnimation> ();

    [Serializable]
    public class VrmAnimation {
        public string name = "";
        public string bone = "";
        public List<Key> keys = new List<Key> ();
    }

    [Serializable]
    public class Key {
        public float[] pos;
        public float[] rot;
        public float[] scl;
        public long time;

        public Key (float[] pos, float[] rot, float[] scl, long time) {
            this.pos = pos;
            this.rot = rot;
            this.scl = scl;
            this.time = time;
        }

        public Key () { }
    }
}
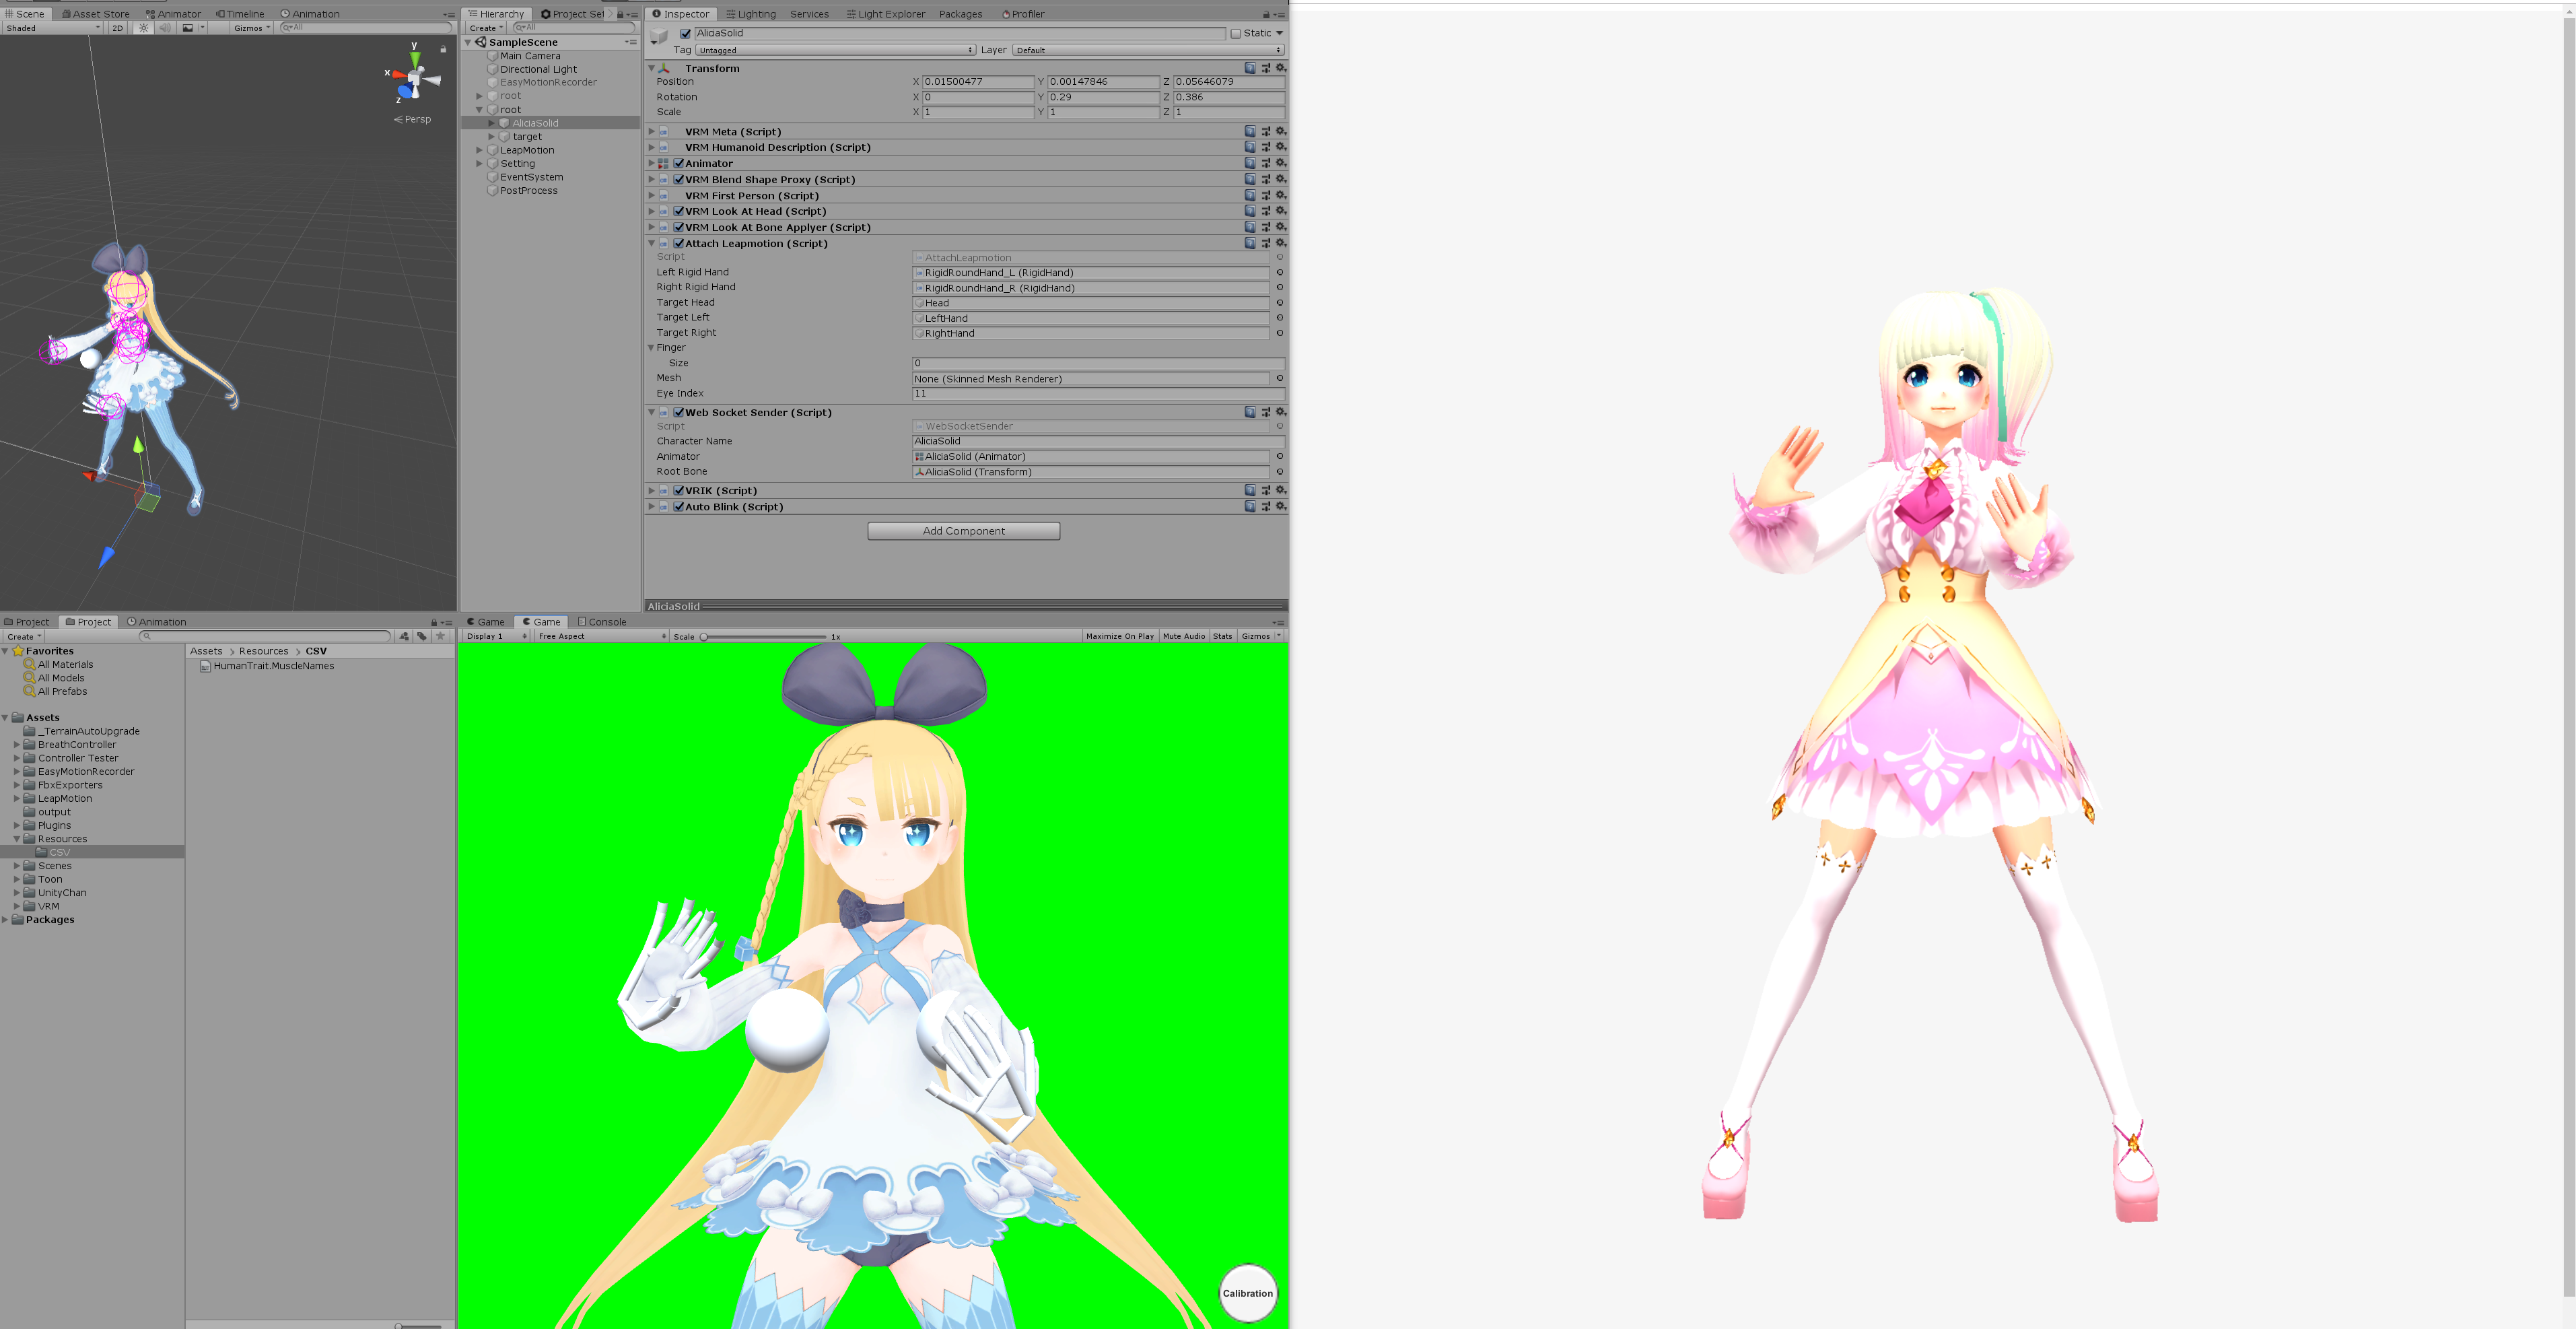
作った Web Socket Sender を適当なオブジェクトに当てて、AnimatorとTransformにVRMを割り当てます。
ボーン構造がちがうVRMでも動きが確認できるようにアリシアちゃんをお借りしてます。

WebSocket Server
unityからwebにアニメーションを送るため、nodeでWebSocketのサーバーを立てます。
import { Server } from "ws";
const server = new Server({ port: 5001 });

server.on("connection", websocket => {
    let time = new Date();

    websocket.on("message", message => {
        console.log("Received: " + (new Date().getMilliseconds() - time.getMilliseconds()) + "ms" /* + message*/);
        time = new Date();
        server.clients.forEach(client => {
            client.send(message);
        });
    });

    websocket.on("close", () => {
        console.log("I lost a client");
    });
});
console.log("start websocket server. port=5001");
three.jsのボーンにあてる
WebSocket から受け取ったアニメーションデータをthree.jsで扱えるように変換してボーンを動かします。
//=== 追加 ===
let boneMap: { [n: number]: THREE.Bone }; // attachHumanoidBoneで取得したボーン状態を入れておく
let messageData: any;

try {
    const socket = new WebSocket("ws://127.0.0.1:5001");
    socket.onopen = (event: Event) => {
        console.log("websocket open");
        socket.onmessage = (message: any) => {
            messageData = message.data;
        };
        socket.onclose = () => {
            console.log("websocket close");
        };
    };
} catch (e) {
    console.warn(e);
}

// renderで各フレームごとに呼び出す
function updateFrame() {
    if (!messageData) return;
    const animation: VrmAnimation[] = JSON.parse(messageData).vrmAnimation;
    for (let ani of animation) {
        const name = -(-ani.name);
        const key = ani.keys[ani.keys.length - 1];
        if (!boneMap || !boneMap[name] || key.rot.length != 4) continue;
        boneMap[name].quaternion.set(-key.rot[0], -key.rot[1], key.rot[2], key.rot[3]);
    }
}

export interface VrmAnimation {
    name: string;
    bone: string;
    keys: Key[];
}

export interface Key {
    pos: number[];
    rot: number[];
    scl: number[];
    time: number;
}
unityとWebsocketサーバーを起動してみたら無事にアニメーションが当たりました![]()
まとめ
今回はWebSocketで通信してモーションデータを送りました。
ちなみにVrmAnimation.Keyのtimeを使ってフレームごとに記録するようにすると、
静的なjsonファイルを読み込むだけでキャラクターを動かすことができます。
AnimationClipを使う必要がないので楽チンですね!
Appendix.
VRMとgltfのスキーマを、型定義ファイル(.d.ts)に変換するpowershellスクリプト
https://github.com/TakenokoTech/ts-vrm/blob/develop/schema/pull.ps1humanoidのJSON
https://github.com/TakenokoTech/ts-vrm/blob/develop/schema/bone.json