はじめに
業務で大量のデータをパワポにまとめる必要があったので、Pythonのライブラリpython-pptxとTkinterを使って半日くらいで作業を自動化しました。
【目標】
・動画・画像・デーブルデータをパワポに自動でまとめる。
・操作をGUI化して、プログラム知らない人でも使用可能にする。
【結論】
シンプルなアプリですが、想像以上に簡単に作れました。
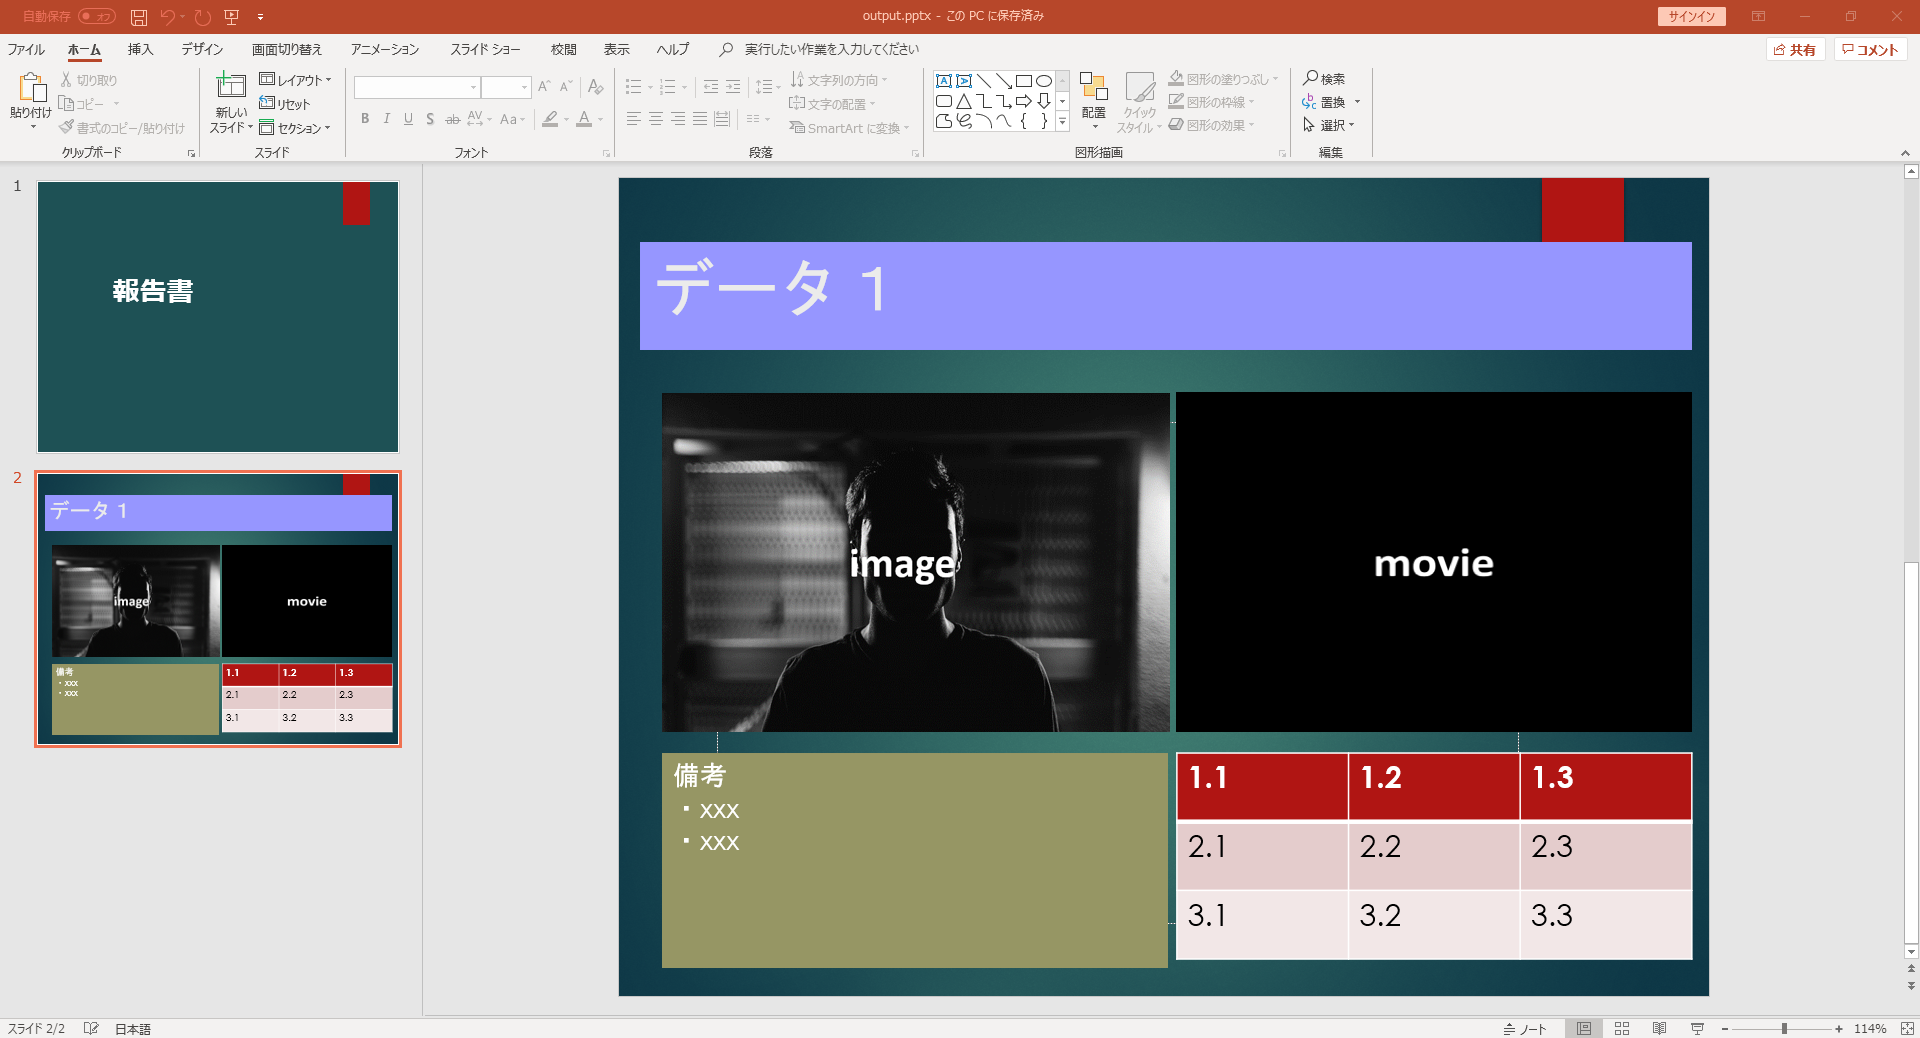
完成品
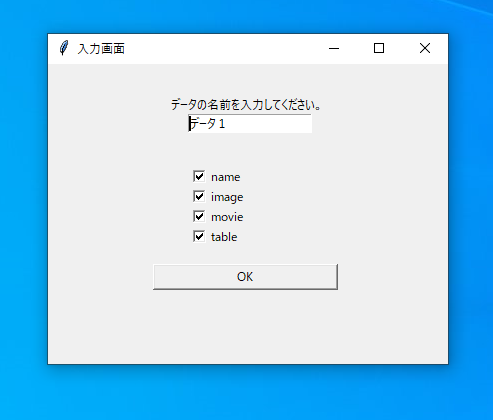
➀プログラム実行すると、

➁GUI入力画面が表示されるので、データの名前を記入してパワポに表示するデータをチェックボックスで選択します。
➂パワポが自動生成されます。スライドにはGUIで記入したデータ名とチェックを付けた画像・テーブル・動画・テキストが入っています。実際の運用ではデータのパスを自動で取得してパワーポイントのスライドを大量に作成しました。
使用したライブラリ
・Tkinter
Pythonに標準で入っているGUI作成用のモジュールです。Python2.7の時と使い方が少し勝手が違うので誤情報を検索しないように注意が必要です。
・Python-pptx
Pythonからpptxファイルを作成できるライブラリです。MITライセンスなので商用利用でも問題ありません。
#コード
code.py
# coding: UTF-8

from pptx import Presentation
from pptx.util import Pt, Inches
from pptx.dml.color import RGBColor
import tkinter
import os

dir_path = os.path.dirname(os.path.realpath(__file__))
os.chdir(dir_path)

# ---------------------------------------------------
"Tkinterの設定"
# ---------------------------------------------------
root = tkinter.Tk()
root.title(u"入力画面")
root.geometry("400x300")

# ---------------------------------------------------
"ラベル"
# ---------------------------------------------------
Static1 = tkinter.Label(text=u'データの名前を入力してください。')
Static1.place(x=120, y=30)
# ---------------------------------------------------
"1行入力ボックス"
# ---------------------------------------------------
EditBox = tkinter.Entry()
EditBox.pack()
EditBox.place(x=140, y=50)
# ---------------------------------------------------
"チェックボックス"
# ---------------------------------------------------
bool1 = tkinter.BooleanVar()
bool2 = tkinter.BooleanVar()
bool3 = tkinter.BooleanVar()
bool4 = tkinter.BooleanVar()

bool1.set(True)
bool2.set(True)
bool3.set(True)
bool4.set(True)
CheckBox1 = tkinter.Checkbutton(text=u"name", variable=bool1)
CheckBox1.pack()
CheckBox1.place(x=140, y=100)
CheckBox2 = tkinter.Checkbutton(text=u"image", variable=bool2)
CheckBox2.pack()
CheckBox2.place(x=140, y=120)
CheckBox3 = tkinter.Checkbutton(text=u"movie", variable=bool3)
CheckBox3.pack()
CheckBox3.place(x=140, y=140)
CheckBox4 = tkinter.Checkbutton(text=u"table", variable=bool4)
CheckBox4.pack()
CheckBox4.place(x=140, y=160)


# ---------------------------------------------------
"ボタン(1行入力文字とチェックボックス読み込み)"
# ---------------------------------------------------
def read_input():
    global name, appear_name, appear_image, appear_movie, appear_table
    name = EditBox.get()
    appear_name = bool1.get()
    appear_image = bool2.get()
    appear_movie = bool3.get()
    appear_table = bool4.get()
    root.destroy()
    return

Button = tkinter.Button(text=u'OK', width=25,command=read_input)
Button.bind("<Button-1>")
Button.place(x=105, y=200)
root.mainloop()

# ---------------------------------------------------
"ここからpython-pptxの設定"
# ---------------------------------------------------
# センチメートルをPowerPoint上の距離に変換する関数
def Centis(length):
    centi = Inches(length/2.54)
    return centi

# ---------------------------------------------------
"テンプレート、出力ファイル名の設定"
# ---------------------------------------------------
# templateとなるpptxファイルを指定する。
template_path = "./template.pptx"
# 出力するpptxファイルを指定する。(存在しない場合、自動作成されます)
save_path = "./output.pptx"

# ---------------------------------------------------
"空のスライドの挿入"
# ---------------------------------------------------
presentation = Presentation(template_path)
title_slide_layout = presentation.slide_layouts[1]  # レイアウトや書式を元ファイルから参照する
slide = presentation.slides.add_slide(title_slide_layout)
shapes = slide.shapes

# ---------------------------------------------------
"タイトルテキストの挿入"
# ---------------------------------------------------
# 入力したい文字列
if appear_name == True:
    slide_title = name
    shapes.title.text = slide_title
    shapes.title.left = Centis(0.5)
    shapes.title.width = Centis(24.5)
    shapes.title.top = Centis(1.5)
    shapes.title.height = Centis(2.5)

    shapes.title.fill.solid()
    shapes.title.fill.fore_color.rgb = RGBColor(150, 150, 255)
# ---------------------------------------------------
"imageの挿入"
# ---------------------------------------------------
if appear_image == True:
    # 挿入する位置
    pic_left = Centis(1)
    pic_top = Centis(5)

    # imageの高さを指定
    pic_height = Centis(7.9)

    image_path = "./image.png"
    slide.shapes.add_picture(image_path, pic_left, pic_top, height=pic_height)

# ---------------------------------------------------
"movieの挿入"
# ---------------------------------------------------
if appear_movie == True:
    movie_path = "./movie.mp4"
    movie_left = Centis(13)
    movie_top = Centis(5)
    movie_width = Centis(12)
    movie_height = pic_height
#poster_frame_imageは動画のトップ画
movie = shapes.add_movie(
        movie_path, movie_left, movie_top, movie_width, movie_height, poster_frame_image="top.png")

# ---------------------------------------------------
"tableの挿入"
# ---------------------------------------------------
if appear_table == True:
    # 入力したいtable状のデータ
    sample_table = [ ["1.1","1.2","1.3"]
                    ,["2.1","2.2","2.3"]
                    ,["3.1","3.2","3.3"]]

    # cell内のフォントサイズ
    cell_font = 20

    # 挿入する位置
    table_left = Centis(13.0)
    table_top = Centis(13.4)

    # tableの幅と高さ(仮)
    table_width = Centis(10)
    table_height = Centis(12)

    # tableの行数と列数(tableのサイズ)
    rows = len(sample_table)
    cols = len(sample_table[0])

    table = slide.shapes.add_table(rows, cols, table_left, table_top, table_width, table_height).table

    # 表の各セルの中身を記入
    for i in range(rows):
        for j in range(cols):
            cell = table.cell(i, j)
            cell.text = sample_table[i][j]
            cell.text_frame.paragraphs[0].font.size = Pt(cell_font)

    # tableの高さを再調整
    table.rows[0].height = Centis(1.6)
    table.rows[1].height = Centis(1.6)
    table.rows[2].height = Centis(1.6)

    # tableの幅を再調整
    table.columns[0].width = Centis(12 / 3)
    table.columns[1].width = Centis(12 / 3)
    table.columns[2].width = Centis(12 / 3)


# ---------------------------------------------------
"テキストボックスの挿入"
# ---------------------------------------------------
# 文字列
sample_str = "備考\n・xxx\n・xxx"

# テキストボックスの位置
text_left = Centis(1)
text_top = Centis(13.4)

# テキストボックスの幅と高さ
text_width = Centis(11.8)
text_height = Centis(5)

# 文字のフォントサイズ
text_font = 20

# 塗りつぶし色指定(R, G, B)
color = RGBColor(150, 150, 100)

text_box = slide.shapes.add_textbox(text_left, text_top, text_width, text_height)

text_box.text = sample_str
text_box.text_frame.add_paragraph().font.size = Pt(text_font)
text_box.fill.solid()
text_box.fill.fore_color.rgb = color


# ---------------------------------------------------
"ファイル保存"
# ---------------------------------------------------
presentation.save(save_path)