身内の勉強会用の資料です
ソースはgithubにおいてあります
WebComponentとは?
説明するよりもデモを見てもらったほうが早いと思うので、code penに簡単な電卓コンポーネント(ks-calc)を作りました。
ソースはgithubにおいてあります
See the Pen YMxZwN by KuwabataK (@kuwabatak) on CodePen.
コードは以下のような感じ
<!DOCTYPE html>
<html dir="ltr" lang="en">
<head>
  <meta charset="utf-8">
  <!-- WebComponentを読み込み -->
  <script src="https://kuwabatak.github.io/Stencil-Calc/mycomponent.js"></script>
</head>
<body>

  <!-- Custom Elementを書く -->
  <ks-calc input="33-4"></ks-calc>

</body>
</html>
WebComponetのソースを<script>タグで読み込んで、使いたい場所にCustom Element(今回はks-calc)を書くだけで、色んな人が作ったWebComponetを自分のサイト上で動かすことができます。
とても簡単
しかもフレームワーク非依存(VueでもReactでも、Vanila JS上でも動く)
WebComponet.orgとか見ると、色んな人が作ったWebComponentを探すことができます
Stencilとは?
ionic-teamが作っているWebComponentを作るためのフレームワーク(ではないらしい)。
ionic v4に組み込まれているのコンポーネントたちはこれで作られているらしい。
(なので実はionic v4のコンポーネントをVueやReact上で動かすこともできる)
StencilでWebComponentを作ってみる!!
注: npm v6以上が必要です
1 - プロジェクトの作成
$ npm init stencil
2 - componentを選んでEnter
? Pick a starter › - Use arrow-keys. Return to submit.

   ionic-pwa     Everything you need to build fast, production ready PWAs
   app           Minimal starter for building a Stencil app or website
❯  component     Collection of web components that can be used anywhere
ちなみに今回のプロジェクトで使ったStencilのバージョンは0.16.2です
プロジェクトの構成
.
├── LICENSE
├── package-lock.json
├── package.json
├── readme.md
├── src
│   ├── components
│   │   └── my-component
│   │       ├── my-component.css    // cssファイル
│   │       ├── my-component.e2e.ts // テストコード
│   │       ├── my-component.tsx    // コンポーネントファイル
│   │       └── readme.md
│   ├── components.d.ts  // コンポーネントの型定義ファイル。自動生成されるのでいじる必要なし
│   ├── index.html
│   └── utils
│       ├── utils.spec.ts
│       └── utils.ts
├── stencil.config.ts
└── tsconfig.json
とりあえずビルドしてみる
$ npm start
なんか文字が出る
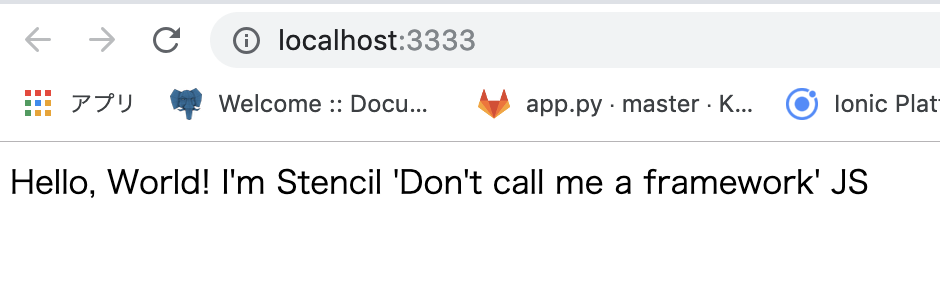
私をFrameWorkと呼ばないで!! とのこと
じゃあなんて呼べばいいんです?Stencilさん
ソースを見てみる
<!DOCTYPE html>
<html dir="ltr" lang="en">
<head>
  <meta charset="utf-8">
  <meta name="viewport" content="width=device-width, initial-scale=1.0, minimum-scale=1.0, maximum-scale=5.0">
  <title>Stencil Component Starter</title>
  <script src="/build/mycomponent.js"></script>

</head>
<body>

  <my-component first="Stencil" last="'Don't call me a framework' JS"></my-component>

</body>
</html>
index.htmlではmy-componentというコンポーネントを呼び出しているようだ
import { Component, Prop } from '@stencil/core';
import { format } from '../../utils/utils';

@Component({
  tag: 'my-component',
  styleUrl: 'my-component.css',
  shadow: true
})
export class MyComponent {
  /**
   * The first name
   */
  @Prop() first: string;

  /**
   * The middle name
   */
  @Prop() middle: string;

  /**
   * The last name
   */
  @Prop() last: string;

  private getText(): string {
    return format(this.first, this.middle, this.last);
  }

  render() {
    return <div>Hello, World! I'm {this.getText()}</div>;
  }
}
-
@Propsで引数を受け取り、render()でDOMを返すみたい - すごくReactっぽい。TSX使ってるし・・・(ionic-teamが作ったのにAngularじゃないんだ)
- でもデータバインディング周りは
@Event()(Angularで言うところの@Output)とか用意されていて、Angularっぽくもある - TypeScriptベースなのはすごく良さそう
簡単な電卓コンポーネントを作ってみる
実際に電卓コンポーネントを作っていく。とりあえず、内部の計算ロジックの方から書いていくことに。
util.tsがすでにあったので、ここに計算ロジックを書きます(引数チェックとか雑なのは許してください・・・)
...追記

/**
 * 文字列をパースして計算します
 *
 * @param input 例: '12+4'
 * @return output 例 16
 */
export function calc(input: string): number {

  const inputNums = input.split(/\+|\-|\*|\//).map(s => parseInt(s))
  const inputOpe = input.split(/\d+/).filter( s => s !== "")

  if (inputNums == null || inputOpe == null){
    return 0
  }
  if(inputNums.length <=1 || inputOpe.length <= 0 ){
    return 0
  }
  if(inputNums.length - inputOpe.length !== 1 ){
    return 0
  }

  return inputOpe.reduce((acc, cur, index) => {
    return _calc(acc, inputNums[index + 1], cur)
  }, inputNums[0])
}

function _calc(num1: number, num2: number, ope: string): number {
  switch (ope) {
    case '+':
      return num1 + num2
    case '-':
      return num1 - num2
    case '*':
      return num1 * num2
    case '/':
      return num1 / num2
  }
}
コンポーネントを作っていく
ざっと調べた感じ、ionic cliみたいなコマンド一発でcomponentを作ってくれるツールは公式には存在しないようなので、my-componentのファイルをコピペしてもらってくることにする
./src/
├── components
│   ├── ks-calc
│   │   ├── ks-calc.css        // 追加
│   │   ├── ks-calc.tsx        // 追加
│   │   └── readme.md          // ビルドすると自動生成された
│   └── my-component
│       ├── my-component.css
│       ├── my-component.e2e.ts
│       ├── my-component.tsx
│       └── readme.md
├── components.d.ts
├── index.html
└── utils
    ├── utils.spec.ts
    └── utils.ts
ks-calcの中身を以下のように書き換え
import { Component, Prop, State, Event, EventEmitter } from '@stencil/core';
import { calc } from '../../utils/utils';

@Component({
  tag: 'ks-calc',
  styleUrl: 'ks-calc.css',
  shadow: true
})
export class KsCalc {
  /**
   * 外からの入力
   */
  @Prop() input: string = "12+4"

  /**
   * 内部で持っている入力の状態
   */
  @State() _input: string = "12+4"

  /**
   * 計算結果が変わったときに結果を返すEvent
   * Angularで言うところの '@Output'
   *
   * @return {number} 計算結果
   */
  @Event() changeResult: EventEmitter

  /**
   * コンポーネントロード時に、Prop()で渡された値をStateに設定
   */
  componentWillLoad() {
    return this._input = this.input
  }

  /**
   * 入力された文字列から計算結果を返す
   */
  private calcText() {
    return calc(this._input);
  }

  /**
   * inputの中身が変わったときに結果を再計算し、
   * changeResultイベントを発火して呼び出し元に伝える
   *
   * @param event
   */
  handleInputChange(event: Event) {
    this._input = event.target["value"]
    this.changeResult.emit(this.calcText())
  }

  render() {
    return <div>
      <input value={this._input} onChange={(event) => this.handleInputChange(event)} />
      <div>{this.calcText()}</div>
    </div>
  }
}
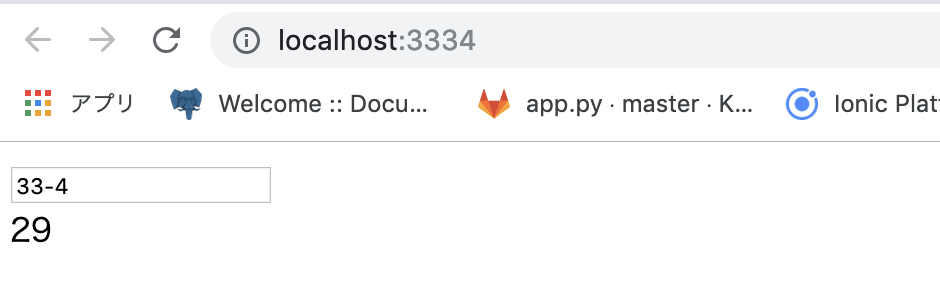
とりあえずこれでできたはずなので、index.htmlを以下のように書き換える
<!DOCTYPE html>
<html dir="ltr" lang="en">
<head>
  <meta charset="utf-8">
  <meta name="viewport" content="width=device-width, initial-scale=1.0, minimum-scale=1.0, maximum-scale=5.0">
  <title>Stencil Component Starter</title>
  <script src="/build/mycomponent.js"></script>
</head>
<body>
  <!-- コンポーネントを呼び出し -->
  <ks-calc input="33-4"></ks-calc>
</body>
</html>
動かしてみる
$ npm start
うごいたー
ビルドしてGithubPageでコンポーネントとして公開してみる
npmとかで公開もできますが、今回はテストなのでGithubPageにホストして公開することにします
作ったWebComponentをビルドする
$ npm run-script build
distディレクトリにビルド後のコンポーネントが吐き出される
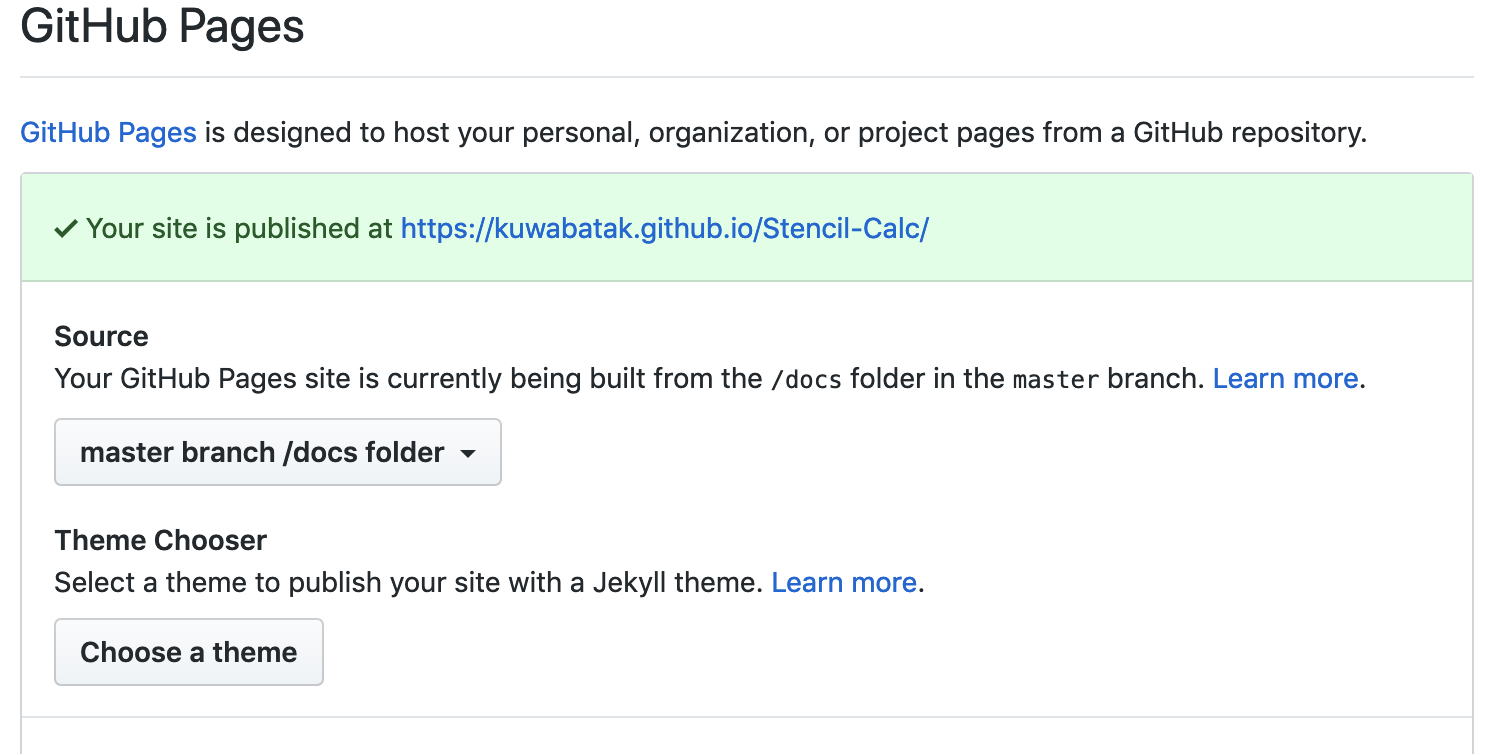
Githubにリポジトリを作り、docsディレクトリを作成。
docsディレクトリの中にdistディレクトリの中身を突っ込む
GitHubのSettingを開き、GitHubPageでdocsディレクトリを公開するように設定
公開したWebComponentが使えるかどうか試してみる
以下のようなhtmlファイルを適当に作成してブラウザで開く
<!DOCTYPE html>
<html dir="ltr" lang="en">
<head>
  <meta charset="utf-8">
  <meta name="viewport" content="width=device-width, initial-scale=1.0, minimum-scale=1.0, maximum-scale=5.0">
  <title>Stencil Component Starter</title>
  <!-- 公開先のmycomponent.jsを指定 -->
  <script src="https://kuwabatak.github.io/Stencil-Calc/mycomponent.js"></script>
</head>
<body>
  <!-- 以下が今回作ったCustomElement -->
  <ks-calc input="33-4"></ks-calc>

</body>
</html>
先ほど見せたようにCode Penでも読み込んで使えるよ!
おまけ
WebComponent内で発火して@Event経由で伝搬したイベントはDOMの標準APIで拾うことができるよ!
<!DOCTYPE html>
<html dir="ltr" lang="en">

<head>
  <meta charset="utf-8">
  <meta name="viewport" content="width=device-width, initial-scale=1.0, minimum-scale=1.0, maximum-scale=5.0">
  <title>Stencil Component Starter</title>
  <script src="/build/mycomponent.js"></script>
</head>

<body>
  <!-- コンポーネントを呼び出し -->
  <ks-calc input="33-4"></ks-calc>
  <!-- コンポーネントで発火したイベントを受け取るためのコード -->
  <script>
    window.addEventListener("load", (evt) => {
      const components = document.querySelectorAll("ks-calc");
      for (let comp of components) {

        // ks-calcコンポーネントで発火されたchangeResultイベントを受け取る事もできる
        comp.addEventListener("changeResult", (evt) => {
          console.log("計算結果は" + evt.detail);
        });
      }
    });
  </script>
</body>

</html>
まとめ
- 思った以上に簡単にWebComponent作れる
- フレームワーク非依存なので、これでコンポーネント作れば再利用性高くなりそう
- ぱっと見Reactと思いきや、データバインディング周りがAngularな感じで面白い
みんなもこれでクソコンポーネント作ろうぜ!