はじめに
今まではTerraformとほんの少しのCloudFormationでAWS環境を管理しています。
上記のツール群は日々アップデートされていますが、それら以外にも頻繁にアップデートされていたり新たなツールが出てきたりと目まぐるしく変化するためキャッチアップを怠ってました…。
今更感もありますが、触ってみようと思います。
Pulumiとは
Create, deploy, and manage modern cloud software.
A single workflow for provisioning cloud apps and infrastructure, in any cloud environment, public, private, or hybrid.
https://www.pulumi.com/product/
と公式に記載があるとおり、アプリケーションとインフラストラクチャを管理・デプロイできるツールです。
複数の言語とプロバイダーに対応しています。
対応言語は下記の言語です。
TypeScriptJavaScriptPython-
C#(Preview) -
Go(Preview)
対応プロバイダーは現時点では下記に対応しています。 (2019年11月現在)
- AWS
- Azure
- DigitalOcean
- Google Cloud
- Kubernetes
- Linode
- OpenStack
- Packet.net
- vSphere
個人で使う分には無料ですが、チームなどで使おうとすると有償版になります。
| COMMUNITY EDITION | TEAM STARTER | TEAM PRO | |
|---|---|---|---|
| 料金 | FREE / 月 | $50 / 月 | $75 / 月(1人毎) |
| 利用可能人数 | 1人のみ | 3人まで | 25人まで(最低3人) |
| 制限事項 | Unlimited stacks & deployments | 20 project stacks & Unlimited deployments | Unlimited projects and stacks |
| 無料期間 | 個人利用なら永年無料 | 14日間無料トライアル* | 14日間無料トライアル* |
*2019年11月16日 現在
もっと大きい規模でも使えるようカスタムプランがあります。
チーム/ロールへの対応、オンプレ対応やSAML/SSOに対応しているみたいです。
Get Start
早速始めてみましょう!
今回はAWS環境を利用して試していこうと思いますので、下記ページに従って進めていきます。
https://www.pulumi.com/docs/get-started/aws/
インストール
$ brew install pulumi
Updating Homebrew...

================================================省略================================================

==> Downloading https://homebrew.bintray.com/bottles/pulumi-1.5.1.mojave.bottle.tar.gz

######################################################################## 100.0%
==> Pouring pulumi-1.5.1.mojave.bottle.tar.gz
==> Caveats
Bash completion has been installed to:
  /usr/local/etc/bash_completion.d

zsh completions have been installed to:
  /usr/local/share/zsh/site-functions
==> Summary
🍺  /usr/local/Cellar/pulumi/1.5.1: 16 files, 124MB
$
$
$ pulumi version
v1.5.1
Install Language Runtime
冒頭でも記載したとおり、下記言語に対応しており言語ごとに必要なバージョンは下記になります。
| 言語 | バージョン |
|---|---|
| TypeScript | Node.js version 8 or later. |
| JavaScript | Node.js version 8 or later. |
| Python | Python version 3.6 or later. |
| C# | .NET Core 3.0 SDK or later. |
あまり無いとは思いますが、インストールしていない場合はLTSをインストールすれば大丈夫だと思います。
AWS configure
こちらは既にAWSを利用している場合はdefaultのcredentialsを見に行きます。
ただし、複数のprofileを持つ場合は、指定してあげるか環境変数に追加しておくかの対応が必要です。
https://www.pulumi.com/docs/get-started/aws/configure/
$ cat ~/.aws/credentials
[default]
aws_access_key_id = AKIAABCDEFG123456789
aws_secret_access_key = xooc3KameeChureethaiS3keephooqui5exuW0sh

[hogehoge]
aws_access_key_id = AKIAHIJKLMN098765432
aws_secret_access_key = vuf7aing9thohngu9naeR5Dahl9aM9aiGheum8Ae

[fugafuga]
aws_access_key_id = AKIAOPQRSTU102938475
aws_secret_access_key = eePh1ohgooph1ateaj9Aif7heixei6zieW9Viequ

[hogefuga]
aws_access_key_id = AKIAVWXYZ65748392012
aws_secret_access_key = aLiv6eMe0Ohr5jeiW2eeph0zoo2haR8pae1thoox
・Set AWS_PROFILEas an environment variable, or
# profile hogehogeを使う場合
$ export AWS_ACCESS_KEY_ID=AKIAHIJKLMN098765432
$ export AWS_SECRET_ACCESS_KEY=vuf7aing9thohngu9naeR5Dahl9aM9aiGheum8Ae
・After creating your project in the next step, run pulumi config set aws:profile . See AWS Configuration for more configuration options.
# 次のステップ前にやると怒られる
$ pulumi config set aws:profile hogehoge
error: no Pulumi.yaml project file found (searching upwards from /Users/user/Documents/GitHub/hands-on). If you have not created a project yet, use `pulumi new` to do so
Finished installing dependencies

Your new project is ready to go! ✨

To perform an initial deployment, run 'pulumi up'

$ pulumi config set aws:profile hogehoge
$
Create a New Project
$ pulumi new aws-typescript  # pulumi new aws-typescript -n hands-on -d "Getting start hands on" -s sandbox でもOK
Manage your Pulumi stacks by logging in.
Run `pulumi login --help` for alternative login options.
Enter your access token from https://app.pulumi.com/account/tokens  #このURLにアクセスしてSign upを選択するとWelocome画面が表示されてCLIが進む
    or hit <ENTER> to log in using your browser                   :
We've launched your web browser to complete the login process.

Waiting for login to complete...


  Welcome to Pulumi!

  Pulumi helps you create, deploy, and manage infrastructure on any cloud using
  your favorite language. You can get started today with Pulumi at:

      https://www.pulumi.com/docs/get-started/

  Tip of the day: Resources you create with Pulumi are given unique names (a randomly
  generated suffix) by default. To learn more about auto-naming or customizing resource
  names see https://www.pulumi.com/docs/intro/concepts/programming-model/#autonaming.


This command will walk you through creating a new Pulumi project.

Enter a value or leave blank to accept the (default), and press <ENTER>.
Press ^C at any time to quit.

project name: hands-on
project description: (A minimal AWS TypeScript Pulumi program) Getting start hands on
Created project 'hands-on'

Please enter your desired stack name.
To create a stack in an organization, use the format <org-name>/<stack-name> (e.g. `acmecorp/dev`).
stack name: (dev) sandbox
Created stack 'sandbox'

aws:region: The AWS region to deploy into: (us-east-1)
Saved config

Installing dependencies...


> deasync@0.1.15 install /Users/user/Documents/GitHub/hands-on/node_modules/deasync
> node ./build.js

`darwin-x64-node-12` exists; testing
Binary is fine; exiting

> grpc@1.21.1 install /Users/user/Documents/GitHub/hands-on/node_modules/grpc
> node-pre-gyp install --fallback-to-build --library=static_library

[grpc] Success: "/Users/user/Documents/GitHub/hands-on/node_modules/grpc/src/node/extension_binary/node-v72-darwin-x64-unknown/grpc_node.node" is installed via remote

> @pulumi/aws@1.8.0 install /Users/user/Documents/GitHub/hands-on/node_modules/@pulumi/aws
> node scripts/install-pulumi-plugin.js resource aws v1.8.0

[resource plugin aws-1.8.0] installing
> @pulumi/docker@0.17.4 install /Users/user/Documents/GitHub/hands-on/node_modules/@pulumi/docker
> node scripts/install-pulumi-plugin.js resource docker v0.17.4

[resource plugin docker-0.17.4] installing
> protobufjs@6.8.8 postinstall /Users/user/Documents/GitHub/hands-on/node_modules/protobufjs
> node scripts/postinstall

added 198 packages from 297 contributors and audited 1626 packages in 16.563s

3 packages are looking for funding.
Run "npm fund" to find out more.
Finished installing dependencies

Your new project is ready to go! ✨

To perform an initial deployment, run 'pulumi up'
これでプロジェクトが作られました。
フォルダ配下に色々と作成されています。
$ ls -la
total 160
drwxr-xr-x   10 user  staff    320 11 16 03:05 .
drwx------+  19 user  staff    608 11 16 02:57 ..
-rw-------    1 user  staff     21 11 16 03:05 .gitignore
-rw-r--r--    1 user  staff     32 11 16 03:05 Pulumi.sandbox.yaml
-rw-------    1 user  staff     67 11 16 03:05 Pulumi.yaml
-rw-------    1 user  staff    273 11 16 03:05 index.ts
drwxr-xr-x  112 user  staff   3584 11 16 03:05 node_modules
-rw-r--r--    1 user  staff  57291 11 16 03:05 package-lock.json
-rw-------    1 user  staff    230 11 16 03:05 package.json
-rw-------    1 user  staff    438 11 16 03:05 tsconfig.json
Review the New Project
上記で作成されたファイルを見ていきましょう。
config:
  aws:profile: hogehoge
  aws:region: us-east-1
name: hands-on
runtime: nodejs
description: Getting start hands on
import * as pulumi from "@pulumi/pulumi";
import * as aws from "@pulumi/aws";
import * as awsx from "@pulumi/awsx";

// Create an AWS resource (S3 Bucket)
const bucket = new aws.s3.Bucket("hands-on"); //デフォルトは "my-bucket"

// Export the name of the bucket
export const bucketName = bucket.id;
- Pulumi.[環境名].yaml
- 環境ごとの設定を記載したファイル (このあたりに書かれている設定はこっちに含まれそう)
- Pulumi.yaml
- Stack自体の設定項目が記載されているファイル (変更することはなさそう)
- index.ts
- 必要なリソースを記載するファイル (リソース増えてきたら分割が必要になるはず)
Deploy the Stack
それではpulumi upを打ってS3バケットを作成してみます。
$ pulumi up
Previewing update (sandbox):

     Type                 Name              Plan
 +   pulumi:pulumi:Stack  hands-on-sandbox  create
 +   └─ aws:s3:Bucket     hands-on          create

Resources:
    + 2 to create

Do you want to perform this update?
  yes
> no
  details
カーソルでは十字キーで操作可能です。
# no を選択した場合
Do you want to perform this update? no
confirmation declined, not proceeding with the update

# details を選択した場合
Do you want to perform this update? details
+ pulumi:pulumi:Stack: (create)
    [urn=urn:pulumi:sandbox::hands-on::pulumi:pulumi:Stack::hands-on-sandbox]
    + aws:s3/bucket:Bucket: (create)
        [urn=urn:pulumi:sandbox::hands-on::aws:s3/bucket:Bucket::hands-on]
        [provider=urn:pulumi:sandbox::hands-on::pulumi:providers:aws::default_1_8_0::04da6b54-80e4-46f7-96ec-b56ff0331ba9]
        acl         : "private"
        bucket      : "hands-on-4099361"
        forceDestroy: false

Do you want to perform this update?
  yes
> no
  details

# yes を選択した場合
Do you want to perform this update? yes
Updating (sandbox):

     Type                 Name              Status
 +   pulumi:pulumi:Stack  hands-on-sandbox  created
 +   └─ aws:s3:Bucket     hands-on          created

Outputs:
    bucketName: "hands-on-17e4f57"

Resources:
    + 2 created

Duration: 20s

Permalink: https://app.pulumi.com/[USER_NAME]/quickstart/dev/updates/1
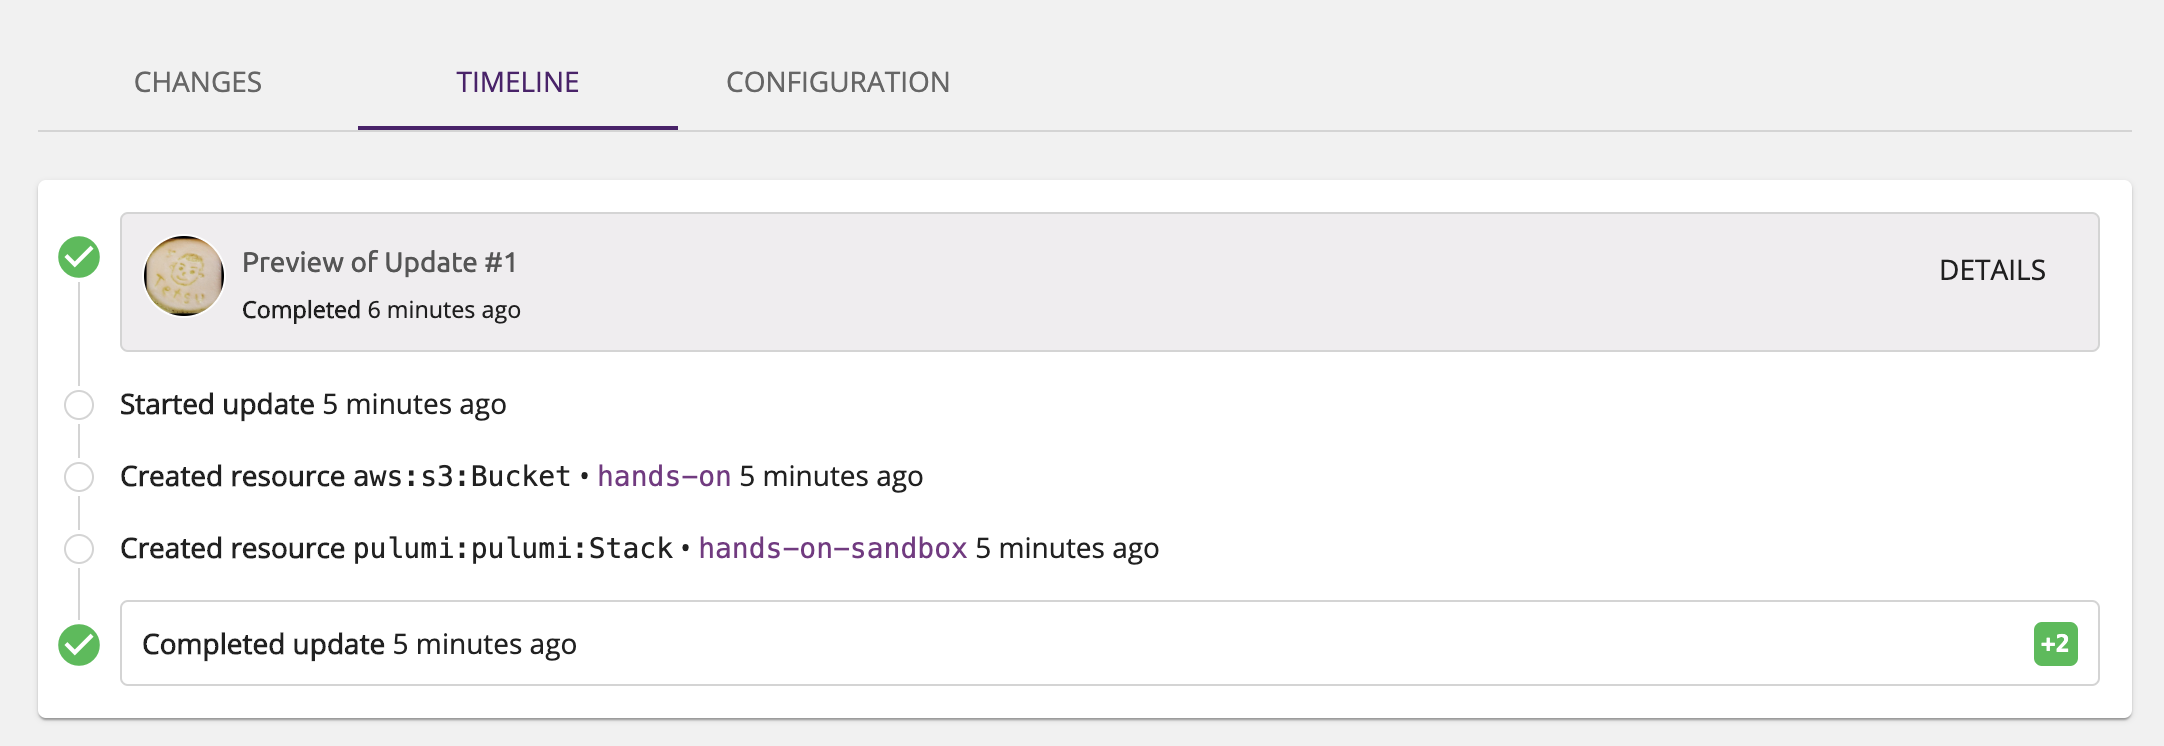
上記URLにアクセスし、コンソールから確認してみます。
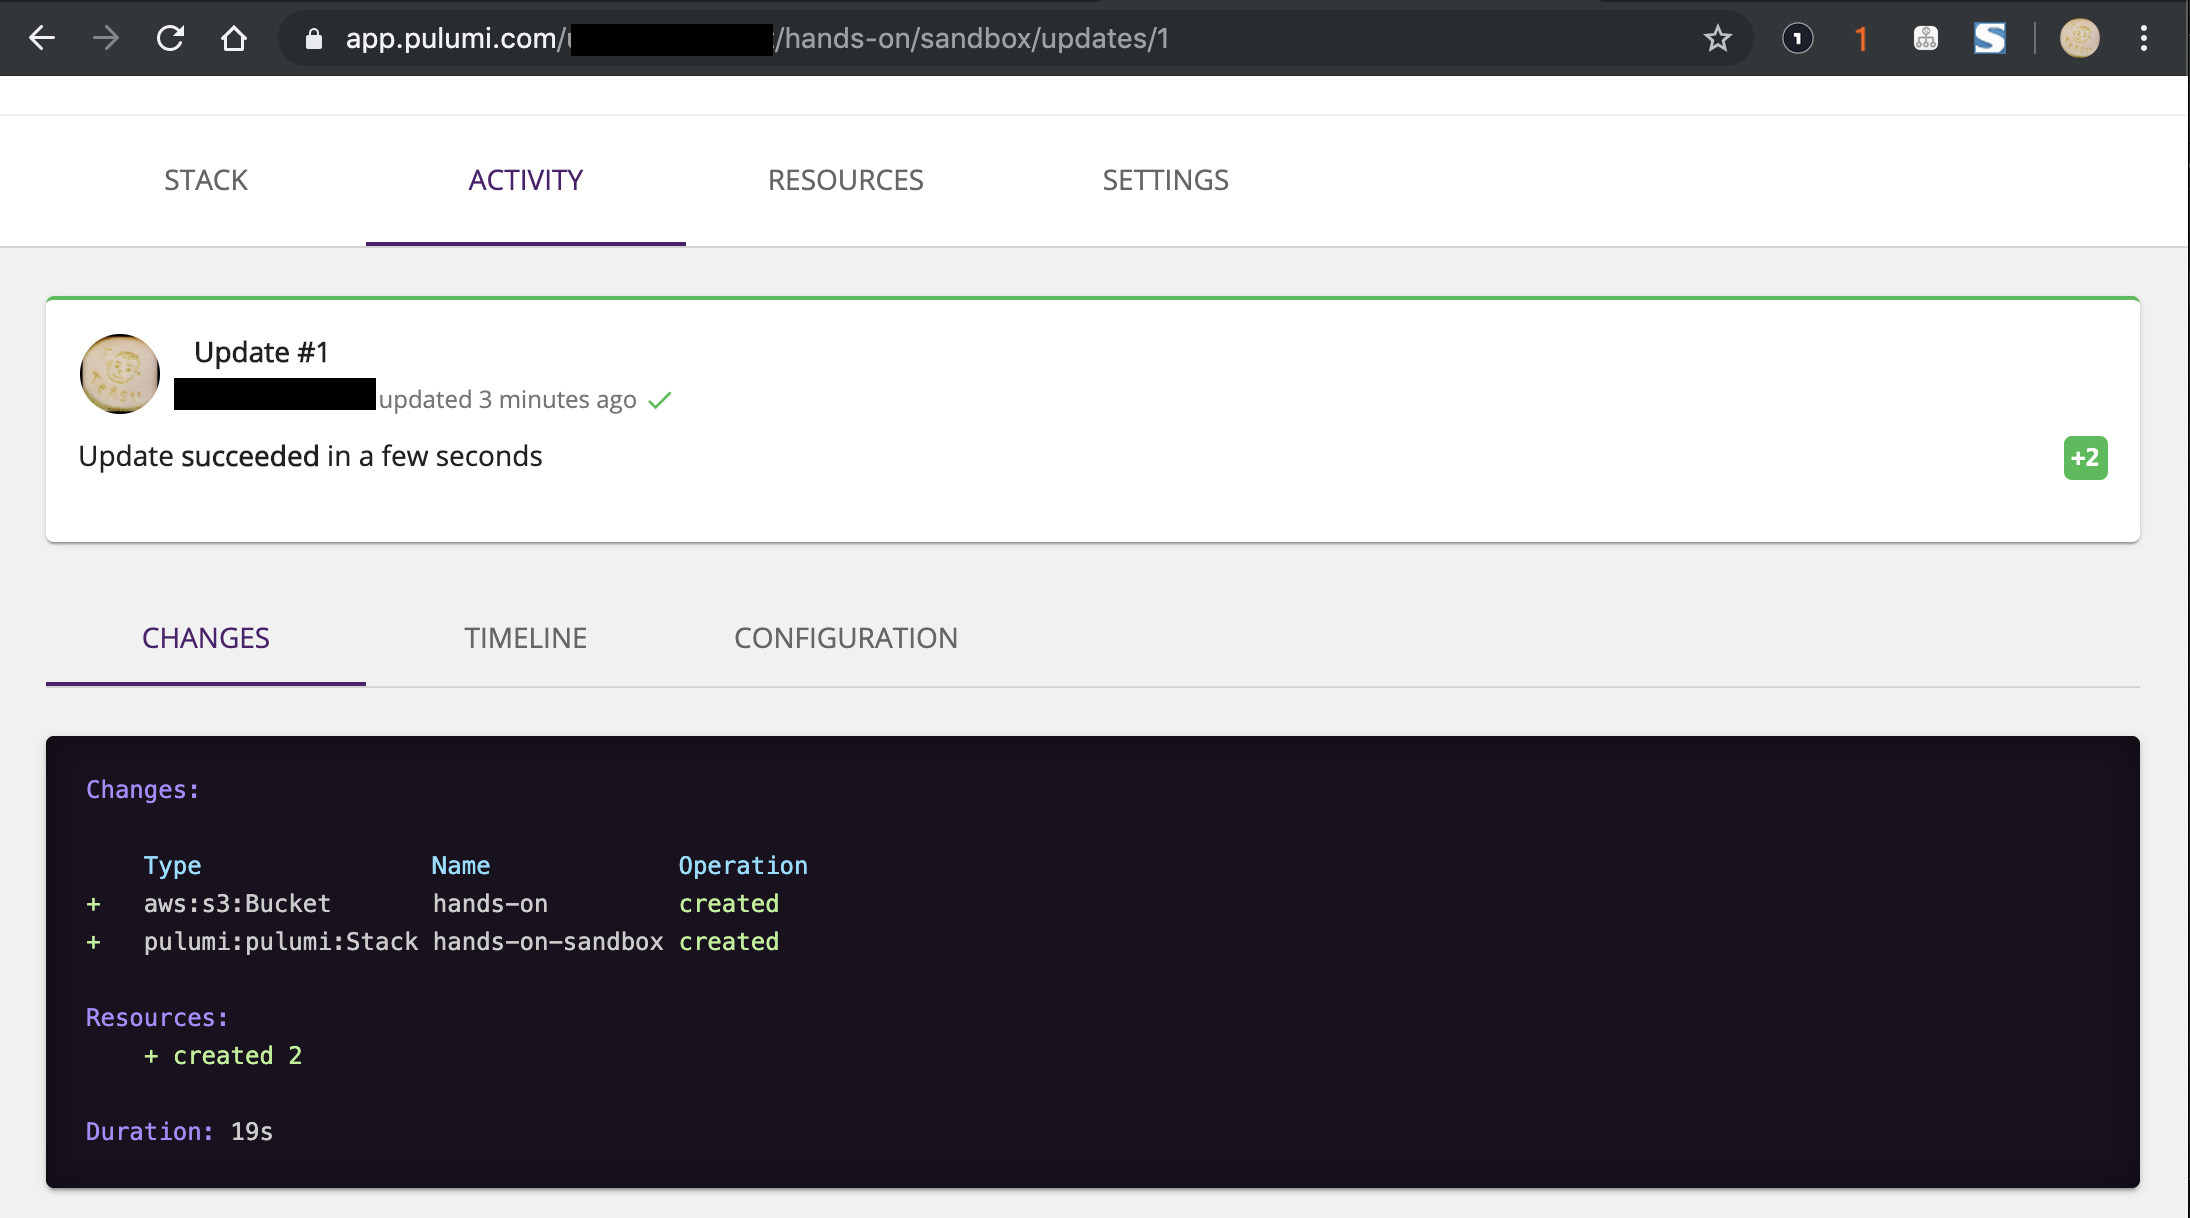
タイムラインもみてみます。
設定も確認

AWSコンソールも確認
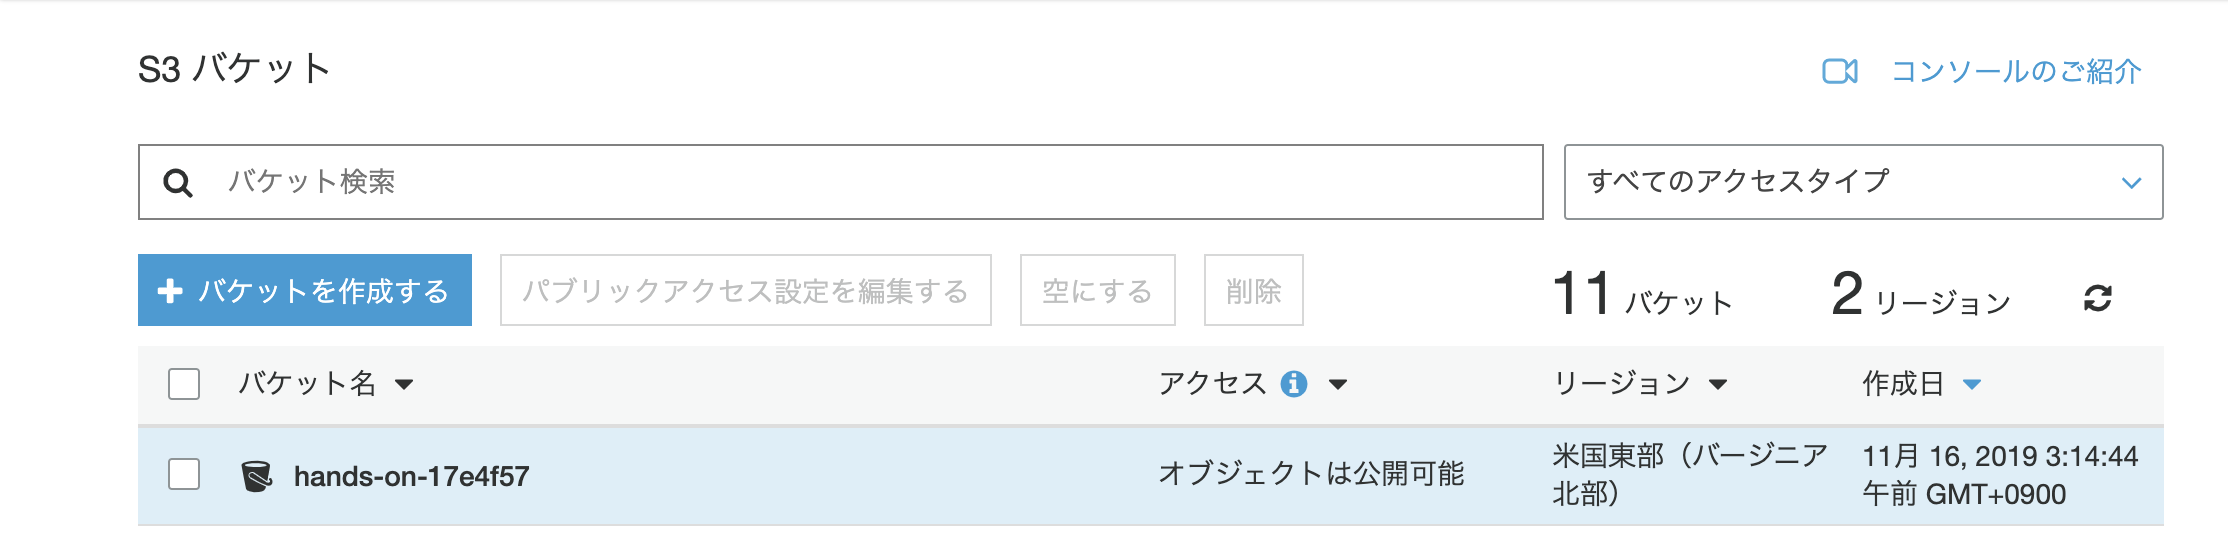
サフィックスが付いてますね。
$ aws s3 ls
2019-11-16 03:14:44 hands-on-17e4f57
ちなみにpulumi previewでもterraform planみたいなことができます。
$ pulumi preview
Previewing update (dev):

     Type                 Name              Plan
 +   pulumi:pulumi:Stack  hands-on-sandbox  create
 +   └─ aws:s3:Bucket     hands-on          create

Resources:
    + 2 to create

Permalink: https://app.pulumi.com/[USER_NAME]/quickstart/dev/previews/efa6381b-4837-40bc-ad54-ebe050eea1f4
コンソール

Stackという名前を使っているんでもしや、と思いましたがそんなことはありませんでした。(SDK使っているんだから当然ちゃ当然ですね。)
$ date
2019年 11月16日 土曜日 03時12分31秒 JST
$ aws cloudformation list-stacks --query 'StackSummaries[].StackId' --output text | tr "\t" "\n" | wc -l
       3
$ date
2019年 11月16日 土曜日 03時22分49秒 JST
$ aws cloudformation list-stacks --query 'StackSummaries[].StackId' --output text | tr "\t" "\n" | wc -l
       3
Modify the Program
KMSを追加して、先ほど作成したS3バケットを暗号化します。
$ $ diff index.ts index.ts_bk
5,7d4
< // Create a KMS Key for S3 server-side encryption
< const key = new aws.kms.Key("sandbox-hands-on-key");
<
9,18c6
< const bucket = new aws.s3.Bucket("sandbox-hands-on", {
<     serverSideEncryptionConfiguration: {
<         rule: {
<             applyServerSideEncryptionByDefault: {
<                 sseAlgorithm: "aws:kms",
<                 kmsMasterKeyId: key.id,
<             }
<         }
<     }
< });
---
> const bucket = new aws.s3.Bucket("sandbox-hands-on");
Deploy the Changes
では変更かけたファイルでデプロイしてみましょう。
$ $ pulumi up
Previewing update (sandbox):

     Type                 Name              Plan       Info
     pulumi:pulumi:Stack  hands-on-sandbox
 +   ├─ aws:kms:Key       hands-on-key      create                                                   # KMSキーが作成されることがわかる
 ~   └─ aws:s3:Bucket     hands-on          update     [diff: +serverSideEncryptionConfiguration]    # S3バケットがSSE差分があり、更新かかるのがわかる

Resources:
    + 1 to create
    ~ 1 to update
    2 changes. 1 unchanged

Do you want to perform this update? yes
Updating (sandbox):

     Type                 Name              Status      Info
     pulumi:pulumi:Stack  hands-on-sandbox
 +   ├─ aws:kms:Key       hands-on-key      created
 ~   └─ aws:s3:Bucket     hands-on          updated     [diff: +serverSideEncryptionConfiguration]

Outputs:
    bucketName: "hands-on-17e4f57"

Resources:
    + 1 created
    ~ 1 updated
    2 changes. 1 unchanged

Duration: 26s

Permalink: https://app.pulumi.com/[USER_NAME]/quickstart/dev/updates/2
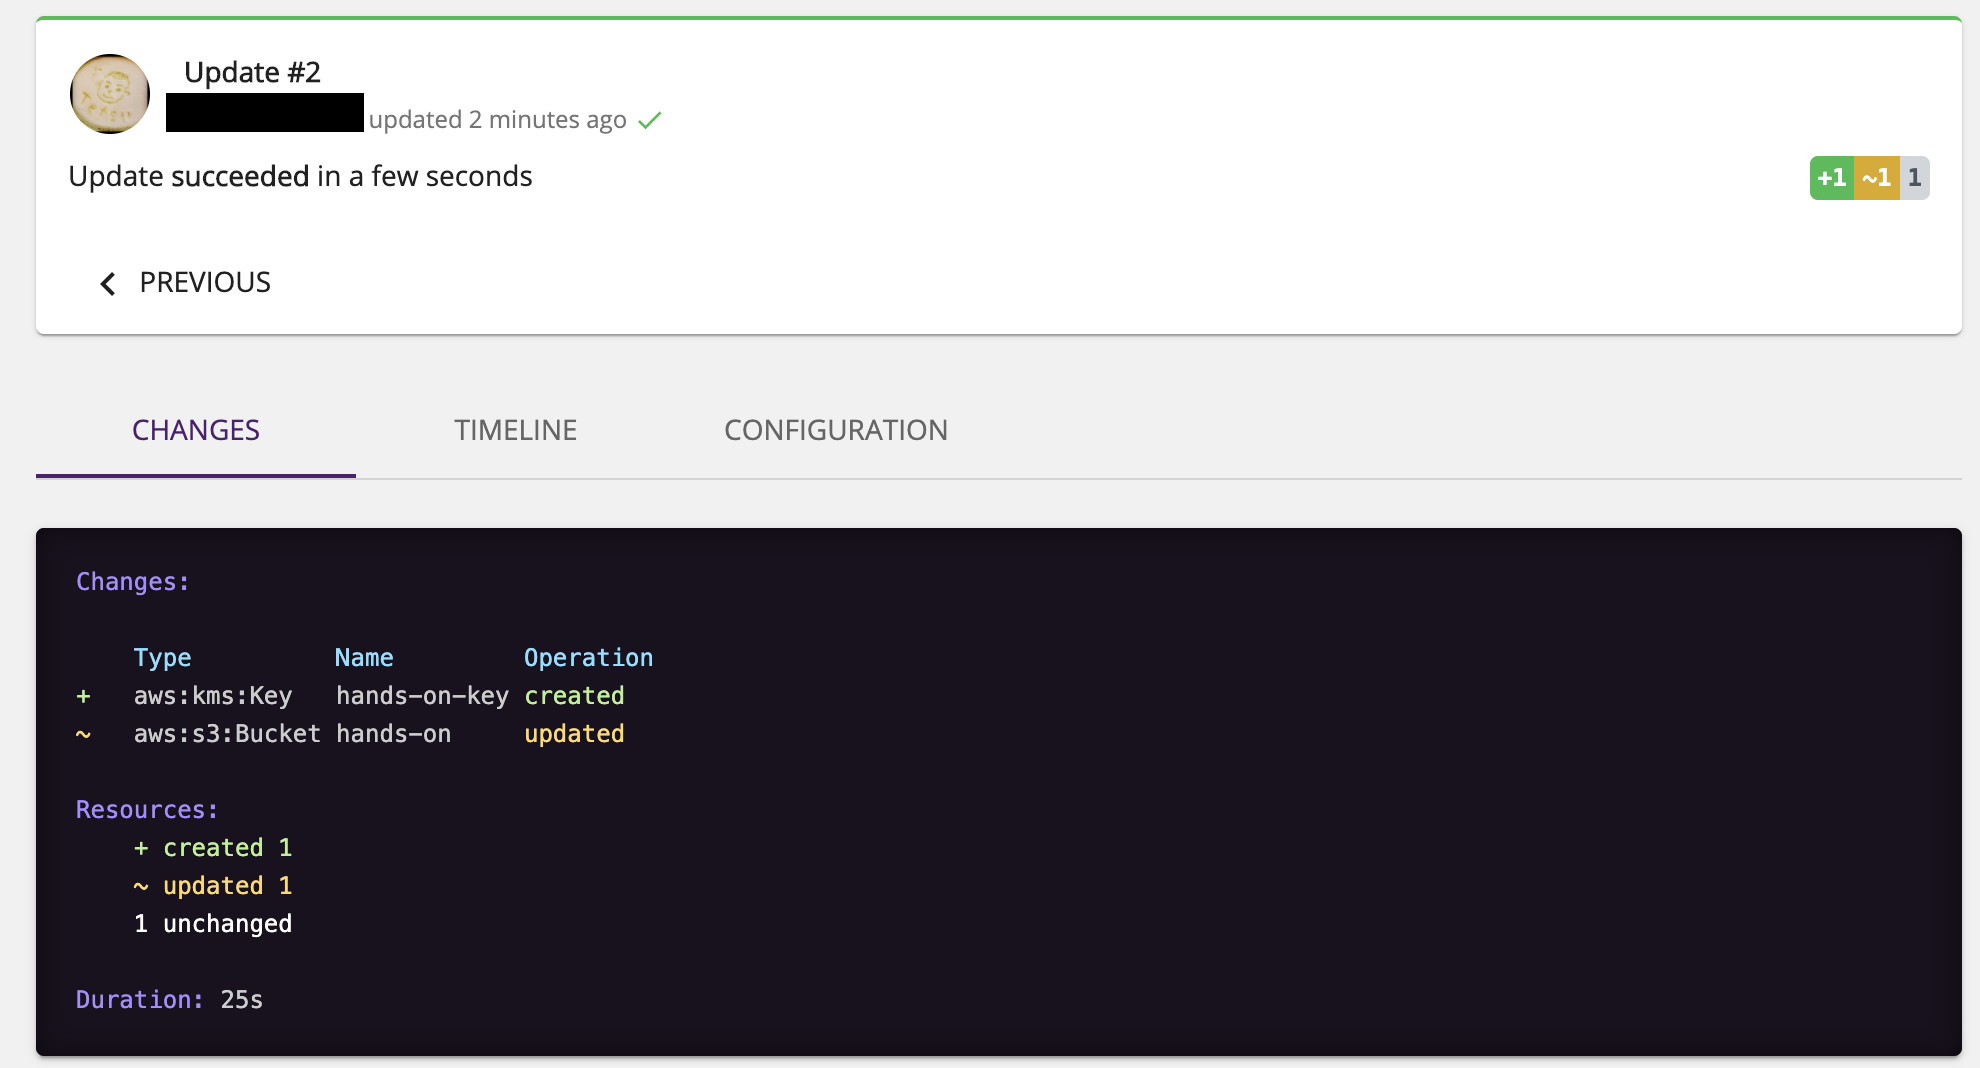
バッチリですね。
$ aws s3api get-bucket-encryption --bucket hands-on-17e4f57
{
    "ServerSideEncryptionConfiguration": {
        "Rules": [
            {
                "ApplyServerSideEncryptionByDefault": {
                    "SSEAlgorithm": "aws:kms",
                    "KMSMasterKeyID": "bcee6948-af72-47b4-bd68-dd327cce7d19"
                }
            }
        ]
    }
}
Destroy the Stack
では作ったリソースを削除しましょう。
$ pulumi destroy
Previewing destroy (sandbox):

     Type                 Name              Plan
 -   pulumi:pulumi:Stack  hands-on-sandbox  delete
 -   ├─ aws:s3:Bucket     hands-on          delete
 -   └─ aws:kms:Key       hands-on-key      delete

Outputs:
  - bucketName: "hands-on-17e4f57"

Resources:
    - 3 to delete

Do you want to perform this destroy?
  yes
> no
  details
ここでもちゃんと確認してくれます。
問題ないことを確認したらyesを選択して削除しましょう。
Do you want to perform this destroy? yes
Destroying (sandbox):

     Type                 Name              Status
 -   pulumi:pulumi:Stack  hands-on-sandbox  deleted
 -   ├─ aws:s3:Bucket     hands-on          deleted
 -   └─ aws:kms:Key       hands-on-key      deleted

Outputs:
  - bucketName: "hands-on-17e4f57"

Resources:
    - 3 deleted

Duration: 37s

Permalink: https://app.pulumi.com/uluru-kinoshitat/hands-on/sandbox/updates/3
The resources in the stack have been deleted, but the history and configuration associated with the stack are still maintained.
If you want to remove the stack completely, run 'pulumi stack rm sandbox'.
最後の一文にある通り、リソースは消えましたが構成管理はしてるよってことなので不要であればpulumi stack rm sandbox
$ pulumi stack rm sandbox
This will permanently remove the 'sandbox' stack!
Please confirm that this is what you'd like to do by typing ("sandbox"): dev
Stack 'sandbox' has been removed!
もしくはdestroy前に下記のように強制的に削除もできます。 (リソースは残るので使う場面は無いと思いますが。。)
$ pulumi stack rm [USER_NAME]/hands-on/sandbox --force
This will permanently remove the '[USER_NAME]/hands-on/sandbox' stack!
Please confirm that this is what you'd like to do by typing ("[USER_NAME]/hands-on/sandbox"): [USER_NAME]/hands-on/sandbox
Stack '[USER_NAME]/hands-on/sandbox' has been removed!
これで一通りGetting startはおしまいです。
Terraformのprovidersを利用してるみたいなので私は割と親和性高くて扱いやすいと思いました。
例えばEC2 Instanceの作成はこんな感じで書けます。
import * as pulumi from "@pulumi/pulumi";
import * as aws from "@pulumi/aws";

const publicAz1a = new aws.ec2.DefaultSubnet("publicAz1a", {
    availabilityZone: "us-east-1",
    tags: {
        Name: "hands-on-public-sub",
        ENV: "sandbox",
    },
});

const amzn2 = aws.getAmi({
    filters: [
        {
            name: "name",
            values: ["amzn-ami-hvm-????.??.?.????????-x86_64-gp2"],
        },
        {
            name: "state",
            values: ["available"],
        },
    ],
    mostRecent: true,
    owners: ["amazon"],
});

const hands_on = new aws.ec2.Instance("hands-on", {
    ami: amzn2.id,
    instanceType: "t2.micro",
    subnetId: publicAz1a.id,
    tags: {
        Name: "hands-on",
        ENV: "sandbox",
    },
});

export const instanceId = hands_on.hostId;
その他コマンドなど
Pulumiの基本コマンドは下記です。
https://www.pulumi.com/docs/reference/cli/
- cancel - 実行中のスタックの更新をキャンセルするコマンド
- config - スタックの設定値を
追加/削除/確認などを行うコマンド - destroy - スタックとそれに紐づくリソースを削除する。スタックごと削除されてしまうので注意が必要
- [Preview]history - スタックの更新履歴を表示するコマンド
- login - Pulumiのサービスにログインするためのコマンドでファイル指定なども可能
- logout - Pulumiのサービスからログアウトするためのコマンド
- [Preview]logs - Stackのログを集約して表示やファイルエクスポートをするコマンド
- new - PulumiのプロジェクトとStackテンプレートを作成するコマンド
- plugin - プロバイダに応じて必要なプラグインが必要になり、それらをインストールするためのコマンド
- preview - デプロイによって生じる結果をdry-runで表示してくれるコマンド
- refresh - 実際のリソース状態に応じて、Stackを更新するコマンド
- stack - Stackを管理するコマンドで
一覧/削除/Stack変更などが可能 - state - Stackの状態を手動で変更するためのコマンド
- up - Stackの状態を実リソースに反映するためのコマンド
- version - Pulumiのバージョン確認のためのコマンド
- whoami - 現在Pulumiにログインしているユーザーを表示するコマンド
上記から頻繁に利用するコマンドと注意すべきコマンドをピックアップしてみます。
共通オプション
| options | Description |
|---|---|
| --color | 出力結果を色付けする。選択可能な値はalways/never/raw/auto (デフォルトはauto) |
| -C, --cwd | Pulumiの実行パスの振る舞いを変更する |
| --disable-integrity-checking | チェックポイントファイルを無視する |
| -e, --emoji | 絵文字の出力を有効化する |
| --logflow | 子プロセスへのログを継承する |
| --logtostderr | ログの出力先をstderrにする |
| --non-interactive | 全てのコマンドの対話モードを無効化する |
| --profiling | CPU/メモリのプロファイルと実行トレースをファイル([filename].[pid].{cpu,mem,trace})に出力する |
| --tracing file: | 指定したエンドポイントのトレースをローカルファイルに出力する |
| -v, --verbose [int] | debugモードでコマンドを実行する |
config
基本構文 : pulumi config [flags] [options]
| flags | Description | Opsitons |
|---|---|---|
| get | 設定を取得する |
-h, --help/-j, --json/--path
|
| refresh | 最新のデプロイに基づきローカル設定ファイルを更新する |
-f, --force/-h, --help
|
| rm | 設定の内容を削除する |
-h, --help/--path
|
| set | 設定をする |
-h, --help/--path/--plaintext/--secret
|
| options | Description |
|---|---|
| -h, --help | ヘルプ |
| --path | 設定するマップまたはリスト内のプロパティへのパスをキーに含む |
| -j, --json | コンフィグコンソール結果をJSON形式で返す |
| -f, --force | バックアップせずに設定ファイルを上書きする |
| --plaintext | 値を暗号化しないで保存する |
| --secret | 値を暗号化して保存する |
new
基本構文 : pulumi new [template|url] [options]
templateはこちらから : pulumi/templates
| options | Description |
|---|---|
| -c, --config | 設定を保存する |
| --config-path | 設定のプロパティ値にmapもしくはlistを設定する |
| -d, --description | プロジェクトの説明を指定する |
| --dir | 作成されたプロジェクトを配置するパス |
| -f, --force | 既存ファイルがあっても無視して新規作成する |
| -g, --generate-only | プロジェクトのみを作成する |
| -h, --help | ヘルプ |
| -n, --name | プロジェクト名を指定する |
| -o, --offline | ローカルからテンプレートを呼び出す |
| --secrets-provider | シークレットキーを指定する 利用可能なプロバイダー: default/passphrase/awskms/azurekeyvault/gcpkms/hashivault
|
| -s, --stack | スタック名を指定する |
| -y, --yes | 確認なしで実行する |
preview
基本構文 : pulumi preview [options]
| options | Description |
|---|---|
| -c, --config | プレビューに使用する設定ファイル |
| --config-file | 指定されたファイルの設定値を使用する |
| --config-path | 設定のプロパティ値にmapもしくはlistを設定する |
| -d, --debug | デバッグモードで実施する |
| --diff | 変更箇所を表示する |
| --expect-no-changes | 変更を検知した場合エラーを返す |
| -h, --help | ヘルプ |
| -j, --json | プレビューコンソール結果をJSON形式で返す |
| -m, --message | プレビュー操作にコメントを紐づける |
| -p, --parallel [int] | リソースの操作を並列で実施する。デフォルトは無制限で実施 |
| --show-config | キーと変数を表示する |
| --show-reads | 読み込まれているリソースと、Stackで直接管理されているリソースと共に表示する |
| --show-replacement-steps | リソースの操作ステップを表示する |
| --show-sames | 変更のないリソースも表示する |
| -s, --stack | 実行するStack名を指定する。デフォルトはカレント |
| --suppress-outputs | コンソール表示を最小限にする |
up
基本構文 : pulumi up [template|url] [options]
| options | Description |
|---|---|
| -c, --config | デプロイに使用する設定ファイル |
| --config-file | 指定されたファイルの設定値を使用する |
| --config-path | 設定のプロパティ値にmapもしくはlistを設定する |
| -d, --debug | デバッグモードで実施する |
| --diff | 変更箇所を表示する |
| --expect-no-changes | 変更を検知した場合エラーを返す |
| -h, --help | ヘルプ |
| -m, --message | デプロイ操作にコメントを紐づける |
| -p, --parallel [int] | リソースの操作を並列で実施する。デフォルトは無制限で実施 |
| -r, --refresh | 実行前にStackの状態を更新する |
| --replace | リソースを指定してデプロイする |
| --secrets-provider | シークレットキーを指定する 利用可能なプロバイダー: default/passphrase/awskms/azurekeyvault/gcpkms/hashivault
|
| --show-config | キーと変数を表示する |
| --show-reads | 読み込まれているリソースと、Stackで直接管理されているリソースと共に表示する |
| --show-replacement-steps | リソースの操作ステップを表示する |
| --show-sames | 変更のないリソースも表示する |
| --skip-preview | 実行前にプレビューを実行しない |
| -s, --stack | 実行するStack名を指定する。デフォルトはカレント |
| --suppress-outputs | コンソール表示を最小限にする |
| -t, --target | URN(awsの場合arn)を指定してデプロイする。複数の指定も可能 |
| --target-replace | 単一のURN(awsの場合arn)を指定してデプロイする |
| -y, --yes | 自動承認で実行する |
refresh
基本構文 : pulumi refresh [options]
| options | Description |
|---|---|
| --config-file | 指定されたファイルの設定値を使用する |
| -d, --debug | デバッグモードで実施する |
| --diff | 変更箇所を表示する |
| --expect-no-changes | 変更を検知した場合エラーを返す |
| -h, --help | ヘルプ |
| -m, --message | リフレッシュ操作にコメントを紐づける |
| -p, --parallel [int] | リソースの操作を並列で実施する。デフォルトは無制限で実施 |
| --show-replacement-steps | リソースの操作ステップを表示する |
| --show-sames | 変更のないリソースも表示する |
| --skip-preview | 実行前にプレビューを実行しない |
| -s, --stack | 実行するStack名を指定する。デフォルトはカレント |
| --suppress-outputs | コンソール表示を最小限にする |
| -t, --target | URN(awsの場合arn)を指定してデプロイする。複数の指定も可能 |
| -y, --yes | 自動承認で実行する |
stack
基本構文 : pulumi stack [options]
| options | Description |
|---|---|
| -h, --help | ヘルプ |
| -i, --show-ids | 各リソースのIDを表示する |
| --show-secrets | マスクされているクレデンシャルを表示する |
| -u, --show-urns | 各リソースのURNを表示する |
| -s, --stack | 実行するStack名を指定する。デフォルトはカレント |
state
基本構文 : pulumi state [flags] [options]
| flags | Description | Opsitons |
|---|---|---|
| delete | Stackのstateからリソースを削除する |
--force/-h, --help/-s, --stack/-y, --yes
|
| unprotect | Stackのstateからリソースの保護を解除する |
--all/-h, --help/-s, --stack/-y, --yes
|
| options | Description |
|---|---|
| --force | 保護されているファイルも強制的に削除する |
| -h, --help | ヘルプ |
| -s, --stack | スタック名を指定する |
| --all | 全てのリソースを保護解除の対象にする |
| -y, --yes | 承認不要で実行する |
destroy
基本構文 : pulumi destroy [options]
| options | Description |
|---|---|
| --config-file | 指定した設定ファイルを利用する |
| -d, --debug | デバッグモードで実行 |
| --diff | 実行時の差分を表示する |
| -h, --help | ヘルプ |
| -m, --message | destroyに任意のメッセージを紐づける |
| -p, --parallel [int] | リソースの操作を並列で実施する。デフォルトは無制限で実施 |
| -r, --refresh | 実行前にStackの状態を更新する |
| --show-config | キーと変数を表示する |
| --show-replacement-steps | リソースの操作ステップを表示する |
| --show-sames | 変更のないリソースも表示する |
| --skip-preview | 実行前にプレビューを実行しない |
| -s, --stack | 実行するStack名を指定する。デフォルトはカレント |
| --suppress-outputs | コンソール表示を最小限にする |
| -t, --target | URN(awsの場合arn)を指定して削除する。複数の指定も可能 |
| -y, --yes | 選択なしで実行ができる |
login
基本構文 : pulumi login
| options | Description |
|---|---|
| -c, --cloud-url | ログインするクラウドURLを指定する(Enterprise) |
| -h, --help | ヘルプ |
| -l, --local | Pulumiをローカル専用で使う |
※ [Preview] S3などを利用してクラウド上で状態管理もできる
pulumi login s3://my-pulumi-state-bucket
所感
結構楽しみながら触れました。
コンソールが見やすくてよかったです。
依存関係の解決はTerraformのようによしなにしてくれないので、そこは注意が必要です。
今のプロビジョニングツールに飽きた方や、新しくCloudFormationやTerraformなどに食指が動かない方は是非一度お試ししてみてはいかがでしょうか?