Custom Lintについて
チーム開発をしていると、プルリクでの細かな指摘で同じことを何度も指摘するようなことがあると思います。
そんなときに、指摘事項をlintが見つけてくれると助かります。
Android標準のlintもありますが、Custom Lintによって、標準のlintが指摘してくれないものやそのチーム独自のルールに適用できるlintを作ることができます。
Android Custom Lintに関しては下記の資料が参考になります。
https://www.slideshare.net/cch-robo/android-lintsrppractice
https://qiita.com/hotchemi/items/9364d54a0e024a5e6275
https://inside.dmm.com/entry/2018/04/03/kotlin-custom-lint
Lin
https://github.com/Serchinastico/Lin
Kotlin DSLとAnnotation Processingを使ったコード生成によって、Custom Lintの作成をちょっと簡単にしてくれるライブラリです。
また、作成したDetectorのテストの記述もシンプルになります。
Linを用いたCustom Lintの作り方
今回は例として、
・UseCase層はすべてsuspend関数にする
というルールをチーム内で決めたとして、そのルールを強制するようなCustom Lintを作ってみます。
コードは下記githubにあげています。
https://github.com/iiinaiii/lintchecks-lin
環境
- IntelliJ IDEA 2018.3.5
- Gradle 5.0
ライブラリ導入
Linを使ってCustom Lintを書くために、依存を追加します。
Linの依存追加
rootのbuild.gradleにJitPackリポジトリを追加
allprojects {
    repositories {
        ...
        maven { url 'https://jitpack.io' }
    }
}
モジュールのdependenciesにLinの依存として以下を追加します。
...
apply plugin: 'kotlin-kapt'

...

dependencies {
    // DSL
    implementation "com.github.serchinastico.lin:dsl:$lin_version"
    // アノテーション
    compileOnly "com.github.serchinastico.lin:annotations:$lin_version"
    // Detectorクラスを自動生成するannotation processor
    kapt "com.github.serchinastico.lin:processor:$lin_version"
    // テスト用のクラス
    testCompile "com.github.serchinastico.lin:test:$lin_version"
}
build.gradle全体
通常のCustom Lintのdependenciesと合わせて、以下のようなbuild.gradleになります。
buildscript {
    ext {
        kotlin_version = '1.3.21'
        lint_version = '26.4.0-alpha09'
        lin_version = '0.0.5'
    }

    repositories {
        google()
        jcenter()
    }
    dependencies {
        classpath "com.android.tools.build:gradle:3.2.1"
        classpath "org.jetbrains.kotlin:kotlin-gradle-plugin:$kotlin_version"
        classpath 'com.github.jengelman.gradle.plugins:shadow:5.0.0'
    }
}

allprojects {
    repositories {
        google()
        jcenter()
        maven { url 'https://jitpack.io' }
    }
}
apply plugin: 'kotlin'
apply plugin: 'kotlin-kapt'
apply plugin: 'com.github.johnrengelman.shadow'
apply plugin: 'java'

configurations {
    lintChecks
}

dependencies {
    // Custom Lint
    compileOnly "org.jetbrains.kotlin:kotlin-stdlib-jdk7:$kotlin_version"
    compileOnly "com.android.tools.lint:lint-api:$lint_version"
    compileOnly "com.android.tools.lint:lint-checks:$lint_version"

    // Lint test
    testCompile "junit:junit:4.12"
    testCompile "com.android.tools.lint:lint:$lint_version"
    testCompile "com.android.tools.lint:lint-tests:$lint_version"
    testCompile "com.android.tools:testutils:$lint_version"

    // Lin
    implementation "com.github.serchinastico.lin:dsl:$lin_version"
    compileOnly "com.github.serchinastico.lin:annotations:$lin_version"
    kapt "com.github.serchinastico.lin:processor:$lin_version"
    testCompile "com.github.serchinastico.lin:test:$lin_version"
}

jar {
    manifest {
        // Only use the "-v2" key here if your checks have been updated to the
        // new 3.0 APIs (including UAST)
        attributes("Lint-Registry-v2": "com.iiinaiii.lint.LinIssueRegistry")
    }
}
Detectorの作成
検出したい事項を表すメソッドを作成し、アノテーション@Detectorを付けます。
メソッドは、LinDetectorを返すdetector()を呼び出すようにし、
第一引数にIssueの定義、
第二引数にラムダで検出ロジック
を書きます。
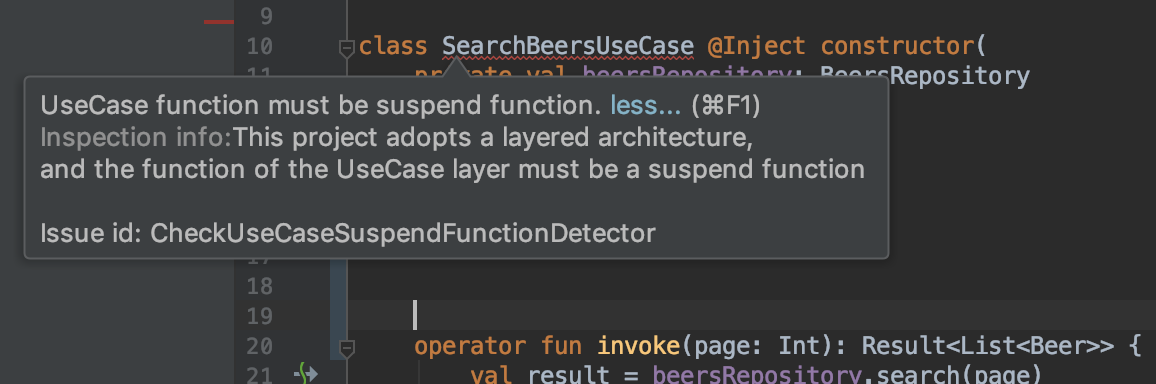
@Detector
fun checkUseCaseSuspendFunction() = detector(
    issue(
        scope = Scope.JAVA_FILE_SCOPE,
        description = "UseCase function must be suspend function.",
        explanation = """This project adopts a layered architecture,
            and the function of the UseCase layer must be a suspend function
        """.trimIndent()
    )
) {
    type {
        suchThat { uClass ->
            if (uClass.name?.contains("UseCase") == false) {
                return@suchThat false
            }

            return@suchThat uClass.methods.filter {
                it.isConstructor.not()
            }.all {
                it.modifierList.text.contains("suspend")
            }.not()
        }
    }
}
Issueの定義
Linに定義されているissue()を使うと、
scope,description,explanation以外のものはLinデフォルトのものになります。
- category = Category(null, "Lin", 100)
- priority = 5
- severity = Severity.ERROR
fun issue(
    scope: EnumSet<Scope>,
    description: String,
    explanation: String
): IssueBuilder = IssueBuilder(scope, description, explanation)

data class IssueBuilder(
    val scope: EnumSet<Scope>,
    val description: String,
    val explanation: String,
    val category: Category = LinCategory,
    var priority: Int = 5,
    var severity: Severity = Severity.ERROR
) {
...
カスタマイズしたい場合はIssueBuilder()を直接呼び出します。
@Detector
fun checkUseCaseSuspendFunction() = detector(
    IssueBuilder(
        scope = Scope.JAVA_FILE_SCOPE,
        description = "UseCase function must be suspend function.",
        explanation = """This project adopts a layered architecture,
            and the function of the UseCase layer must be a suspend function
        """.trimIndent(),
        category = Category.PERFORMANCE,
        priority = 8,
        severity = Severity.WARNING
    )
検出ロジックの作成
検出ロジックの作成は以下のような流れになります
- 検出したい構文要素に対応するメソッドを呼び出す
- その中でsuchThatメソッドを呼び出す
- その中で検出ロジックを書き、指摘事項を検出したらtrueを、検出しなければfalseを返す
今回の例では、
・UseCase層はすべてsuspend関数にする
というルールに当てはまるロジックを作るので、
・クラス名に"UseCase"が含まれること
・該当クラスのすべてのメソッドのmodifierに"suspend"が付与されていること
が検出ロジックとなります。
@Detector
fun checkUseCaseSuspendFunction() = detector(
    issue(
        ...
    )
) {
    // クラス名が「〜UseCase」のものを検出するため, type{}を使う
    type {
        suchThat { uClass ->
            // クラス名の検査 : "UseCase"が含まれていること
            if (uClass.name?.contains("UseCase") == false) {
                return@suchThat false
            }

            // メソッドの検査 : "suspend" modifierが付いていること
            return@suchThat uClass.methods.filter {
                // コンストラクタは除外
                it.isConstructor.not()
            }.all {
                // すべてのメソッドのmodifierに"suspend"が含まれること
                it.modifierList.text.contains("suspend")
            }.not()
        }
    }
}
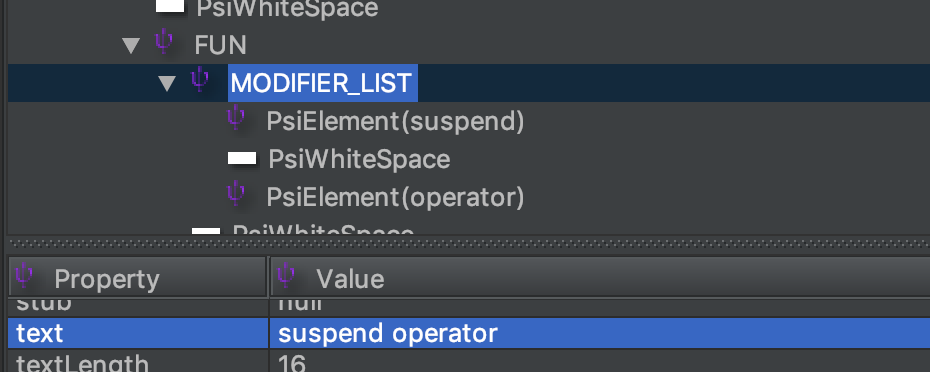
PsiViewerプラグイン
検出したい部分の構文要素が何かを知るにはPsiViewerプラグインが便利です。
PsiViewerを使うと、上記の例の"suspend"がmethod.modifierList.textに含まれることがわかります。
Detectorクラスの自動生成
ここまでできたら、gradleのassembleタスクを実行します。
{@Detectorを付けたメソッド名+Detector}という名前の、Detectorクラスが自動生成されます。
class CheckUseCaseSuspendFunctionDetector : Detector(), UastScanner {
    val projectVisitor: LinVisitor = LinVisitor(detector)

    lateinit var javaContext: JavaContext
...
IssueRegistryの作成
先程自動生成されたクラスからissueが取得できるようになっています
IssueRegistryを継承したIssueクラスを作成し、issuesのリスト返却の内容として、上記自動生成クラスのissueを含めます。
class LinIssueRegistry : IssueRegistry() {
    override val api: Int
        get() = CURRENT_API

    override val minApi: Int
        get() = -1

    override val issues: List<Issue> = listOf(
        CheckUseCaseSuspendFunctionDetector.issue
    )
}
通常のCustom Lint同様、 作成したIssueRegistryを下記のようにモジュールのbuild.gradleに記載します。
...
...
jar {
    manifest {
        // Only use the "-v2" key here if your checks have been updated to the
        // new 3.0 APIs (including UAST)
        attributes("Lint-Registry-v2": "com.iiinaiii.lint.LinIssueRegistry")
    }
}
テストを書く
Linを使うとDetectorのテストもシンプルに書けます。
テストクラスの作成
LinTestを実装したテストクラスを作成し、issueとして自動生成Detectorクラスのissueを返します。
class UseCaseFunctionDetectorTest : LintTest {
    override val issue: Issue
        get() = CheckUseCaseSuspendFunctionDetector.issue
...
テストメソッドの書き方
書き方は以下のようになります
expect(
   """
   // 検出したいコードの文字列
   """.inKotlin //(or inJava)
) toHave SomeError("{fileName}")
expect(
   """
   // 検出したいコードの文字列
   """.inKotlin //(or inJava)
) toHave NoErrors
今回作成した、Detectorのテストコードは以下のようになりました。
    @Test
    fun whenContainsNotSuspendFunction_detectsErrors() {
        expect(
            """
                package foo

                class SampleUseCase @Inject constructor(
                    private val sampleRepository: SampleRepository
                ) {

                    operator fun invoke(id: Int): Result<SampleData> {
                        val result = sampleRepository.getSampleData(id)
                        return when (result) {
                            is Result.Success -> Result.Success(result.data.toSampleData())
                            is Result.Error -> result
                        }.exhaustive
                    }
                }
            """.inKotlin
        ) toHave SomeError("src/foo/SampleUseCase.kt")
    }
KotlinでLintのテストコードを書くと、トリプルクォートが使えるので、テスト対象のクラスの表現がしやすいのですが、それに加えてLinを使うとアサーションが書きやすくなりました。
ちなみに以前Kotlinで書いた、Custom LintのDetectorのテストは以下のようなアサーションをしていました。
val kotlinResult = lintProject(LintDetectorTest.kotlin(SOURCE_PATH + "Foo.kt", kotlinCode))
assertThat(kotlinResult).isEqualTo(
            """
src/com/iiinaiii/lintchecks/Foo.kt:7: Error: Don't write http:// code direct!!! [WriteHttpDirect]
                    private val fieldUrl = "http://www.foo.jp/field"
                                            ~~~~~~~~~~~~~~~~~~~~~~~
src/com/iiinaiii/lintchecks/Foo.kt:17: Error: Don't write http:// code direct!!! [WriteHttpDirect]
                        val localUrl = "http://www.foo.jp/local"
                                        ~~~~~~~~~~~~~~~~~~~~~~~
src/com/iiinaiii/lintchecks/Foo.kt:22: Error: Don't write http:// code direct!!! [WriteHttpDirect]
                        request("http://www.foo.jp/direct")
                                 ~~~~~~~~~~~~~~~~~~~~~~~~
3 errors, 0 warnings
        """.trimIndent()
)
jarを作成してプロジェクトに適用する
Fat Jarの作成
以上で、Linを使ったCustom Lintの作成ができました。
Androidのプロジェクトに適用するため、jarを作成します。
Linのクラスをjarに含めるようにするため、Gradle Shadow Pluginを使って、Fat Jarを作成するようにしました。
https://imperceptiblethoughts.com/shadow/
以下のコマンドで、モジュール/build/libs配下にjarが生成されます。
./gradlew {モジュール名}:shadowJar
Androidプロジェクトへ配置
Androidプロジェクトの適当な場所にjarを配置し、
gradleのdependenciesに以下のように記載すると、Custom Lintが動作します。
dependencies {
  ...
  lintChecks files("lint/checks-all.jar")
}
注 : ハマったポイント
annotation processingによる自動生成を含むからなのか
1つjavaのファイルを配置しておかないと、"ソース・ファイルがありません"
というエラーが出てうまくいきませんでした。
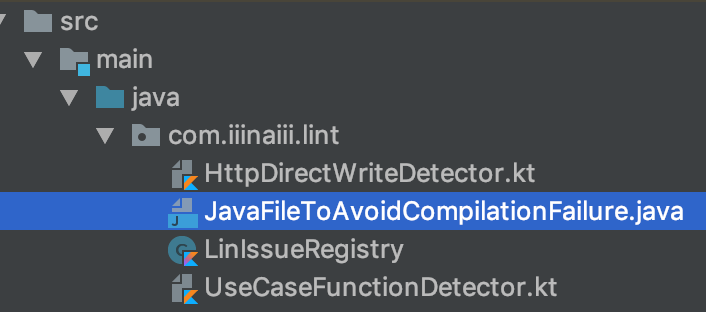
Linのリポジトリでもそのようにしていたため、現状では回避策としてそのようにする必要があるかもしれません。
https://github.com/Serchinastico/Lin/blob/master/detectors/src/main/kotlin/com/serchinastico/lin/detectors/JavaFileToAvoidCompilationFailure.java
完成
Linのその他機能
Linには以下のような機能もあるようです。
機会があれば使ってみたいと思います。
- Quantifiers : Lintルールに回数の規定を付ける
- Storage : 検出した状態を保存し、後で使える
まとめ
- Linを使うとDSLによって、issueの定義、検出ロジックに集中できるので、Custom Lintが書きやすくなりました。
- Linを使うとDSLによって、自作したDetectorのテストコードが書きやすくなりました。