前提:CentOS7.4
Conohaログイン -> ドメイン -> ドメイン取得
-> 適当なドメイン名を取得購入
ドメイン設定
DNS -> +ドメイン -> 取得済みのドメイン名入力 -> 保存
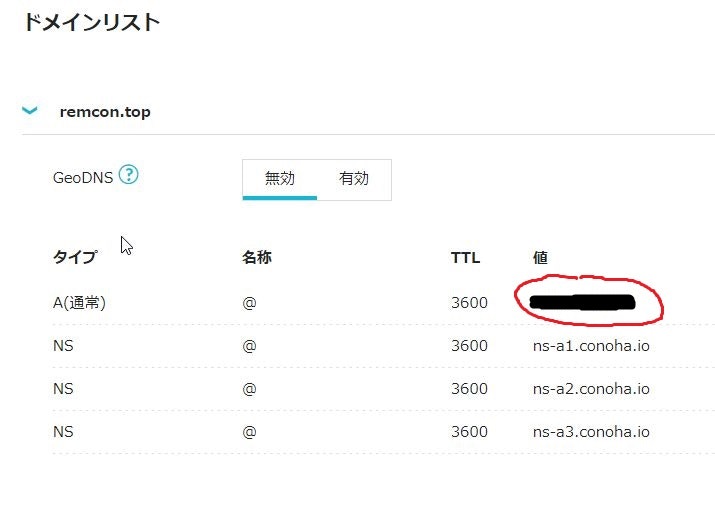
ドメイン名が反映されたら編集。
・ドメイン名クリック -> 鉛筆マーク -> + -> A @ 3600 ConohaのIPアドレス -> 保存
(注:「転送設定」はしない。Let’s Encryptでハマります。)
(豆:ドメインに紐付けるサーバーのアドレスの変更には1~3日かかります。)
ファイアウォールの確認・設定
--> 確認
# firewall-cmd --list-all --permanent
--> http https があればOKです。
--> なければ
# firewall-cmd --add-service=http --zone=public --permanent
# firewall-cmd --add-service=https --zone=public --permanent
# systemctl restart firewalld.service
(注:Conoha -> サーバー -> ネットワーク情報 -> 接続許可ポート -> 全て許可)
VirtualHostの設定
NameVirtualHost *:80

<VirtualHost *:80>
ServerAdmin root@{ドメイン名}
DocumentRoot /var/www/html
ServerName {ドメイン名}
</VirtualHost>
Let’s EncryptのSSL証明書のインストール
# yum install -y certbot python2-certbot-apache
# certbot --apache -d {ドメイン名}
-> 対話方式でメールアドレス等を入力 -> Agree -> 任意でy/n
うまくいけばこんなメッセージがきます!
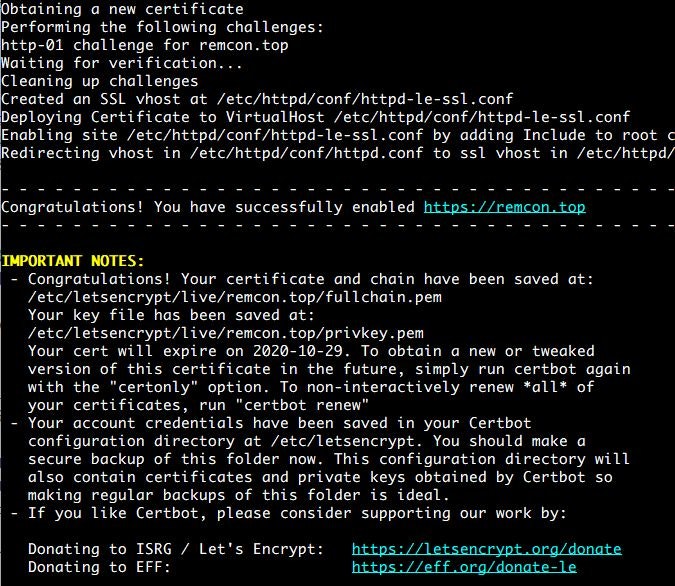
重要ポイント
-> Deploying Certficate to VirtualHost /etc/httpd/conf/httpd-le-ssl.conf
httpd-le-ssl.confの自動作成。
-> Enabling site /etc/httpd/conf/httpd-le-ssl.conf by adding Include to root configuration
httpd.confに上記ファイルのInclude設定追記。
-> Redirecting vhost in /etc/httpd/conf/httpd/conf to ssl vhost in /etc/httpd/conf/httpd-le-ssl.conf
httpからhttpsへのリダイレクト処理の自動設定。
証明書インストールの確認
## 証明書
# ls /etc/letsencrypt/live/{ドメイン名}
-> cert.pem chain.pem fullchain.pem privkey.pem README
## 追加された設定
-> /etc/httpd/conf/httpd-le-ssl.conf が追加されているか?
-> /etc/httpd/conf/httpd.conf の末尾にhttpd-le-ssl.confのIncludeが追記されたか?
## http -> httpsのリダイレクトは正しく動作しているか?
ssl.confの設定(証明書の有効化)
+ SSLCertificateFile /etc/letsencrypt/live/{ドメイン名}/cert.pem
+ SSLCertificateKeyFile /etc/letsencrypt/live/{ドメイン名}/privkey.pem
+ SSLCertificateChainFile /etc/letsencrypt/live/{ドメイン名}/chain.pem

# systemctl restart firewalld.service
証明書の有効期限を確認
$ sudo certbot certificates
#証明書の有効期限が89日間の例
- - - - - - - - - - - - - - - - - - - - - - - - - - - - - - - - - - - - - - - -
Found the following certs:
  Certificate Name: ******.***
    Serial Number: 41b036408751294a375b4ec64ab9f67c973
    Domains: ******.***
    Expiry Date: 2021-01-15 16:52:20+00:00 (VALID: 89 days)
    Certificate Path: /etc/letsencrypt/live/******.***/fullchain.pem
    Private Key Path: /etc/letsencrypt/live/******.***/privkey.pem
- - - - - - - - - - - - - - - - - - - - - - - - - - - - - - - - - - - - - - - -```
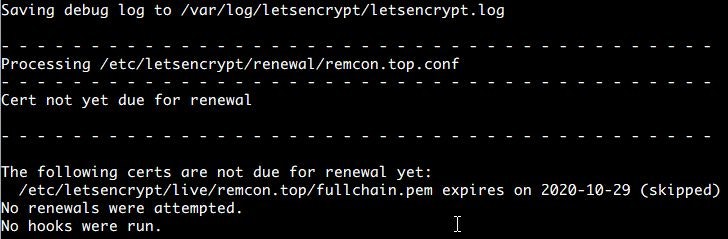
更新の手続き
-> 更新コマンド
# /usr/bin/certbot renew --post-hook "systemctl restart httpd.service"
期限がまだなのでできるはずもありませんがこんな画面でOKです。
crondの確認
# systemctl status crond
-> active
証明書の自動更新設定
##3ヶ月に1度更新するのが本当なのですがここでは1週間に1度更新を試みます。
# vim /etc/cron.d/letsencrypt -> 新規作成
+ 12 02 * * 1 root /bin/certbot renew --post-hook "systemctl restart httpd.service"
-> 毎週月曜の2時12分に更新。サーバーの負荷分散を考え中途半端な時刻にしてみた。
cronの実行結果の確認
# less /var/log/cron
ここまででリダイレクト処理ができていれば以下は必要なし
リダイレクト処理
HTTPにきたアクセスをHTTPSに転送。
<IfModule mod_rewrite.c>
RewriteEngine on
RewriteCond %{HTTPS} off
RewriteRule ^(.*)$ https://%{HTTP_HOST}%{REQUEST_URI} [R=301,L]
</IfModule>
.htaccess設定を有効にする
<Directory "/var/www/html">
-    AllowOverride none
+    AllowOverride all
</Directory>
以上です。お疲れさまです!
LGTMお願いします!
ストックのついでにもLGTMお願いします!
モチベーションが上がります!(^^)