執筆時点(2014/04/19)のバージョン等
Android 4.3, 4.4で確認(下位バージョンでも動作すると思われます)
FontAwesome 4.0.3
はじめに
Androidアプリでボタンなどにアイコンを配置したいことはよくあると思いますが、アプリのイメージカラーに合わせたり画面の解像度ごとに画像を用意するのは手間がかかります。
PhotoShopやGIMPに慣れていないと、コーディングの時間より画像作成にばかり時間を取られたり。
Font Awesomeは、(画像でなく)フォントとして369種類ものアイコンが提供されているWebフォントです。
これをボタンなどのビューにセットすることでオシャレなアイコンを簡単に実装できます。
あくまでテキストなので、色やサイズの指定はAndroid標準の指定方法がそのまま使えます。Layoutファイルで何度でも簡単に変更して最適な設定を試せます!!
カスタムViewとかむずかしそう...と思うかもしれませんが、ほぼコピペでいけると思うので試してみてください。
あ、Android-Bootstrapで問題なければ、そちらでどうぞー(わたしの場合、ある画面ではうまく動かなかった)。
実装例
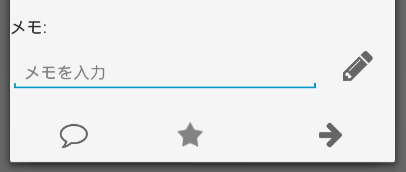
えんぴつアイコン、吹き出し、右やじるしがFont Awesomeを使ったボタンです。
(★はToggleButton。FontAwesome不使用)
導入手順の概要
- Font AwesomeのサイトからフォントファイルをダウンロードしてAndroidStudioまたはeclipseのプロジェクト内、assetsフォルダに配置する。
- フォントファイルを読み込むためのクラスを作る。
- TextViewやButtonをextendsしてフォント指定できるカスタムViewを作る。
- Layoutファイルでフォント、アイコン、色、サイズ等を指定して使う!
1.Font Awesomeのフォントファイルをダウンロード
-
http://fortawesome.github.io/Font-Awesome/ の
Downloadボタンからzipファイルをダウンロードします。 - zipを解凍してできたフォルダ内
fontフォルダのfontawesome-webfont.ttfをAndroidプロジェクトのassetsフォルダにコピーします。
2.フォントファイル読み込みクラスを作成
assetsフォルダ配下の指定されたパスのフォントファイルを読み込むクラスです。パフォーマンス向上、メモリ節約のため、読み込み済みのフォントは再読み込みしないようにしてあります。
参考:Typeface.createFromAsset leaks asset stream
import android.content.Context;
import android.graphics.Typeface;
import android.util.Log;

import java.util.Hashtable;

public class CachedTypefaces {
    private static final String TAG = "CachedTypefaces";

    private static final Hashtable<String, Typeface> cache = new Hashtable<String, Typeface>();

    public static Typeface get(Context context, String assetPath) {
        synchronized (cache) {
            if (!cache.containsKey(assetPath)) {
                try {
                    Typeface t = Typeface.createFromAsset(context.getAssets(), assetPath);
                    cache.put(assetPath, t);
                } catch (Exception e) {
                    Log.e(TAG, "Could not get typeface '" + assetPath + "' because " + e.getMessage());
                    return null;
                }
            }
            return cache.get(assetPath);
        }
    }
}
3.アイコンを使うカスタムViewを作成
Buttonを例にカスタムViewの作り方を示します。
参考:Custom fonts and XML layouts (Android)
カスタムボタンクラス
指定されたフォントファイルを読み込んでTypeFaceにセットするクラス。extends元をTextViewなどに変えればほぼそのまま他のViewでも使えます。
import android.content.Context;
import android.content.res.TypedArray;
import android.graphics.Typeface;
import android.util.AttributeSet;
import android.util.Log;
import android.widget.Button;
import android.widget.TextView;

import jp.caliconography.android.util.CachedTypefaces;

public class CustomFontButton extends Button {
    private static final String TAG = "CustomFontButton";

    public CustomFontButton(Context context) {
        super(context);
    }

    public CustomFontButton(Context context, AttributeSet attrs) {
        super(context, attrs);
        setCustomFont(context, attrs);
    }

    public CustomFontButton(Context context, AttributeSet attrs, int defStyle) {
        super(context, attrs, defStyle);
        setCustomFont(context, attrs);
    }

    private void setCustomFont(Context ctx, AttributeSet attrs) {
        TypedArray a = ctx.obtainStyledAttributes(attrs, R.styleable.CustomFontTextView);
        String customFont = a.getString(R.styleable.CustomFontTextView_customFont);
        setCustomFont(ctx, customFont);
        a.recycle();
    }

    public boolean setCustomFont(Context context, String asset) {
        Typeface tf = null;
        try {
            // ここでフォントファイル読み込み。
            // 読み込み済みならキャッシュから。
            tf = CachedTypefaces.get(context, asset);
        } catch (Exception e) {
            Log.e(TAG, "Could not get typeface: " + e.getMessage());
            return false;
        }

        setTypeface(tf);
        return true;
    }
}
カスタムボタン用の属性を定義
res/values/attrs.xml で CustomFontButton 用の属性を定義します。この customFont という属性をレイアウトファイルで使用します。
<?xml version="1.0" encoding="utf-8"?>
<resources>
    <declare-styleable name="CustomFontButton">
        <attr name="customFont" format="string"/>
    </declare-styleable>
</resources>
Layoutファイルでカスタムボタンを使う
- 3行目:
xmlns:myappのmyappは任意の文字列(ネームスペース名)にしてください。 -
<your.app.package.CustomFontButton>タグ内、myapp:customFont属性で1.で配置したファイルを指定します。 -
android:text属性で表示したいアイコンのUnicodeを指定します。- Unicodeはこちらを参照: Font Awesome cheetsheet。
-
android:text属性にはアイコンのUnicodeだけでなく、通常の文字列も指定できます(混在してもOK)。
- background、textSizeやtextColorなど、通常のButtonと同様に指定できます。色の変更も簡単!!
<?xml version="1.0" encoding="utf-8"?>
<LinearLayout xmlns:android="http://schemas.android.com/apk/res/android"
xmlns:myapp="http://schemas.android.com/apk/res-auto"
<!-- ↑xmlnsの追加を忘れずに! -->
android:id="@+id/LinearLayout01"
android:layout_width="fill_parent"
android:layout_height="fill_parent"
android:orientation="vertical">
<your.app.package.CustomFontButton
android:id="@+id/btnSomething"
android:layout_width="wrap_content"
android:layout_height="wrap_content"
android:text=""
android:textSize="30sp"
android:textColor="#666"
myapp:customFont="fontawesome-webfont.ttf"
android:onClick="onClickSomething"/>
</LinearLayout>
上のxmlの指定で、下図のえんぴつアイコンが表示されます!
できないこと
- あくまでViewにセットする文字列の一部なので、アイコンと文言で色やサイズを変えることはできません。
- ToggleButtonはbackgroundに指定する 画像で 表示を切り替えるので、文字列で指定するこの方法ではうまく切り替えれらませんでした。(いろいろやればできるかも)
