目的
- ResNet-34でCIFAR-10の分類精度95%を目指す
- 実際にネットで拾ってきた画像を分類する
前置き
- フレームワークにはKearsを使用
- ResNet自体の説明は散々語られているので簡潔に説明する
- ResNetとCIFAR-10について知っている方は1、2章は飛ばしてもらいたい
1.ResNetとは
ResNetは2015年にMicrosoftが提案したニューラルネットワークでDeep Residual Networkの略
その名の通り層がかなり深いのでまさにディープラーニングと言っていい。
種類としてはResNet-18, ResNet-34, ResNet-50, ResNet-101, ResNet-152などがある
数が増えるにつれ層が深くなっていくのが特徴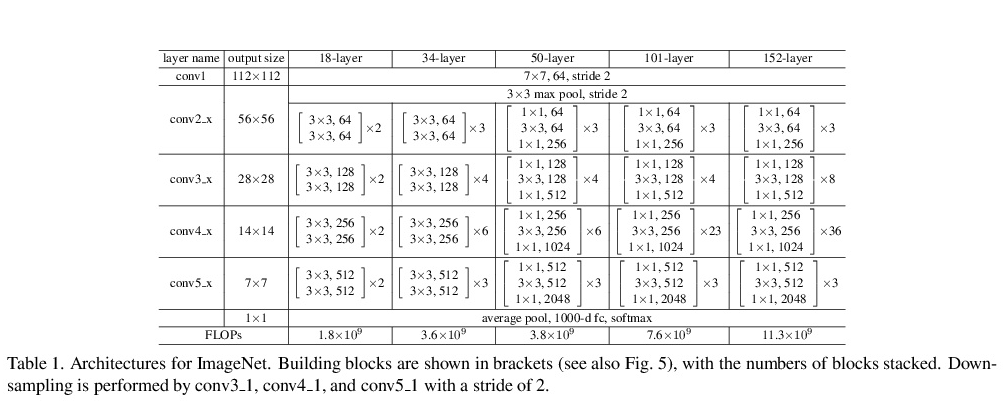
ただ下から2番目のResNet-34だけでもこれだけ深くなる

そして何より従来のモデルと比較したとき圧倒的に精度がいい。
が層が深いゆえに学習時間が極端に長いというデメリットもあるためある程度のPCスペックと
時間が必要。
自分の場合、隠れ層なしのシンプルネットワーク(batchsize=256, epoch=20, Dataset=MNIST)
とResNet-34を比較した場合、学習を終えるまでに50倍の時間が掛かっている。
1-2.層は深くなると精度が上がるのか
ニューラルネットワークを勉強したての誰しもが考えたことのある
「これ層を増やせば精度が100%になるんじゃね?」という考えの答えは半分正解で半分間違えである。
半分正解というのは、実際層が深くなるにつれモデルの表現力は高くなるので
「ある程度の層」であれば精度は確実にあがる。
ここで「ある程度の層」と書いたのは「深すぎる層」では勾配が消滅してしまう
という問題が発生してしまうためだ。
1-3.勾配消滅
勾配の消滅とはなんだろうか。
ご存知の通りニューラルネットワークが学習するためには勾配が必要になってくる。
基本的には勾配は誤差逆伝播法で求められ各層における勾配の変数は層が深くなるにつれ
数を増してくる(実際は追加した層の手前側(入力層に近い側)の変数が増える)
仮にもしこの変数のほとんどが1.0以下であれば入力層に近い側の層は勾配が非常に小さい値に収束してしまうことに
なるのだが、実際活性化関数の微分値は1.0以下であり、シグモイドに関しては0.25以下、
また活性化関数は例えば2層のパーセプトンであれば最大2回、1000層のパーセプトンであれば最大1000回
掛け合わせることになり
結局非常に小さい値に収束してしまうことになってしまうのだ。
1-4.勾配が0に近づく
じゃあ勾配が0に近づくとどうなるのか
当たり前だがその層における重みパラメーターの更新は一切ストップする
つまりその層が存在することの意味を全くなさず
また全体の学習速度の著しい低下を招くこととなる酷い状態に陥る
1-5.ShortcutConnection
そこでこの勾配を保存するべく考えられた対策がResNetの醍醐味であるShortcutConnection。
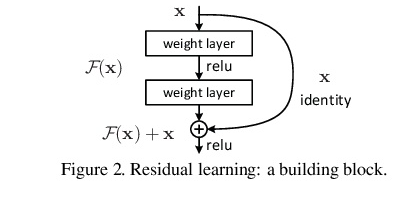
ShortcutConnection自体難しいものではなくテンソル同士のただの足し算です。
Kerasの場合keras.layers.Add()を使います。
ただ足し合わせる前にxをF(x)に合わせるため整形する必要がある。
このShortcutConnection、勾配を保存するための苦肉の策かと思われるが
実際 F(x) + x の微分値は1に非常に近く勾配の減衰対策に非常に役に立っている。
2.CIFAR-10とは
CIFAR-10は32x32x3のカラー画像でトレーニング用5万枚、テスト用1万の計6万枚のデータセット。
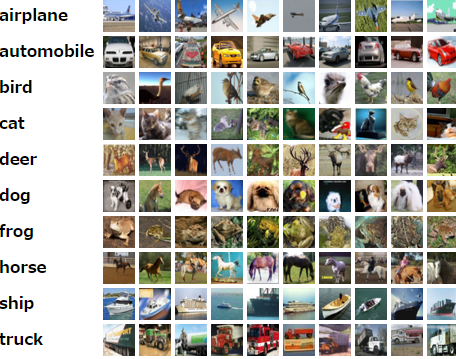
それぞれの画像は10クラス(airplane, automobile, bird, cat, deer, dog, frog, horse, ship, truck)
に分けられます。
3.ResNetの実装
実際にResNetを実装していきますが、一からblockを書いていくと大変なため
nekobean氏の Keras-Keras 実装で学ぶ ResNetを参考にfunctions.pyとResNet_build.pyを作成
from functools import reduce
from keras import backend as K
from keras.layers import (Activation, Add, GlobalAveragePooling2D,BatchNormalization, Conv2D, Dense, Flatten, Input, MaxPooling2D)
from keras.models import Model
from keras.regularizers import l2

def compose(*funcs):
    if funcs:
        return reduce(lambda f, g: lambda *args, **kwargs: g(f(*args, **kwargs)), funcs)
    else:
        raise ValueError('Composition of empty sequence not supported.')

def ResNetConv2D(*args, **kwargs):
    conv_kwargs = {
        'strides': (1, 1),
        'padding': 'same',
        'kernel_initializer': 'he_normal',
        'kernel_regularizer': l2(1.e-4)
    }
    conv_kwargs.update(kwargs)

    return Conv2D(*args, **conv_kwargs)

def bn_relu_conv(*args, **kwargs):
    return compose(
        BatchNormalization(),
        Activation('relu'),
        ResNetConv2D(*args, **kwargs))

def shortcut(x, residual):
    x_shape = K.int_shape(x)
    residual_shape = K.int_shape(residual)

    if x_shape == residual_shape:
        shortcut = x
    else:
        stride_w = int(round(x_shape[1] / residual_shape[1]))
        stride_h = int(round(x_shape[2] / residual_shape[2]))

        shortcut = Conv2D(filters=residual_shape[3],
                          kernel_size=(1, 1),
                          strides=(stride_w, stride_h),
                          kernel_initializer='he_normal',
                          kernel_regularizer=l2(1.e-4))(x)
    return Add()([shortcut, residual])

def basic_block(filters, first_strides, is_first_block_of_first_layer):
    def f(x):
        if is_first_block_of_first_layer:
            conv1 = ResNetConv2D(filters=filters, kernel_size=(3, 3))(x)
        else:
            conv1 = bn_relu_conv(filters=filters, kernel_size=(3, 3),
                                 strides=first_strides)(x)

        conv2 = bn_relu_conv(filters=filters, kernel_size=(3, 3))(conv1)

        return shortcut(x, conv2)

    return f

def bottleneck_block(filters, first_strides, is_first_block_of_first_layer):
    def f(x):
        if is_first_block_of_first_layer:
            conv1 = ResNetConv2D(filters=filters, kernel_size=(3, 3))(x)
        else:
            conv1 = bn_relu_conv(filters=filters, kernel_size=(1, 1),
                                 strides=first_strides)(x)

        conv2 = bn_relu_conv(filters=filters, kernel_size=(3, 3))(conv1)
        conv3 = bn_relu_conv(filters=filters * 4, kernel_size=(1, 1))(conv2)

        return shortcut(x, conv3)

    return f

def residual_blocks(block_function, filters, repetitions, is_first_layer):
    def f(x):
        for i in range(repetitions):
            first_strides = (2, 2) if i == 0 and not is_first_layer else (1, 1)

            x = block_function(filters=filters, first_strides=first_strides,
                               is_first_block_of_first_layer=(i == 0 and is_first_layer))(x)
        return x

    return f
from functools import reduce
from keras import backend as K
from keras.layers import (Activation, Add, GlobalAveragePooling2D,
                          BatchNormalization, Conv2D, Dense, Flatten, Input,
                          MaxPooling2D)
from keras.models import Model
from keras.regularizers import l2
from functions import (basic_block, bottleneck_block, compose, ResNetConv2D, residual_blocks)

class ResnetBuilder():
    @staticmethod
    def build(input_shape, num_outputs, block_type, repetitions):
        if block_type == 'basic':
            block_fn = basic_block
        elif block_type == 'bottleneck':
            block_fn = bottleneck_block

        input = Input(shape=input_shape)

        conv1 = compose(ResNetConv2D(filters=64, kernel_size=(7, 7), strides=(2, 2)),
                        BatchNormalization(),
                        Activation('relu'))(input)

        pool1 = MaxPooling2D(
            pool_size=(3, 3), strides=(2, 2), padding='same')(conv1)

        block = pool1
        filters = 64
        for i, r in enumerate(repetitions):
            block = residual_blocks(block_fn, filters=filters, repetitions=r,
                                    is_first_layer=(i == 0))(block)
            filters *= 2

        block = compose(BatchNormalization(),
                        Activation('relu'))(block)

        pool2 = GlobalAveragePooling2D()(block)

        fc1 = Dense(units=num_outputs,
                    kernel_initializer='he_normal',
                    activation='softmax')(pool2)

        return Model(inputs=input, outputs=fc1)

    @staticmethod
    def build_resnet_18(input_shape, num_outputs):
        return ResnetBuilder.build(
            input_shape, num_outputs, 'basic', [2, 2, 2, 2])

    @staticmethod
    def build_resnet_34(input_shape, num_outputs):
        return ResnetBuilder.build(
            input_shape, num_outputs, 'basic', [3, 4, 6, 3])

    @staticmethod
    def build_resnet_50(input_shape, num_outputs):
        return ResnetBuilder.build(
            input_shape, num_outputs, 'bottleneck', [3, 4, 6, 3])

    @staticmethod
    def build_resnet_101(input_shape, num_outputs):
        return ResnetBuilder.build(
            input_shape, num_outputs, 'bottleneck', [3, 4, 23, 3])

    @staticmethod
    def build_resnet_152(input_shape, num_outputs):
        return ResnetBuilder.build(
            input_shape, num_outputs, 'bottleneck', [3, 8, 36, 3])
これでResNetのモデルを作成する準備ができました。
3-1.CIFAR-10を学習するクラス
NB_CLASSES = 10
NB_EPOCH = 200
BATCH_SIZE = 256
VERBOSE = 1

class ResNetCifar10:
    def __init__(self):
        self.cifar10_inputShape=(32, 32, 3)
        self.momentum = SGD(lr=0.1, decay=1e-4, momentum=0.9, nesterov=True)
        self.label = ['airplane', 'automobile', 'bird', 'cat', 'deer', 'dog', 'frog', 'horse', 'ship', 'truck']
        self.ResNetModel = ResnetBuilder.build_resnet_34(self.cifar10_inputShape, NB_CLASSES)
        plot_model(self.ResNetModel, to_file='ResNetModel.png', show_shapes=True, show_layer_names=True)
        self.ResNetModel.compile(optimizer=self.momentum, loss=losses.binary_crossentropy, metrics=['acc'])
epochは200回、バッチサイズは少しでも早く学習させるため大きめに256をとる
ResnetBuilder.build_resnet_34でモデルを作成、optimizerにはResNetでエラー率が一番低い
momentum
3-2.学習
class ResNetCifar10:
    def train_cifar10(self, output_graph=True, save_weight=True):
        (x_train, y_train), (x_test, y_test) = get_preprocessed_cifar10()

        trainDataAccuracy_array = []
        testDataAccuracy_array = []
        epoch_array = range(1, NB_EPOCH + 1)

        start_time = time.time()
        for epoch in range(NB_EPOCH):
            perm = np.random.permutation(x_train.shape[0])

            for i in range(0, x_train.shape[0], BATCH_SIZE):
                x_batch = x_train[perm[i : i + BATCH_SIZE]]
                y_batch = y_train[perm[i : i + BATCH_SIZE]]

                self.ResNetModel.train_on_batch(x_batch, y_batch)

            train_score = self.ResNetModel.evaluate(x_train, y_train, batch_size=BATCH_SIZE, verbose=VERBOSE)
            test_score = self.ResNetModel.evaluate(x_test, y_test, batch_size=BATCH_SIZE, verbose=VERBOSE)
            trainDataAccuracy_array.append(train_score[1])
            testDataAccuracy_array.append(test_score[1])
            interval = int(time.time() - start_time)
            print('epoch = {0:d} / {1:d} --- 実行時間 = {2:d}[sec] --- 1epochに掛かる平均時間 = {3:.2f[sec]'\
            .format(epoch + 1, NB_EPOCH, interval, interval / (epoch + 1)))
            print("Test score : {0:f} --- Test accuracy : {1:f}".format(test_score[0], test_score[1]))
        end_time = int(time.time() - start_time)

        if output_graph:
            plt.plot(epoch_array, trainDataAccuracy_array, label="train")
            plt.plot(epoch_array, testDataAccuracy_array, linestyle="--",label="test")
            plt.xlabel("epoch")
            plt.ylabel("accuracy")
            plt.title("ResNet with Cifar-10 ({0:d}[sec])".format(end_time))
            plt.legend()
            plt.show()

        if save_weight:
            self.ResNetModel.save_weights('ResNetModel_cifar10_weights.h5')
とくに解説するところはないが、epoch毎にtrainとtestを評価後
実行時間と1epochに対する平均時間を出力しています。
output_graphがtrueであればグラフをsave_weightがtrueであれば重みを出力します。
get_preprocessed_cifar10はCIFAR-10を正規化、one-hotラベル化して返すだけの関数です。
def get_preprocessed_cifar10(nb_classes=NB_CLASSES, debug=True):
    (x_train, y_train), (x_test, y_test) = cifar10.load_data()

    if debug:
        print("cifar-10_tarin_shape = ", x_train.shape)

    x_train = x_train.astype('float32')
    x_test = x_test.astype('float32')
    x_train /= 255.0
    x_test /= 255.0

    y_train = np_utils.to_categorical(y_train, nb_classes)
    y_test = np_utils.to_categorical(y_test, nb_classes)

    return (x_train, y_train), (x_test, y_test)
3-3.学習結果
実際に学習してみます。
epoch = 200 / 200 --- 実行時間 = 7992[sec] --- 1epochに掛かる平均時間 = 39.96[sec]
Test score : 0.265991 --- Test accuracy : 0.956100
2時間ちょいかかっているが、95.6%までいきました。
次にtrainとtestの精度グラフ
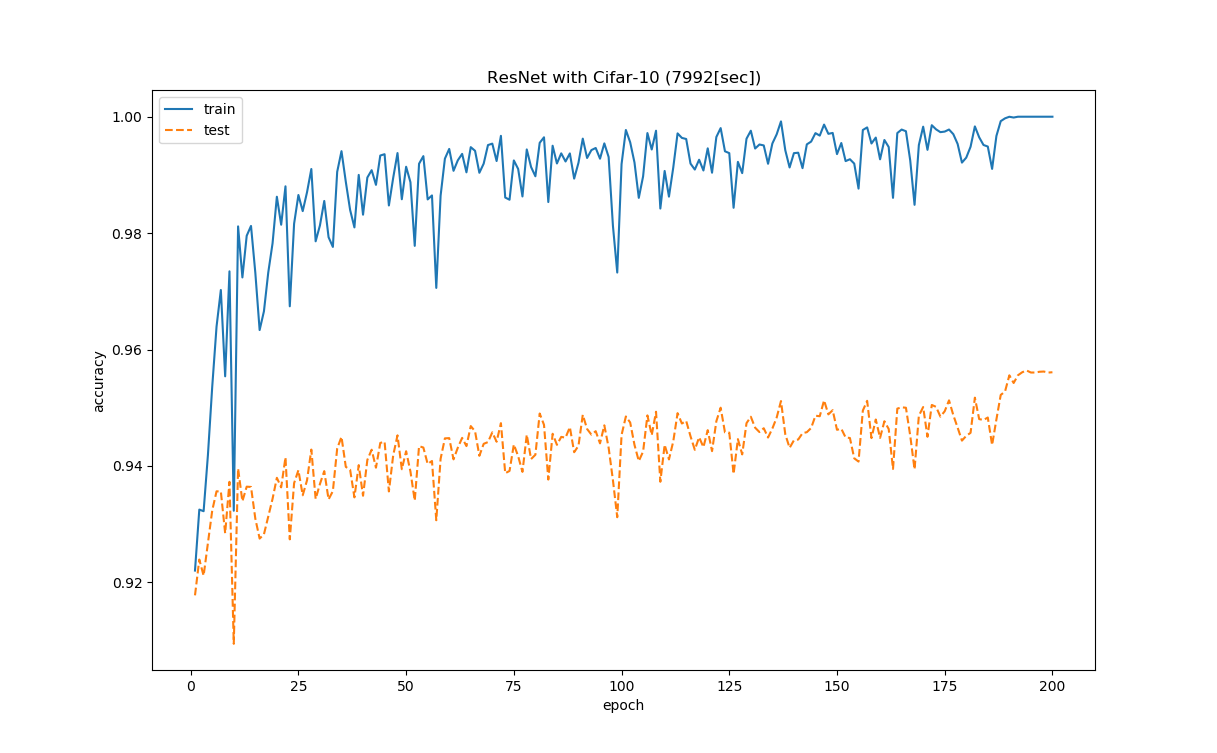
気になるのは最終的に精度は上がっているものの少し学習の安定性に欠けているという印象。
あと200epoch付近で学習が頭打ちになってしまっています。
ハイパーパラメータの見直しで少し改善するかもしれません。
4.実際に画像を分類する
実際にネットで拾ってきた画像を分類していきます。
ぱくたそ-フリー素材・無料写真ダウンロードからフリーの画像を4枚
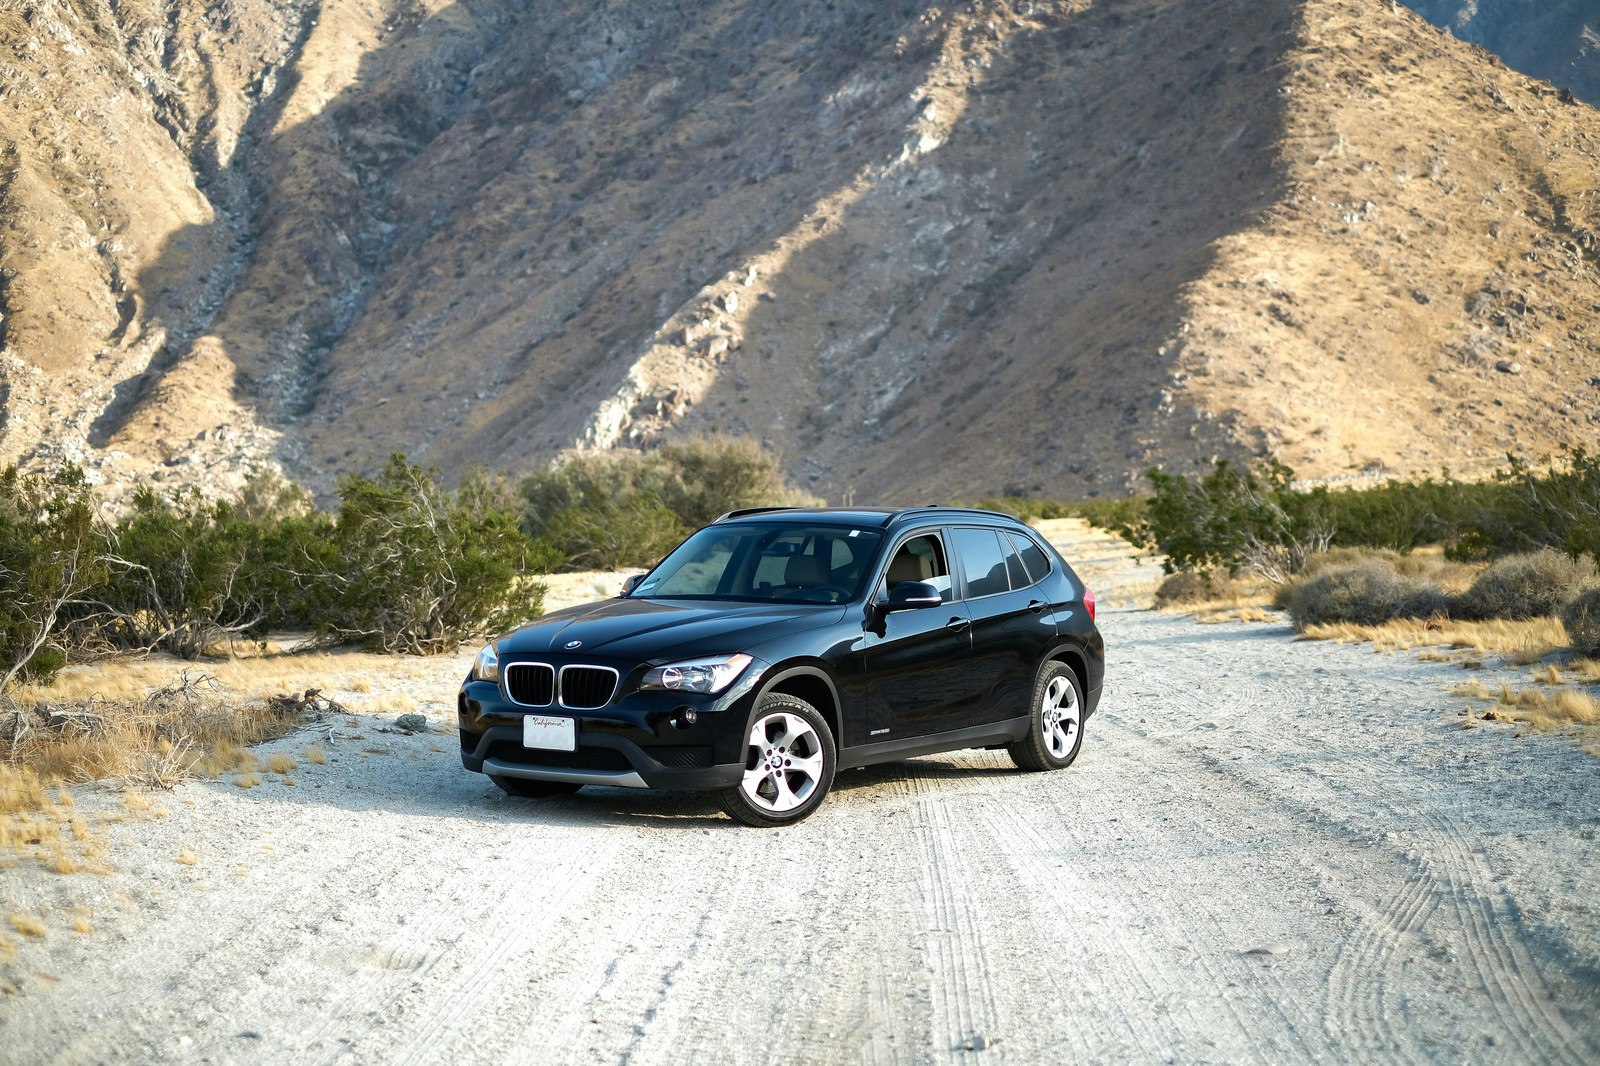
4WDの車.jpg
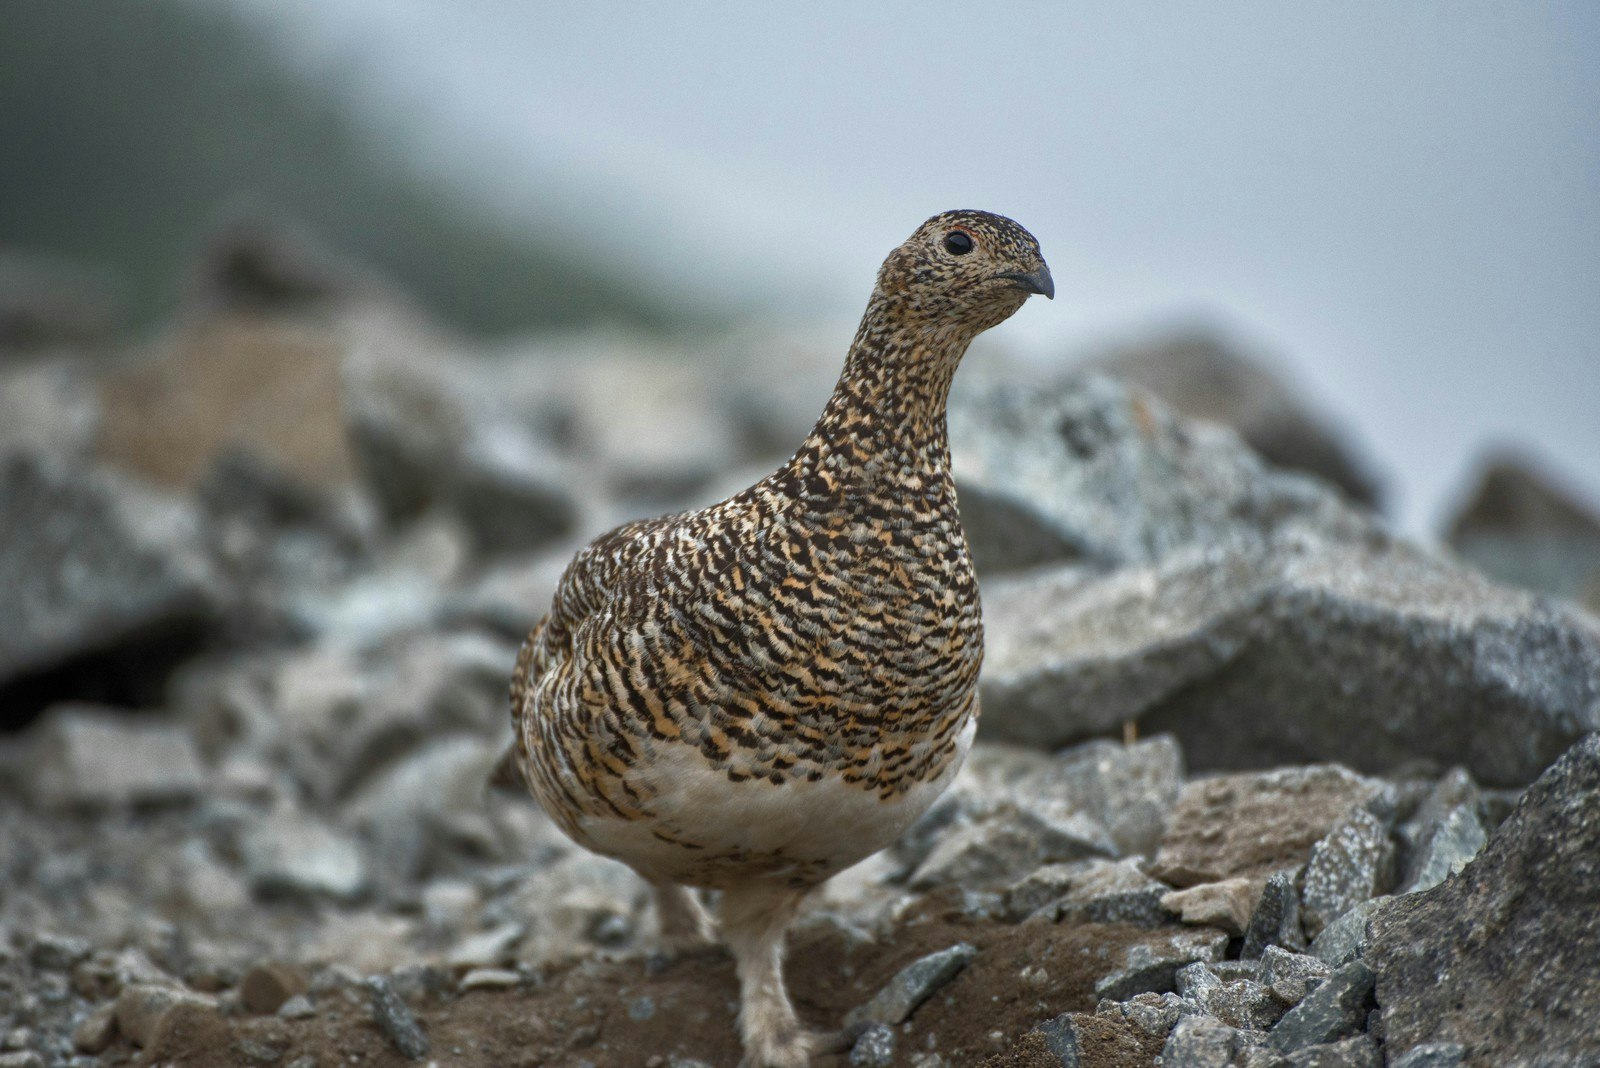
ライチョウ.jpg
ANA飛行機.jpg

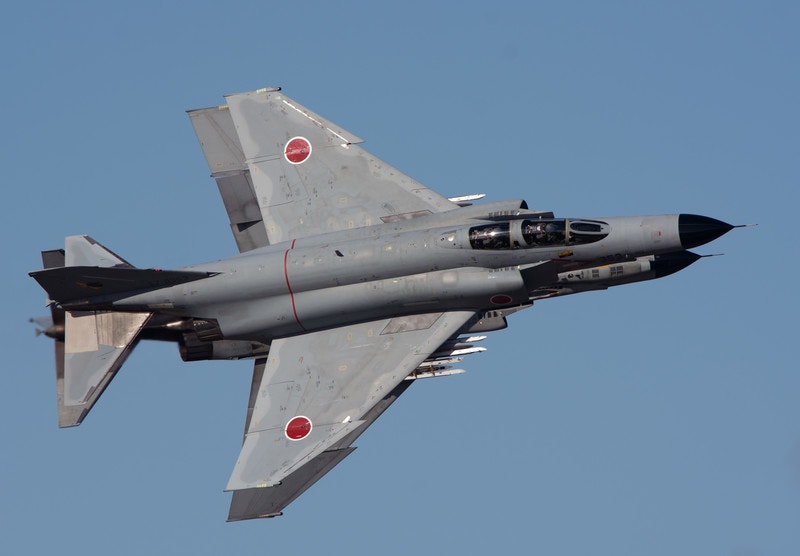
F-4.jpg
4-1.予想
class ResNetCifar10:
    def ResNet_predict_from_oneFile(self, filePath, file_name, debug=True):
        img = Image.open(filePath)
        img_resize = img.resize((self.cifar10_inputShape[0], self.cifar10_inputShape[1]), Image.LANCZOS)
        img2np = np.asarray(img_resize)
        img2np.flags.writeable = True
        img2np.astype('float32')
        img2np_norm = np.true_divide(img2np, 255)[np.newaxis, :, :, :]

        print(SEPARATOR)
        if debug:
            print(img_resize.size)
            print(img2np.shape)
            print(img2np_norm.shape)
            img_resize.show()

        result = self.ResNetModel.predict(img2np_norm, batch_size=1)

        if debug:
            print(result)

        print(file_name + 'は' + self.label[np.argmax(result)] + 'です')
        print(SEPARATOR)
ひとつのfileを予想する関数、リサイズしてCIFAR-10と同じshape(32, 32, 3)に直し、正規化、
4次元にしてバッチ化する。バッチサイズは1。
np.argmaxで予想値が最大であるインデックスをもらい、あらかじめ作っておいたlabelで出力します。
4-2.予想結果
-------------------------------------------
(32, 32)
(32, 32, 3)
(1, 32, 32, 3)
[[1.9546824e-04 5.8359575e-01 4.7138854e-04 2.0560318e-01 2.0655398e-05
  4.4659572e-03 5.6324240e-02 9.8631773e-08 3.3805543e-05 1.4928940e-01]]
4WDの車.jpgはautomobileです
-------------------------------------------
-------------------------------------------
(32, 32)
(32, 32, 3)
(1, 32, 32, 3)
[[6.1109358e-01 3.8851249e-01 1.6947994e-14 1.2230012e-12 8.7307809e-13
  1.0739320e-14 1.1554062e-11 1.7096847e-08 4.1672934e-06 3.8975177e-04]]
ANA飛行機.jpgはairplaneです
-------------------------------------------
-------------------------------------------
(32, 32)
(32, 32, 3)
(1, 32, 32, 3)
[[1.0000000e+00 9.1591491e-13 3.1573472e-12 1.1155164e-12 1.1883133e-15
  2.5061708e-12 2.7409932e-14 1.1204458e-13 5.4665026e-11 8.8882623e-13]]
F-4.jpgはairplaneです
-------------------------------------------
-------------------------------------------
(32, 32)
(32, 32, 3)
(1, 32, 32, 3)
[[2.8588169e-03 4.3748798e-07 8.7153786e-01 8.0151046e-03 1.0439421e-01
  5.4259864e-03 1.1523938e-03 6.4688884e-03 8.6980901e-05 5.9177735e-05]]
ライチョウ.jpgはbirdです
-------------------------------------------
全問正解
5.最後
全容はgithubで確認してください。