Ubuntu設定メモです。
Package System(apt-get)
パッケージシステムから、「名前」を検索
aptitude search 名前
インストールしたいツール類の名前の検索とか...
ツール更新とか
sudo apt-get update
sudo apt-get upgrade
Font
プログラマ向けフォントinconsolataをインストール
sudo add-apt-repository ppa:myunity/ppa
sudo apt-get update
sudo apt-get install myunity
sudo apt-get install fonts-inconsolata
get http://levien.com/type/myfonts/Inconsolata.otf
cp Inconsolata.otf ~/.fonts
Virtual Window設定
仮想ウインドウを有効設定
「システム設定」ー「外観」ー「挙動」タブ
==>「ワークスペースを有効にする」にチェック
仮想ウインドウの縦横の数を設定
(Memo) compizconfig-settings-managerの導入が必要
インストール
sudo apt-get install compizconfig-settings-manager
起動方法
サーチ画面で、「CompizConfig Settings Manager」を呼び出す
「一般」ー「一般オプション」ー「デスクトップサイズ」
OneDrive(旧SkyDrive)
OneDrive
(Memo)Ubuntu 14.10で確認
下記からダウンロード
Sync With OneDrive in Ubuntu Via OneDrive-D (Unofficial Client)
http://ubuntuhandbook.org/index.php/2014/06/sync-with-onedrive-in-ubuntu-via-onedrive-d-unofficial-client/
sudo ./inst install
(このあとGUIが立ち上がって、OneDrive設定画面が出るのでMicorosoftアカウント入力)

手動で同期を取る
sudo onedrive-d
GUI設定ツールを起動
onedrive-prefs
確認
(Memo) gitからのダウンンロードではうまく動かなかった
git clone https://github.com/xybu92/onedrive-d.git
./setup.py install?
Emacs Setting
日本語入力「Mozc」を使う
インストール
sudo apt-get install emacs-mozc emacs-mozc-bin
macs設定ファイルのMozc設定の追記
「~/emacs.d/.init.el」,「~/.emacs」等に
下記を追加
(require 'mozc)
;; or (load-file "/path/to/mozc.el")
(set-language-environment "Japanese")
(setq default-input-method "japanese-mozc")
Emacs の「Mark+Set(Ctrl-Space)」と Mozcの「日本語入力モード切替え」のアサインが衝突する問題
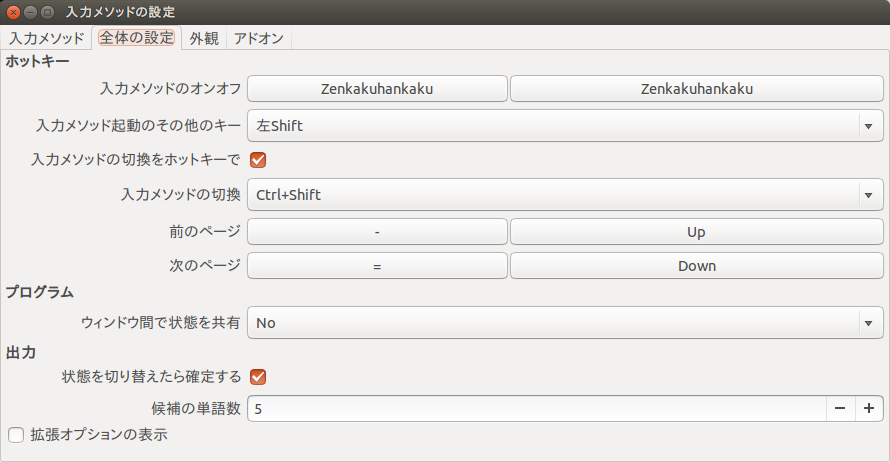
Mozcの入力メソッド設定画面
「全体の設定」タブー「入力メソッドのオンオフ」を
Zenhakuhankaku...[全角/半角]キーに割当てに(Alt+kanjiでもお好きに設定)、変更
(Memo).Xdefaults, .Xresourcesなどの設定に、下記を記載しておいて、
”xrdb ~/.Xresources”実行で設定反映する方法はうまく行かなかった
「Emacs*UseXIM: false」
Programming
boost
Package Systemに入っているので、そのままインストール
sudo apt-get install libboost-all-dev
etc...
Telnetサーバー
1)inetutilsとtelnetdをインストール
sudo apt-get install inetutils-inetd
sudo apt-get install telnetd
2)接続を許可するホストまたはネットワークを設定する。
sudo gedit /etc/hosts.allow
最下行に次の行を追加する。
「in.telnetd: 192.168.6.」...192.168.6.**系の場合
3)サービスを起動する。
sudo /etc/init.d/inetutils-inetd start
または
sudo /etc/init.d/inetutils-inetd restart