目的
PHPによる既存のシステムの改修を行う為、
ステップ実行によるデバックを可能にする。
(当方PHP経験がほぼありません)
今回は Vim, vdebug, Xdebug を使用します。
環境
OS X yosemite です。
PHPは初期に導入されていたものを使用しています。(多分)
$ sw_vers -productVersion
10.10.1

$ vim --version
VIM - Vi IMproved 7.4 (2013 Aug 10, compiled Dec 17 2014 15:30:28)
MacOS X (unix) version
Included patches: 1-488
Compiled by Homebrew

$ php -v
PHP 5.5.14 (cli) (built: Sep  9 2014 19:09:25)
Copyright (c) 1997-2014 The PHP Group
Zend Engine v2.5.0, Copyright (c) 1998-2014 Zend Technologies
    with Xdebug v2.3.0dev, Copyright (c) 2002-2015, by Derick Rethans
環境構築
vdebug の導入。
vim上でdebugを実施するためのプラグインです。
私の環境下では neobundle を用います。
vimrc に以下の内容を追記し、インストールを行います。
NeoBundle 'joonty/vdebug'
php.ini の配置
初期では php.ini は未配置のようなので、
初期値のファイルをコピーし、使用する。
sudo cp /etc/php.ini.default /etc/php.ini
xdebug の導入の前に準備
xdebug の導入前にいくつか事前に導入しておくものがある。
phpize コマンドがエラーなく動作することが目的となります。
1. Xcode Command Line Tools
xcode-select --install
2. autoconf
brew install autoconf
xdebug の導入
git clone https://github.com/derickr/xdebug.git
cd xdebug
phpize
./configure --enable-xdebug
make
cp -r modules/  /usr/local/xdebug
ちなみに phpize コマンドの結果は以下のようになったかと思います。
$ phpize
Configuring for:
PHP Api Version:         20121113
Zend Module Api No:      20121212
Zend Extension Api No:   220121212
正常に make できた場合には以下を php.ini へ設定します。
zend_extension= /usr/local/xdebug/xdebug.so
xdebug.remote_enable=on
xdebug.remote_handler=dbgp
xdebug.remote_host=localhost
xdebug.remote_port=9000
最後に apache を再起動します。
sudo apachectl restart
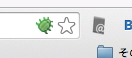
chrome 拡張の Xdebug helper の導入
ブラウザとの連携は chrome を用います。
また、Xdebug との連携を行う為の拡張を導入します。
導入後はURLバーに虫の形のアイコンが表示されます。
デバックを実行したい場合はクリックし、「Debug」を選択します。
実行
vdebugの操作については githubページ にてご確認ください。
vim にて debug したい箇所にて F10 キーを押し、
ブレイクポイントを設定します。
また、F5 キーを押し Vdebug を待機状態にします。
その後ブラウザにてそのコードを通過するページを表示します。
(先ほどの虫アイコンがDebug状態であることを確認ください。)
うまく動作すると Vim 側のウインドウが分割され
デバック状態になっているかと思います。
F2, F3, F4 を用いてステップ実行を行っていきます。
以上
参考にさせていただいたエントリー
Vim + Vdebug + Xdebug でPHPのリモートデバッグ - Code Life
How to setup PHP Xdebug in Mac OSX 10.9 mavericks - ComputersnYou