前回の記事
http://qiita.com/yuya-okada/items/f90debb5ba994790f6fe
1.下準備
まず、プレイヤーのオブジェクトを用意しなくては何も始まりません。 今回は手間を省くために、Unityのスタンダードアセットに付属の既存のオブジェクトを使用します。 [Assets]>[Import Package]>[Character Controller] を選択し、スタンダードアセットをインポートします。 インポートが完了したら、Projectビューから、 [Standard Assets]>[Character Controller]>[First Person Controller] を好きな場所に配置してください。このオブジェクトの名前を"Player"に変更します。 また、 [GameObject]>[Create Other]>[Cube] から、立方体を出して、適当に拡大して地面を作ります。 さらに、 [GameObject]>[Create Other]>[Directional Light] から照明も配置しておきましょう。 この状態で実行すると、一人称視点のゲーム画面になります。
WASDもしくは矢印キーで移動して、マウスで視点変更ができます。
2.プレイヤーにPhotonViewを追加する
このプレイヤーをPhotonで同期し、ネットワーク通信プレイができるようにしていきます。PhotonCloudで同期するGameObjectにはPhotonViewというコンポーネントをアタッチする必要があります。
このコンポーネントはアタッチしたオブジェクトに関するデータをサーバーに送信します。
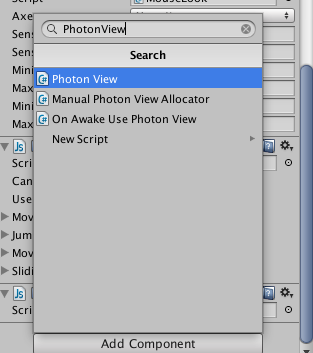
PlayerオブジェクトのInspectorビューから、
[Add Component]>"PhotonView"で検索>"PhotonView"をアタッチ

3.プレイヤーをインスタンス化する
先ほどのPlayerオブジェクトをProjectビューにドラッグ&ドロップして、Playerをプレファブ化します。
そうしたら、もうHierarchyビューのPlayerオブジェクトはいらないので消してしまいましょう。
さらに、Projectビューを
右クリック>[Create]>[Folder]
より、"Resources"フォルダを作り、Playerプレファブをその中に入れましょう。Photonで同期させるプレファブはResourcesフォルダの中にある必要があります。
[GameObject]>[Create Empty]
から、空のゲームオブジェクトを作成して名前を"Manager"とします。
このゲームオブジェクトにはゲーム全体を管理するスクリプトをアタッチします。
Projectビューを
右クリック>[Create]>[C# Script]
から、"NetworkManager"スクリプトを作成します。
using UnityEngine;
using System.Collections;
//Photon.MonoBehaviourであることに注意
public class NetworkManager : Photon.MonoBehaviour {

	void Awake () {
	    PhotonNetwork.Instantiate("Player", new Vector3(0,2,0), Quaternion.identity ,0); //プレイヤーをインスタンス化
	}

}
Photonでゲームオブジェクトを同期させるときは、通常のInstantiateでなく、PhotonNetwork.Instantiateを使用します。
引数は、
(String プレファブ名,Vector3 生成位置,Quaternion 角度,int グループ)
となっています。最初の3つは通常のInstantiateと同じです。最後のグループには、プレファブにアタッチされているPhotonViewのプロパティにあるgroupと同じ数字をいれます。
初期設定は0です。
[File]>[BuildSettings]>[Scenes In Build]
で、前回作ったメニュー画面のシーンが0、今作ったゲーム画面1になっていることを確認したら、ビルドします。
ビルドしたものを起動して、Create Roomで新しいルームを作ります。
さらに、Unityの画面でもう一つ通常通りに実行し、Join Roomで一つ目と同じルーム名を入力します。
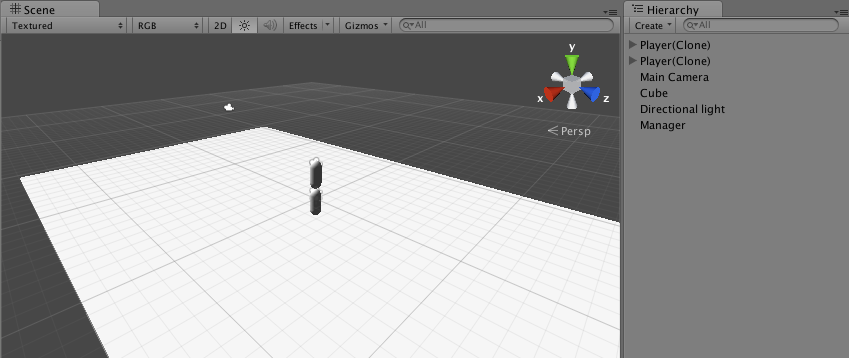
すると、このようにHierarchyビューでは同期された2つのPlayerが表示されます。
しかし、現在の状態では問題があります。 移動してみると分かるのですが、一人が移動すると他の人も全員おなじようにうごいてしまうのです。次回はこの問題を解決していきたいと思います。
次回の記事は近日中に書く予定です。
