普段はJavaScriptばかり書いているのですが、Swiftに触れる機会があり、「xcodeの使い方」や「package管理は何を使えばいいのか」など環境の違いに戸惑いました。
同じような人もたくさんいるだろうなと思い、チュートリアルとして書きました。
とはいえ今回はあまりswiftについての説明はありません。
あと何となくstoryboardを使いたくなかったので、使用していません。(TableViewだけだし・・・)
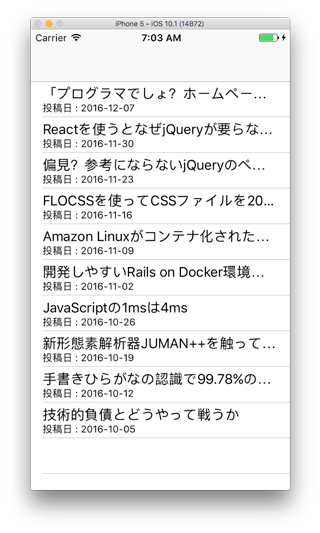
完成するとこんな感じになります。
1. プロジェクトを作る
プロジェクトを作る前に作業するフォルダを作ります。
今回はDocuments(書類)直下にswiftフォルダを作ります。
Documents
 └ swift
xcodeを起動したら[File] → [New] → [Project]を選択します。
選択したらProjectを作っていきます。
テンプレートは「Single View Application」を選択します。

今回は「AwesomeProject」という名前でプロジェクトを作りました。
この辺りは好きなように作って下さい。

2. Package Managerをインストールする
次にPackage Managerをインストールしていきます。
パッケージマネージャの候補は3つありました。
- Cocoapods
- Carthage
- Swift Package Manager
今回は「Carthage」を使ってパッケージ管理をしていきたいと思います。読み方は「カルタゴ」みたいです。
CarthageのインストールにはHomebrewを使用するので、事前にインストール/アップデートをお願いします。
インストール
brew install carthage
3. ライブラリをインストール
terminalでディレクトリに移動します。
cd Documents/swift/AwesomeProject/
移動したらCartfileを作ります。
vi Cartfile
AlamofireとSwiftyJSONを使用するのでCartfileに以下のように書き込みます。
- Alamofireはリクエストをシンプルにしてくれるライブラリです。
- SwiftyJSONはJSONの型を定義してくれるライブラリです。
github "Alamofire/Alamofire"
github "SwiftyJSON/SwiftyJSON"
書き込み終わったらCarthageを使ってAlamofireとSwiftyJSONを落としてきます。
carthage update --platform iOS --no-use-binaries
そのまま叩くとSwiftyJSONを使う時にエラーになる為--no-use-binariesオプションを付けています。
*** Fetching SwiftyJSON
*** Fetching Alamofire
*** Checking out Alamofire at "4.2.0"
*** Checking out SwiftyJSON at "3.1.3"
*** xcodebuild output can be found in /var/folders/wt/h0f881ys5697zvh5pvrkhbvr0000gn/T/carthage-xcodebuild.3V1iFn.log
*** Building scheme "Alamofire iOS" in Alamofire.xcworkspace
*** Building scheme "SwiftyJSON iOS" in SwiftyJSON.xcworkspace
4. プロジェクトにライブラリを追加
ライブラリの選択
- 左カラムのツリーから[AwesomeProject]を選択します。
- 選択したら[General]を選びます。
- [Embedded Binaries]の+をクリックして下さい。
- ポップアップ(?)が出てくるので[Add Other...]を選択します。
- AwesomeProject/Carthage/Build/iOSと移動して.frameworkと書かれたものを選択し、[Open]をクリックします。

- 次にオプションを聞いてくるので[Create folder references]を選択し、[Finish]します。

- 最終的にこんな感じです。

ライブラリのビルド
- [General]から[Build Phases]に移動します。
- +を押して[New Run Script Phase]を選択します。

- Run Scriptを開き、以下のように記述します。
- 「Type a script or drag a script file from your workspace to insert its path」と記述されている部分に
/usr/local/bin/carthage copy-frameworksと記述します。 - Run script only when installingにチェックを入れます。
- Input Fileに以下を追加します。
$(SRCROOT)/Carthage/Build/iOS/Alamofire.framework
$(SRCROOT)/Carthage/Build/iOS/SwiftyJSON.framework

5. Swift3.0で実装
AppDelegate.swift
import UIKit

@UIApplicationMain
class AppDelegate: UIResponder, UIApplicationDelegate {

    var window: UIWindow?
    var navigationController: UINavigationController?

    func application(_ application: UIApplication, didFinishLaunchingWithOptions launchOptions: [UIApplicationLaunchOptionsKey: Any]?) -> Bool {

        // rootになるViewControllerの設定
        let root: ViewController = ViewController()
        navigationController = UINavigationController(rootViewController: root)
        window = UIWindow(frame: UIScreen.main.bounds)
        window!.rootViewController = navigationController
        return true

    }

    func applicationWillResignActive(_ application: UIApplication) {}

    func applicationDidEnterBackground(_ application: UIApplication) {}

    func applicationWillEnterForeground(_ application: UIApplication) {}

    func applicationDidBecomeActive(_ application: UIApplication) {}

    func applicationWillTerminate(_ application: UIApplication) {}


}
ViewController.swift
import UIKit
import Alamofire
import SwiftyJSON

class ViewController: UIViewController, UITableViewDelegate, UITableViewDataSource {

    // itemsをJSONの配列と定義
    var items: [JSON] = []

    override func viewDidLoad() {
        super.viewDidLoad()

        // TableViewを作成
        let tableView = UITableView()
        tableView.frame = CGRect(x: 0, y: 0, width: self.view.frame.width, height: self.view.frame.height)
        tableView.delegate = self
        tableView.dataSource = self
        self.view.addSubview(tableView)

        // QiitaのAPIからデータを取得
        let listUrl = "http://qiita-stock.info/api.json";
        Alamofire.request(listUrl).responseJSON{ response in
            let json = JSON(response.result.value ?? 0)
            json.forEach{(_, data) in
                self.items.append(data)
            }
            tableView.reloadData()
        }
    }

    // tableのcellにAPIから受け取ったデータを入れる
    func tableView(_ tableView: UITableView, cellForRowAt indexPath: IndexPath) -> UITableViewCell {
        let cell = UITableViewCell(style: .subtitle, reuseIdentifier: "TableCell")
        cell.textLabel?.text = items[indexPath.row]["title"].string
        cell.detailTextLabel?.text = "投稿日 : \(items[indexPath.row]["send_date"].stringValue)"
        return cell
    }

    // cellの数を設定
    func tableView(_ tableView: UITableView, numberOfRowsInSection section: Int) -> Int {
        return items.count
    }

    override func didReceiveMemoryWarning() {
        super.didReceiveMemoryWarning()
    }


}
完成
まとめ / 感想
内容はそんなに難しくないと思いますが、開発環境の構築などSwiftを学ぶ以前に覚える事が多い印象でした。
SwiftyJSONとAlamofireは便利ですね!